Rebena Te Ra Dungeon Walkthrough | Switch Puzzle Solution

This is a guide to the dungeon Rebena Te Ra in Final Fantasy: Crystal Chronicles Remastered Edition (FFCC). Read on to see our guide about Rebena Te Ra and a list of all obtainable items, artifacts, scrolls, and monsters you can encounter in this dungeon on each cycle, as well as how to solve the switch puzzle.
| Normal | Hard |
|---|---|
| Rebena Te Ra | Rainy Ruins |
List of Contents
Rebena Te Ra Map
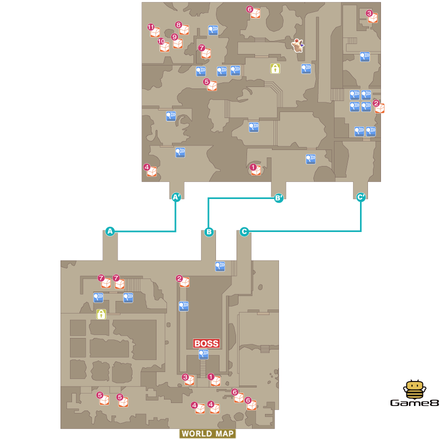 Enlarge
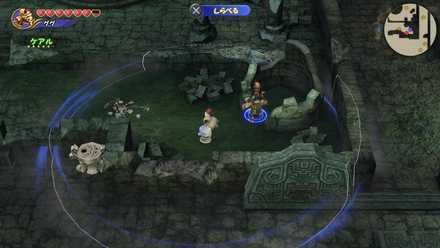
Just after collecting the final key, a small area will open where you can collect an Artifact and another Moogle Stamp.
Item List
Area 1
| Contents | |
|---|---|
| 1 | Fang Charm/Ice Brand/Power Wristband/Shuriken |
| 2 | Blue Yarn/White yarn |
| 3 | Tome of Magic |
| 4 | Raise |
| 5 | Raise |
| 6 | Raise |
| 7 | Raise |
Area 2
| Contents | |
|---|---|
| 1 | Blue Yarn/White yarn |
| 2 | Tome of Magic |
| 3 | Eternal Sallet/Gold Gloves |
| 4 | Blue Yarn/White yarn |
| 5 | Goblin Pocket/Star Pendant |
| 6 | Elven Mantle |
| 7 | Rune Bell/Rune Staff/Silver Bracer/Winged Cap |
| 8 | Holy Shield/Pure Belt |
| 9 | Holy Shield/Pure Belt |
| 10 | Holy Shield/Pure Belt |
| 11 | Holy Shield/Pure Belt |
Area 1
| Contents | |
|---|---|
| 1 | Engetsurin/Fang Charm/Heavy Armband/Ice Brand |
| 2 | Blue Yarn/White yarn |
| 3 | Tome of Magic |
| 4 | Raise/Blizzard |
| 5 | Raise/Blizzard |
| 6 | Raise/Blizzard |
| 7 | Raise/Blizzard |
Area 2
| Contents | |
|---|---|
| 1 | Blue Yarn/White yarn |
| 2 | Tome of Magic |
| 3 | Holy Armor/Pure Armor/Eternal Sallet/Gold Gloves |
| 4 | Blue Yarn/White yarn |
| 5 | Goblin Pocket/Star Pendant |
| 6 | Elven Mantle/Teddy Bear |
| 7 | Cat's Bell/Mage Masher/Rune Bell/Winged Cap |
| 8 | Holy Shield/Pure Belt/Holy Armor/Pure Armor |
| 9 | Holy Shield/Pure Belt/Holy Armor/Pure Armor |
| 10 | Holy Shield/Pure Belt/Holy Armor/Pure Armor |
| 11 | Holy Shield/Pure Belt/Holy Armor/Pure Armor |
Area 1
| Contents | |
|---|---|
| 1 | Engetsurin/Heavy Armband/Onion Sword |
| 2 | Blue Yarn/White yarn/Ancient Potion |
| 3 | Tome of Magic/Tome of Sorcery |
| 4 | Blizzard |
| 5 | Blizzard |
| 6 | Blizzard |
| 7 | Blizzard |
Area 2
| Contents | |
|---|---|
| 1 | Blue Yarn/White yarn/Ancient Potion |
| 2 | Tome of Magic/Tome of Sorcery |
| 3 | Diamond Armor/Holy Armor/Pure Armor |
| 4 | Blue Yarn/White yarn/Ancient Potion |
| 5 | Goblin Pocket/Star Pendant |
| 6 | Elven Mantle/Teddy Bear |
| 7 | Cat's Bell/Mage Masher/Gold Hairpin/Mage Staff |
| 8 | Diamond Armor/Holy Armor/Pure Armor |
| 9 | Diamond Armor/Holy Armor/Pure Armor |
| 10 | Diamond Armor/Holy Armor/Pure Armor |
| 11 | Diamond Armor/Holy Armor/Pure Armor |
Rebena Te Ra Walkthrough
Recommended Starting Stats
| HP | Strength | Defense | Magic |
|---|---|---|---|
| 6 | 45 | 35 | 35 |
Rebena Te Ra is one of the two dungeons alongside Conall Curach that will start off the final stretch of your journey. Enemies and bosses are strong so you need to be powerful enough to match.
The final dungeon's enemies are even stronger so you should use these dungeons to collect better gear and artifiacts. If you're having difficulty clearing the dungeons, add +10 to the recommended stats and aim for that.
Conall Curach Map and Dungeon Walkthrough
Take Out Bats For a Key
In the wide enclosed area on the left side of Area 1, you'll encounter some Vampire Bats flying around. One of them will hold a key; you can use it on the door directly north, or you can take it all the way to the other side of the dungeon to unlock a door and get an artifact.
Artifacts Guide | All Artifact Locations
Head to Area 2 and Gather Magicite
The map for Rebena Te Ra is pretty large and you'll need to cut through different parts of it to make progress. Once you get the key from the Bat and go through the door, you'll have to press both switches at the same time to proceed. With that done continue on to the second area.
In area 2, head to the left towards a treasure chest where you'll run into a monster that drops a Cure magicite.
List of Magicite and its Effects
Beware of Mimics
Out of treasure chests 8-11 in area 2, only one of them actually holds a treasure as the rest are Mimics, so be careful. There are other Mimics present as well, usually noticeable when chests appear in pairs. To find out which is a Mimic, cast magic on the chest and listen out for the sound an enemy makes when resisting a spell. Mimics are strong to magic so if you do happen to fight one use physical attacks.
Hit the Orbs With Magic Then Strike
In the second area you'll encounter glowing orbs that function as switches. Depending on the color of the orbs you need to hit them with the corresponding magic (Fire for Red, Blizzard for Blue, etc) followed by a physical attack in order to open the door.
After that continue on to your upper right along the path towards the next one.
Switch Puzzle is Difficult on Single Player
Near treasure chest 5 in the second area there will be two switches that must be hit by magic simultaneously. While not necessarily difficult with a second player, those playing alone will have an extremely frustrating time getting through. This path is not required to complete the Dungeon, so skipping it and coming back in multiplayer mode is recommended.
If you are determined to get through alone, you'll need to rely on Mog to cast Magic on the other orb. Take damage from the nearby Gargoyle until Mog begins to cast magic and aim for the orb you want Mog to hit, then move to the other. Otherwise, if you have an item which speeds up Casting Time, you will be able to hit both switches in time with the appropriate magic, as shown in the video above. Strike both switches as quickly as you can to move on.
Take Magic Damage on Tiles
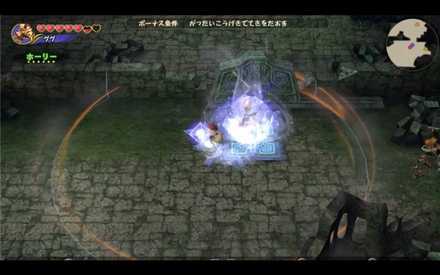
Once you've made your way to the right side of the second area you'll notice strange tiles on the ground. Standing on these tiles and taking the corresponding magic damage will open the door. You'll lose some HP in the process but this is the only way to proceed. Keep in mind that if you have any equipment that resists a certain type of magic you will need to unequip.
Tile Attributes
| Tile Attributes | |
|---|---|
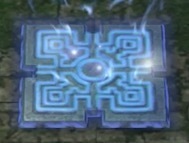 Ice Ice |
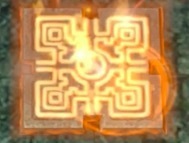 Fire Fire |
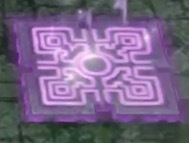 Lightning Lightning |
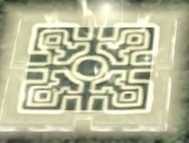 Any Element Any Element |
Keep going to your right and return to the first area through the pathway marked C on the map.
Use Holy For a Shortcut
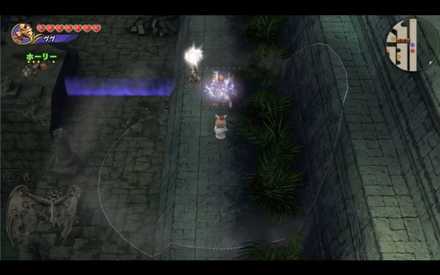
Once back in the first area, press the switch on top of the pyramid to open the boss door. Go back the way you came and use Holy on the glowing orb to your left to create a shortcut back to the entrance.
Rebena Te Ra Boss Guide
Lich

Rebena Te Ra Monsters
| Monster |
Cerberus
Cycle: All |
Gargoyle
Cycle: All |
|---|---|
|
Ghost
Cycle: All |
Skeleton
Cycle: All |
|
Skeleton (Mace)
Cycle: All |
Skeleton (Spear)
Cycle: Cycle 2 & 3 |
|
Skeleton Mage (Fire)
Cycle: All |
Skeleton Mage (Ice)
Cycle: All |
|
Skeleton Mage (Lightning)
Cycle: All |
Skeleton Mage (Rebena Te Ra)
Cycle: All |
|
Vampire Bat
Cycle: All |
Wraith
Cycle: All |
Rebena Te Ra Obtainables
The alphabets and numbers refers to the items/monsters where those items can be obtained respectively.
Scrolls List
| Scroll |
White Yarn
(All) |
Tome of Sorcery
(Cycle 3) |
Tome of Magic
(All) |
|---|---|---|
|
Forbidden Tome
(Boss) |
Blue Yarn
(All) |
Pure Belt
(Cycle 1 & 2) |
|
Eternal Sallet
(Cycle 1 & 2) |
Gold Gloves
(Cycle 1 & 2) |
Holy Shield
(Cycle 1 & 2) |
|
Pure Armor
(Cycle 2 & 3) |
Holy Armor
(Cycle 2 & 3) |
Diamond Armor
(Cycle 3) |
|
Dark Weapon
(Boss) |
||
Materials
| Materials |
Cerberus's Fang
(All) |
Gear
(All) |
Heavenly Dust
(All) |
|---|---|---|
|
Holy Water
(All) |
Ethereal Orb
(Boss) |
Orichalcum
(Boss) |
|
Ancient Potion
(Cycle 3) |
Devil's Claw
(Cycle 3) |
White Silk
(Cycle 3) |
|
Blue Silk
(Cycle 1 & 2) |
Fiend's Claw
(Cycle 1 & 2) |
Tiny Crystal
(Cycle 1 & 2) |
|
Alloy
(Cycle 2 & 3) |
Diamond Ore
(Cycle 2 & 3) |
Mythril
(Cycle 2 & 3) |
Artifacts
| Artifacts |
Gobbie Pocket
(All & Boss) |
Star Pendant
(All & Boss) |
Main Gauche
(Boss) |
|---|---|---|
|
Mjollnir
(Boss) |
Sage's Staff
(Boss) |
Black Hood
(Boss) |
|
Flametongue
(Boss) |
Wonder Wand
(Boss) |
Helm of Arai
(Boss) |
|
Loaded Dice
(Boss) |
Kris
(Boss) |
Masquerade
(Boss) |
|
Noah's Lute
(Boss) |
Ogrekiller
(Boss) |
Red Slippers
(Boss) |
|
Drill
(Boss) |
Ribbon
(Boss) |
Twisted Headband
(Boss) |
|
Power Wristband
(Cycle 1) |
Rune Staff
(Cycle 1) |
Shuriken
(Cycle 1) |
|
Silver Bracer
(Cycle 1) |
Silver Spectacles
(Cycle 1) |
Fang Charm
(Cycle 1 & 2) |
|
Winged Cap
(Cycle 1 & 2) |
Elven Mantle
(Cycle 1 & 2 & Boss) |
Ice Brand
(Cycle 1 & 2 & Boss) |
|
Rune Bell
(Cycle 1 & 2 & Boss) |
Cat's Bell
(Cycle 2 & 3) |
Heavy Armband
(Cycle 2 & 3) |
|
Mage Masher
(Cycle 2 & 3) |
Teddy Bear
(Cycle 2 & 3) |
Engetsurin
(Cycle 2 & 3 & Boss) |
|
Giant's Glove
(Cycle 3) |
Gold Hairpin
(Cycle 3) |
Onion Sword
(Cycle 3) |
|
Chicken Knife
(Cycle 3 & Boss) |
Mage's Staff
(Cycle 3 & Boss) |
|
Crystal Chronicles Related Guides

Story Walkthrough Guides
| All Story Guides | |
|---|---|
| Story Walkthrough | Post-Game Dungeons |
All Dungeon and Town Guides
| Tipa Peninsula | |
|---|---|
| Tipa | Port Tipa |
| River Belle Path | Goblin Wall |
| Iron Mine Downs | |
| Marr's Pass | Jegon River (East) |
| The Mushroom Forest | The Mine of Cathuriges |
| Vale of Alfitaria | |
| Alfitaria | Tida |
| Moschet Manor | - |
| Veo Lu | |
| Shella | Veo Lu Sluice |
| Plains of Fum | |
| The Fields of Fum | Jegon River (West) |
| Daemon's Court | Selepation Cave |
| Kilanda Islands | |
| Kilanda | - |
| Rebena Plains | |
| Conall Curach | Rebena Te Ra |
| Lynari Isle | |
| Leuda | Lynari Desert |
| The Abyss | |
| Mag Mell | Mount Vellenge |
| The Nest of Memories | - |
Author
Rebena Te Ra Dungeon Walkthrough | Switch Puzzle Solution
improvement survey
03/2026
improving Game8's site?

Your answers will help us to improve our website.
Note: Please be sure not to enter any kind of personal information into your response.

We hope you continue to make use of Game8.
Rankings
- We could not find the message board you were looking for.
Gaming News
Popular Games

Genshin Impact Walkthrough & Guides Wiki

Honkai: Star Rail Walkthrough & Guides Wiki

Umamusume: Pretty Derby Walkthrough & Guides Wiki

Pokemon Pokopia Walkthrough & Guides Wiki

Resident Evil Requiem (RE9) Walkthrough & Guides Wiki

Monster Hunter Wilds Walkthrough & Guides Wiki

Wuthering Waves Walkthrough & Guides Wiki

Arknights: Endfield Walkthrough & Guides Wiki

Pokemon FireRed and LeafGreen (FRLG) Walkthrough & Guides Wiki

Pokemon TCG Pocket (PTCGP) Strategies & Guides Wiki
Recommended Games

Diablo 4: Vessel of Hatred Walkthrough & Guides Wiki

Fire Emblem Heroes (FEH) Walkthrough & Guides Wiki

Yu-Gi-Oh! Master Duel Walkthrough & Guides Wiki

Super Smash Bros. Ultimate Walkthrough & Guides Wiki

Pokemon Brilliant Diamond and Shining Pearl (BDSP) Walkthrough & Guides Wiki

Elden Ring Shadow of the Erdtree Walkthrough & Guides Wiki

Monster Hunter World Walkthrough & Guides Wiki

The Legend of Zelda: Tears of the Kingdom Walkthrough & Guides Wiki

Persona 3 Reload Walkthrough & Guides Wiki

Cyberpunk 2077: Ultimate Edition Walkthrough & Guides Wiki
All rights reserved
© 2003, 2020 SQUARE ENIX CO., LTD. All Rights Reserved.
The copyrights of videos of games used in our content and other intellectual property rights belong to the provider of the game.
The contents we provide on this site were created personally by members of the Game8 editorial department.
We refuse the right to reuse or repost content taken without our permission such as data or images to other sites.




ohhh 100% clear video w/ all puzzles here https://youtu.be/6GYvXOSczBo