This survey will take about 1 minute.
Your answers will help us to improve our website.
Final Fantasy Crystal Chronicles
Conall Curach Map and Dungeon Walkthrough
This is a guide to the dungeon Conall Curach in Final Fantasy: Crystal Chronicles Remastered Edition (FFCC). Read on to see our guide about Conall Curach and a list of all obtainable items, artifacts, scrolls, and monsters you can encounter in this dungeon on each cycle.
| Normal | Hard |
|---|---|
| Conall Curach | Foggy Swamp |
List of Contents
Conall Curach Map
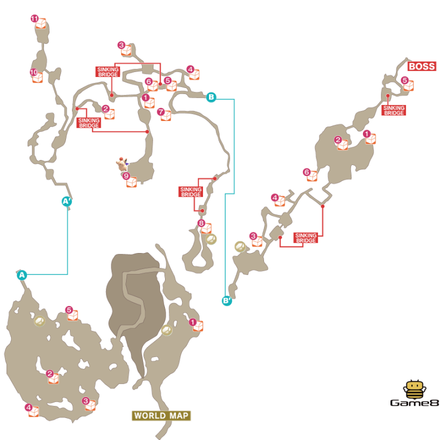 Enlarge
In an area with a lone treasure chest with a nearby tree, search to the north of said tree until you find the Moogle House in this area.
Item List
Area 1
| Contents | |
|---|---|
| 1 | Phoenix Down |
| 2 | Master's Weapon/Mighty Weapon/Valiant Weapon/Victorious Weapon |
| 3 | Lightning Shield/Mythril Shield |
| 4 | Lightning Sallet/Mythril Sallet |
| 5 | 20 Gil/30 Gil/50 Gil/100 Gil |
Area 2
| Contents | |
|---|---|
| 1 | 20 Gil/30 Gil/50 Gil/100 Gil |
| 2 | Main Gauche/Main Gauche |
| 3 | Candy Ring/Faerie Ring/Mage Masher/Red Slippers |
| 4 | Eternal Armor/Mythril Armor |
| 5 | Lightning Gloves/Mythril Gloves |
| 6 | Eternal Armor/Mythril Armor |
| 7 | Lightning Belt/Mythril Belt |
| 8 | Ring of Cure/Star Pendant |
| 9 | Green Beret/Kaiser Knuckles/Loaded Dice |
| 10 | Eternal Armor/Mythril Armor |
| 11 | Soul of the Lion |
Area 3
| Contents | |
|---|---|
| 1 | Master's Weapon/Mighty Weapon/Valiant Weapon/Victorious Weapon |
| 2 | Eternal Armor/Mythril Armor |
| 3 | Mythril Sallet/Lightning Sallet/Mythril Belt/Lightning Belt |
| 4 | Lightning Belt/Lightning Sallet/Mythril Belt/Mythril Sallet |
| 5 | Phoenix Down |
| 6 | Lightning Gloves/Mythril Gloves |
Area 1
| Contents | |
|---|---|
| 1 | Phoenix Down |
| 2 | Master's Weapon/Mighty Weapon/Valiant Weapon/Victorious Weapon |
| 3 | Holy Shield/Lightning Shield/Magic Shield |
| 4 | Eternal Sallet/Lightning Sallet/Time Sallet |
| 5 | 50 Gil/100 Gil/200 Gil/400 Gil |
Area 2
| Contents | |
|---|---|
| 1 | 50 Gil/100 Gil/200 Gil/400 Gil |
| 2 | Main Gauche/Teddy Bear |
| 3 | Candy Ring/Noah's Lute/Red Slippers/Sage's Staff |
| 4 | Eternal Armor/Holy Armor/Mythril Armor/Pure Armor |
| 5 | Gold Gloves/Lightning Gloves |
| 6 | Mythril Armor/Pure Armor/Eternal Armor/Holy Armor |
| 7 | Lightning Belt/Pure Belt |
| 8 | Ring of Cure/Star Pendant |
| 9 | Flametongue/Green Beret/Loaded Dice/Mjollnir |
| 10 | Eternal Armor/Holy Armor/Mythril Armor/Pure Armor |
| 11 | Soul of the Dragon/Soul of the Lion |
Area 3
| Contents | |
|---|---|
| 1 | Master's Weapon/Mighty Weapon/Valiant Weapon/Victorious Weapon |
| 2 | Eternal Armor/Holy Armor/Mythril Armor/Pure Armor |
| 3 | Lightning Sallet/Time Sallet/Lightning Belt/Pure Belt |
| 4 | Lightning Belt/Lightning Sallet/Pure Belt/Time Sallet |
| 5 | Phoenix Down |
| 6 | Gold Gloves/Holy Shield/Lightning Gloves |
Area 1
| Contents | |
|---|---|
| 1 | Phoenix Down |
| 2 | Mighty Weapon/Valiant Weapon/Victorious Weapon |
| 3 | Holy Shield |
| 4 | Diamond Sallet/Eternal Sallet/Time Sallet |
| 5 | 200 Gil/400 Gil/1000 Gil/1200 Gil |
Area 2
| Contents | |
|---|---|
| 1 | 200 Gil/400 Gil/1000 Gil/1200 Gil |
| 2 | Chicken Knife/Teddy Bear |
| 3 | Dark Matter/Noah's Lute/Sage's Staff/Tome of Ultima |
| 4 | Diamond Armor/Holy Armor/Pure Armor |
| 5 | Gold Gloves |
| 6 | Pure Armor/20 Gil/Holy Armor/Diamond Armor |
| 7 | Diamond Belt/Pure Belt |
| 8 | Ring of Cure/Star Pendant |
| 9 | Flametongue/Giant's Glove/Heavy Armband/Mjollnir |
| 10 | Diamond Armor/Holy Armor/Pure Armor |
| 11 | Soul of the Dragon |
Area 3
| Contents | |
|---|---|
| 1 | Valiant Weapon/Victorious Weapon |
| 2 | Diamond Armor/Gold Armor/Pure Armor |
| 3 | Time Sallet/Diamond Sallet/Pure Belt/Diamond Belt |
| 4 | Diamond Belt/Diamond Gloves/Lightning Sallet/Pure Belt/Time Sallet |
| 5 | Phoenix Down |
| 6 | Diamond Gloves/Diamond Shield/Gold Gloves/Holy Shield |
Conall Curach Walkthrough
Recommended Starting Stats
| HP | Strength | Defense | Magic |
|---|---|---|---|
| 6 | 45 | 35 | 35 |
Conall Curach is one of the two dungeons alongside Rebena Te Ra that will start off the final stretch of your journey. Enemies and bosses are strong so you need to be powerful enough to match.
The final dungeon's enemies are even stronger so you should use these dungeons to collect better gear and artifiacts. If you're having difficulty clearing the dungeons, add +10 to the recommended stats and aim for that.
Defeat All the Entrance Enemies for Magicite
While most dungeons you could get by with just Cure, Conall Curach is the only dungeon that absolutely requires Raise. Your goal is to be able to cast Holy so you will also need at least one elemental magicite.
The Sahagin that spawns above the bridge drops a Raise magicite so plow on through until you reach that monster. Once you've prepared Holy and Cure you should be all set to take on the dungeon.
List of Magicite and its Effects
Ignore the Rest of the Enemies
Conall Curach is loaded with enemies so if you try to take them all on you won't make much progress. It's recommended to ignore the vast majority of the enemies as you make your way to the end of the dungeon.
However, when you come across the small bridges guarded by a monster, you should take them out. You could try and go around them but there's always a chance Mog will get aggro'd.
If You Killed the Bomb in Daemon's Court...
If you've been following this wiki you will likely have used the Bomb to destroy the log bridge twice in Daemon's Court allowing you to find a treasure here. The logs from the bridge will have collected in Conall Curach's second map to the northwest allowing access to go further in.
This area is the only way you can get the Soul of the Lion scroll required to make Lilties' strongest accessory, the Lion's Heart.
Daemon's Court Dungeon Walkthrough
Watch Out for Weak Bridges
Certain bridge sections are weak, and will collapse if too many characters and/or monsters are on them. So, be careful in multiplayer, as the obvious strategy to stay close together could send you in the Miasma-filled water.
Use Gravity on Stone Sahagins
Most magic are ineffective against the Stone Sahagins, except for Gravity, which will cut their HP in half. After that, finish them off with physical attacks.
Use Thunder against Behemoths
Behemoths can be a handful, especially when surrounded by Stone Sahagins. Paralyze them with Thundaga and damage them with other Thunder spellls.
Conall Curach Boss Guide
Dragon Zombie

Conall Curach Monsters
| Monster |
Abaddon
Cycle: All |
Behemoth
Cycle: All |
|---|---|
|
Dark Flan
Cycle: All |
Flan (Conall Curach)
Cycle: All |
|
Ghost
Cycle: All |
Gigan Toad (Conall Curach)
Cycle: All |
|
Ice Bomb
Cycle: All |
Magic Plant
Cycle: All |
|
Sahagin
Cycle: All |
Sahagin Lord
Cycle: All |
|
Snow Mu
Cycle: All |
Stone Sahagin
Cycle: All |
|
Thunder Bomb
Cycle: All |
|
Conall Curach Obtainables
The alphabets and numbers refers to the items/monsters where those items can be obtained respectively.
Scrolls List
| Scroll |
Soul of the Lion
(All) |
Soul of the Dragon
(Cycle 2 & 3) |
Wind Belt
(Cycle 2 & 3) |
|---|---|---|
|
Pure Belt
(Cycle 2 & 3) |
Mythril Belt
(Cycle 1) |
Lightning Belt
(Cycle 1 & 2) |
|
Diamond Belt
(Cycle 3) |
Time Sallet
(Cycle 2 & 3) |
Mythril Sallet
(Cycle 1) |
|
Lightning Sallet
(Cycle 1 & 2) |
Eternal Sallet
(Cycle 2 & 3) |
Diamond Sallet
(Cycle 3) |
|
Mythril Gloves
(Cycle 1) |
Lightning Gloves
(Cycle 1 & 2) |
Gold Gloves
(Cycle 2 & 3) |
|
Diamond Gloves
(Cycle 3) |
Mythril Shield
(Cycle 1) |
Magic Shield
(Cycle 2 & 3) |
|
Lightning Shield
(Cycle 1 & 2) |
Holy Shield
(Cycle 2 & 3) |
Diamond Shield
(Cycle 3) |
|
Pure Armor
(Cycle 2 & 3) |
Mythril Armor
(Cycle 1 & 2) |
Holy Armor
(Cycle 2 & 3) |
|
Gold Armor
(Cycle 2 & 3) |
Eternal Armor
(Cycle 1 & 2) |
Diamond Armor
(Cycle 3 & Boss) |
|
Victorious Weapon
(All) |
Valiant Weapon
(All) |
Mighty Weapon
(All) |
|
Master's Weapon
(All) |
Lunar Weapon
(Boss) |
Legendary Weapon
(Cycle 3) |
Materials
| Materials |
Chilly Gel
(All) |
Jagged Scythe
(All) |
Orichalcum
(All) |
|---|---|---|
|
Pressed Flower
(All) |
Remedy
(All) |
Thunderball
(All) |
|
Toad Oil
(All) |
Dragon's Fang
(Boss) |
Bronze
(Cycle 1) |
|
Blue Silk
(Cycle 1 & 2) |
Iron
(Cycle 1 & 2) |
Soul of the Lion
(Cycle 1 & 2) |
|
Alloy
(Cycle 2 & 3) |
Diamond Ore
(Cycle 2 & 3) |
Soul of the Dragon
(Cycle 2 & 3) |
|
Ancient Potion
(Cycle 3) |
Mythril
(Cycle 3) |
White Silk
(Cycle 3) |
Artifacts
| Artifacts |
Sage's Staff
(All & Boss) |
Star Pendant
(All & Boss) |
Gobbie Pocket
(Boss) |
|---|---|---|
|
Rat's Tail
(Boss) |
Gold Hairpin
(Boss) |
Ice Brand
(Boss) |
|
Wonder Wand
(Boss) |
Wonder Bangle
(Boss) |
Rune Bell
(Boss) |
|
Ogrekiller
(Boss) |
Kris
(Boss) |
Sasuke's Blade
(Boss) |
|
Twisted Headband
(Boss) |
Engetsurin
(Boss) |
Ring of Raise
(Boss) |
|
Faerie Ring
(Cycle 1) |
Kaiser Knuckles
(Cycle 1) |
Mage Masher
(Cycle 1) |
|
Maneater
(Cycle 1) |
Sparkling Bracer
(Cycle 1) |
Candy's Ring
(Cycle 1 & 2) |
|
Green Beret
(Cycle 1 & 2) |
Main Gauche
(Cycle 1 & 2) |
Loaded Dice
(Cycle 1 & 2 & Boss) |
|
Red Slippers
(Cycle 1 & 2 & Boss) |
Ring of Cure
(Cycle 1 & 2 & Boss) |
Mjollnir
(Cycle 2 & 3) |
|
Noah's Lute
(Cycle 2 & 3) |
Flametongue
(Cycle 2 & 3 & Boss) |
Teddy Bear
(Cycle 2 & 3 & Boss) |
|
Chicken Knife
(Cycle 3) |
Dark Matter
(Cycle 3) |
Heavy Armband
(Cycle 3) |
|
Giant's Glove
(Cycle 3 & Boss) |
Ultima Tome
(Cycle 3 & Boss) |
|
Crystal Chronicles Related Guides

Story Walkthrough Guides
| All Story Guides | |
|---|---|
| Story Walkthrough | Post-Game Dungeons |
All Dungeon and Town Guides
| Tipa Peninsula | |
|---|---|
| Tipa | Port Tipa |
| River Belle Path | Goblin Wall |
| Iron Mine Downs | |
| Marr's Pass | Jegon River (East) |
| The Mushroom Forest | The Mine of Cathuriges |
| Vale of Alfitaria | |
| Alfitaria | Tida |
| Moschet Manor | - |
| Veo Lu | |
| Shella | Veo Lu Sluice |
| Plains of Fum | |
| The Fields of Fum | Jegon River (West) |
| Daemon's Court | Selepation Cave |
| Kilanda Islands | |
| Kilanda | - |
| Rebena Plains | |
| Conall Curach | Rebena Te Ra |
| Lynari Isle | |
| Leuda | Lynari Desert |
| The Abyss | |
| Mag Mell | Mount Vellenge |
| The Nest of Memories | - |
Author
Conall Curach Map and Dungeon Walkthrough
Please participate in our site
improvement survey
03/2026
improvement survey
03/2026
Would you assist in
improving Game8's site?
improving Game8's site?

×
We are listening to our users' valuable opinions and discussing how to act on them.
The information collected through this survey will be used for the purpose of improving our services. In addition, the information will only be disclosed a part of a statistic in a format that will not allow identification of personal information.
Begin Survey
Not Now
×
Please rate each item regarding Game8.co's Advertisements.
Amount of Ads
Very Dissatisfied
Somewhat Dissatisfied
Fine
Somewhat Satisfied
Highly Satisfied
Placement of Ads
Timing of Ad Display
Ad Loading Speed
Safeness of Ads
Content of Ads
×
Please rate each item regarding Game8.co's Quality of Articles.
Amount of information
Very Dissatisfied
Somewhat Dissatisfied
Fine
Somewhat Satisfied
Highly Satisfied
Frequency of updates
Speed of new information
Accuracy of articles
Understandibility of articles
Readability of sentences
×
Please rate each item regarding Game8.co's Usability of the Site.
Ease of finding information
Very Dissatisfied
Somewhat Dissatisfied
Fine
Somewhat Satisfied
Highly Satisfied
Loading Speed
Use of Color
Font Size
Visibility of Images
Easy to Understand Layout
×
Please rate each item regarding Game8.co's Message Boards, Comments.
Ease of Writing
Very Dissatisfied
Somewhat Dissatisfied
Fine
Somewhat Satisfied
Highly Satisfied
Readability
Ease in Finding Information
Comment Quality
Comment Quantity
Admin Response
×
Please rate each item regarding Game8.co's Site's new design.
Please rate our site's new design
Very Dissatisfied
Somewhat Dissatisfied
Fine
Somewhat Satisfied
Highly Satisfied
Do you think that the website's design change makes the site easier to use?
Has the new design made it easier for you to find information on the site?
Has the new design improved the overall visual appeal of the site?
How would you rate your overall satisfaction with the new design of the site?
×
How likely are you to recommend Game8 to someone you know?
Very Unlikely
0
1
2
3
4
5
6
7
8
9
10
Very Likely
If you have other opinions regarding potential improvement to the website, please share them with us. We would appreciate your honest opinion.
Note: This is a free response section, so you can proceed without entering anything.
Note: Please be sure not to enter any kind of personal information into your response.
Note: Please be sure not to enter any kind of personal information into your response.
×
Thank You
×
Thank you for participating in our survey! Your answers will help us to improve the quality of our website and services.
We hope you continue to make use of Game8.
We hope you continue to make use of Game8.
Close
Rankings
- We could not find the message board you were looking for.
Gaming News


![Everwind Review [Early Access] | The Shaky First Step to A Very Long Journey](https://img.game8.co/4440226/ab079b1153298a042633dd1ef51e878e.png/thumb)

![Monster Hunter Stories 3 Review [First Impressions] | Simply Rejuvenating](https://img.game8.co/4438641/2a31b7702bd70e78ec8efd24661dacda.jpeg/thumb)
Popular Games

Genshin Impact Walkthrough & Guides Wiki
Honkai: Star Rail Walkthrough & Guides Wiki
Umamusume: Pretty Derby Walkthrough & Guides Wiki
Pokemon Pokopia Walkthrough & Guides Wiki
Resident Evil Requiem (RE9) Walkthrough & Guides Wiki
Monster Hunter Wilds Walkthrough & Guides Wiki
Wuthering Waves Walkthrough & Guides Wiki
Arknights: Endfield Walkthrough & Guides Wiki
Pokemon FireRed and LeafGreen (FRLG) Walkthrough & Guides Wiki
Pokemon TCG Pocket (PTCGP) Strategies & Guides Wiki


Recommended Games
Diablo 4: Vessel of Hatred Walkthrough & Guides Wiki
Fire Emblem Heroes (FEH) Walkthrough & Guides Wiki
Yu-Gi-Oh! Master Duel Walkthrough & Guides Wiki
Super Smash Bros. Ultimate Walkthrough & Guides Wiki
Pokemon Brilliant Diamond and Shining Pearl (BDSP) Walkthrough & Guides Wiki
Elden Ring Shadow of the Erdtree Walkthrough & Guides Wiki
Monster Hunter World Walkthrough & Guides Wiki
The Legend of Zelda: Tears of the Kingdom Walkthrough & Guides Wiki
Persona 3 Reload Walkthrough & Guides Wiki
Cyberpunk 2077: Ultimate Edition Walkthrough & Guides Wiki


All rights reserved
© 2003, 2020 SQUARE ENIX CO., LTD. All Rights Reserved.
The copyrights of videos of games used in our content and other intellectual property rights belong to the provider of the game.
The contents we provide on this site were created personally by members of the Game8 editorial department.
We refuse the right to reuse or repost content taken without our permission such as data or images to other sites.
In cycle 3, Chest 3 contained a Scroll for Magic Shield when I went through it just now