Fallen Twilight City Okhema Chests and Spirithief Locations
★ Exclusive: Check out the State of Meta in 4.0!
♦ Latest: 4.0 Redeem Codes
♦ Phase 2: Sparkxie, Sparkle, Cerydra, Rappa
♦ Upcoming: Ashveil, Silver Wolf Lv.999, Evanescia
♦ Events: Cosmicon, Roll On!, Ding! Arcadia Fun-Time Clock-In Essentials

There are 43 Fallen Twilight City Okhema chests to collect in Honkai: Star Rail. Check out our map guide for all Fallen Twilight City chests and Spirithief locations!
| Amphoreus Map Guide | |
|---|---|
| Fallen Twilight City Okhema Chests | Fallen Twilight City Okhema Puzzles |
List of Contents
“Fallen Twilight City” Okhema Chest Locations
Fallen Twilight City Interactive Map
Select icons to toggle them on/off
| Space Anchor | Treasure Chest | ||
| Spirithief | Bookshelf Readable |
Fallen Twilight City Okhema Chests
| Fallen Twilight City Treasure Chest Map | |||||||||||
|---|---|---|---|---|---|---|---|---|---|---|---|
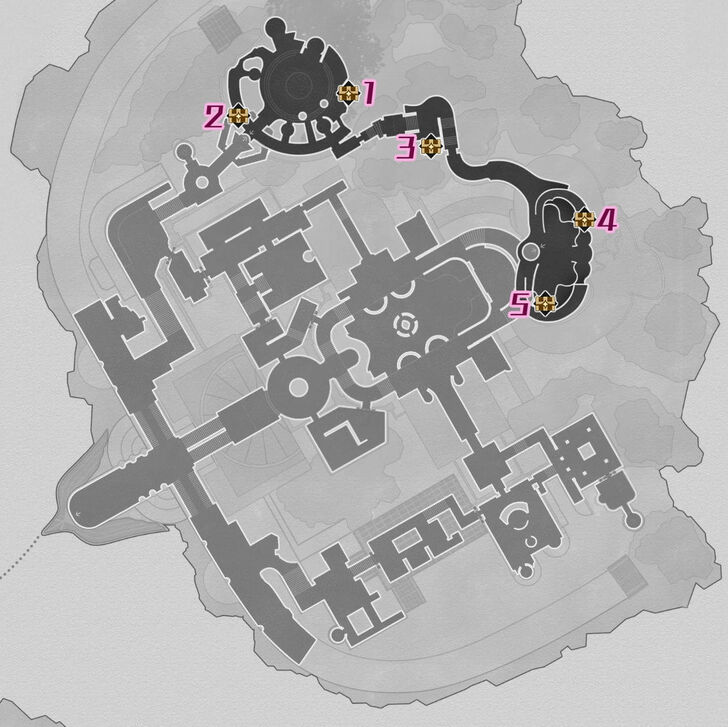 See Full Image |
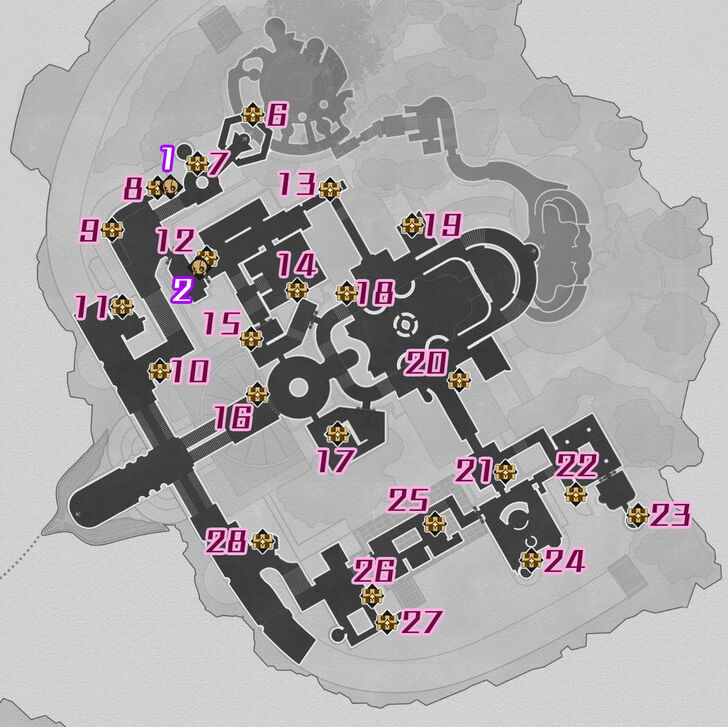 See Full Image |
||||||||||
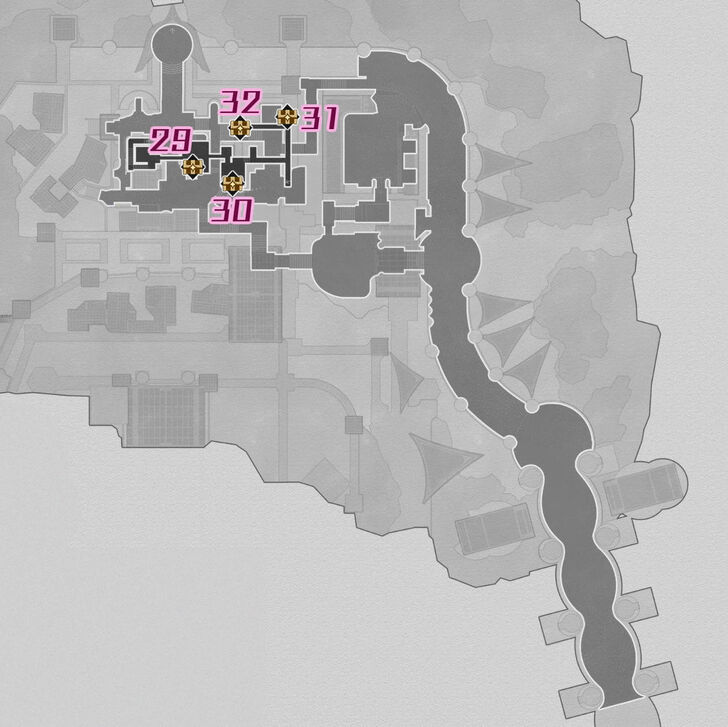 See Full Image |
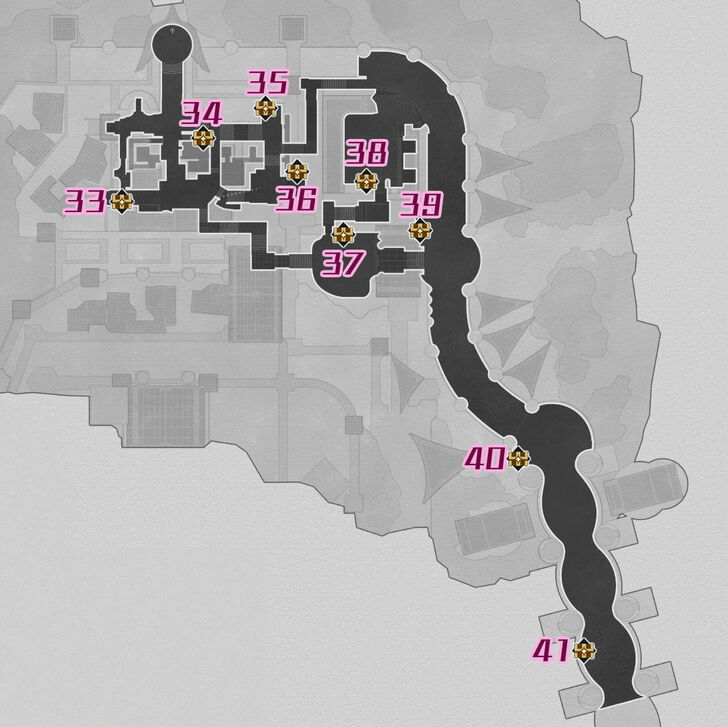 See Full Image |
||||||||||
| Fallen Twilight City Treasure Chests | |||||||||||
| Chest 1 | Chest 2 | Chest 3 | Chest 4 | ||||||||
| Chest 5 | Chest 6 | Chest 7 | Chest 8 | ||||||||
| Chest 9 | Chest 10 | Chest 11 | Chest 12 | ||||||||
| Chest 13 | Chest 14 | Chest 15 | Chest 16 | ||||||||
| Chest 17 | Chest 18 | Chest 19 | Chest 20 | ||||||||
| Chest 21 | Chest 22 | Chest 23 | Chest 24 | ||||||||
| Chest 25 | Chest 26 | Chest 27 | Chest 28 | ||||||||
| Chest 29 | Chest 30 | Chest 31 | Chest 32 | ||||||||
| Chest 33 | Chest 34 | Chest 35 | Chest 36 | ||||||||
| Chest 37 | Chest 38 | Chest 39 | Chest 40 | ||||||||
| Chest 41 | |||||||||||
| Fallen Twilight City Spirithief Locations | |||||||||||
| Spirithief 1 | Spirithief 2 | ||||||||||
How to Get “Fallen Twilight City” Okhema Chests
Fallen Twilight City Okhema Chest 1
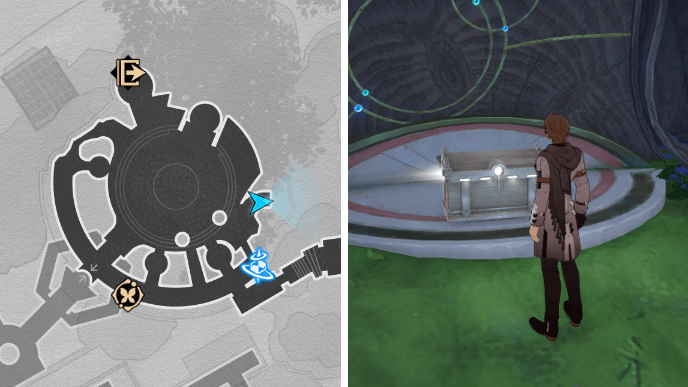
Head a few steps north from the Nightshade Courtyard Space Anchor and climb up the large tree root to reach Chest 1.
Fallen Twilight City Okhema Chest 2
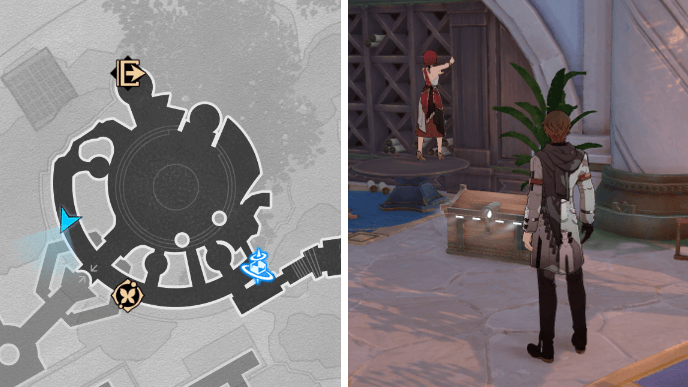
Follow the path west of the Garmentmaker and you'll find Chest 2 near a group of scholars.
Fallen Twilight City Okhema Chest 3
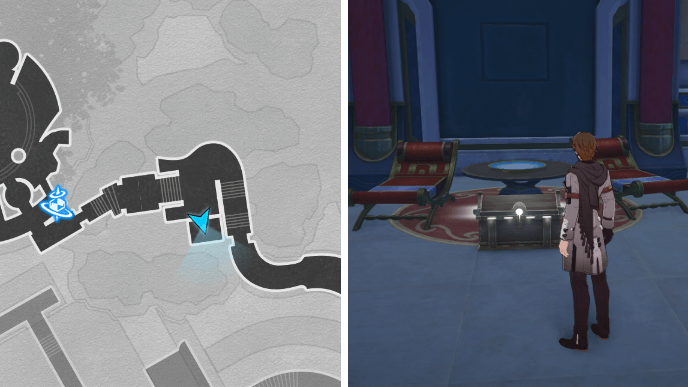
Head east from the Nightshade Courtyard Space Anchor. Along the way, you'll come across Chest 3 in a small lounge area.
Fallen Twilight City Okhema Chest 4
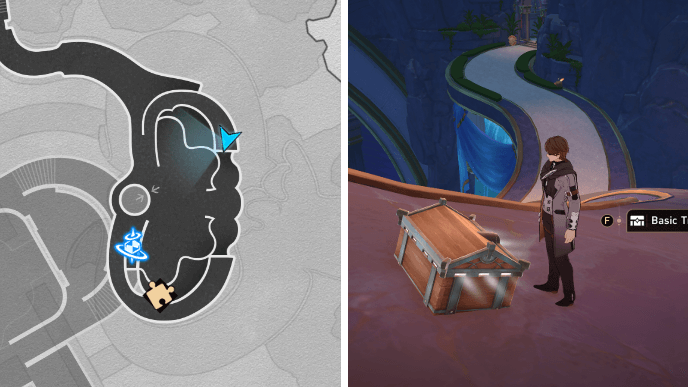
Go up the ramp directly north of the Reverie Bath Space Anchor. You'll find Chest 4 all the way at the top.
Fallen Twilight City Okhema Chest 5

Return to the Reverie Bath Space Anchor and go up the stairs east of the nearby elevator. Turn right, and follow the path past the floating scroll. At the end, there'll be a Golden Scapegoat that gives Chest 5.
Fallen Twilight City Golden Scapegoat 1
You can solve the Golden Scapegoat that gives the chest by following the steps shown above!
Fallen Twilight City Okhema Chest 6
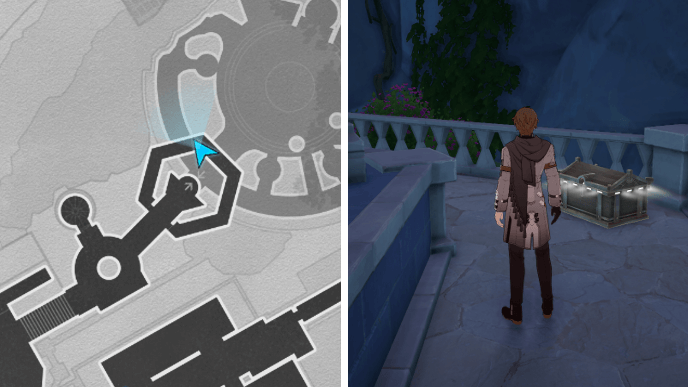
Take the elevator near the Garmentmaker down to F1. After reaching the bottom, go to the area behind the elevator to find Chest 6.
Fallen Twilight City Okhema Chest 7

From Chest 6, continue walking southwest and turn right at the Holy Candle. Chest 7 will be in front of a gazebo with a prayer fountain.
Fallen Twilight City Okhema Chest 8
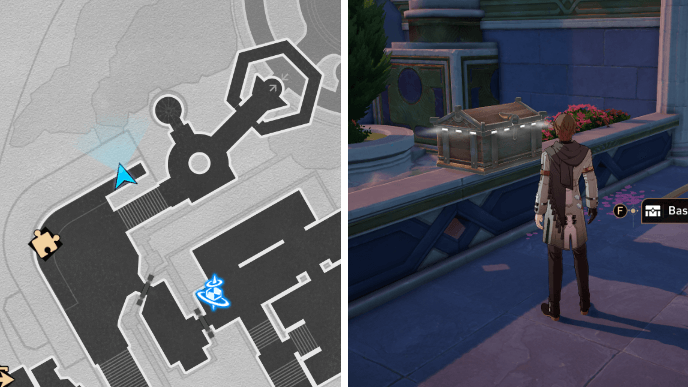
After getting Chest 7, go down the stairs past the Holy Candle and turn right to go into the narrow space next to the staircase. Chest 8 will be on the stone railing. You'll need to get the chest back from a Spirithief.
Fallen Twilight City Okhema Chest 9
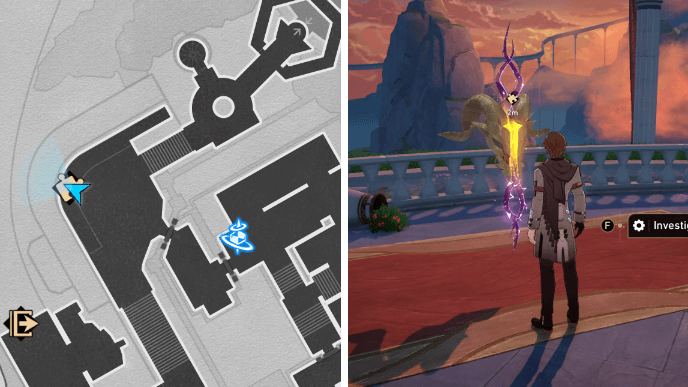
Head southwest from Chest 8's location to find a Golden Scapegoat puzzle. After solving it, you'll get Chest 10.
Fallen Twilight City Golden Scapegoat 2
You can solve the Golden Scapegoat that gives the chest by following the steps shown above!
Fallen Twilight City Okhema Chest 10
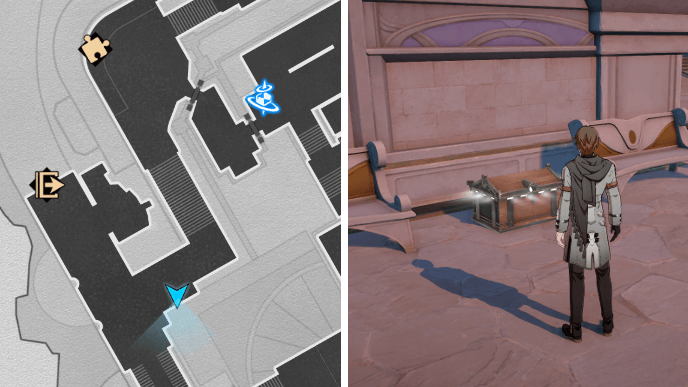
Go down the stairs southeast of Chest 9. Along the path, you'll spot Chest 10 in between two benches.
Fallen Twilight City Okhema Chest 11
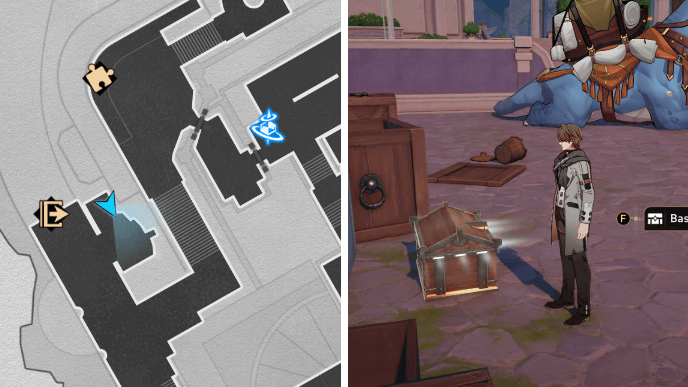
Head to the small area with a resting dromas near the exit leading to the Murmuring Woods. Chest 11 will be next to a pile of scattered crates.
Fallen Twilight City Okhema Chest 12
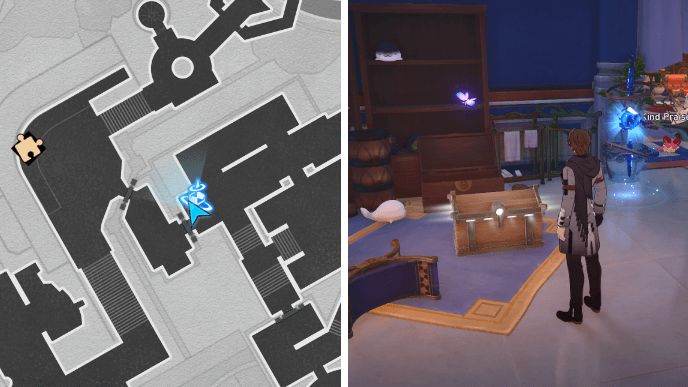
Interact with the Little Chimera next to the Mirage Cove Space Anchor. A Spirithief will try to take it away. After getting it back, the Spirithief will also leave Chest 12 behind.
Fallen Twilight City Okhema Chest 13
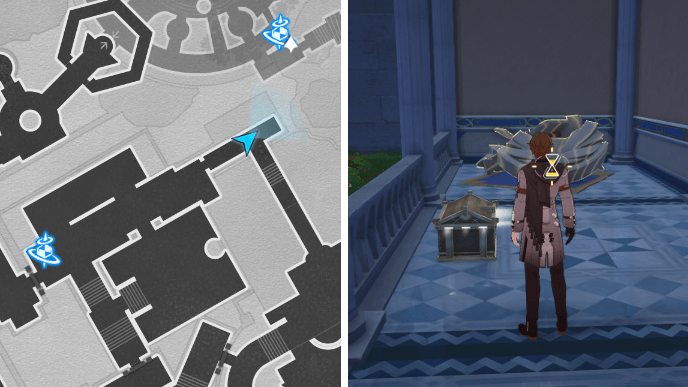
Head northeast from the Mirage Cove Space Anchor and go through the archway. You should find Chest 13 in front of the broken lion head statue.
Fallen Twilight City Okhema Chest 14
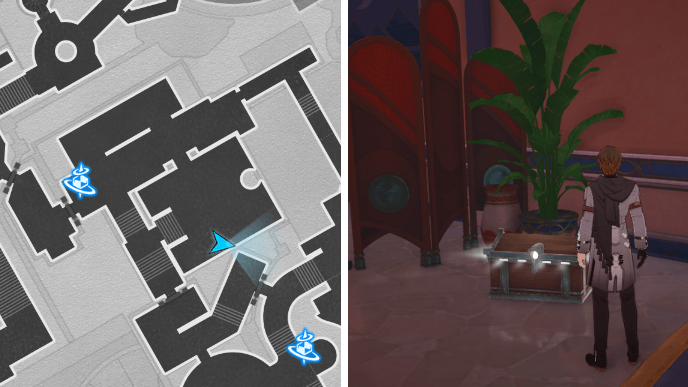
Chest 14 is in the room with a circular hot bath. The chest will be next to a folding screen and a tall plant.
Fallen Twilight City Okhema Chest 15
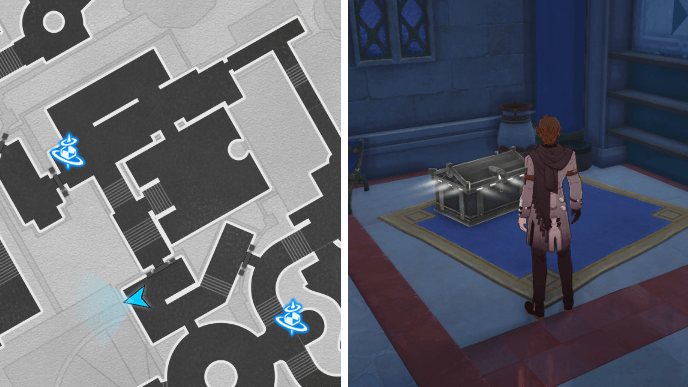
Go into the changing room southeast of the Mirage Cove Space Anchor. Chest 15 will be by some shelves and towel racks.
Fallen Twilight City Okhema Chest 16
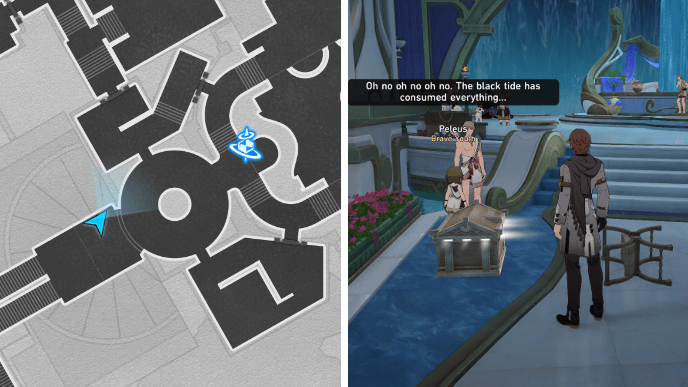
From Chest 15, take the exit leading to the circular lobby and turn right. Chest 16 can be found next to Peleus and Ixion.
Fallen Twilight City Okhema Chest 17
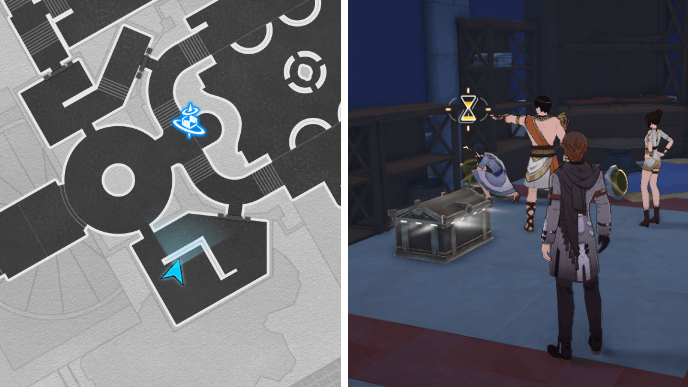
Head to the room southeast of the circular lobby. In the room, you should find Chest 17 by a group of people overlooking a broken lamp.
Fallen Twilight City Okhema Chest 18
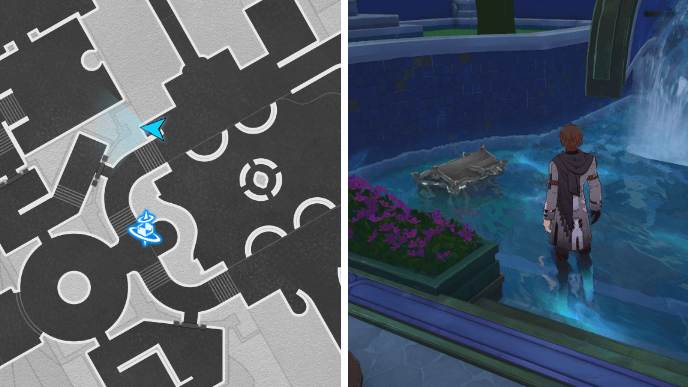
Chest 18 can be found in the small pool northeast of the Tranquil Waters Space Anchor.
Fallen Twilight City Okhema Chest 19
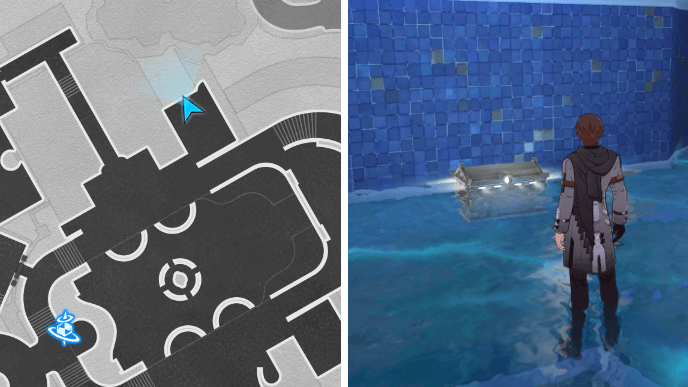
From Chest 18, continue heading northeast to find Chest 19 in the wider pool area.
Fallen Twilight City Okhema Chest 20
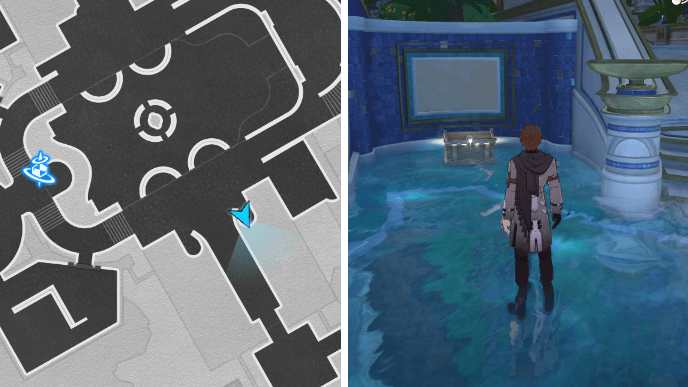
Follow the path leading southeast from the Tranquil Waters Space Anchor. You should spot Chest 20 in the small space on the left side of the ramp leading out of the main bath area.
Fallen Twilight City Okhema Chest 21
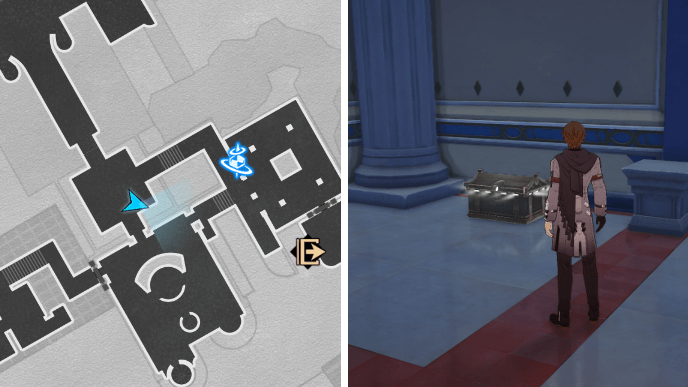
Chest 21 can be found in the southeastern corner of the small lecture room located west of the Whispering Hall Space Anchor.
Fallen Twilight City Okhema Chest 22
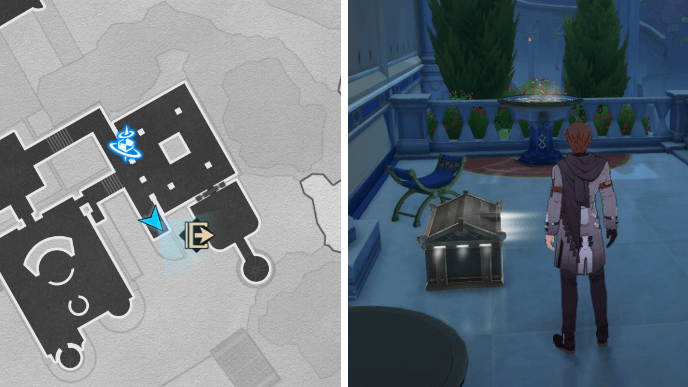
Head a few steps southeast from the Whispering Hall Space Anchor to find Chest 22 in front of a prayer ritual fountain.
Fallen Twilight City Okhema Chest 23
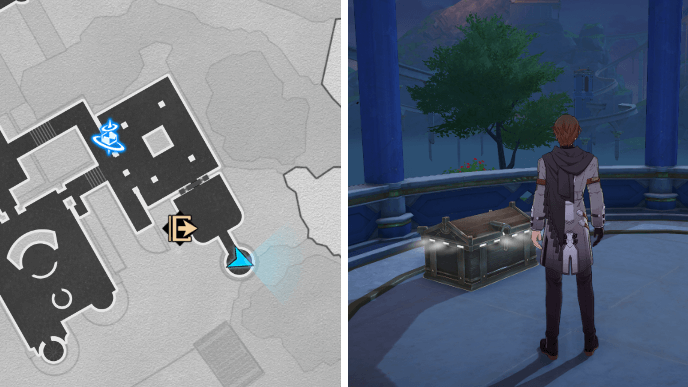
Go into the resting accomodation that leads to the Vortex of Genesis and walk out onto the balcony. There, you'll find Chest 23.
Fallen Twilight City Okhema Chest 24

Chest 24 can be found by a gazebo located southwest of Misia the Organist.
Fallen Twilight City Okhema Chest 25
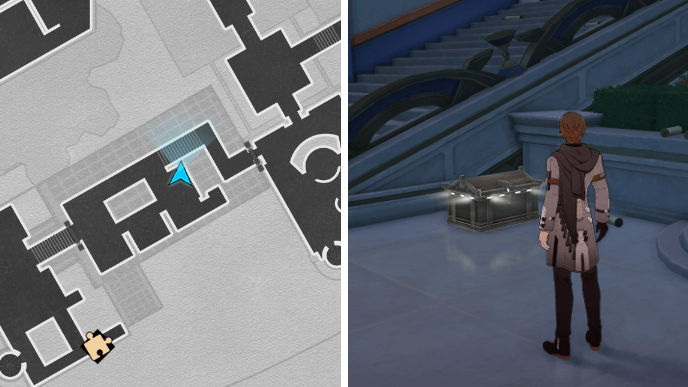
Chest 25 is located next to the stairs leading down to the library. There will also be a prayer ritual fountain nearby.
Fallen Twilight City Okhema Chest 26
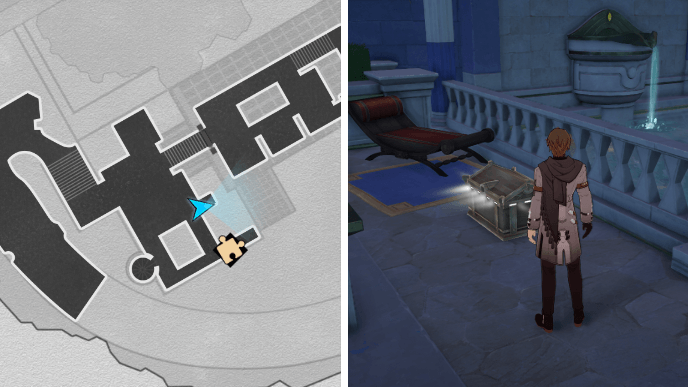
From Chest 25, head southwest and exit the library. Then, turn go left towards the small square pools. Chest 26 will be next to a lounge chair by one of the pools.
Fallen Twilight City Okhema Chest 27
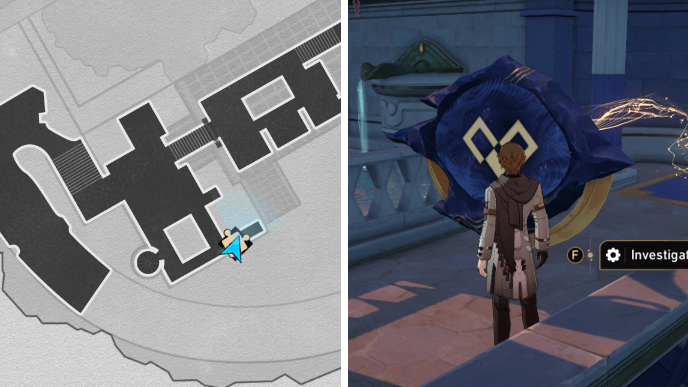
On the other side of the pool next to Chest 25, there will be a Prophecy Tablet. Solve it to get Chest 27.
Fallen Twilight City Prophecy Tablet
You can solve the Prophecy Tablet that gives the chest by following the steps shown above!
Fallen Twilight City Okhema Chest 28
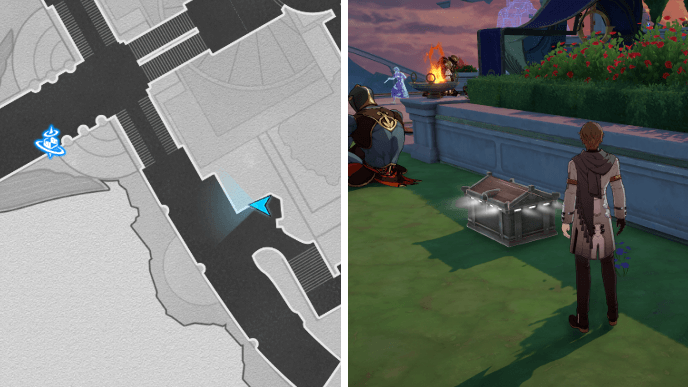
From Chest 27, head northwest and go down the stairs. At the bottom, you'll see Chest 28 by a group of people standing by a dromas stop.
Fallen Twilight City Okhema Chest 29
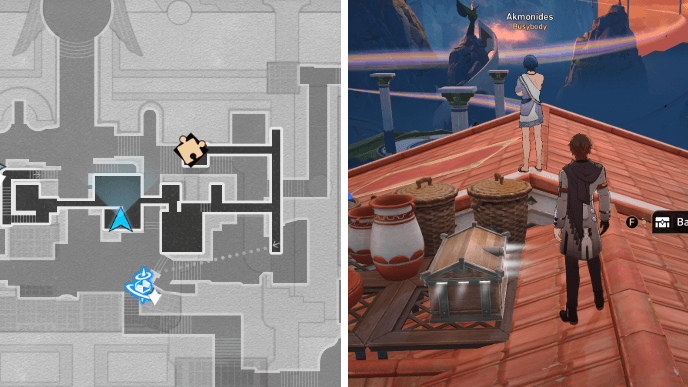
Chest 29 is located on top of a roof at the southwest area of F2. The chest will be next to some baskets and vases behind Akmonides.
Fallen Twilight City Okhema Chest 30

From Chest 29, cross over to the roof of the next building. You'll find Chest 30 overlooking a cloth sunshade.
Fallen Twilight City Okhema Chest 31
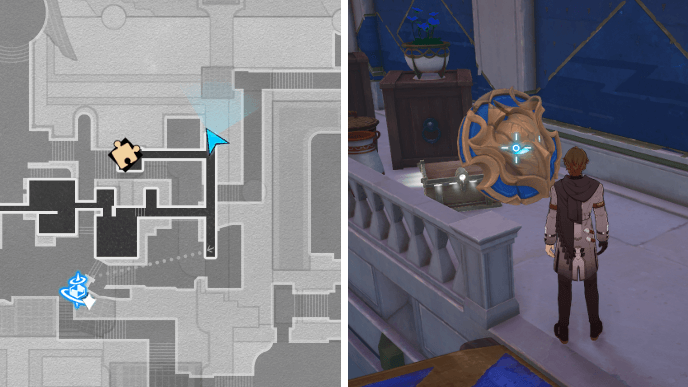
After getting Chest 30, head east and cross over the first cloth bridge. Before reaching the second cloth bridge, you'll find Chest 31 behind a shield.
Fallen Twilight City Okhema Chest 32
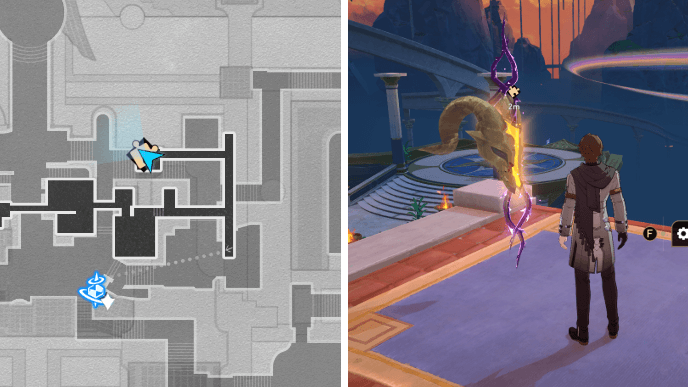
From Chest 31, go west to reach the roof of the next building. There'll be a Golden Scapegoat puzzle that you need to solve to get Chest 32.
Fallen Twilight City Golden Scapegoat 3
You can solve the Golden Scapegoat that gives the chest by following the steps shown above!
Fallen Twilight City Okhema Chest 33
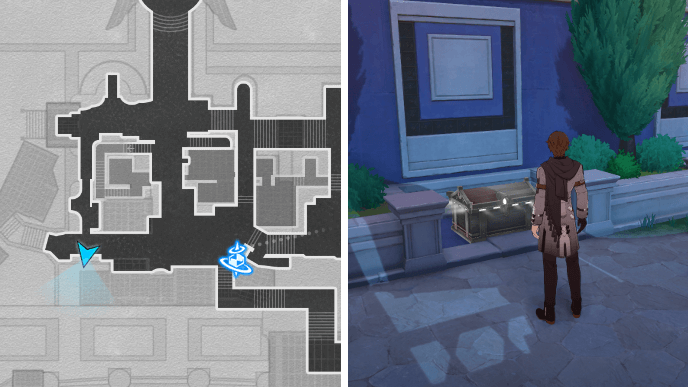
Head west from the Silent Night's Market Space Anchor and you'll eventually spot Chest 33 in between two tall shrubs.
Fallen Twilight City Okhema Chest 34
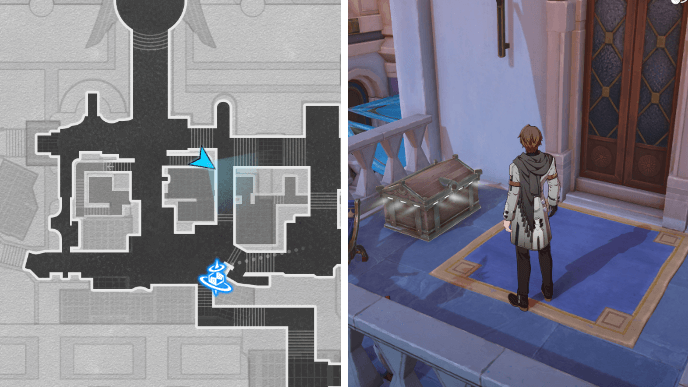
Go up the stairs directly opposite to the ones leading to the rooftop area in F2. Chest 34 will be at the doorstep of the building.
Fallen Twilight City Okhema Chest 35
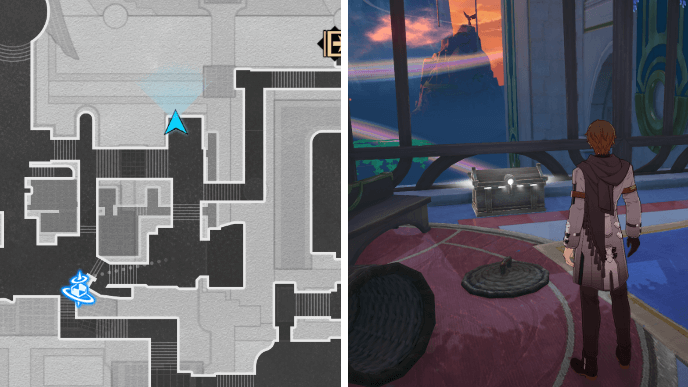
From Chest 34, head east towards the shaded rest area. There'll be a bench and a group of people near Chest 35.
Fallen Twilight City Okhema Chest 36
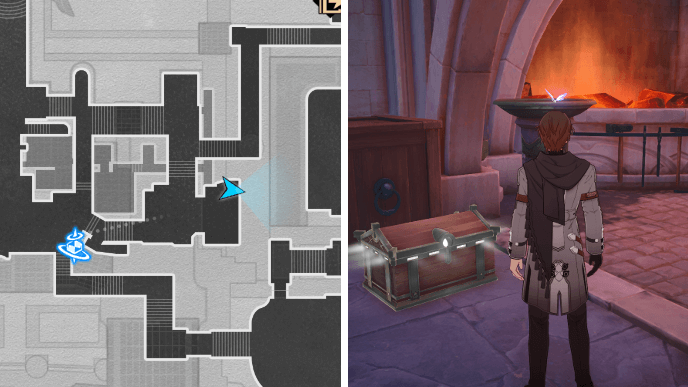
After getting Chest 35, go south towards the blacksmith workshop. Chest 36 will be on the left side of the main forge
Fallen Twilight City Okhema Chest 37
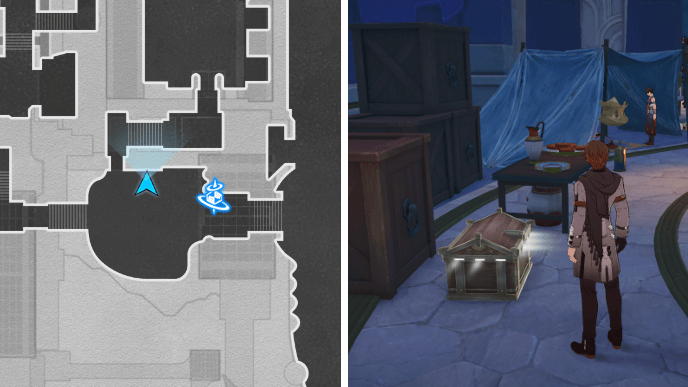
Chest 37 can be found by a pile of crates a few steps west of the Sentinel Plaza Space Anchor.
Fallen Twilight City Okhema Chest 38
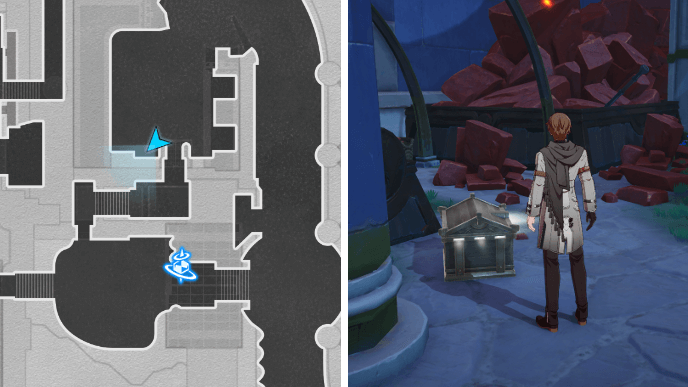
Head to the dromas stables north of the Sentinel Plaza Space Anchor. You should find Chest 38 near a large feeder box.
Fallen Twilight City Okhema Chest 39
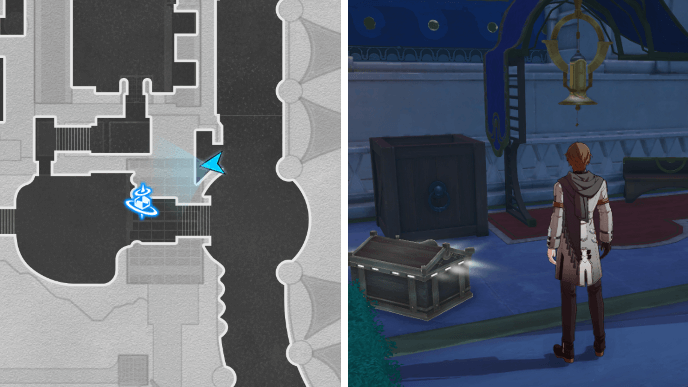
Go east from the Sentinel Plaza Space Anchor and turn left. Chest 39 will be by a dromas stop.
Fallen Twilight City Okhema Chest 40
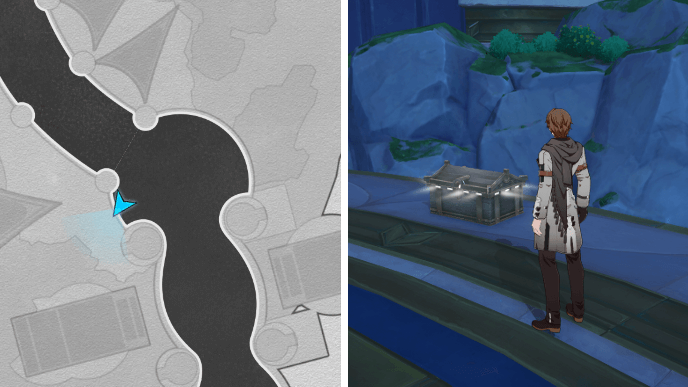
From Chest 39, head south through the wide walkway. A the way, you should spot Chest 40 on your right, just before the memory fragment of Petros the city guard.
Fallen Twilight City Okhema Chest 41
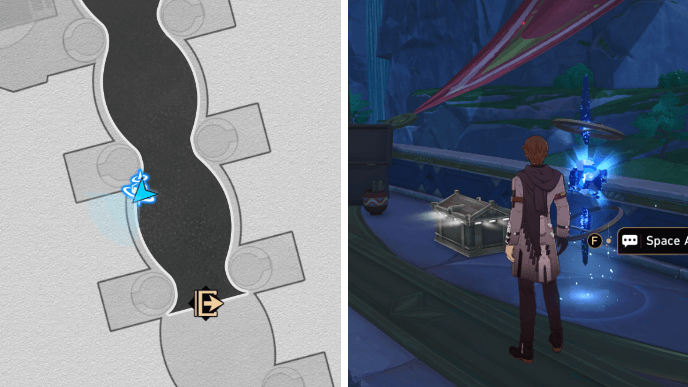
Chest 41 can be found right next to the Road of Sunset Space Anchor. There'll also be another dromas stop nearby.
“Fallen Twilight City” Okhema Spirithief Locations
Fallen Twilight City Spirithief 1
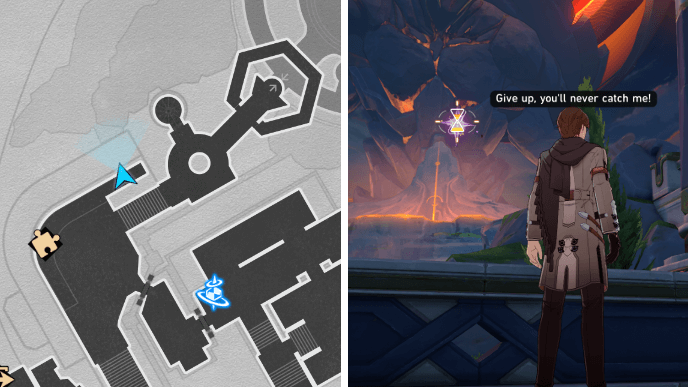
The first Spirithief in Fallen Twilight City can be found when picking up Chest 8. Rewind time while focusing on the stone titan in the distance to bring it back!
Fallen Twilight City Spirithief 2
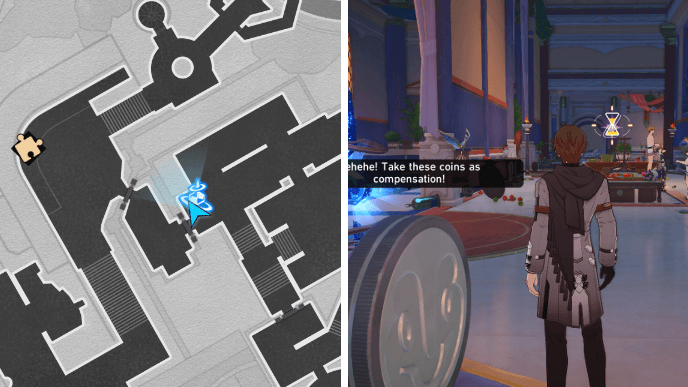
Interact with the Little Chimera next to the Mirage Cove Space Anchor to make the second Fallen Twilight City Spirithief appear. Focus on the archway past the banquet table while rewinding time to have it return the Chimera and spawn an extra chest!
How to Unlock “Fallen Twilight City” Okhema
Progress Through The Fall at Dawn's Rise Mission

You can unlock “Fallen Twilight City” Okhema by progressing through the The Fall at Dawn's Rise mission!
The Fall at Dawn's Rise Mission Guide
Honkai: Star Rail Related Guides
List of All Maps
| List of Maps | |
|---|---|
| Herta Space Station | Jarilo-VI |
| The Xianzhou Luofu | Penacony |
| Amphoreus | Planarcadia |
Treasure Chest Locations
Author
Fallen Twilight City Okhema Chests and Spirithief Locations
improvement survey
03/2026
improving Game8's site?

Your answers will help us to improve our website.
Note: Please be sure not to enter any kind of personal information into your response.

We hope you continue to make use of Game8.
Premium Articles
Rankings
- We could not find the message board you were looking for.
Gaming News
Popular Games

Genshin Impact Walkthrough & Guides Wiki

Honkai: Star Rail Walkthrough & Guides Wiki

Umamusume: Pretty Derby Walkthrough & Guides Wiki

Pokemon Pokopia Walkthrough & Guides Wiki

Resident Evil Requiem (RE9) Walkthrough & Guides Wiki

Monster Hunter Wilds Walkthrough & Guides Wiki

Wuthering Waves Walkthrough & Guides Wiki

Arknights: Endfield Walkthrough & Guides Wiki

Pokemon FireRed and LeafGreen (FRLG) Walkthrough & Guides Wiki

Pokemon TCG Pocket (PTCGP) Strategies & Guides Wiki
Recommended Games

Fire Emblem Heroes (FEH) Walkthrough & Guides Wiki

Diablo 4: Vessel of Hatred Walkthrough & Guides Wiki

Yu-Gi-Oh! Master Duel Walkthrough & Guides Wiki

Super Smash Bros. Ultimate Walkthrough & Guides Wiki

Pokemon Brilliant Diamond and Shining Pearl (BDSP) Walkthrough & Guides Wiki

Elden Ring Shadow of the Erdtree Walkthrough & Guides Wiki

Monster Hunter World Walkthrough & Guides Wiki

The Legend of Zelda: Tears of the Kingdom Walkthrough & Guides Wiki

Persona 3 Reload Walkthrough & Guides Wiki

Cyberpunk 2077: Ultimate Edition Walkthrough & Guides Wiki
All rights reserved
Copyright © 2024 HoYoverse, COGNOSPHERE. All Rights Reserved.
The copyrights of videos of games used in our content and other intellectual property rights belong to the provider of the game.
The contents we provide on this site were created personally by members of the Game8 editorial department.
We refuse the right to reuse or repost content taken without our permission such as data or images to other sites.


![Slay the Spire 2 Review [Early Access] | Still the Deckbuilder to Beat](https://img.game8.co/4433115/44e19e1fb0b4755466b9e516ec7ffb1e.png/thumb)

![Resident Evil Village Review [Switch 2] | Almost Flawless Port](https://img.game8.co/4432790/e1859f64830960ce4248d898f8cd38d9.jpeg/thumb)


Scapegoat by Chest 31 is incorrect. It supposed to be the puzzle with the multiple bridges and buttons, 8 steps.