Reunite with Brittany! Walkthrough
This is a story walkthrough for Reunite with Brittany! in Pikmin 3 Deluxe for the Nintendo Switch. This guide will cover the section of the Distant Tundra where Brittany and Alph are separated, and Brittany will meet up with Yellow Pikmin to find her way out of the cave. Read on for tips and strategy!
| Previous Walkthrough | Next Walkthrough |
|---|---|
| Defeat the Armored Mawdad! | Where's the Captain? |
List of Contents
| Fruit That Can Be Recovered |
 Cupid's Grenade Cupid's Grenade
|
 Disguised Delicacy Disguised Delicacy
|
 Sunseed Berry Sunseed Berry
|
|---|---|---|
 Velvety Dreamdrop Velvety Dreamdrop
|
||
Reunite with Brittany! Walkthrough
Objectives List
| Order | Objectives |
|---|---|
| 1 | Make a current with the Yellow Pikmin and the Lightbulb |
| 2 | Push the Iron Ball and leave the cave |
| 3 | Defeat the Swooping Snitchbug and break the Electric Gate |
| 4 | As Alph, throw Red and Rock Pikmin to the Other Side |
| 5 | As Brittany, throw Yellow Pikmin to the other side |
| 6 | Break the Electric Gate |
| 7 | Defeat the Pyroclasmic Slooch and carry the fragments |
| 8 | Use the Geysers to collect more fragments |
| 9 | Ride the Geyser and Collect Fragments |
| 10 | Break the Large Crystal and carry the Fragments |
| 11 | Complete the bridge and recover the fruit, then reunite with Brittany |
1: Make a current with the Yellow Pikmin and the Lightbulb
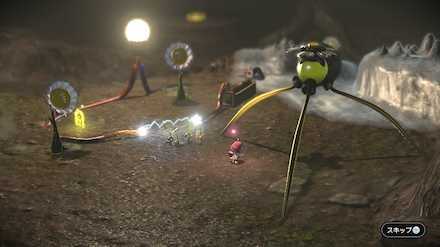
After taking control of Brittany and walking forward a bit, she will encounter two Pikmin forming a broken current with the lightbulb, as well as three seeds near a grounded yellow onion. Pluck the Pikmin from the ground, then throw them at the Pikmin current to light up the lightbulb and restore the fallen onion.
Yellow Pikmin Abilities and Where to Find
After this, go around the cave and throw yellow Pikmin at all of the pellets nearby to increase your numbers. There is a large pellet worth 5 Pikmin just northwest of the onion's location that you'll want to grab last, as it is easier to bring down and carry with more Pikmin. In the lower part of the cave, a geyser can be used for faster access to the top.
2: Push the Iron Ball and leave the cave
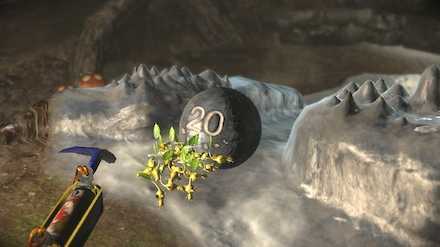
After you have collected all of the pellets and you have 20 Yellow Pikmin, you can have them charge forward at the Iron Ball to push it forward. This will break the cave's wall and allow you to exit.
3: Defeat the Swooping Snitchbug and break the Electric Gate
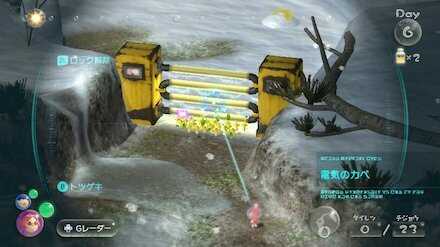
After stepping outside, you'll be able to switch between Alph and Brittany again. First head right outside of the cave, and defeat the Swooping Snitchbug, then continue toward the Electric Gate. After having all of your yellow pikmin charge forward at the gate, go ahead and shift control to Alph.
4: As Alph, throw Red and Rock Pikmin to the Other Side
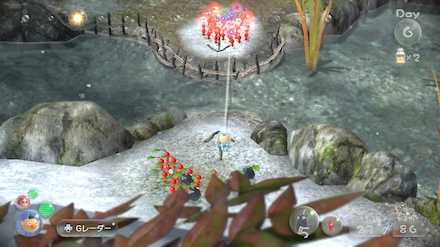
After gaining control of Alph, draw some Red and Rock Pikmin out of the Onion (~30ish of each), then throw some of them at the tunnel near the onion to have them dig it up. After that, head over to the area of the map where there are arrows pointing to the other side, with a small amount of water separating them. Throw your remaining red and rock pikmin to the other side for Brittany to use.
Around this time, the Electric Gate will likely be finished, so it's time to swap back to Brittany.
5: As Brittany, throw yellow pikmin to the other side
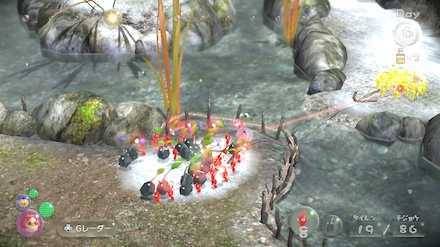
After the Electric Gate has been broken, call the Yellow Pikmin as Brittany and have her throw them across the water to Alph. Then, swap back to Alph and have him whistle to assemble them all.
6: Break the Electric Gate
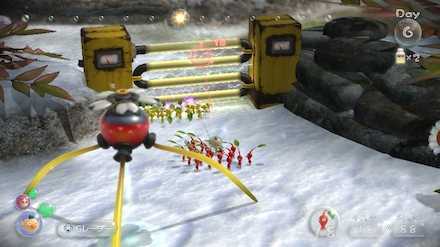
With Alph's new team of yellow pikmin, head back up to the Drake and Onion's landing point. Have all of the yellow pikmin work on taking down the electric gate, then gather the pikmin that have completed digging the tunnel. Go through the tunnel, and on the other side is a glass wall, which can be broken by throwing rock pikmin at it. Break the glass wall and any crystals nearby.
7: Defeat the Pyroclasmic Slooch and carry the fragments
| Location of the Fragments near the Pyroclasmic Slooch |
|---|
 Enlarge Enlarge |
You'll be able to see the fragments needed to build the bridge after smashing the glass wall. Before picking them up, go behind the Pyroclasmic Slooch found here and toss some red pikmin on it so they can take it out. Red Pikmin are immune to fire, so as long as you don't allow it to eat them, they should have no problem taking it out. After defeating it, you can have your pikmin start carrying the fragments.
Command some pikmin to carry the Sunseed Berry and Pyroclasmic Slooch remains as well, then switch back over to Brittany.
8: Use the Geysers to collect more fragments
| Location of the Northwest Fragments |
|---|
 Enlarge Enlarge |
As Brittany, gather up the nearby pikmin and head through the area where the electric gate was. Throw some rock pikmin at the crystal to reveal a geyser, then ride it up to the next level. From there, try and get behind the Arctic Cannon Larva to throw some pikmin on it and take it down.
After doing so, there is another geyser than can be found, allowing you to continue upward. Before picking up the fragments you see here, you should take out the Whiptongue Bulborb first. Unleash your pikmin on it from behind, then send them to work on carrying the fragments after defeating it.
Pick up the nearby fruit on your way
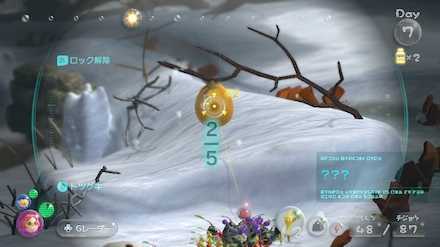
There is a Velvety Dreamdrop nearby, which you can throw 5 pikmin on to knock down and carry, as well as a Cupid's Grenade buried nearby that you can set 2 or 3 pikmin on to dig up. You cannot recover them until the bridge is fully complete, but if you have the Pikmin go ahead and move them toward the front of the bridge, it will make your work a lot easier when you do finish it up.
After sending out all of your Pikmin to carry fragments and fruit, switch back over to Alph.
9: Ride the Geyser and Collect Fragments
| The Fragments Near the Geyser |
|---|
 Enlarge Enlarge |
While playing as Brittany, Alph's work with the bridge should have finished, so reassemble your pikmin, then take the geyser to move. Use some red pikmin to take down the Fiery Blowhog, then carry the fragments further behind it. After putting all pikmin to work on moving the bridge fragments, you can swap back over to Brittany.
10: Break the Large Crystal and carry the Fragments
| Fragments Near the Large Crystal |
|---|
 Enlarge Enlarge |
After Brittany's pikmin finish what they were doing, gather them up again and head down near the bridge. Then head toward the left of the cave entrance, go through the path and destroy the Large Crystal that you see there. This will allow you to completely avoid having to fight with the joustmites while moving the fragments.
The final bridge fragments here are found inside a potted plant, but before you can get them, backtrack toward the bridge and break the crystal just to the left of it. Hop on the Bouncy Mushroom and have your pikmin carry the fragments found where you land.
11: Complete the bridge then reunite with Brittany
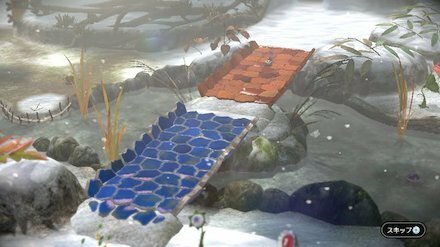
After your Pikmin finish carrying the bridge fragments, the bridge will be rebuilt. At this point, you can reunite with Brittany and use any remaining time to have your Pikmin move the new fruit to the S.S. Drake.
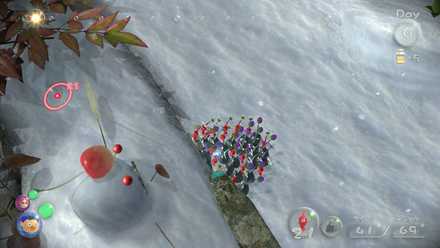
Close to the landing site is a Cupid's Grenade placed on top of a snowman. You only need 1 Pikmin to retrieve this fruit.
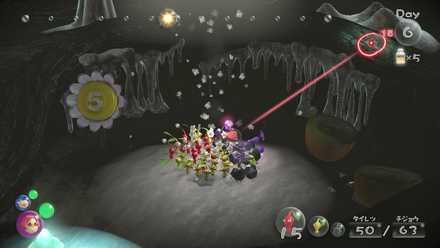
You can find a Disguised Delicacy encased in ice at the top portion inside of the cave that Brittany fell in. Use Rock Pikmin to break the ice and retrieve the fruit.
Related Guides
| Previous Walkthrough | Next Walkthrough |
|---|---|
| Defeat the Armored Mawdad! | Where's the Captain? |

| Prologue | |
|---|---|
 Exploration Day 1 Exploration Day 1 |
- |
| Garden of Hope | |
 Where's Brittany? Where's Brittany? |
 The Captain's Signal? The Captain's Signal? |
 Defeat the Armored Mawdad! Defeat the Armored Mawdad! |
- |
| Distant Tundra | |
 Reunite With Brittany! Reunite With Brittany! |
 Where's the Captain? Where's the Captain? |
 Defeat the Vehemoth Phosbat! Defeat the Vehemoth Phosbat! |
- |
| Tropical Wilds | |
 Find the Cosmic-Drive Key! Find the Cosmic-Drive Key! |
- |
| Twilight River | |
 To Twilight River! To Twilight River! |
 Save Olimar! Save Olimar! |
 Defeat the Scornet Maestro! Defeat the Scornet Maestro! |
- |
| Garden of Hope (Revisited) | |
 Follow Olimar! Follow Olimar! |
 Find the Hocotatian! Find the Hocotatian! |
 Save the Hocotatian! Save the Hocotatian! |
- |
| Formidable Oak | |
 Head to the Formidable Oak Head to the Formidable Oak |
 Find Captain Olimar! Find Captain Olimar! |
 Save Captain Olimar! Save Captain Olimar! |
- |
Author
Reunite with Brittany! Walkthrough
improvement survey
03/2026
improving Game8's site?

Your answers will help us to improve our website.
Note: Please be sure not to enter any kind of personal information into your response.

We hope you continue to make use of Game8.
Rankings
- We could not find the message board you were looking for.
Gaming News
Popular Games

Genshin Impact Walkthrough & Guides Wiki

Honkai: Star Rail Walkthrough & Guides Wiki

Umamusume: Pretty Derby Walkthrough & Guides Wiki

Pokemon Pokopia Walkthrough & Guides Wiki

Resident Evil Requiem (RE9) Walkthrough & Guides Wiki

Monster Hunter Wilds Walkthrough & Guides Wiki

Wuthering Waves Walkthrough & Guides Wiki

Arknights: Endfield Walkthrough & Guides Wiki

Pokemon FireRed and LeafGreen (FRLG) Walkthrough & Guides Wiki

Pokemon TCG Pocket (PTCGP) Strategies & Guides Wiki
Recommended Games

Diablo 4: Vessel of Hatred Walkthrough & Guides Wiki

Cyberpunk 2077: Ultimate Edition Walkthrough & Guides Wiki

Fire Emblem Heroes (FEH) Walkthrough & Guides Wiki

Yu-Gi-Oh! Master Duel Walkthrough & Guides Wiki

Super Smash Bros. Ultimate Walkthrough & Guides Wiki

Pokemon Brilliant Diamond and Shining Pearl (BDSP) Walkthrough & Guides Wiki

Elden Ring Shadow of the Erdtree Walkthrough & Guides Wiki

Monster Hunter World Walkthrough & Guides Wiki

The Legend of Zelda: Tears of the Kingdom Walkthrough & Guides Wiki

Persona 3 Reload Walkthrough & Guides Wiki
All rights reserved
© 2013 - 2020 Nintendo. Pikmin and Nintendo Switch are trademarks of Nintendo.
The copyrights of videos of games used in our content and other intellectual property rights belong to the provider of the game.
The contents we provide on this site were created personally by members of the Game8 editorial department.
We refuse the right to reuse or repost content taken without our permission such as data or images to other sites.




![Monster Hunter Stories 3 Review [First Impressions] | Simply Rejuvenating](https://img.game8.co/4438641/2a31b7702bd70e78ec8efd24661dacda.jpeg/thumb)


