Dovebrook District Treasure Chest Locations
★ Exclusive: Check out the State of Meta in 4.0!
♦ Latest: 4.1 Banners and Events
♦ Phase 1: Ashveil and Hyacine
♦ Phase 2: Boothill
♦ Upcoming: Silver Wolf Lv.999, Evanescia, Elation Trailblazer
♦ Events: Wispae War Saga and Divergent Universe
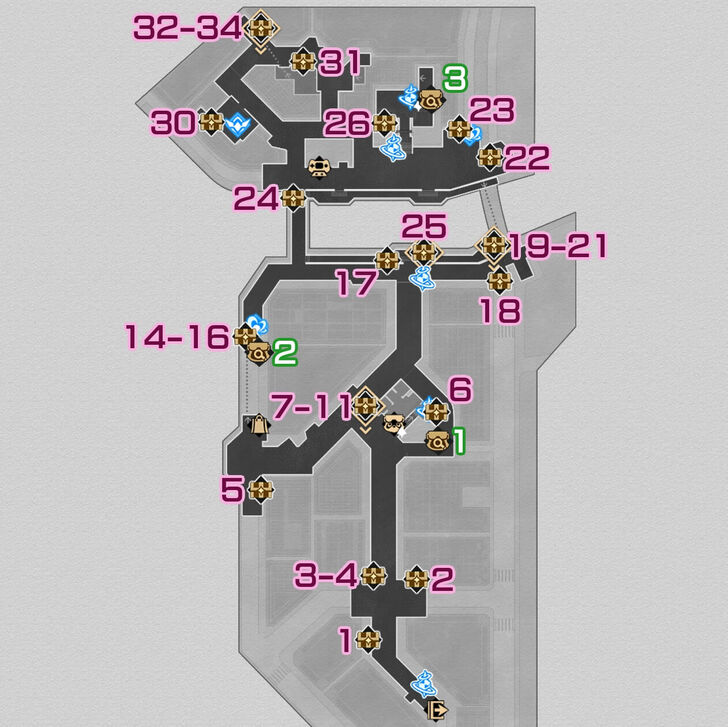
There are 40 Dovebrook District chests to collect in Honkai: Star Rail. Check out our map guide to see all Dovebrook District chest locations!
List of Contents
Dovebrook District Chest Locations
Dovebrook District Interactive Map
Select icons to toggle them on/off
| Space Anchor | Treasure Chest | ||
| Furbobo Treasure | |||
Dovebrook District Chests
| Dovebrook District Chest Map | |||||||||||
|---|---|---|---|---|---|---|---|---|---|---|---|
 See Full Image |
 F2 Center See Full Image |
||||||||||
 See Full Image |
 F2 North See Full Image |
||||||||||
| Dovebrook District Treasure Chests | |||||||||||
| Chest 1 | Chest 2 | Chest 3 | Chest 4 | ||||||||
| Chest 5 | Chest 6 | Chest 7 | Chest 8 | ||||||||
| Chest 9 | Chest 10 | Chest 11 | Chest 12 | ||||||||
| Chest 13 | Chest 14 | Chest 15 | Chest 16 | ||||||||
| Chest 17 | Chest 18 | Chest 19 | Chest 20 | ||||||||
| Chest 21 | Chest 22 | Chest 23 | Chest 24 | ||||||||
| Chest 25 | Chest 26 | Chest 27 | Chest 28 | ||||||||
| Chest 29 | Chest 30 | Chest 31 | Chest 32 | ||||||||
| Chest 33 | Chest 34 | Chest 35 | Chest 36 | ||||||||
| Chest 37 | |||||||||||
| Dovebrook District Furbobo Treasure | |||||||||||
| Furbobo Treasure 1 | Furbobo Treasure 2 | Furbobo Treasure 3 | |||||||||
How to Get Dovebrook District Chests
Dovebrook District Chest 1
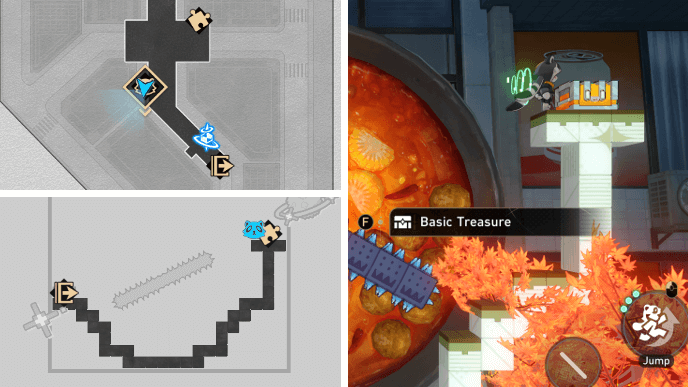
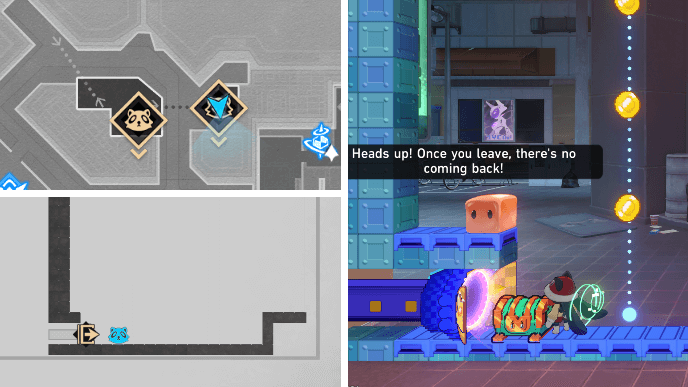
Dovebrook District Chest 1 comes from the Interplanar Jump Difficulty IV stage located at the southern part of F1. You'll need to collect all the Pixcoins to unlock the chest. Time your jumps whenever the coins get close and avoid the spiked platform.
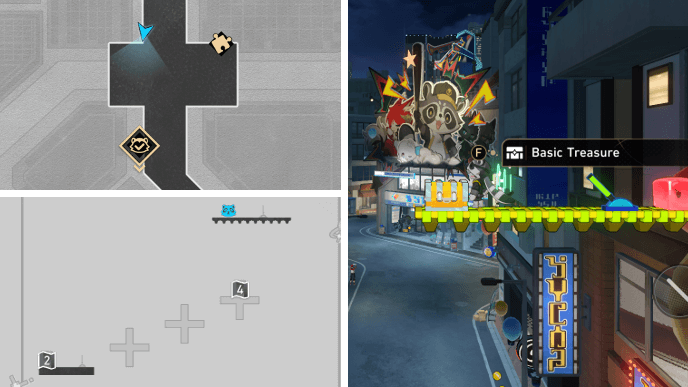
Dovebrook District Chest 2
Dovebrook District Chest 2 comes from a Shiftmation puzzle found a few steps northeast from Chest 1's location.
Dovebrook District Chest 3
You can find two more Dovebrook District chests in the Interplanar Jump Difficulty III stage found directly east of Chest 2's location. The pipe entrance is under the tail of the golden cat statue.
Chest 3 is in Level 3 of the stage. You'll need to use the lever to set the platforms into a vertical position so that you can jump up to the topmost platform where the chest is.
Dovebrook District Chest 4
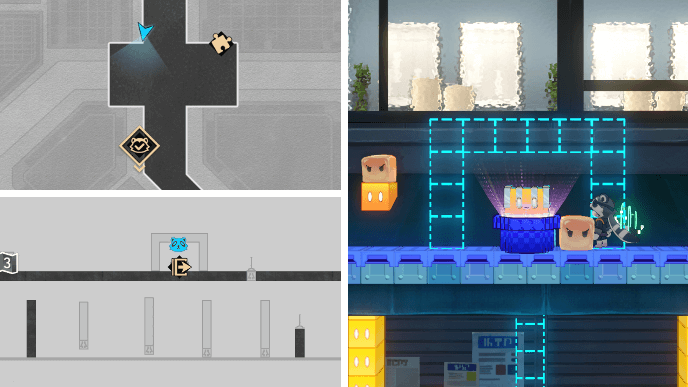
Dovebrook District Chest 4 is in Level 4 of the Interplanar Jump Difficulty III stage. To remove the obstacles blocking the chest, you must continuously toggle the lever to switch off the lower blocks as the cloudae moves from left to right.
Once the imagenae moves to the rightmost area, it'll be able to reach the lever and remove the blocks surrounding Chest 4.
Dovebrook District Chest 5
Dovebrook District Chest 5 can be obtained after solving the Shiftmation puzzle located directly south of the ∞-Eleven Store at the west side of F1.
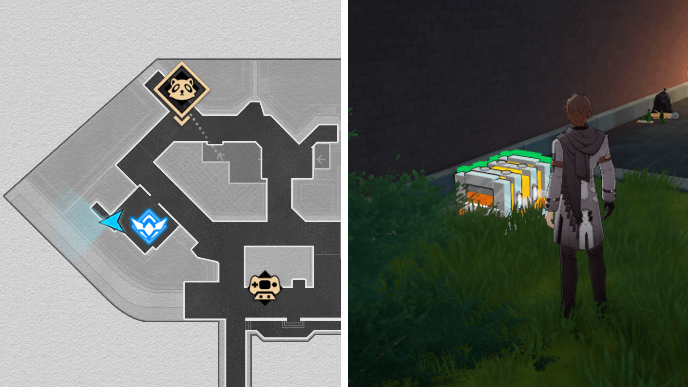
Dovebrook District Chest 6
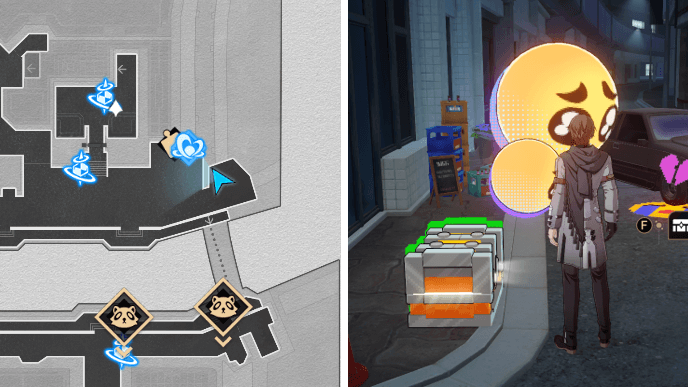
Dovebrook Chest 6 can be found next to a broken fence in the alley behind the Furbobocom building.
Dovebrook District Chest 7

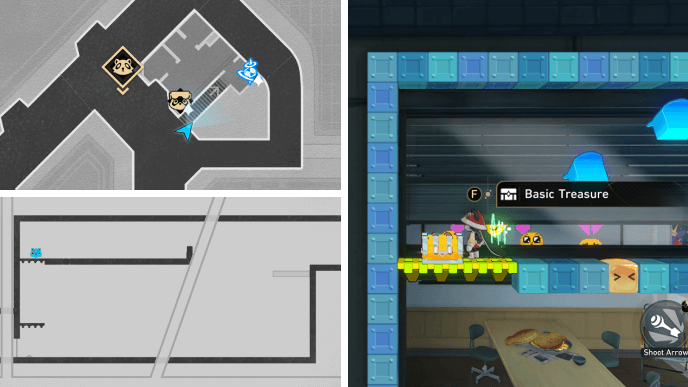
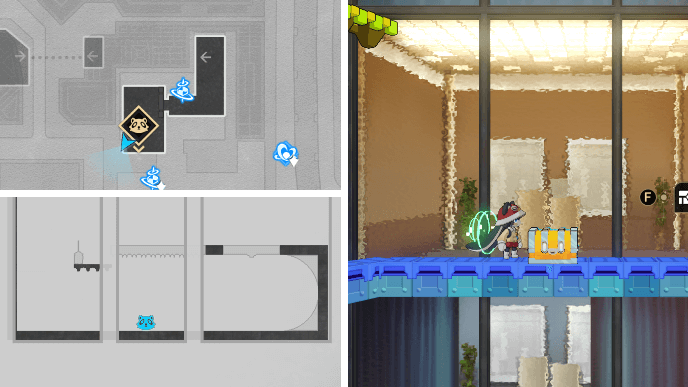
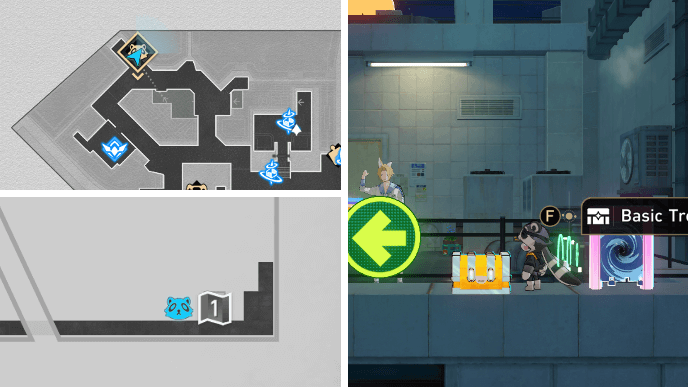
Look for the Interplanar Jump Difficulty III stage located next to the staircase that leads into the Furbobocom building. Dovebrook District Chest 7 can be found in the hidden area on Level 1, which can be accessed from the yellow block above the entrance pipe.
Wall jump up through the narrow space until you reach the upper platform. You'll find Chest 7 in between some spiked blocks.
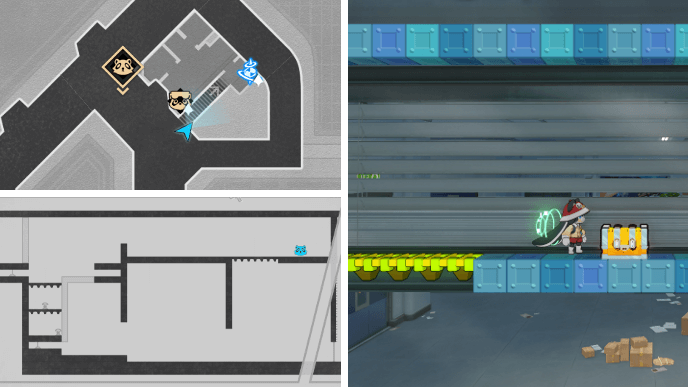
Dovebrook District Chest 8
Chest 8 can be found on a platform underneath the hidden area where Chest 7 is. Shoot at the lever to deactivate the spikes and cross over safely. Then, you can use the ladder wall to climb up and reach the chest easily.
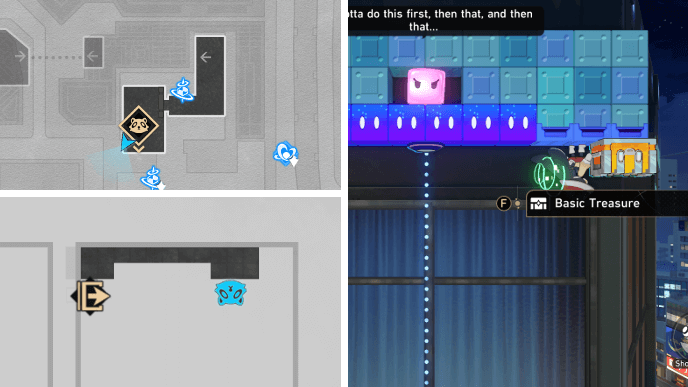
Dovebrook District Chest 9
After getting Chest 8, keep progressing through Level 1 until you spot the ice blocks. Instead of heading left, jump to the platform on the right. Once you get close enough to the wall, it will disappear and reveal another hidden area. Keep going right until you find Chest 9.
Dovebrook District Chest 10
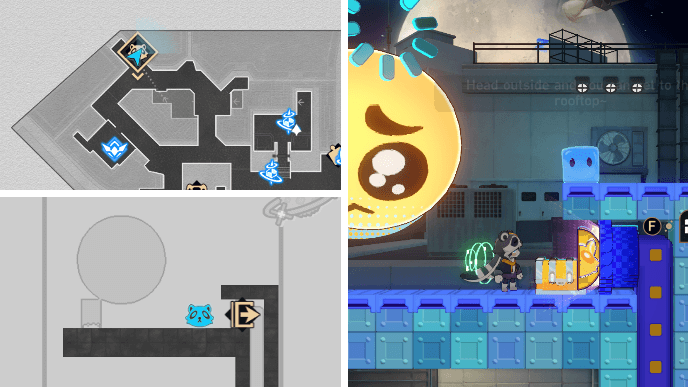
From Chest 9, head back to the left and use the ice blocks to reach Level 2. While the blue platform is still at the top, triple jump all the way to the left side to reach another hidden area at the top. Cross through the moving imagenae to reach Chest 10 at the end.
Dovebrook District Chest 11
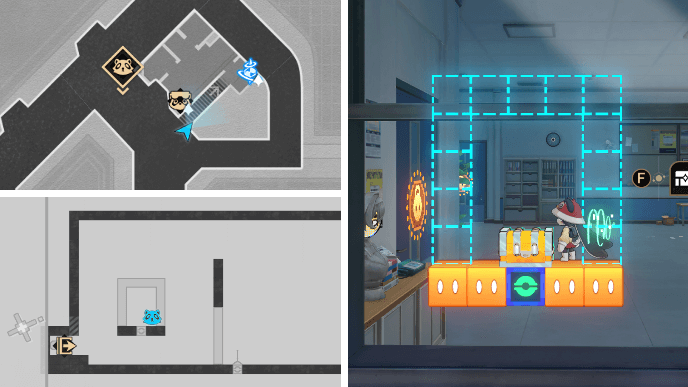
After getting Chest 10, progress onwards through Level 2 to find Chest 11 near the exit. Stand underneath the platform where Chest 11 is and shoot at the lever to remove the blocks surrounding the chest.
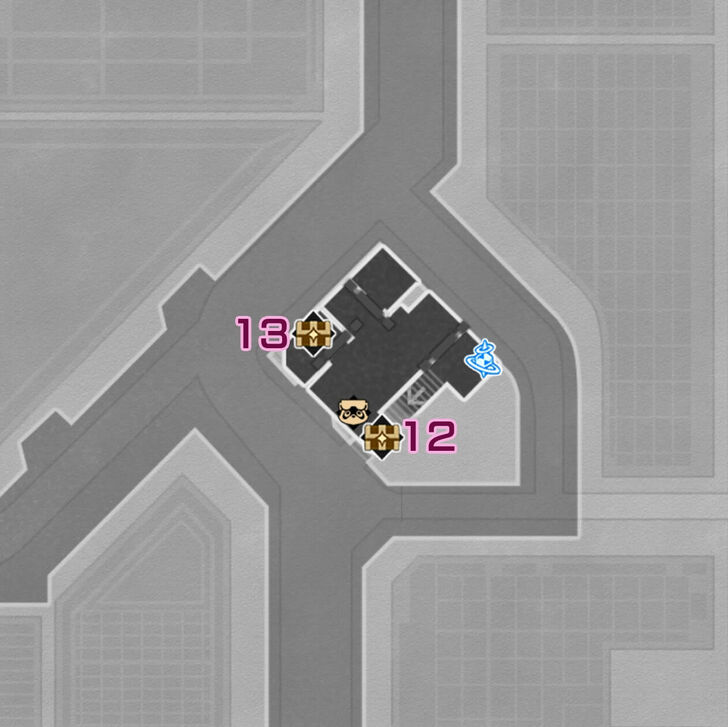
Dovebrook District Chest 12
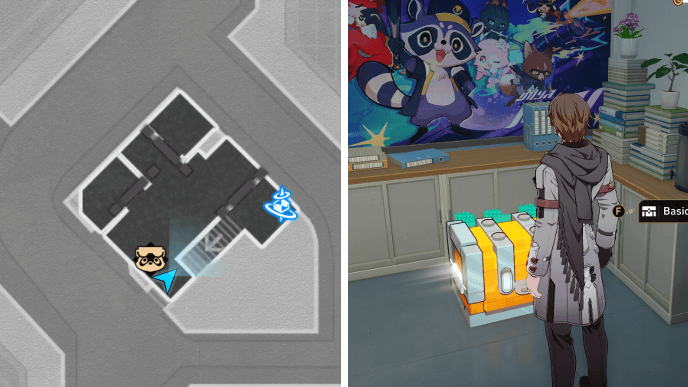
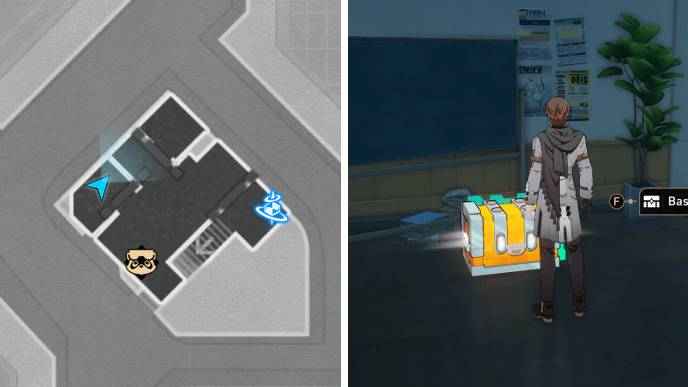
Dovebrook District Chest 12 can be found right next to the Furbobocom desk in the Furbobo Weekly Headquarters.
Dovebrook District Chest 13
Dovebrook District Chest 13 is in the room with a green sign above it in the Furbobo Weekly Headquarters.
Dovebrook District Chest 14
Look for the Interplanar Jump Difficulty V stage near the Bud of Aether Calyx on F1. This pipe entrance will directly lead you to Level 2 of the stage. Use the nearby portal to teleport to Level 1 instead.
Keep going right and you should come across a Slice of Arcadian Life challenge. Just step on the buttons underwater to remove the walls blocking the hedgehogae above from going to the right. Once the hedgehogae presses all the buttons, Chest 14 can be obtained.
Dovebrook District Chest 15
After getting Chest 14, continue heading right to complete another Slice of Arcadian Life challenge. Use the lever to toggle platforms on and off as the hedgehogae walks through the area and activates the buttons that unlock Chest 15.
Dovebrook District Chest 16
From Chest 15, keep going right and press the red button near the portal. This will reveal a grid of emotis that can be used to figure out the Bizarre Melody in Dovebrook District. Use the portal to return to Level 2 and jump up to the speakers to play the Bizarre Melody.
Input the following buttons: Top Left, Right, Right, Right, Bottom Right, Bottom Left, Bottom Left, Top Right. This will bring you to a secret Interplanar Jump Difficulty I stage! Chest 16 can be found on one of the green platforms.
Dovebrook District Chest 17
Dovebrook District Chest 17 can be found by a small hedge located a few steps northwest of the Dovebrook Riverside Path Space Anchor.
Dovebrook District Chest 18
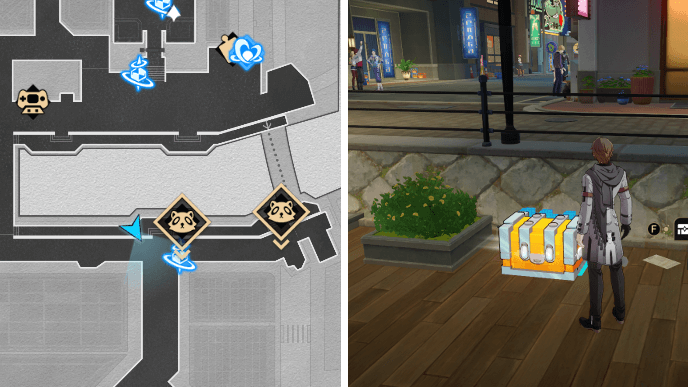
Dovebrook District Chest 18 can be found by some barriers and cones a few steps east of the Dovebrook Riverside Path Space Anchor.
Dovebrook District Chest 19

Dovebrook District Chest 19 is in Level 1 of the Interplanar Jump Difficulty III stage northeast of the Dovebrook Riverside Path Space Anchor.
Dovebrook District Chest 20
After getting Chest 19, backtrack to the area near the entrance you came from and jump up from the blue platform to reach a hidden area above. Keep going left until you reach Level 2.
Use the Strolling Belt to change the direction of gravity and reach the red platforms that will lead to Chest 20.
Dovebrook District Chest 21
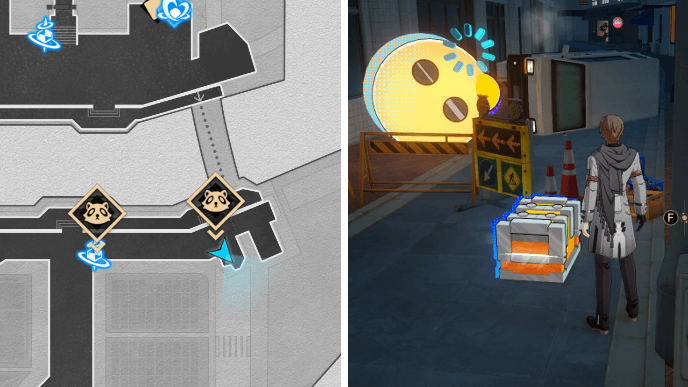
From Chest 20's location, keep going right until you spot the pipe exit. Chest 21 will be on a platform above the pipe.
Dovebrook District Chest 22
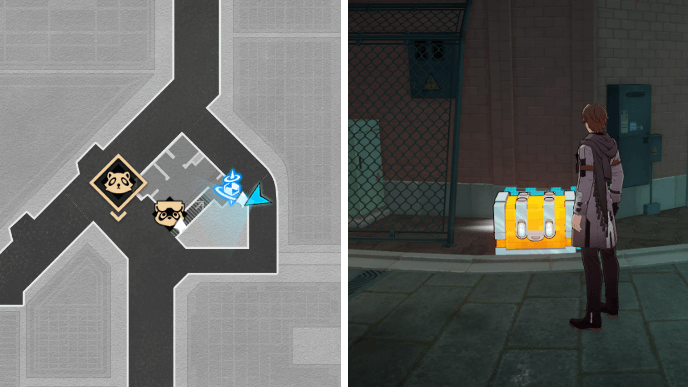
Dovebrook District Chest 22 can be found by a group of emotis located a few steps southeast of the Bud of Treasures Calyx on F1.
Dovebrook District Chest 23
Dovebrook District Chest 23 comes from a Shiftmation puzzle right next to the Bud of Treasures Calyx on F1.
Dovebrook District Chest 24

Dovebrook District Chest 24 can be obtained upon completing and exiting the Interplanar Jump stage that appears during the Medical Disputes on the Ship of Fools Trailblaze Mission.
Dovebrook District Chest 25

Dovebrook District Chest 25 is in Level 2 of the Interplanar Jump Difficulty II stage right in front of the Dovebrook Riverside Path Space Anchor. The chest can be found near the pipe exit that leads to World's End Tavern.
Dovebrook District Chest 26
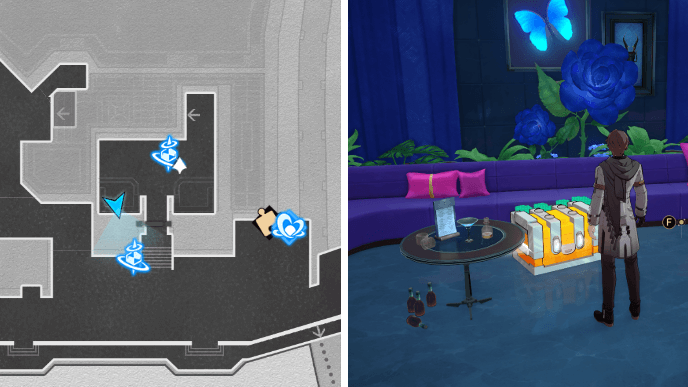
Dovebrook District Chest 26 can be found in the lounge area at the lobby of the Synwish Tower in the northern part of F1.
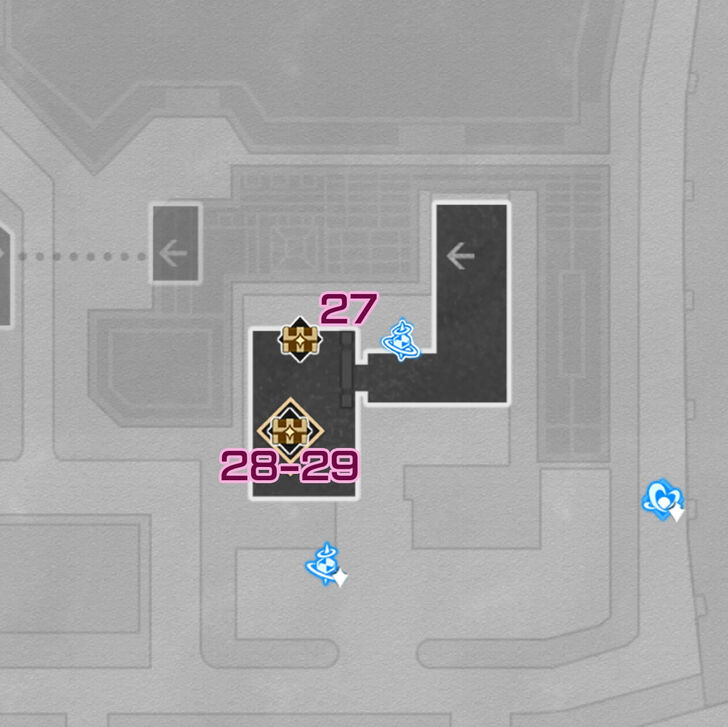
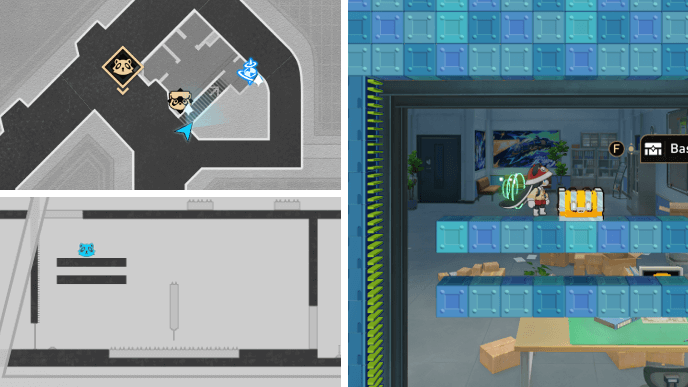
Dovebrook District Chest 27
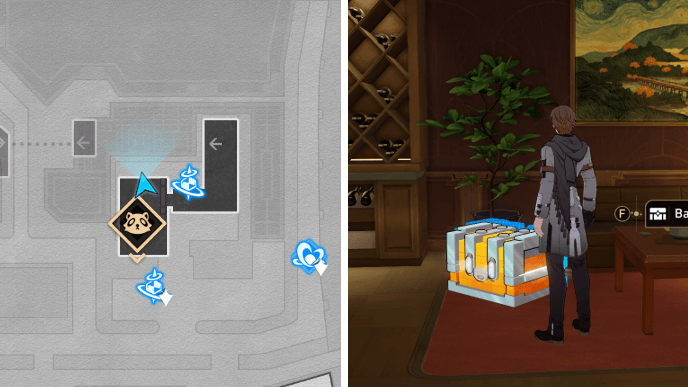
Dovebrook District Chest 27 can be found next to a large wine shelf at the Synwish Syndicate Boss's Office in F3.
Dovebrook District Chest 28
From Chest 27, head a few steps south and enter the Interplanar Jump Difficulty II stage near the window. After making the long drop from the top of the stage, you'll eventually come across Chest 28 as you go right.
Dovebrook District Chest 29
After getting Chest 28, go up the Strolling Belt and use the blue elevator platform to head upwards towards the exit. You should spot Chest 29 near the exit pipe.
Dovebrook District Chest 30
Dovebrook District Chest 30 can be found next to a bush near the Shape of Soundburst Stagnant Shadow on F1.
Dovebrook District Chest 31
Dovebrook District Chest 31 is located a few steps east of the northernmost Interplanar Jump Difficulty III stage in F1.
Dovebrook District Chest 32

Enter the northernmost Interplanar Jump Difficulty III stage in F1. Go left past the entrance pipe and drop down to find Chest 32 tucked away in the corner.
Dovebrook District Chest 33
After picking up Chest 32, continue going right and use the Teleporter to reach Level 2. You should immediately see Chest 33 in front of you.
Dovebrook District Chest 34
From Chest 33, continue progressing through the stage until you reach Level 3. Chest 34 will be right in front of the exit pipe that leads to F2.
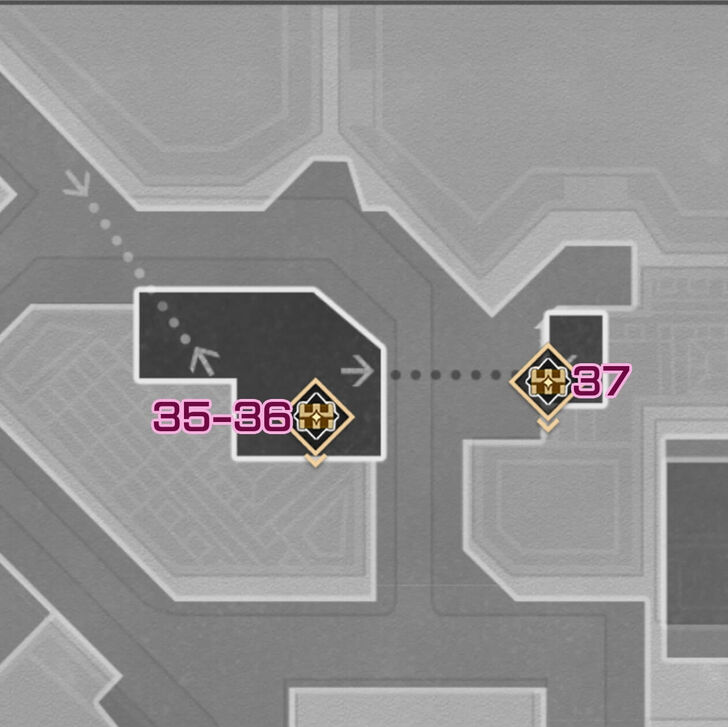
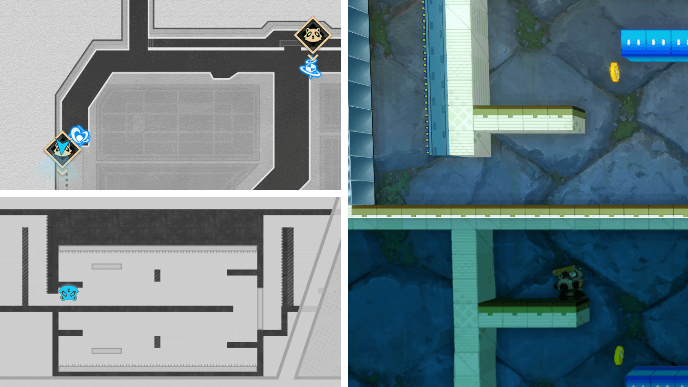
Dovebrook District Chest 35
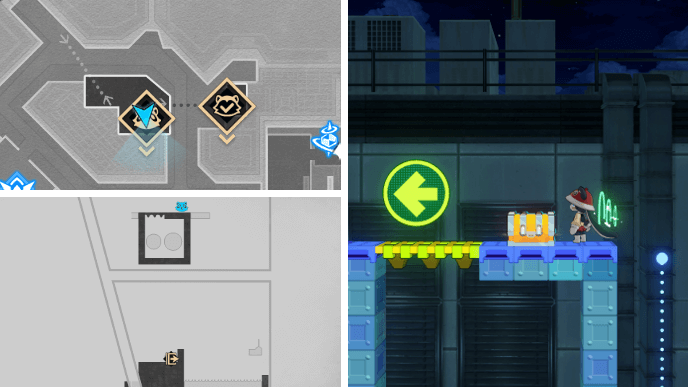
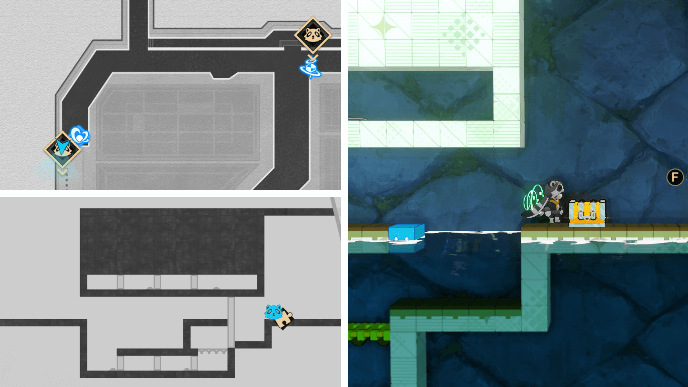
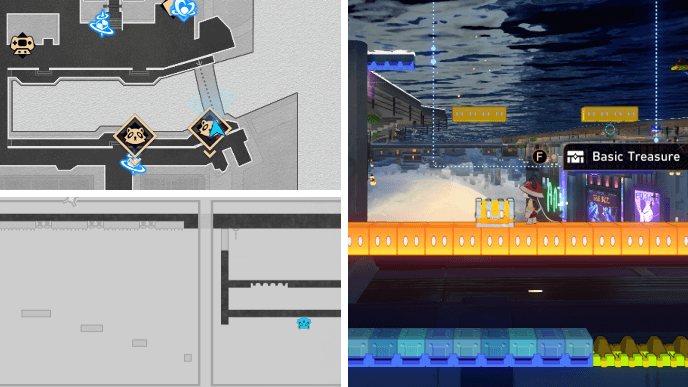
Enter the Interplanar Jump Difficulty IV stage in F2 North. When the moving platform with a lever comes down from the right side of the pipe, jump over the spikes and onto the platform. Once you reach the top, you should find Chest 35 on the left.
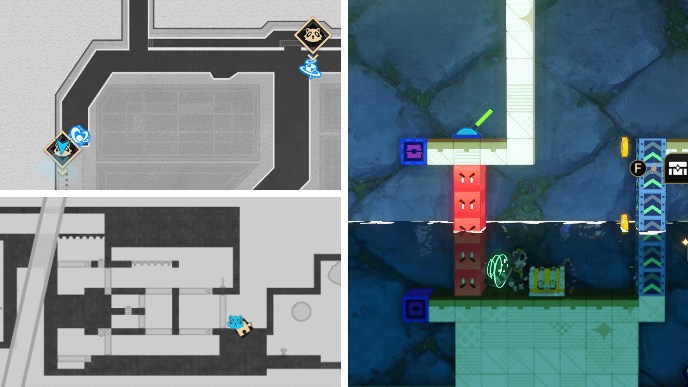
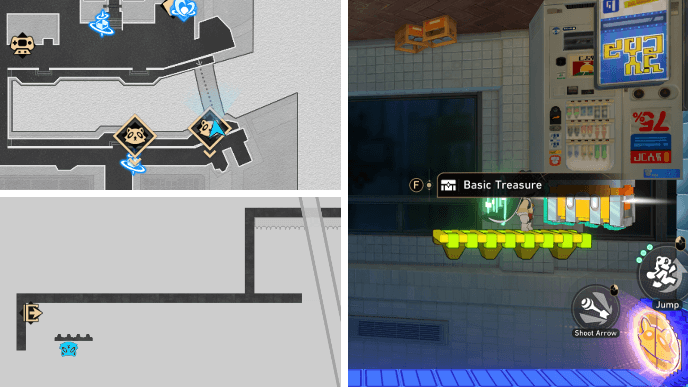
Dovebrook District Chest 36
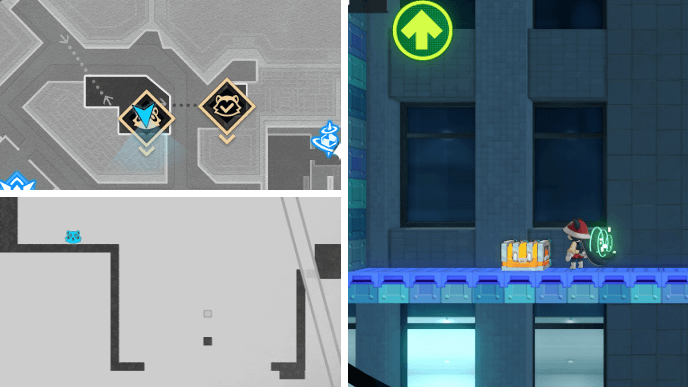
After getting Chest 35, continue heading left through the level while avoiding the cloudae in the air. Pick up the ability upgrade so your bows turn into plungers that can be used to scale up the wall. Chest 36 will be at the top.
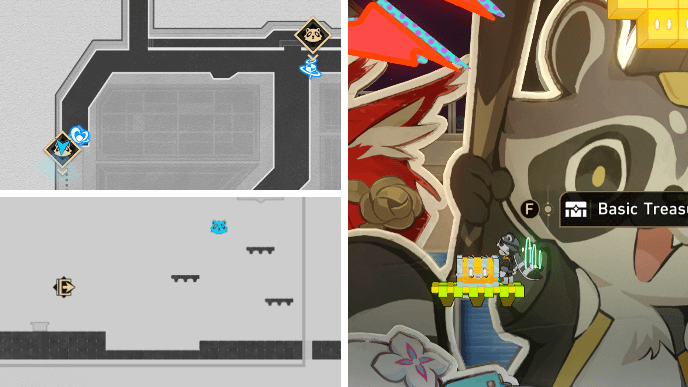
Dovebrook District Chest 37
Enter the Interplanar Jump Difficulty II stage in F2 North. You can just drop all the way down to reach Chest 37 in front of the exit pipe.
Dovebrook District Furbobo Treasure Locations
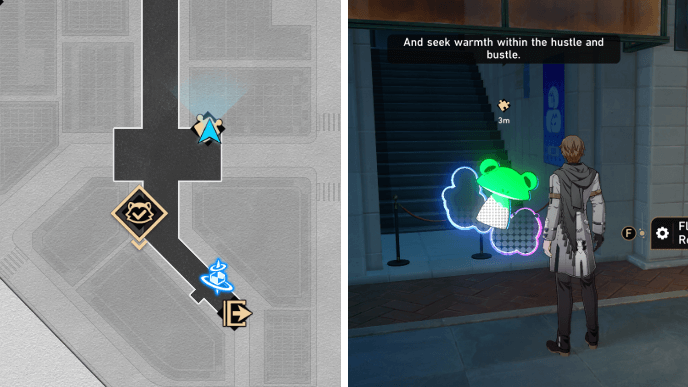
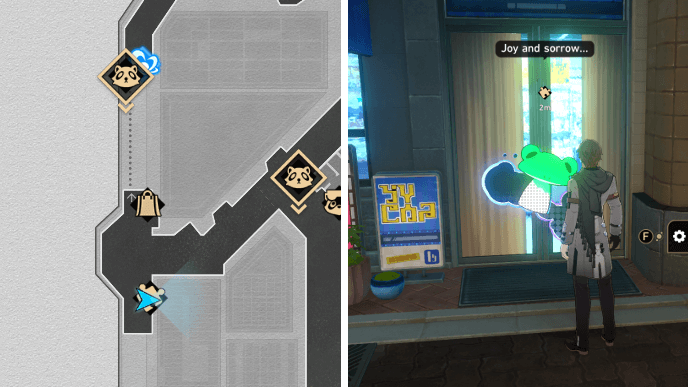
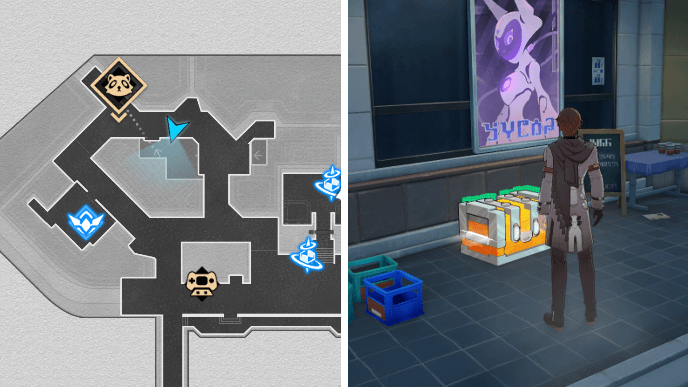
Dovebrook District Furbobo Treasure 1
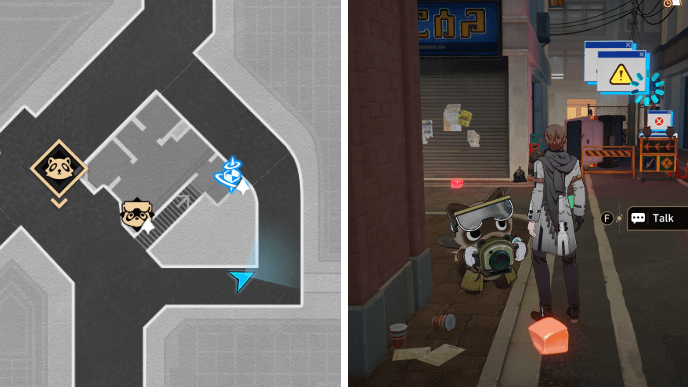
The first Dovebrook District Furbobo Treasure can be found at the alley behind the Furbobocom building. After talking to the Furbobo Journalist, head northwest and you should find a yellow barrier. Attack the barrier to get rid of its disguise and get your treasure!
Dovebrook District Furbobo Treasure 2
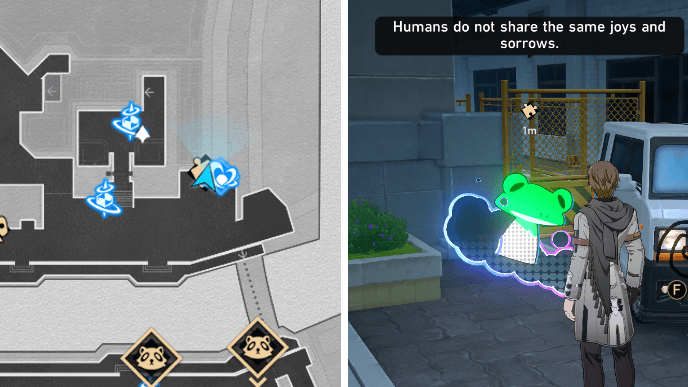
The next Dovebrook District Furbobo Treasure can be found in the Interplanar Jump Difficulty V stage near the Bud of Aether Calyx on F1. Once you reach the marked area, the Furbobo Journalist will transform and mimic your movement.
Use the blue platform to cross over to the other side. Once you're there, just keep jumping up until you touch the reflection. This will let you catch and claim rewards from the Furbo Journalist.
Dovebrook District Furbobo Treasure 3
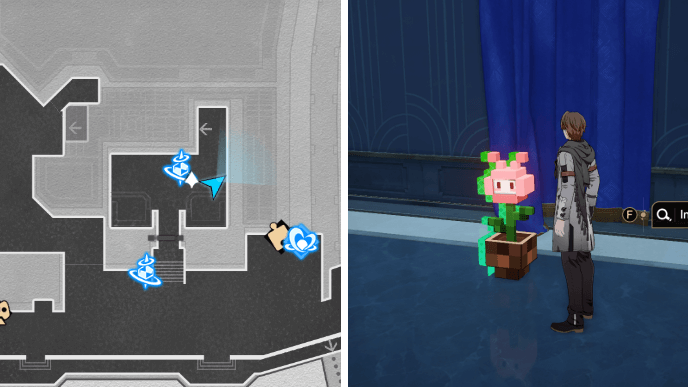
The last Dovebrook District Furbobo Treasure can be found by investigating the pixel plant in the lobby area of the Synwish Tower. You'll need to defeat it in battle to claim the Furbo Journalist's rewards.
How to Unlock Dovebrook District
Progress Through No Aha at Full Moon
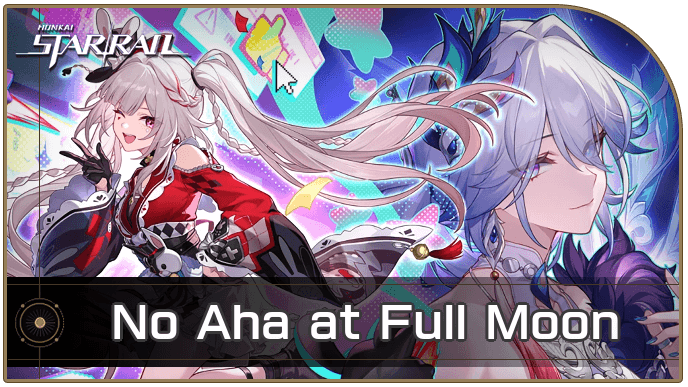
You can unlock Dovebrook District by progressing through the No Aha at Full Moon Trailblaze Mission!
No Aha at Full Moon Mission Guide
Honkai: Star Rail Related Guides
List of All Maps
| List of Maps | |
|---|---|
| Herta Space Station | Jarilo-VI |
| The Xianzhou Luofu | Penacony |
| Amphoreus | Planarcadia |
Treasure Chest Locations
Comment
Author

Dovebrook District Treasure Chest Locations
Premium Articles

Rankings
- We could not find the message board you were looking for.
Gaming News

![Star Savior Review [First Impressions] | Engaging, Entertaining, and Expensive](https://img.game8.co/4447603/8f500e9bf666bdb8adb1af478e9dfdbd.png/show)


Popular Games

Genshin Impact Walkthrough & Guides Wiki
Umamusume: Pretty Derby Walkthrough & Guides Wiki
Crimson Desert Walkthrough & Guides Wiki
Monster Hunter Stories 3: Twisted Reflection Walkthrough & Guides Wiki
Honkai: Star Rail Walkthrough & Guides Wiki
Pokemon Pokopia Walkthrough & Guides Wiki
The Seven Deadly Sins: Origin Walkthrough & Guides Wiki
Wuthering Waves Walkthrough & Guides Wiki
Zenless Zone Zero Walkthrough & Guides Wiki
Arknights: Endfield Walkthrough & Guides Wiki


Recommended Games
Fire Emblem Heroes (FEH) Walkthrough & Guides Wiki
Diablo 4: Vessel of Hatred Walkthrough & Guides Wiki
Cyberpunk 2077: Ultimate Edition Walkthrough & Guides Wiki
Yu-Gi-Oh! Master Duel Walkthrough & Guides Wiki
Super Smash Bros. Ultimate Walkthrough & Guides Wiki
Pokemon Brilliant Diamond and Shining Pearl (BDSP) Walkthrough & Guides Wiki
Elden Ring Shadow of the Erdtree Walkthrough & Guides Wiki
Monster Hunter World Walkthrough & Guides Wiki
The Legend of Zelda: Tears of the Kingdom Walkthrough & Guides Wiki
Persona 3 Reload Walkthrough & Guides Wiki


All rights reserved
Copyright © 2024 HoYoverse, COGNOSPHERE. All Rights Reserved.
The copyrights of videos of games used in our content and other intellectual property rights belong to the provider of the game.
The contents we provide on this site were created personally by members of the Game8 editorial department.
We refuse the right to reuse or repost content taken without our permission such as data or images to other sites.