All Puzzles in Strife Ruins Castrum Kremnos
★ Exclusive: Check out the State of Meta in 4.0!
♦ Latest: 4.1 Livestream Redeem Codes
♦ Phase 2: Sparkxie, Sparkle, Cerydra, Rappa
♦ Upcoming: Ashveil, Silver Wolf Lv.999, Evanescia
♦ Events: Cosmicon, Roll On!, Ding! Arcadia Fun-Time Clock-In Essentials
Here are all the Strife Ruins Castrum Kremnos puzzles in Honkai: Star Rail. Check out solutions for Strife Ruins Castrum Kremnos Prophecy Tablets, Golden Scapegoats, along with Golden Short Spear, Coins of Whimsy, and Creation Nymph locations!
| Amphoreus Map Guide | |
|---|---|
| Strife Ruins Castrum Kremnos Chests | Strife Ruins Castrum Kremnos Puzzles |
List of Contents
All Strife Ruins Castrum Kremnos Puzzles
Puzzles in Strife Ruins Castrum Kremnos
Shown above are the puzzle types found in Strife Ruins Castrum Kremnos! Click on the puzzles in the list to jump to a section and see guides on how to solve them!
Strife Ruins Castrum Kremnos Prophecy Tablets
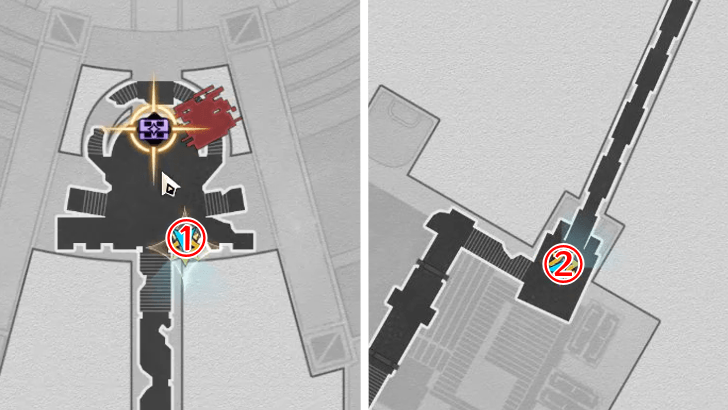
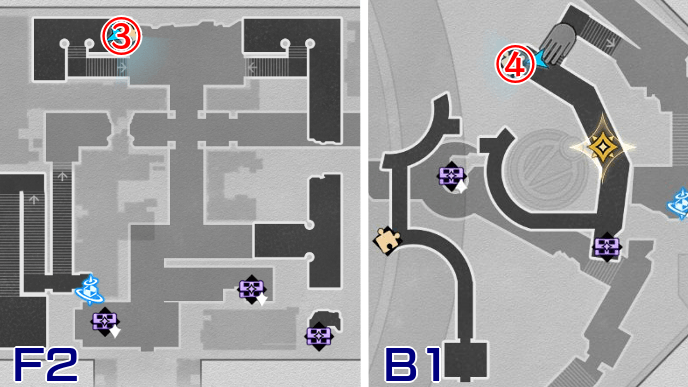
All Strife Ruins Castrum Kremnos Prophecy Tablets
| Strife Ruins Castrum Kremnos Prophecy Tablets | |
|---|---|
 |
 |
| Strife Ruins Castrum Kremnos Puzzle Solutions | |
| Prophecy Tablet 1 | Prophecy Tablet 2 |
| Prophecy Tablet 3 | Prophecy Tablet 4 |
There are 4 Prophecy Tablet puzzles found in Strife Ruins Castrum Kremnos. Click on the links in the table to jump to a puzzle solution!
Strife Ruins Castrum Kremnos Prophecy Tablet 1 Solution
| Strife Ruins Prophecy Tablet 1 Solution | |
|---|---|
| 1 |  Put the square in the center. |
| 2 | 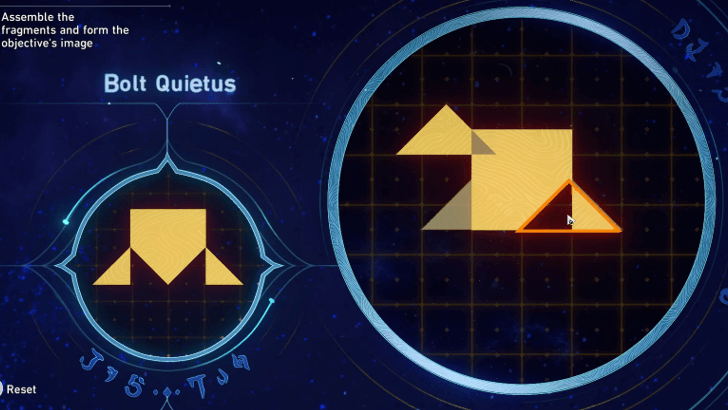 Place one of the small triangles at the right sharp corner of the projected image. |
| 3 | 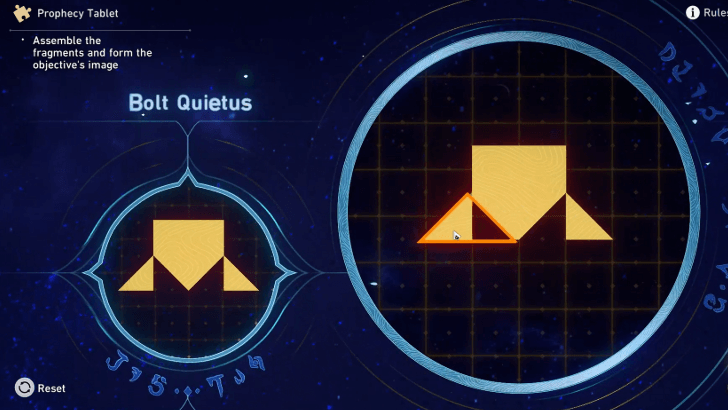 Place the last small triangle at the left sharp corner of the projected image. |
▲ Back to All Prophecy Tablets ▲
Strife Ruins Castrum Kremnos Prophecy Tablet 2 Solution
| Strife Ruins Prophecy Tablet 2 Solution | |
|---|---|
| 1 | 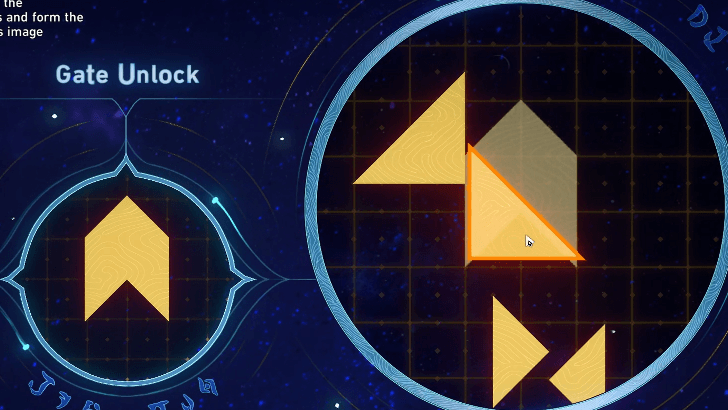 Put the right triangle at the bottom of the highlighted shape. |
| 2 | 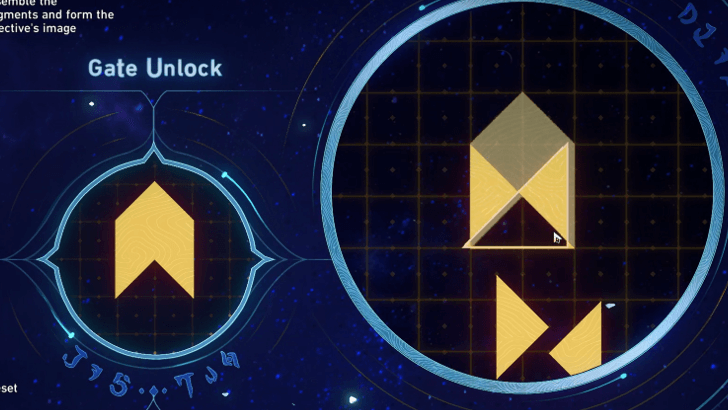 Put the other right triangle on the opposite side. |
| 3 | 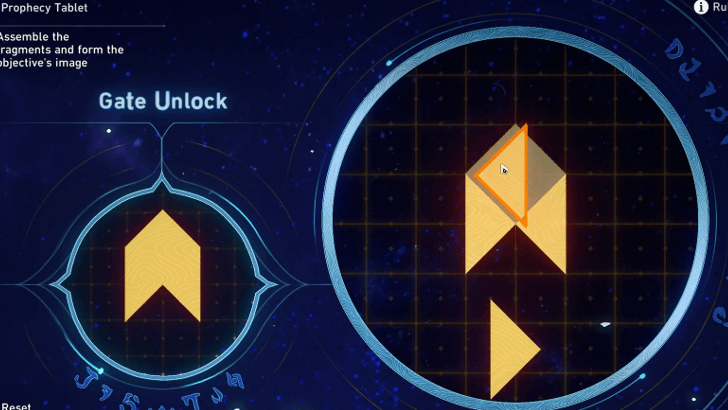 Place one of the small triangles on the top left. |
| 4 | 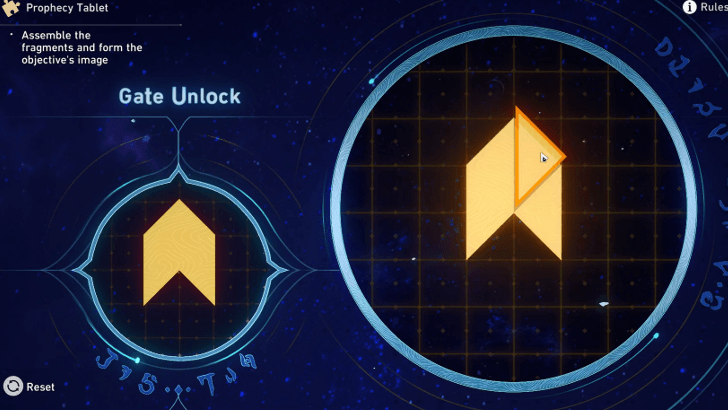 Place the last small triangle to the top right. |
▲ Back to All Prophecy Tablets ▲
Strife Ruins Castrum Kremnos Prophecy Tablet 3 Solution
| Strife Ruins Prophecy Tablet 3 Solution | |
|---|---|
| 1 | 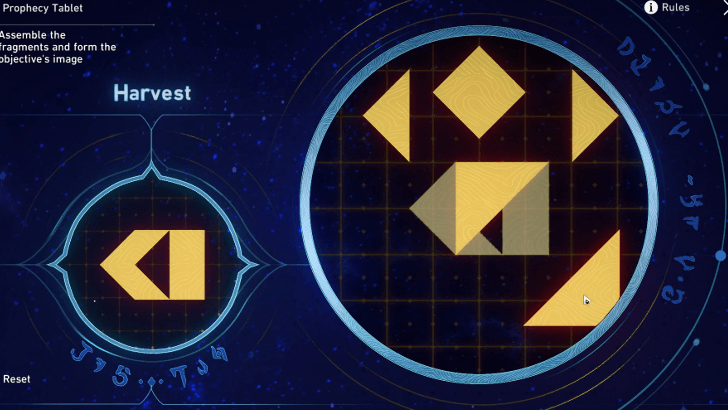 Use one of the right triangles to create half of a square in the far right side of the projected image. |
| 2 | 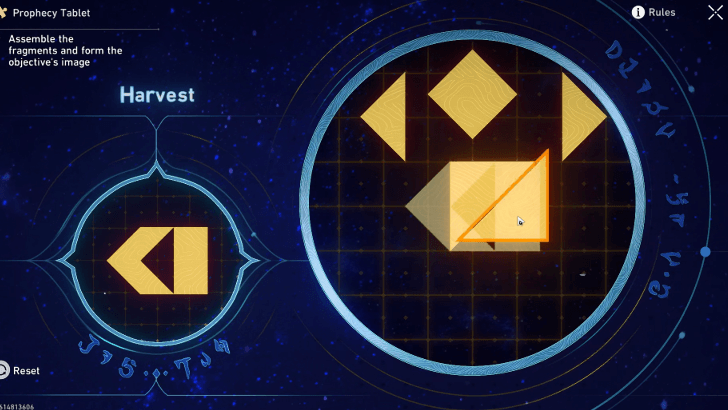 Use the second right triangle to create the other half of the sqaure. |
| 3 | 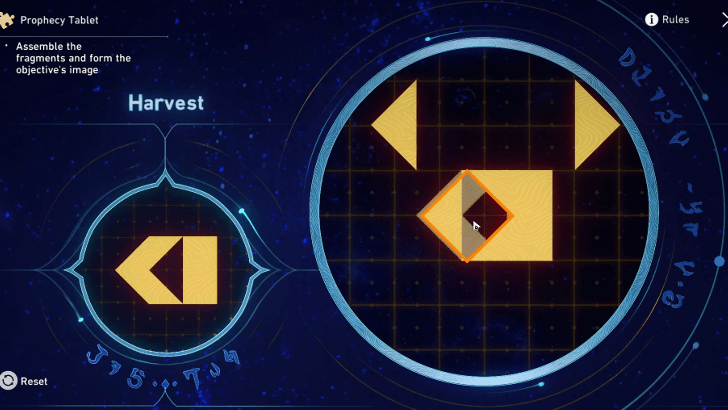 Place the diamond on the far left side of the projected image. |
| 4 | 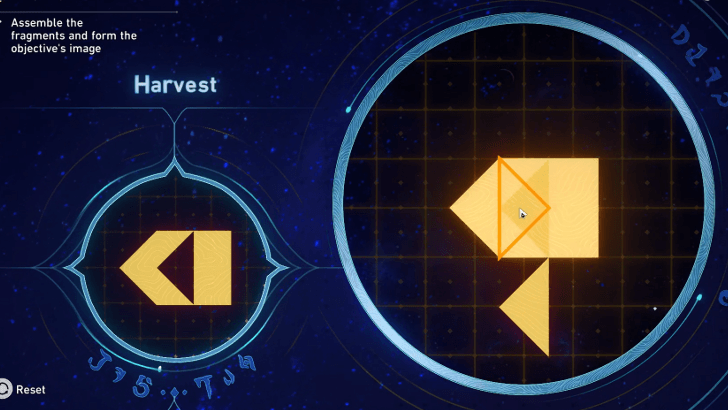 Put the small triangle on the right-half of the diamond. |
| 5 | 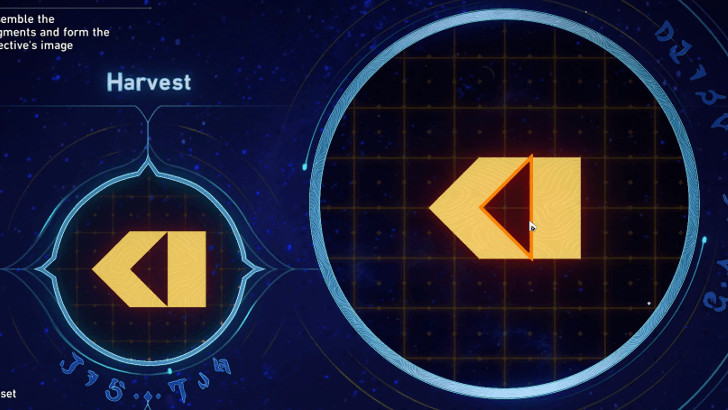 Use the last small triangle to create a triangle-shaped hole in the middle. |
▲ Back to All Prophecy Tablets ▲
Strife Ruins Castrum Kremnos Prophecy Tablet 4 Solution
| Strife Ruins Prophecy Tablet 4 Solution | |
|---|---|
| 1 | 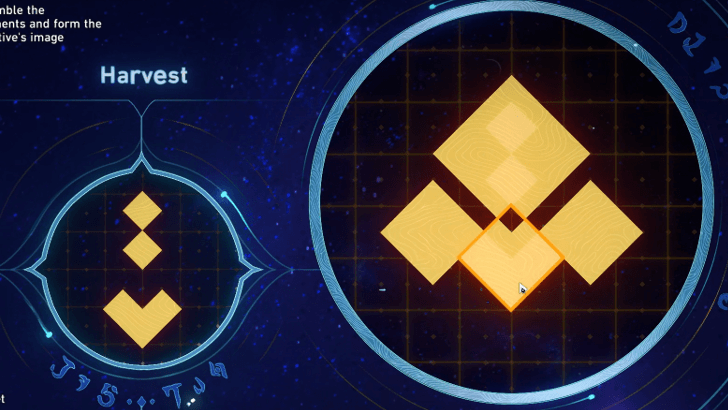 Place a diamond at the bottom, where there is an arrow-looking shape. |
| 2 | 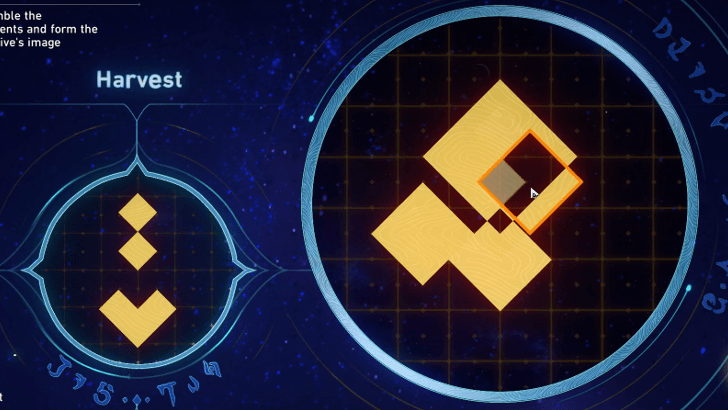 Place another diamond on top-right of the diamond you used in step 1. |
| 3 | 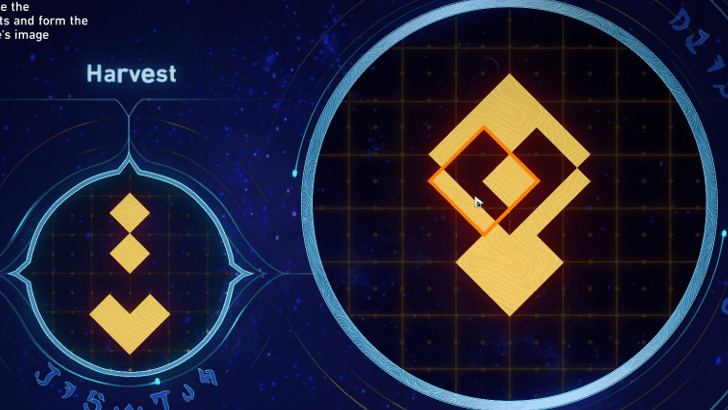 Use another diamond to overlap with the diamond you used in step 2. This should create a small diamond in the middle. |
| 4 | 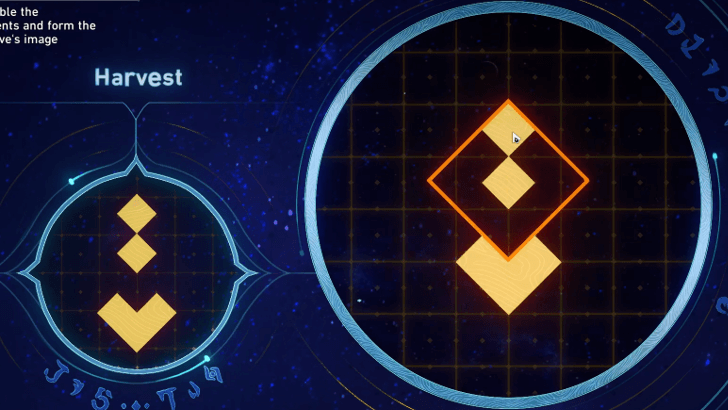 Use the big diamond to overlap with the three small diamonds you used in the previous steps. This should create the shape you need! |
▲ Back to All Prophecy Tablets ▲
Strife Ruins Castrum Kremnos Golden Scapegoat
All Strife Ruins Castrum Kremnos Golden Scapegoat Puzzles
| Strife Ruins Castrum Kremnos B1 | Strife Ruins Castrum Kremnos F2 |
|---|---|
 |
 |
| Strife Ruins Castrum Kremnos F3 | Strife Ruins Castrum Kremnos B1 Northeast |
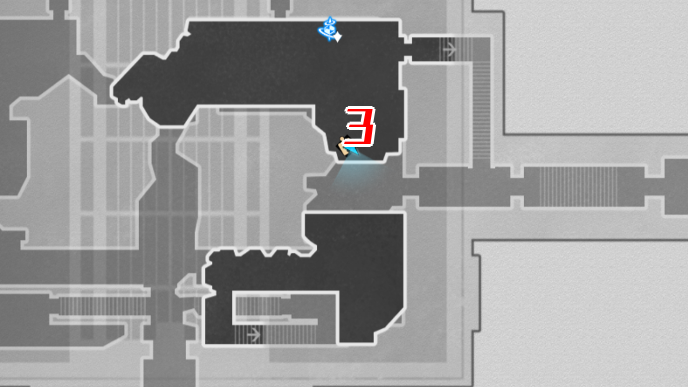 |
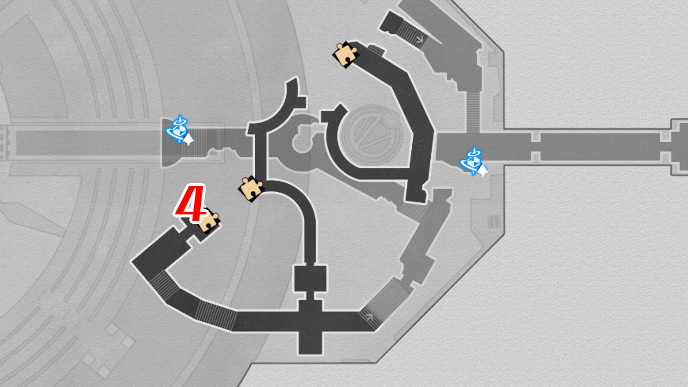 |
| Strife Ruins Castrum Kremnos Puzzle Solutions | |
| Golden Scapegoat 1 | Golden Scapegoat 2 |
| Golden Scapegoat 3 | Golden Scapegoat 4 |
There are 4 Golden Scapegoat puzzles found in Strife Ruins Castrum Kremnos. Click on the links in the table to jump to a puzzle solution!
Strife Ruins Castrum Kremnos Golden Scapegoat 1 Solution
| Strife Ruins Golden Scapegoat 1 |
|---|
Input the commands: Right, Right, Right, Right. Make your way to the ladder and climb up then cross the bridge to get to the altar. |
▲ Back to All Golden Scapegoats ▲
Strife Ruins Castrum Kremnos Golden Scapegoat 2 Solution
| Strife Ruins Golden Scapegoat 2 |
|---|
Input the commands: Right, Down, Right, Right, Right. Make your way to the nearest ladder to avoid your past self and then climb up then cross the bridge to get to the altar. |
▲ Back to All Golden Scapegoats ▲
Strife Ruins Castrum Kremnos Golden Scapegoat 3 Solution
| Strife Ruins Golden Scapegoat 3 |
|---|
Input the commands: Left, Right, Right, Right. Hop down on the left and move back and forth until your past self falls on the button then head to the altar. |
▲ Back to All Golden Scapegoats ▲
Strife Ruins Castrum Kremnos Golden Scapegoat 4 Solution
| Strife Ruins Golden Scapegoat 4 |
|---|
Input the commands: Right, Up, Right, Up, Right, Up, Right, Right, Right. Move back and forth until your past self drops down on the button. Cross the bridge to reach the altar. |
▲ Back to All Golden Scapegoats ▲
Strife Ruins Castrum Kremnos Golden Short Spear
All Strife Ruins Castrum Kremnos Golden Short Spears
There are 2 Golden Short Spears to collect in Strife Ruins Castrum Kremnos. Use the table below as a guide on where to find them!
| Location and Solution | |
|---|---|
| 1 | 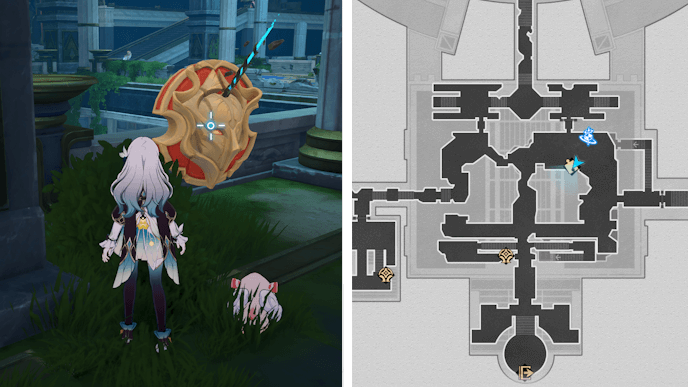 |
| 2 |  |
Strife Ruins Castrum Kremnos Coins of Whimsy
All Strife Ruins Castrum Kremnos Coins of Whimsy
There are 6 Coins of Whimsy to collect in Strife Ruins Castrum Kremnos. Use the table below as a guide on where to find them!
| No. | Image | How to Find |
|---|---|---|
| 1 | 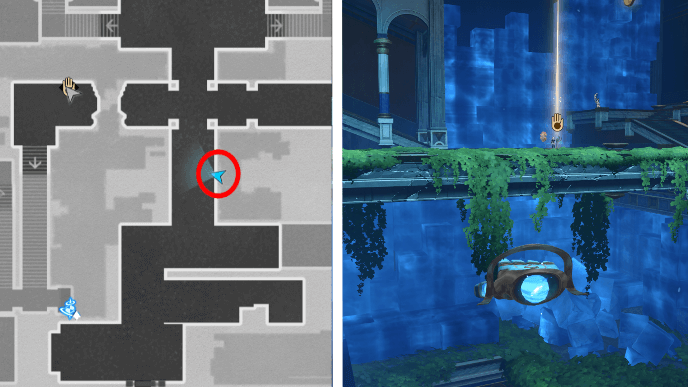 |
Use the Hand of Zagreus and fly underneath the bridge to find and grab the coin. |
| 2 | 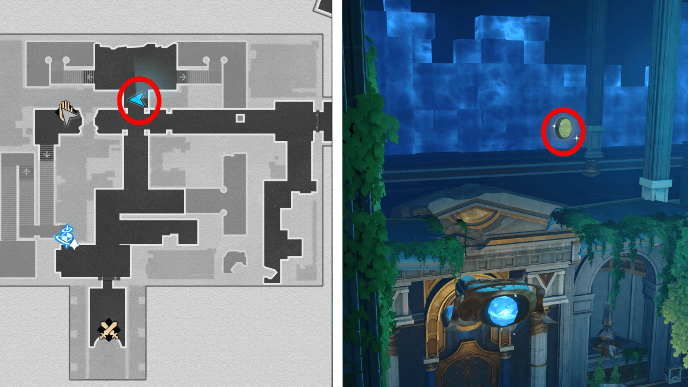 |
Use the Hand of Zagreus and fly towards the right side until you see some pillars. Go up and you'll find the coin in the air. |
| 3 | 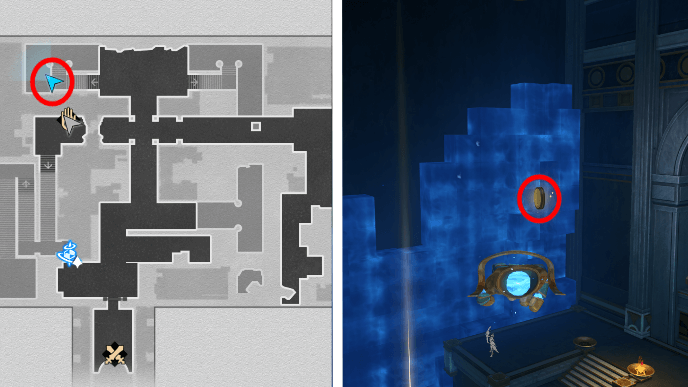 |
Use the Hand of Zagreus and fly to the right until you see some blue cubes. The coin will be up in the air just next to the cubes. |
| 4 | 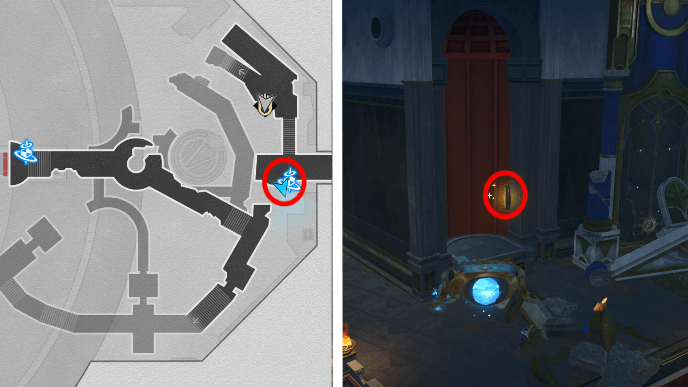 |
Use the Hand of Zagreus up the stairs and fly down to a stone arch near some ruins. The coin will be up between the stone arch and the rubble. |
| 5 | 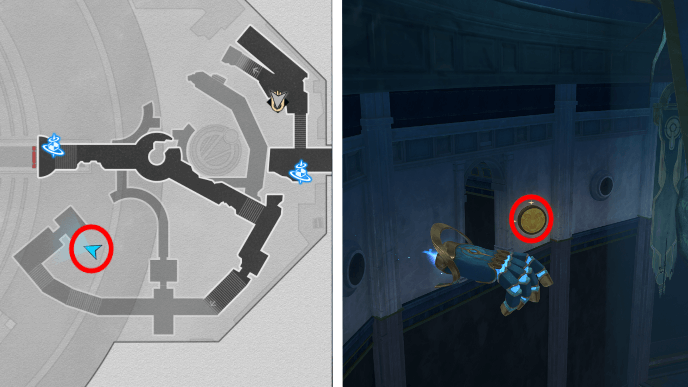 |
Use the Hand of Zagreus and fly southwest until you see flags and holes on the wall. The coin will be high up in the air for you to grab. |
| 6 | 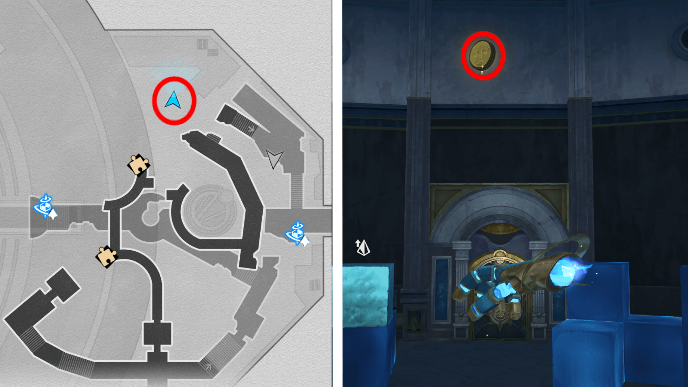 |
Use the Hand of Zagreus and fly northeast until you see a stack of blue cubes. Place the blue cube from the right to the left to make the coin appear up in the air. |
Strife Ruins Castrum Kremnos Creation Nymphs
All Strife Ruins Castrum Kremnos Creation Nymphs
| Strife Ruins Creation Nymphs Map | |||||||
|---|---|---|---|---|---|---|---|
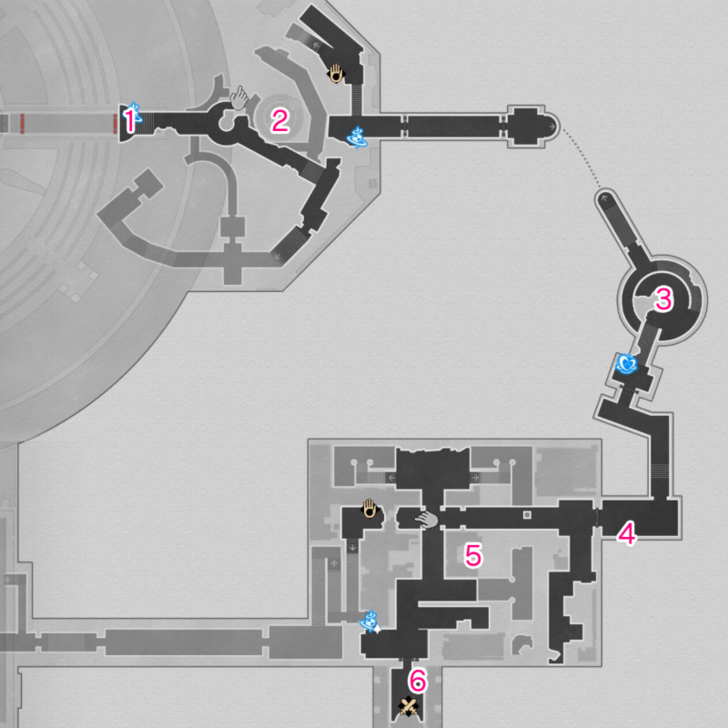 See Full Image |
 See Full Image |
||||||
 See Full Image |
 See Full Image |
||||||
 See Full Image |
|||||||
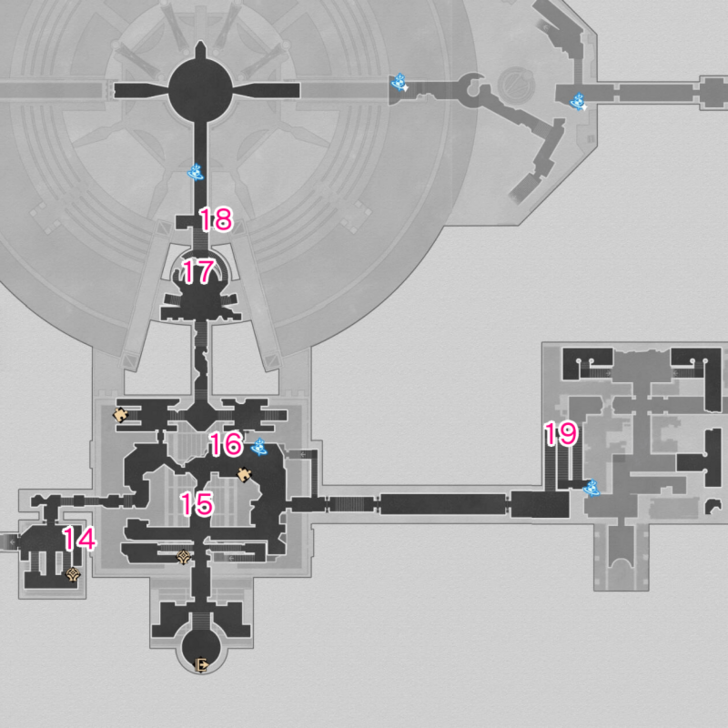
There are a total of 20 Creation Nymphs that can be found in Strife Ruins Castrum Kremnos.
| No. | Image | How to Find |
|---|---|---|
| 1 |  |
Found beside the Space Anchor. |
| 2 | 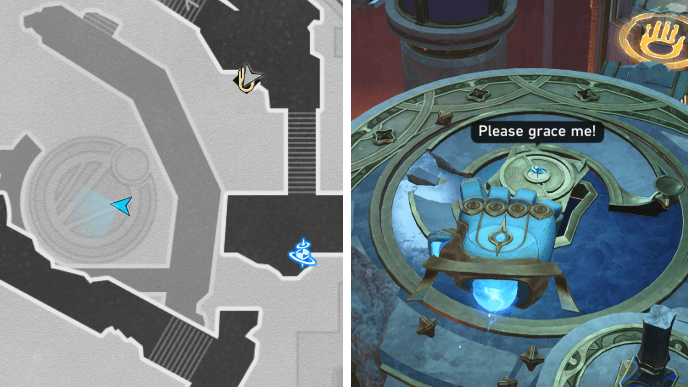 |
Found on the circular platform in the Silent Chisel Ground. Use the Hand of Zagreus in the area to get the Nymph. |
| 3 |  |
Found on top of the broken statue. |
| 4 | 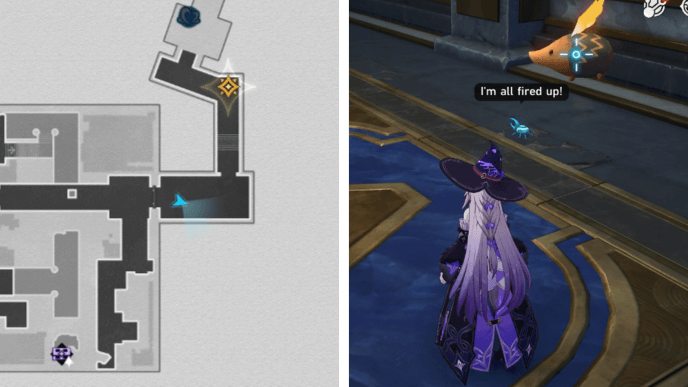 |
Found on the floor beside a Flying Amphora. |
| 5 |  |
Found on the air. To get this Creation Nymph, you have to use the Hand of Zagreus. |
| 6 | 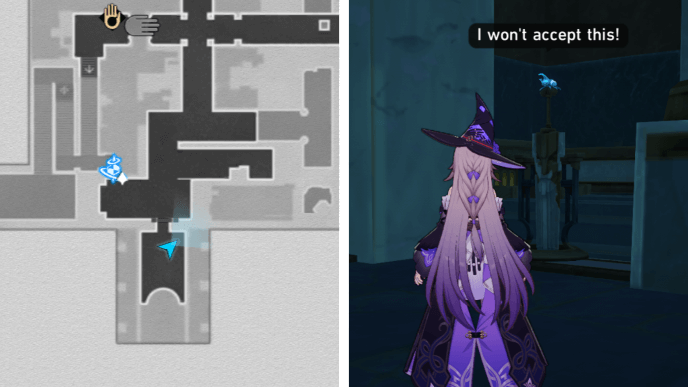 |
Found on top of the lone sword by the weapon rack. |
| 7 | 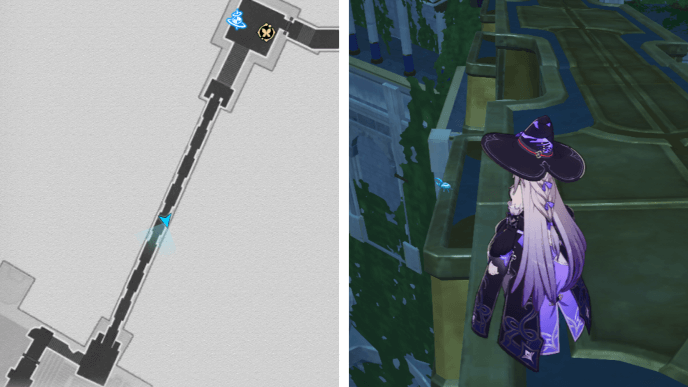 |
Found on the side of the golden chain path. |
| 8 | 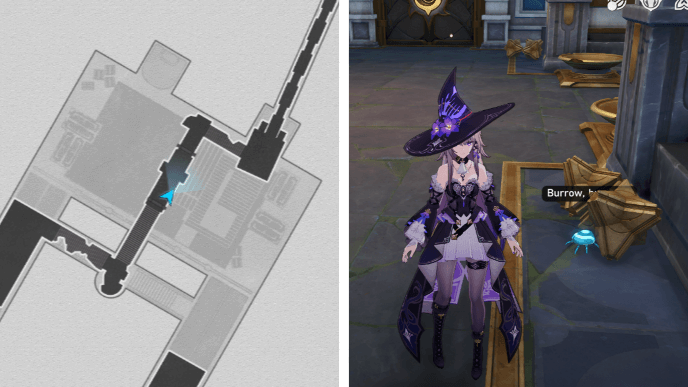 |
Found hiding in the rubble. |
| 9 |  |
Found on the wall with a dragon insignia. |
| 10 | 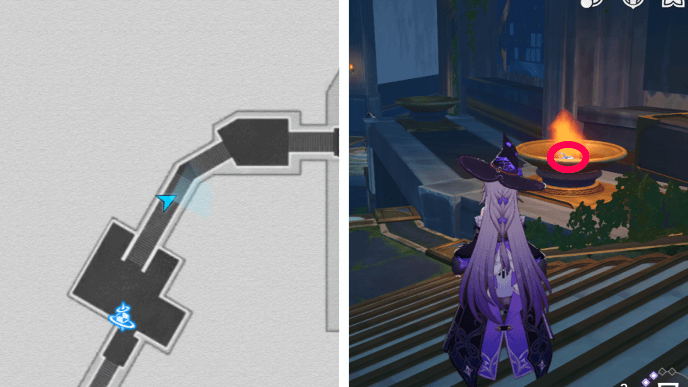 |
Found hanging by the burning brazier. |
| 11 | 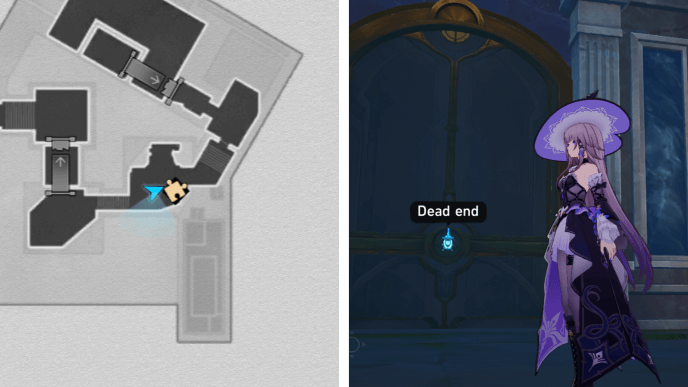 |
Found hanging on the middle of the door. |
| 12 | 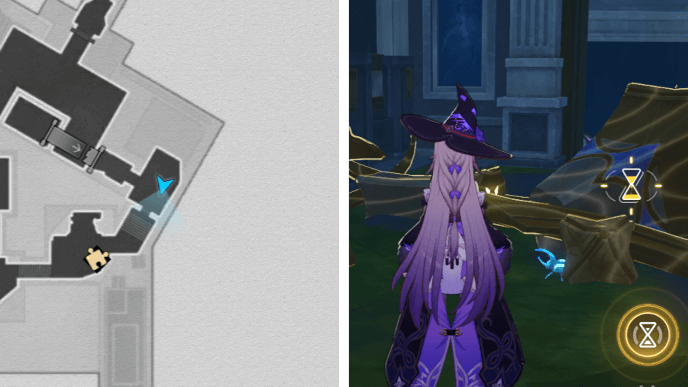 |
Trapped under the broken debris. Use Oronyx's Prayer to free it. |
| 13 | 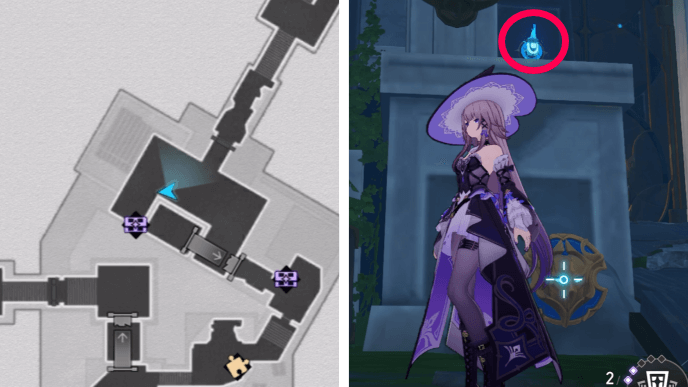 |
Found pretending to be a blue light. You have to break the destructible object to collect it. |
| 14 | 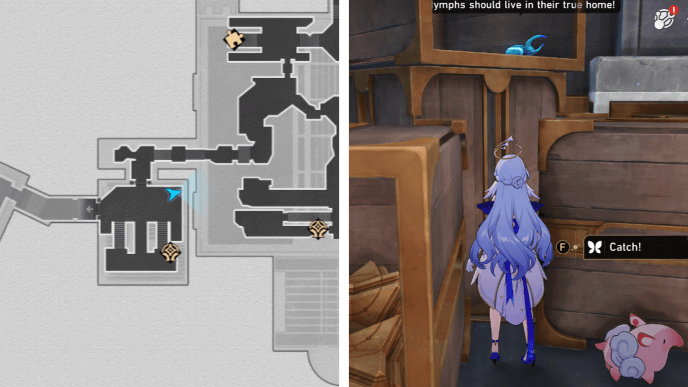 |
Found inside the upper boxes at the corner of the room. |
| 15 | 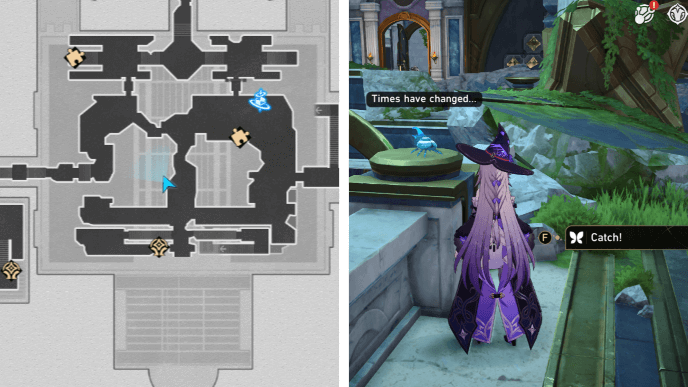 |
Found sitting on the edge of the handrail. |
| 16 | 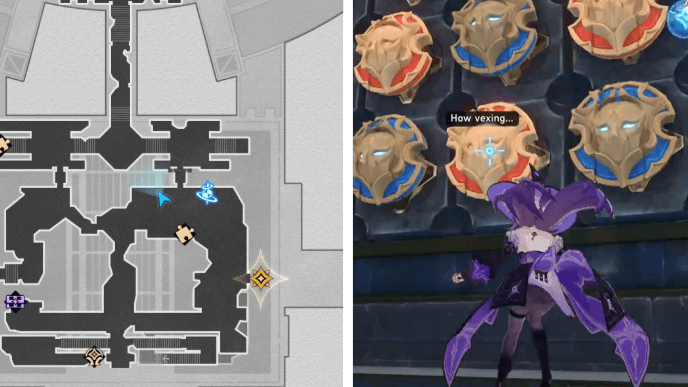 |
Hit the destructible object near the Space Anchor. |
| 17 | 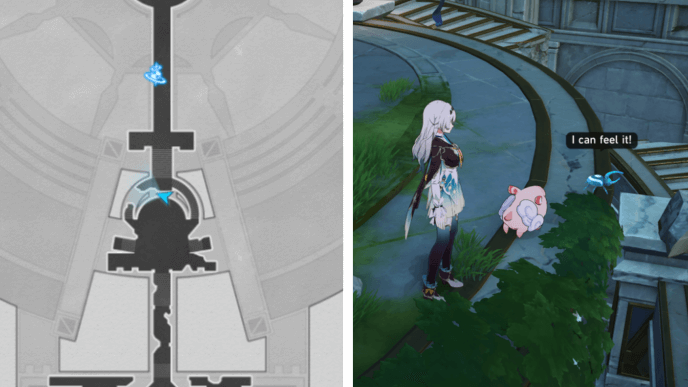 |
Found at the edge of the platform. |
| 18 | 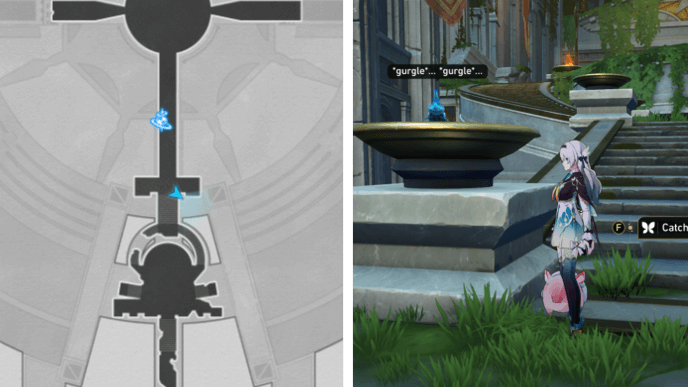 |
Found on top of the Brazier. |
| 19 | 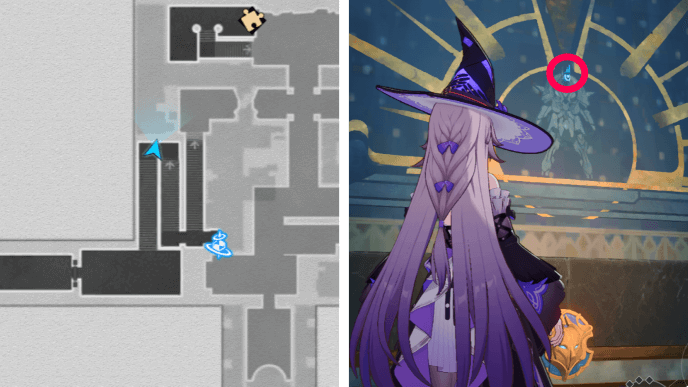 |
Found disguised as a guard's head on the mural in the middle of the stairs. |
| 20 |  |
Found on the mural and sticking the light blue squares. |
▲ Back to All Creation Nymphs ▲
Honkai: Star Rail Related Guides
List of All Maps
| List of Maps | |
|---|---|
| Herta Space Station | Jarilo-VI |
| The Xianzhou Luofu | Penacony |
| Amphoreus | Planarcadia |
Treasure Chest Locations
Comment
Author
All Puzzles in Strife Ruins Castrum Kremnos
improvement survey
03/2026
improving Game8's site?

Your answers will help us to improve our website.
Note: Please be sure not to enter any kind of personal information into your response.

We hope you continue to make use of Game8.
Premium Articles
Rankings
Gaming News
Popular Games

Genshin Impact Walkthrough & Guides Wiki

Honkai: Star Rail Walkthrough & Guides Wiki

Umamusume: Pretty Derby Walkthrough & Guides Wiki

Pokemon Pokopia Walkthrough & Guides Wiki

Resident Evil Requiem (RE9) Walkthrough & Guides Wiki

Monster Hunter Wilds Walkthrough & Guides Wiki

Wuthering Waves Walkthrough & Guides Wiki

Arknights: Endfield Walkthrough & Guides Wiki

Pokemon FireRed and LeafGreen (FRLG) Walkthrough & Guides Wiki

Pokemon TCG Pocket (PTCGP) Strategies & Guides Wiki
Recommended Games

Diablo 4: Vessel of Hatred Walkthrough & Guides Wiki

Fire Emblem Heroes (FEH) Walkthrough & Guides Wiki

Yu-Gi-Oh! Master Duel Walkthrough & Guides Wiki

Super Smash Bros. Ultimate Walkthrough & Guides Wiki

Pokemon Brilliant Diamond and Shining Pearl (BDSP) Walkthrough & Guides Wiki

Elden Ring Shadow of the Erdtree Walkthrough & Guides Wiki

Monster Hunter World Walkthrough & Guides Wiki

The Legend of Zelda: Tears of the Kingdom Walkthrough & Guides Wiki

Persona 3 Reload Walkthrough & Guides Wiki

Cyberpunk 2077: Ultimate Edition Walkthrough & Guides Wiki
All rights reserved
Copyright © 2024 HoYoverse, COGNOSPHERE. All Rights Reserved.
The copyrights of videos of games used in our content and other intellectual property rights belong to the provider of the game.
The contents we provide on this site were created personally by members of the Game8 editorial department.
We refuse the right to reuse or repost content taken without our permission such as data or images to other sites.


![Everwind Review [Early Access] | The Shaky First Step to A Very Long Journey](https://img.game8.co/4440226/ab079b1153298a042633dd1ef51e878e.png/thumb)

![Monster Hunter Stories 3 Review [First Impressions] | Simply Rejuvenating](https://img.game8.co/4438641/2a31b7702bd70e78ec8efd24661dacda.jpeg/thumb)


