All Dream Jigsaw Puzzle Solutions and Locations
★ Exclusive: Check out the State of Meta in 4.0!
♦ Latest: 4.0 Redeem Codes
♦ Phase 2: Sparkxie, Sparkle, Cerydra, Rappa
♦ Upcoming: Ashveil, Silver Wolf Lv.999, Evanescia
♦ Events: Cosmicon, Roll On!, Ding! Arcadia Fun-Time Clock-In Essentials
Honkai: Star Rail's Dream Jigsaw is a puzzle in the Penacony Map. See all dream jigsaw puzzle solutions, puzzle locations, and how to play it here!
List of Contents
All Dream Jigsaw Puzzle Locations
Star Rail Dream Jigsaw Locations
Click on the links to jump to a detailed guide!
Dream's Edge Dream Jigsaw Solutions
Dream's Edge Jigsaw Puzzle Solutions
| Dream's Edge Jigsaw Puzzles | ||
|---|---|---|
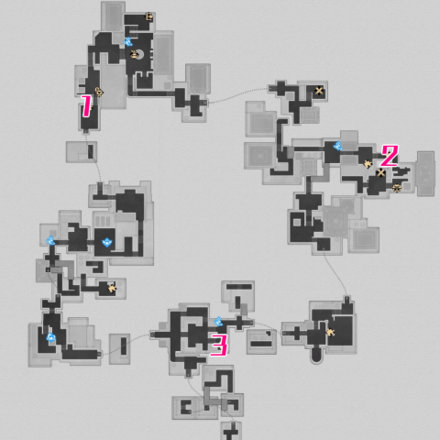 Click to see the full map image! |
||
| Jigsaw 1 | Jigsaw 2 | Jigsaw 3 |
Dream's Edge Jigsaw Puzzle 1
| 1 | 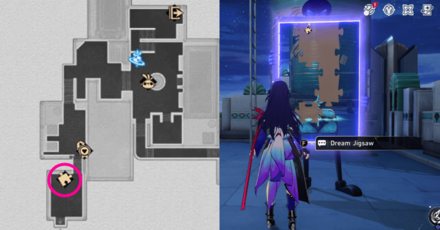 Use The Family's Construction Authority Space Anchor and head to the area. |
|---|---|
| 2 | 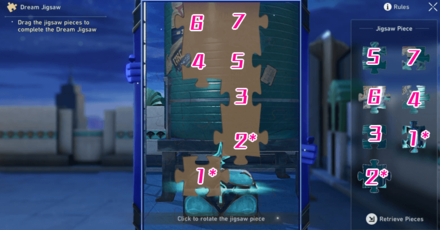 Put the jigsaw pieces that match the number within the frame as shown in the image. The asterisk (*) are pieces that need to be rotated a few times. Click to see the full image! |
| 3 | 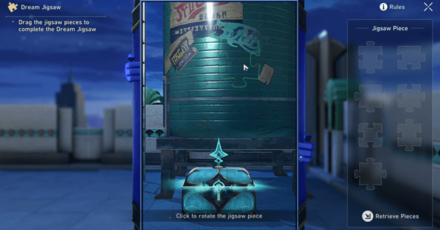 The puzzle is supposed to look like this image. Once you're done solving the chest will be accessible! |
Return to All Dream's Edge Puzzles ▲
Dream's Edge Jigsaw Puzzle 2
| 1 | 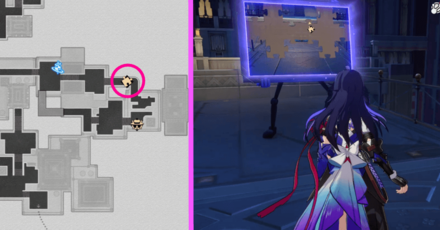 Use the Dreamweaver Plaza Space Anchor to teleport near the jigsaw puzzle. You need to use the Hanu's Adventure feature. |
|---|---|
| 2 | 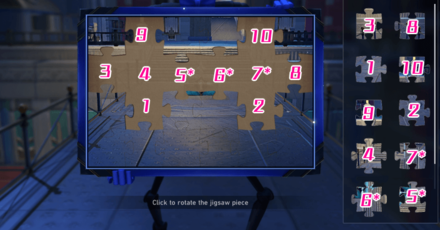 Match the number to the numbers on the pieces as indicated in the image above. The asterisk (*) are pieces that need to be rotated until it matches the image. Click on to see the full image! |
| 3 | 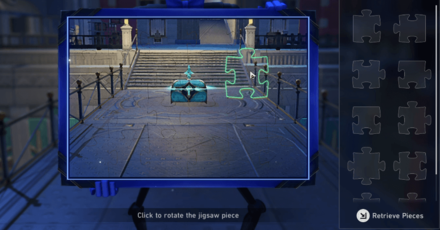 Solving the puzzle will open up a path and a treasure chest! |
How to Get to Puzzle 2 with Hanu's Adventure
| How to Get to Hanu's Adventure for Puzzle 2 | |
|---|---|
| 1 | 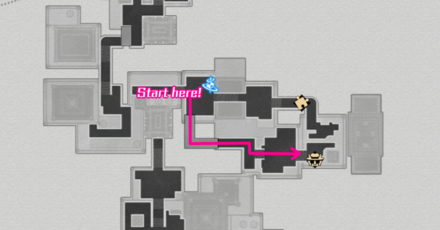 The puzzle cannot be reached by normal means as the puzzle is the way to open up a path to the other side. To get there, you need to take an alternate route shown on the map leading to the Hanu's Adventure. |
| 2 |
• As Hanu, first activates his skill to see the beam of the Mr Domescreen. • Then, while it's not looking, run towards the rocket and use it. • After that, just continue walking following the square pipe path until you encounter another rocket which will take you to another TV to return to normal. |
Return to All Dream's Edge Puzzles ▲
Dream's Edge Jigsaw Puzzle 3
| 1 | 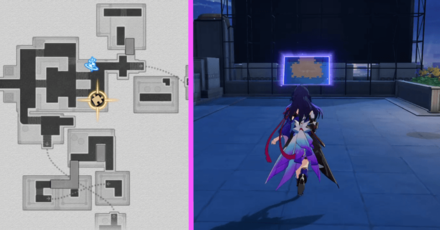 The Dream Jigsaw will be right in front of the Rooftop Garden Space Anchor. |
|---|---|
| 2 | 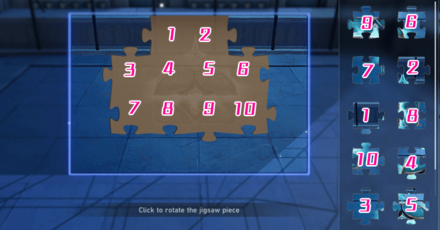 Match the numbers on the jigsaw piece to the ones in the frame. Click to see the full image here! |
| 3 | 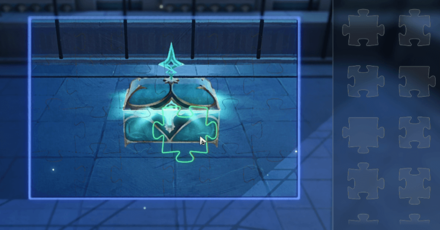 You'll get a treasure chest after solving the puzzle. |
Return to All Dream's Edge Puzzles ▲
A Child's Dream Jigsaw Solutions
A Child's Dream Jigsaw Puzzle Solutions
| A Child's Dream Jigsaw Puzzles | |
|---|---|
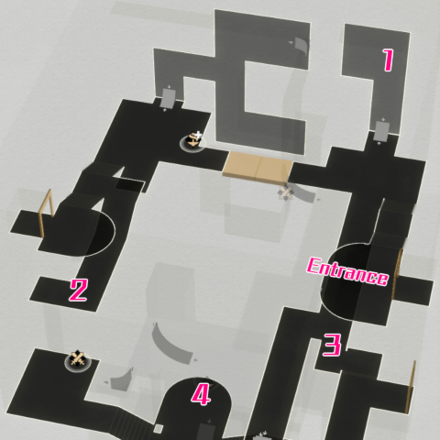 Click to see the full map image! |
|
| Jigsaw 1 | Jigsaw 2 |
| Jigsaw 3 | Jigsaw 4 |
A Child's Dream Jigsaw Puzzle 1
| 1.1 |  The third dream jigsaw puzzle is on the wall near the entrance of the layered room. |
|---|---|
| 1.2 | From puzzle 2, just run straight towards it after getting a bubble charge then use it to create a bubble bridge towards it. If you're starting from the entrance, head down to defeat enemies near the bubble tower then head for that wall after charging up. |
| 2 | 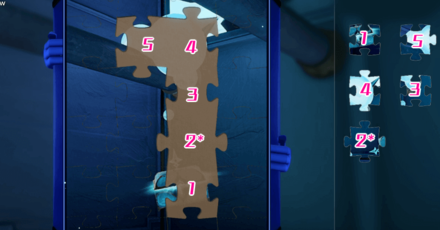 Match the numbers on the jigsaw puzzle to the ones in the frame. Take note that the ones with the asterisks (*) are the pieces that need to be rotated. Click here to see the full image! |
| 3 | 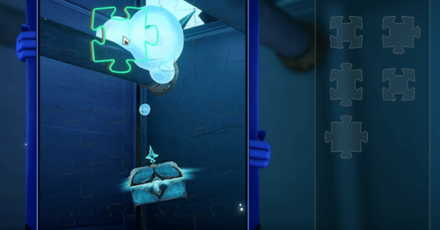 After solving the puzzle, the treasure chest in the image will appear and you can claim it! |
Return to A Child's Dream Puzzles ▲
A Child's Dream Jigsaw Puzzle 2
| 1.1 | 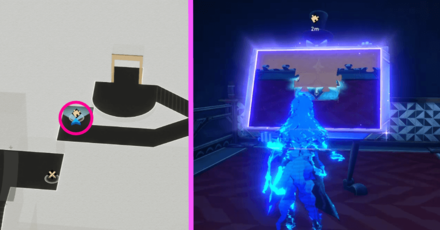 Use the Corridor of Memories Space Anchor and head to the three dimensional layered map below it. |
|---|---|
| 1.2 | 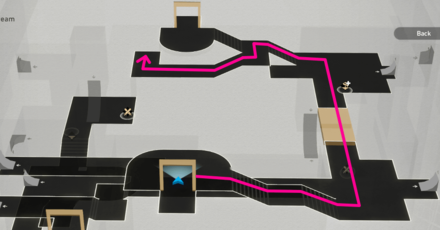 Once you enter the 3D room, you will be on the opposite side of the map. You must simply run towards the other entrance. Below it where the puzzle is located! |
| 2 | 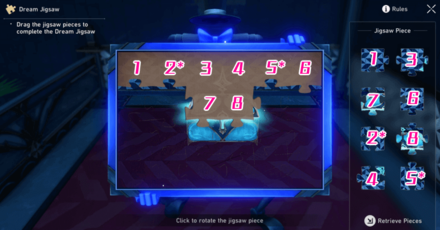 Match the numbers on the jigsaw pieces and ones within the frame. The ones marked with an asterisk (*) are the ones that needs to be rotated. Click to see the full image here! |
| 3 | 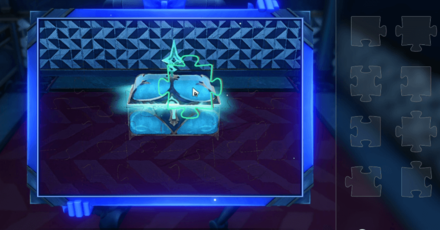 After you complete the jigsaw puzzle the chest in the frame will appear and you can get the reward. |
Return to A Child's Dream Puzzles ▲
A Child's Dream Jigsaw Puzzle 3
| 1 | 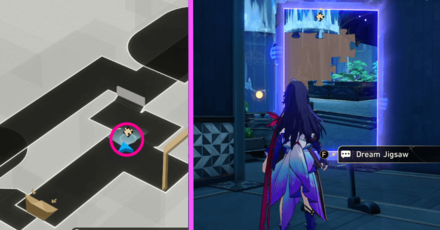 The second puzzle in A Child's Dream will open up a path. As such, you must use the dream bubble tower to get bubble charges beforehand. There are two ways to get there as indicated in route guides below. |
|---|---|
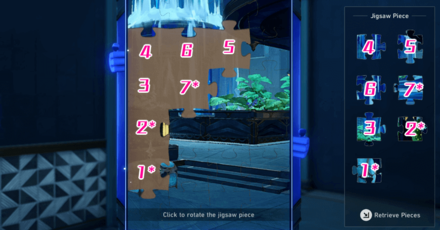 Match the numbers on the jigsaw piece panel to the ones on the frame. Take note that the ones that have asterisks (*) on them need to be rotated. Click here to see the full image! |
|
| 3 | 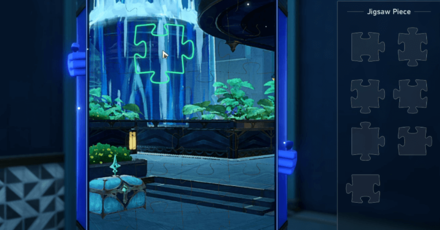 After you solve the puzzle, a path will open up and a treasure chest will also be available for the taking! |
How to Get Child's Dream Puzzle 3 Route 1
| 1 | 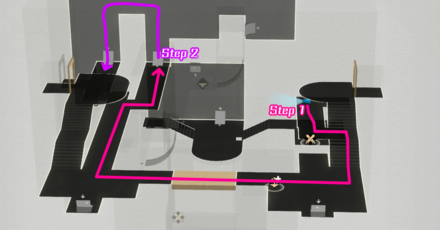 The first route is for those who are coming from puzzle 1. Simply follow the route indicated on the map and get the a bubble change from the bubble tower. Take note that there are enemies near it and you may need to defeat them first before getting to the tower. |
|---|---|
| 2 | Once you reach the end of the corridor on the other side, use a bubble charge to create a bubble bridge. Run around the column to the other side then use another bubble charge to create a bridge. The jigsaw puzzle should be there after you the floor has righted. |
How to Get Child's Dream Puzzle 3 Route 2
| 1 | 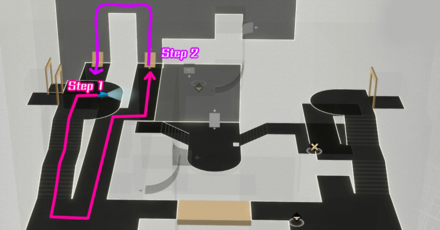 The second route is for those who just entered the room. From the balcony you're standing on, head down to get a bubble charge. Then go back and run towards the end of the corridor as indicated on the route map above. |
|---|---|
| 3 | Like the first route, use the bubble charges to create a bubble bridge twice. Once you're down the second bridge, the puzzle should be right in front of you. |
Return to A Child's Dream Puzzles ▲
A Child's Dream Jigsaw Puzzle 4
| 1 |  The puzzle is also within the three-dimensional layered map as the others! |
|---|---|
| 2 | 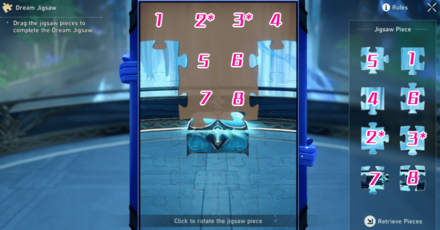 Match the jigsaw pieces to the ones within the frame. Note that the ones marked with an asterisks (*) need to be rotated to match the picture. Click here to see the full image! |
| 3 | 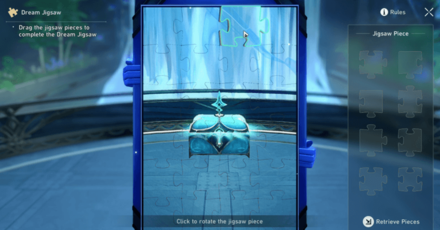 After solving the puzzle, a treasure chest will appear! |
How to Get to Dream Puzzle 4
| 1 | 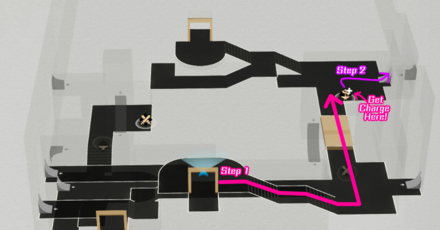 From the entrance, head towards the right and then forward until you reach the bubble tower. From the bubble tower, head up to the bubble bridge behind it! |
|---|---|
| 2 | 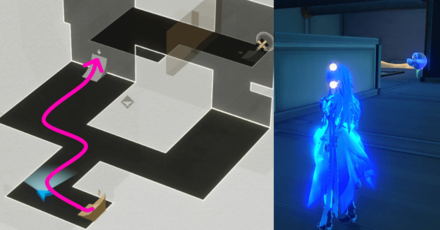 In the next part, go towards the nearest bubble bridge! |
| 3 | 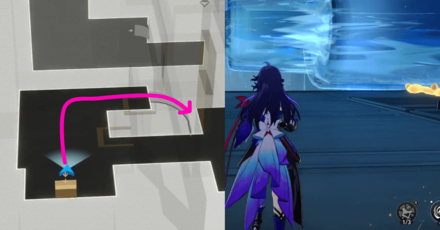 After that, head to the long bubble bridge heading down. |
| 4 |  Once in the next level, head straight towards the bubble tower to recharge. After that, just continue heading up using the two bubble bridges above. |
| 5 | After going through two bubble bridges, you'll reach the puzzle! |
Return to A Child's Dream Puzzles ▲
The Reverie (Dreamscape) Jigsaw Solutions
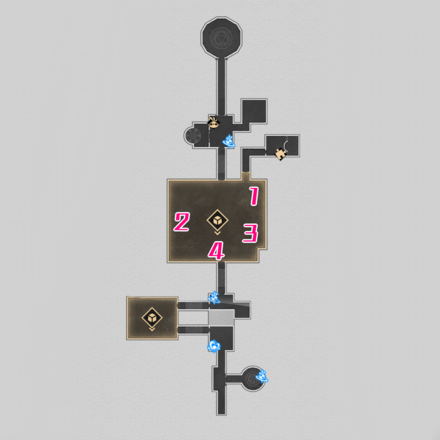
The Reverie (Dreamscape) Jigsaw Puzzle Solutions
| The Reverie (Dreamscape) Jigsaw Puzzles | |
|---|---|
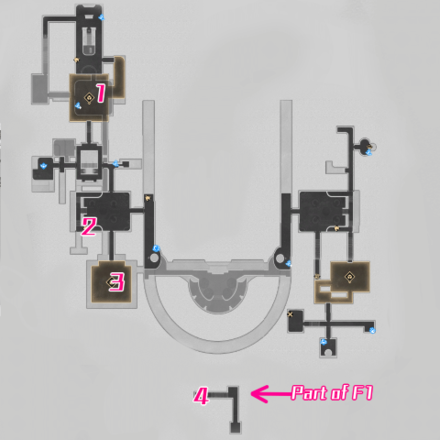 Click to see the full map image! |
|
| Jigsaw 1 | Jigsaw 2 |
| Jigsaw 3 | Jigsaw 4 |
The Reverie (Dreamscape) Jigsaw Puzzle 1
| 1 | 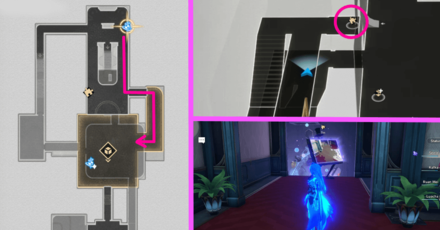 Use the Dramjolt Hostelry Space Anchor and head straight for the second entrance in the layered map as shown in the image above. |
|---|---|
| 2 | 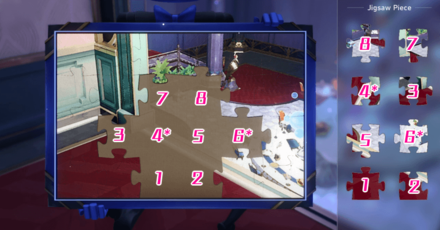 Match the numbers on the jigsaw pieces to the ones on the frame to solve the puzzle! Note that the ones marked with asterisks (*) are the ones you must rotate to match the image. Click here to see the full image! |
| 3 |  Once you complete the puzzle a chest on the lower floor of the layered map will appear! Simply head down and take the chest! |
Return to Reverie (Dreamscape) Puzzles ▲
The Reverie (Dreamscape) Jigsaw Puzzle 2
| 1 | 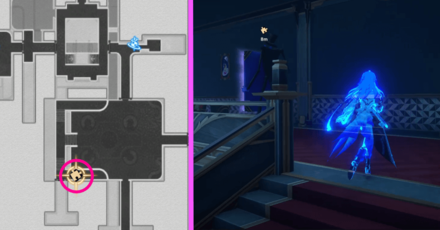 Use the VIP Lounge Corridor Space Anchor to teleport near the puzzle and head towards it! |
|---|---|
| 2 | 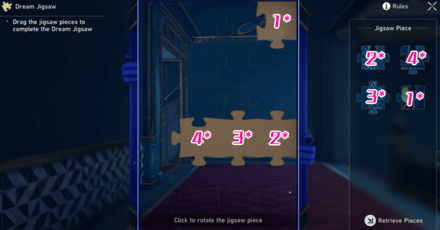 Match the numbers on the jigsaw pictures to the ones within the frame. All of the pieces in this puzzle need to be rotated to match the picture. Click here to see the full image! |
| 3 | 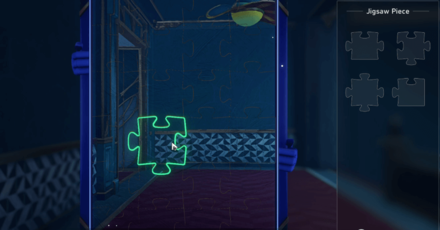 After completing the puzzle, the path will open. Once you head inside, you'll see a chest you can claim! |
Return to Reverie (Dreamscape) Puzzles ▲
The Reverie (Dreamscape) Jigsaw Puzzle 3
| 1 | 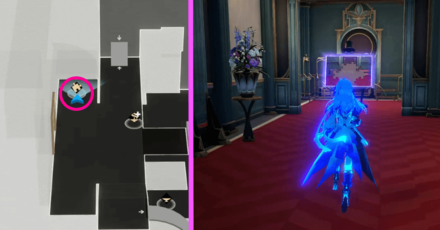 From the area near puzzle 2, head inside the 3D layered map. The dream jigsaw will be on the left side of the entrance. |
|---|---|
| 2 | 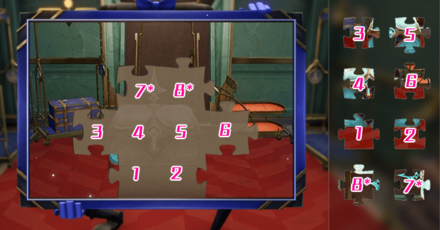 Match the numbers on the jigsaw pieces to the ones on the frame. The numbers marked with asterisks (*) are the ones that must rotated. Click here to see the full image |
| 3 | 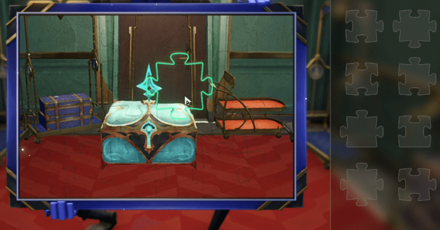 After solving the dream puzzle, a treasure chest will appear! |
Return to Reverie (Dreamscape) Puzzles ▲
The Reverie (Dreamscape) Jigsaw Puzzle 4
| 1 | 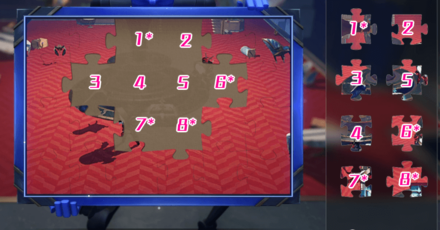 Match the numbers on the jigsaw pieces to the ones within the frame. The ones marked with an asterisk (*) must the rotated to match the picture of the puzzle. Click to see the full image here! |
|---|---|
| 2 | 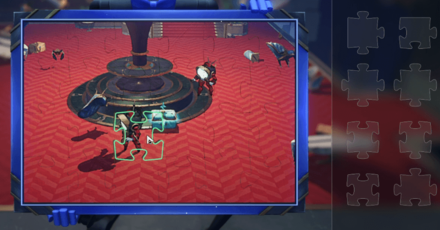 After completing the puzzle a treasure chest will appear at the bottom of the platform where you're in! You can only claim this by sneaking back towards Hanu's TV to return to normal. |
How to Get to Dream Jigsaw Puzzle 4
| 1 | 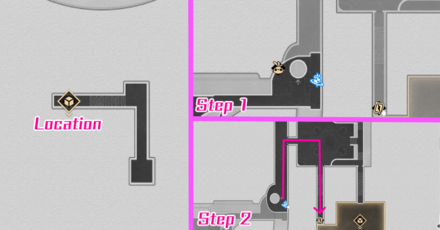 The location for puzzle 4 is in the detached area that can only be accessed by interacting with the Arcane Artwork teleporter. The first step you must do is to teleport to the Dreamscape Lobby Space Anchor and then use the elevator to head to F3. In step 2, run towards the arcane artwork as shown above. Beware of enemies on the way through! |
|---|---|
| 2 | 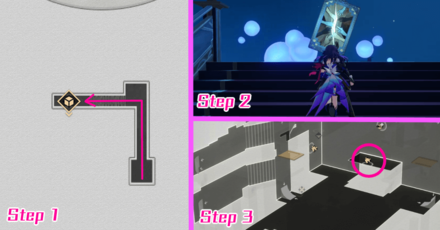 After interacting with the Arcane Artwork in F1, you'll get teleported to the detached map. Head inside and you'll be transported to a 3D layered map. The puzzle sits on a raised platform. |
| 3 | 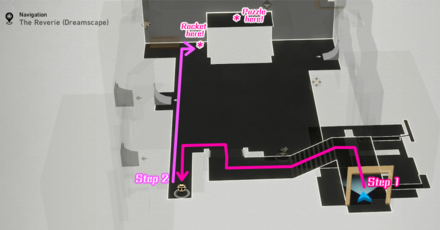 The only way to get to the puzzle is to transform into Hanu using the Hanu's Adventure feature. After that, while avoiding the notice of enemies, head to the blue rocket at the end of the corridor near the raised platform. Use the rocket and climb up to the stack of books to the puzzle! |
Return to Reverie (Dreamscape) Puzzles ▲
Dewlight Pavilion Dream Jigsaw Solutions
Dewlight Pavilion Jigsaw Puzzle Solutions
| Dewlight Pavilion Jigsaw Puzzles | |
|---|---|
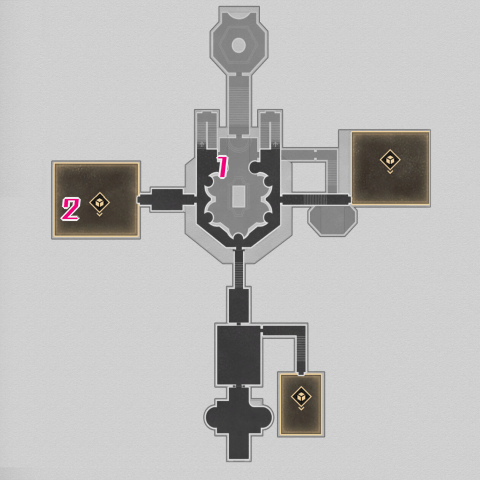 See the full map image! |
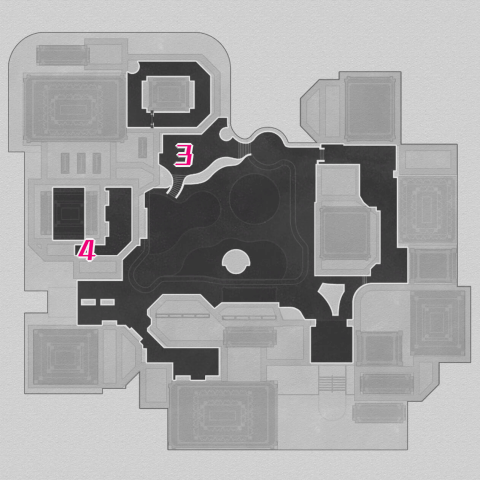 See the full map image! |
| Jigsaw 1 | Jigsaw 2 |
| Jigsaw 3 | Jigsaw 4 |
Dewlight Pavilion Jigsaw Puzzle 1
| 1 | 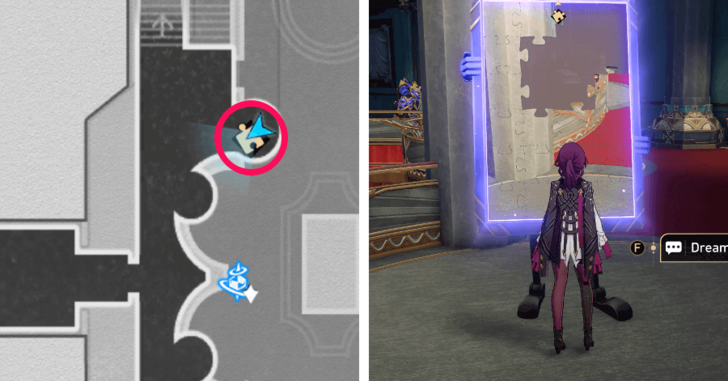 Use the Dreammaster Hall Space Anchor and head up the stairs on the left to get to the area. |
|---|---|
| 2 | 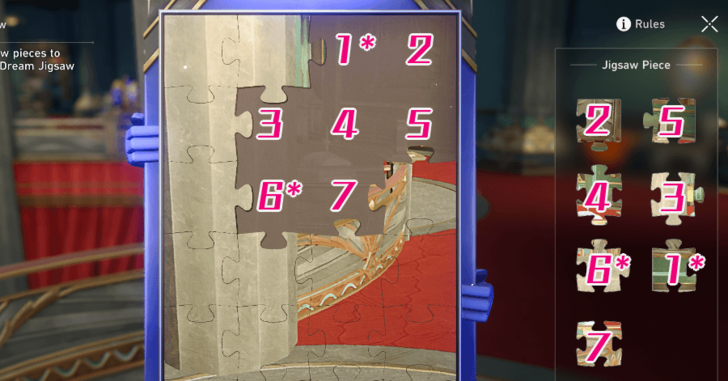 Put the jigsaw pieces that match the number within the frame as shown in the image. The asterisk (*) are pieces that need to be rotated a few times. Click to see the full image! |
| 3 | 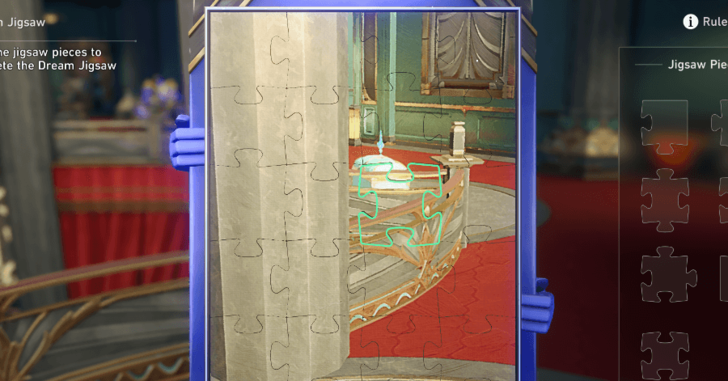 After solving the Dream Jigsaw, a chest will spawn in the nearby area! |
Return to All Dewlight Pavilion Puzzles ▲
Dewlight Pavilion Jigsaw Puzzle 2
| 1 | 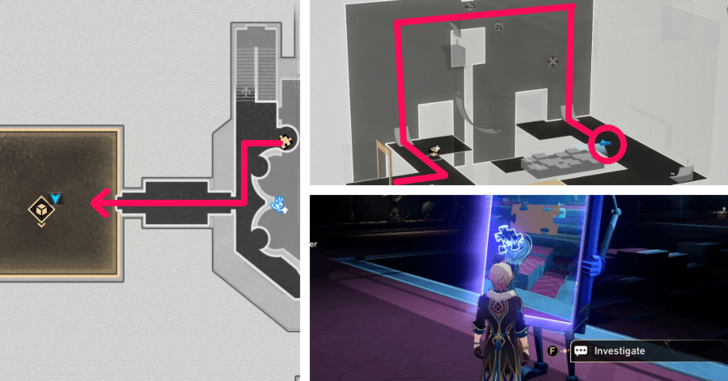 From the area where Puzzle 1 is, make your way to the western puzzle room. Use the bubble bridges on the room's left wall to get to Puzzle 2. You'll need to retrieve one of the puzzle's pieces nearby before you can solve it. Activate the nearby control panel to form a bridge and collect it. |
|---|---|
| 2 | 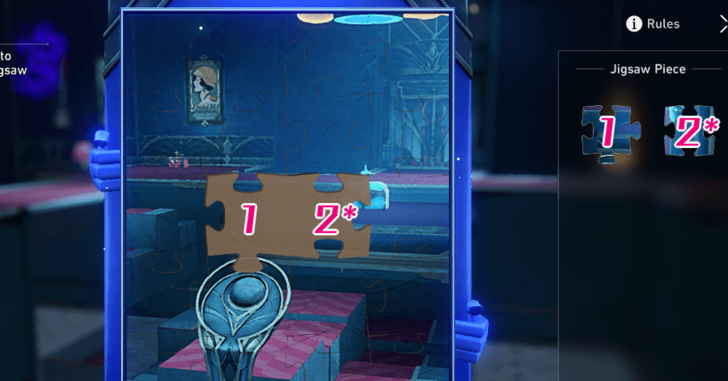 Put the jigsaw pieces that match the number within the frame as shown in the image. The asterisk (*) are pieces that need to be rotated a few times. Click to see the full image! |
| 3 | 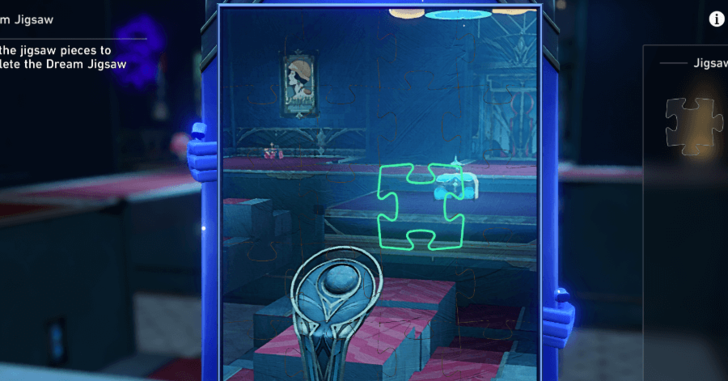 Once you solve the puzzle, a control panel will appear and allow you to activate a bridge to reach the chest! |
Return to All Dewlight Pavilion Puzzles ▲
Dewlight Pavilion Jigsaw Puzzle 3
| 1 | 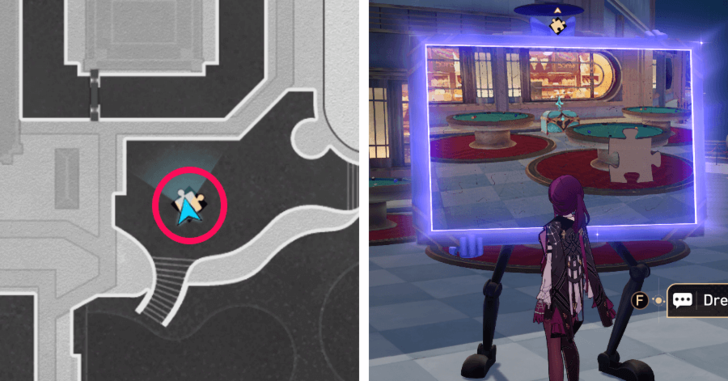 Head towards the raised area northwest of the City Sandpit Space Anchor to find Puzzle 3. |
|---|---|
| 2 | 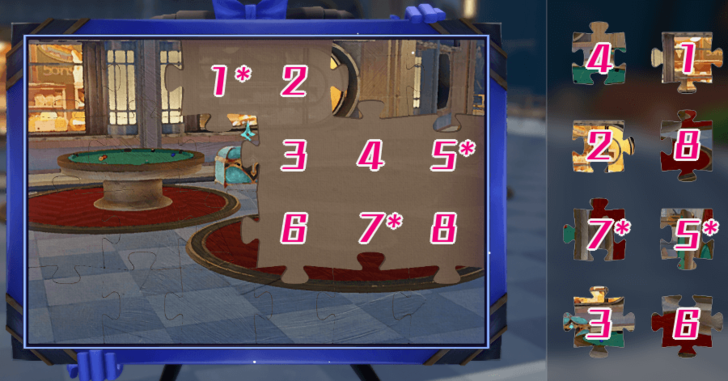 Put the jigsaw pieces that match the number within the frame as shown in the image. The asterisk (*) are pieces that need to be rotated a few times. Click to see the full image! |
| 3 | 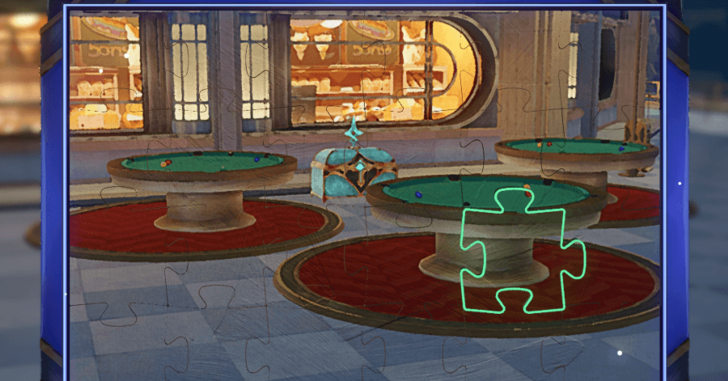 A chest will appear by the billiard tables after solving the puzzle! |
Return to All Dewlight Pavilion Puzzles ▲
Dewlight Pavilion Jigsaw Puzzle 4
| 1 | 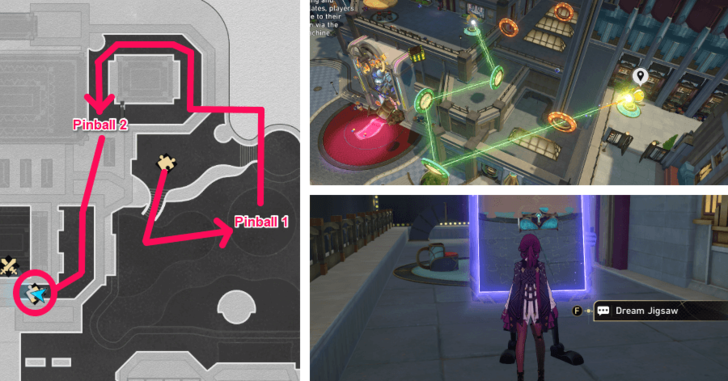 Use the Bubble Pinball southeast of Puzzle 3 to reach the top of a building. Then, go to the next Bubble Pinball and adjust its trajectory as shown above to reach the correct area. Puzzle 4 will be guarded by an enemy so you'll need to defeat it first to gain access to the puzzle. |
|---|---|
| 2 | 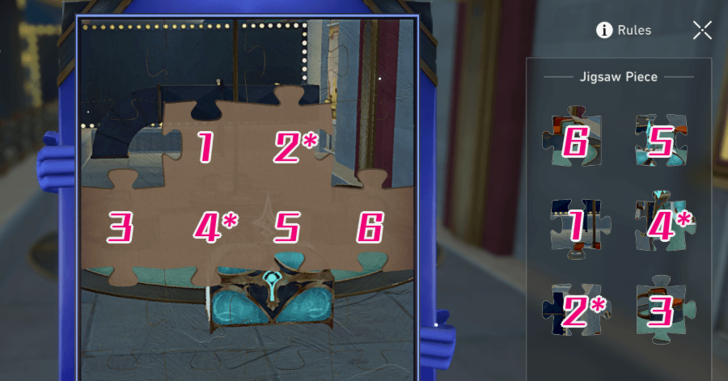 Put the jigsaw pieces that match the number within the frame as shown in the image. The asterisk (*) are pieces that need to be rotated a few times. Click to see the full image! |
| 3 | 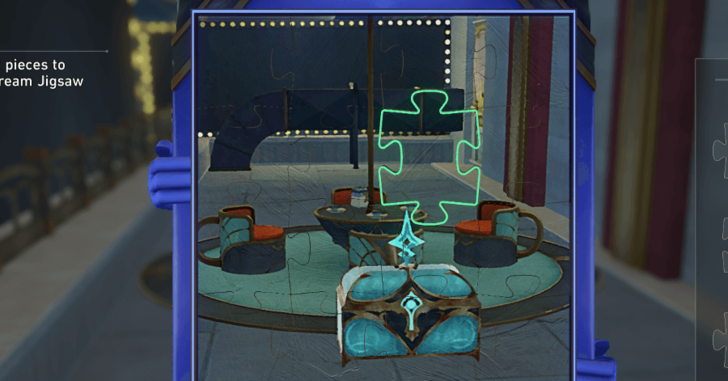 After solving the jigsaw puzzle, a chest will appear in front of the table! |
Return to All Dewlight Pavilion Puzzles ▲
Clock Studios Theme Park Dream Jigsaw Solutions
Clock Studios Theme Park Jigsaw Puzzle Solutions
| Clock Studios Theme Park Jigsaw Puzzles | |
|---|---|
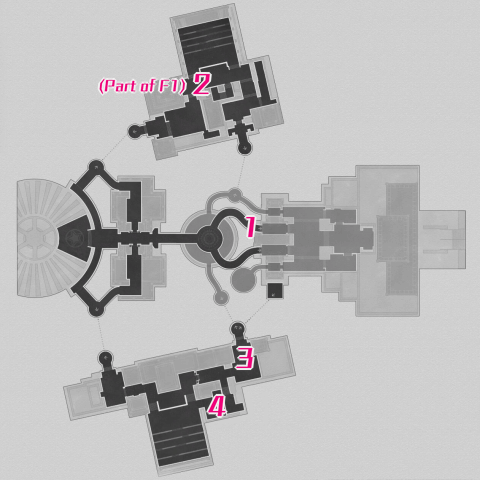 Click to see the full map image! |
|
| Jigsaw 1 | Jigsaw 2 |
| Jigsaw 3 | Jigsaw 4 |
Clock Studios Theme Park Jigsaw Puzzle 1
| 1.1 | 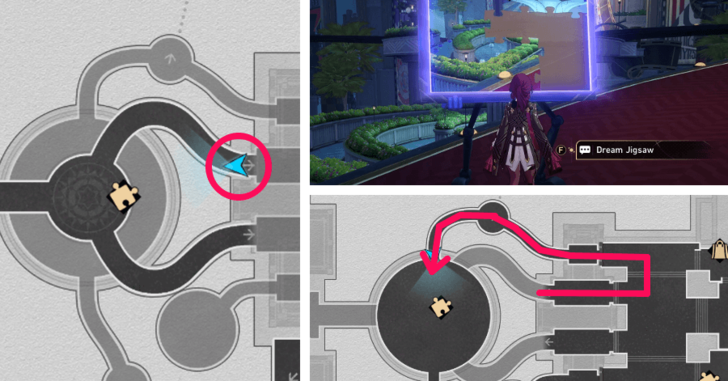 Use the Theme Park Entrance Space Anchor and take the path leading upwards on the right side of the Clockie Statue. Before you can solve the puzzle, the Puzzle Gentleman will ask you to retrieve the Jigsaw Pieces in the circular maze on F1. |
|---|---|
| 1.2 | You can find all the scattered jigsaw pieces by following the path shown above. After getting them all, head back to the Dream Jigsaw to solve Puzzle 1. |
| 2 | 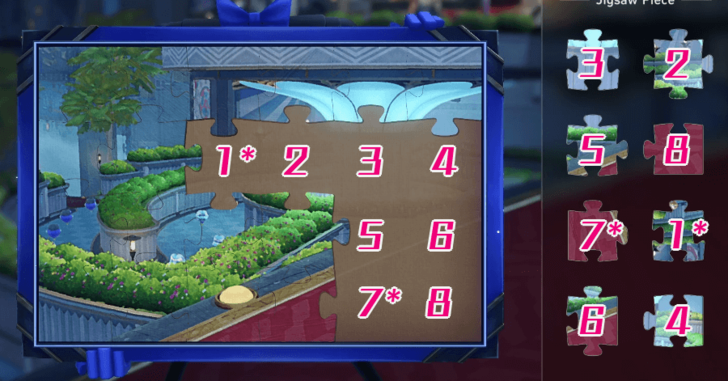 Put the jigsaw pieces that match the number within the frame as shown in the image. The asterisk (*) are pieces that need to be rotated a few times. Click to see the full image! |
| 3 | 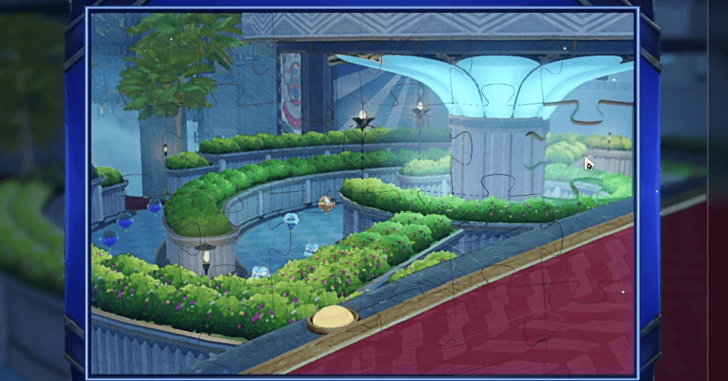 This is what the full image should look like. The Puzzle Gentleman will reshape the maze and spawn a chest in it after solving the puzzle! |
How to Get Dream Jigsaw Puzzle 1 Chest
| 1 | 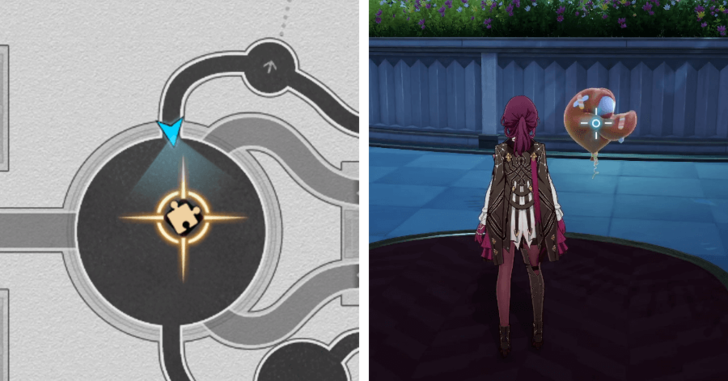 Return to the circular maze in F1 after the Puzzle Gentleman reshapes it. |
|---|---|
| 2 | Simply follow the balloons to reach the center of the maze and get the Puzzle 1 chest! |
Back to All Theme Park Puzzles ▲
Clock Studios Theme Park Jigsaw Puzzle 2
| 1 | 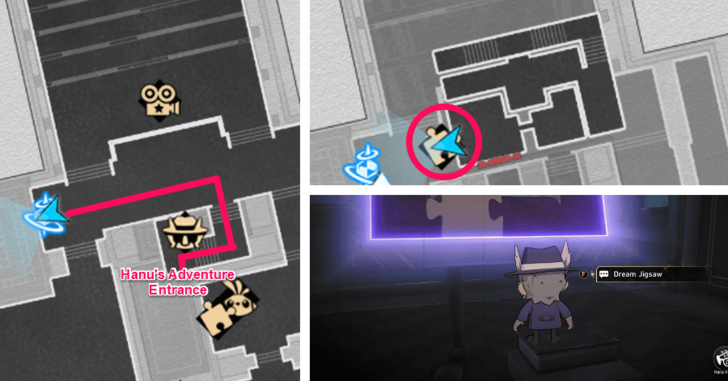 Use the Hamster Ball Park Space Anchor and go into the Hanu's Adventure puzzle room by transforming. Puzzle 2 will be near the entrance of the room, but you'll need to get the scattered pieces before you can solve it. |
|---|---|
| 2 | 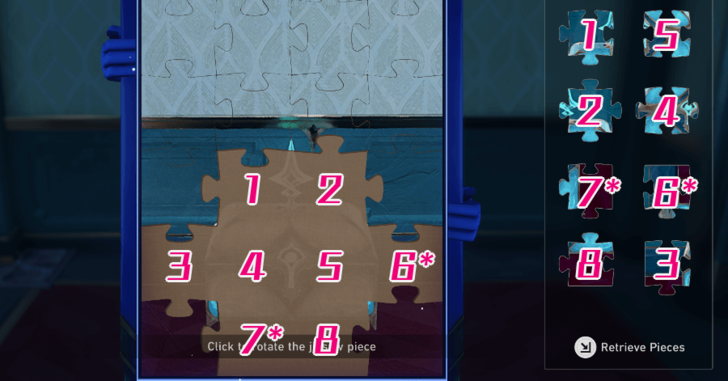 Put the jigsaw pieces that match the number within the frame as shown in the image. The asterisk (*) are pieces that need to be rotated a few times. Click to see the full image! |
| 3 | 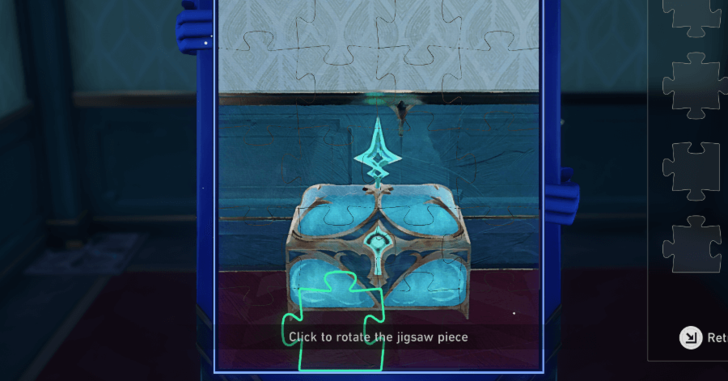 After solving the jigsaw puzzle, a chest will appear in front of you! |
Back to All Theme Park Puzzles ▲
Clock Studios Theme Park Jigsaw Puzzle 3
| 1 | 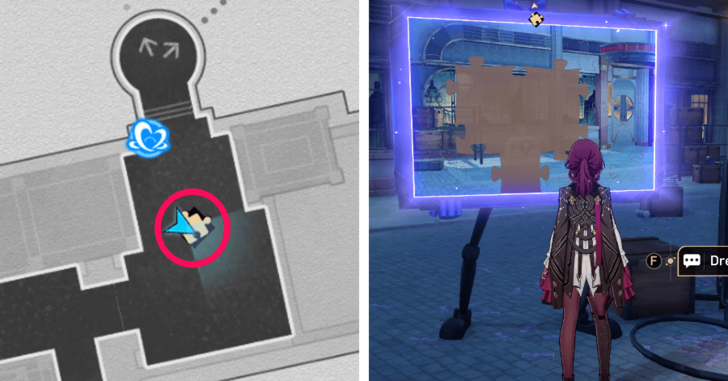 Teleport to the Bud of Preservation Calyx in the southern area of F2 to find Puzzle 3. |
|---|---|
| 2 | 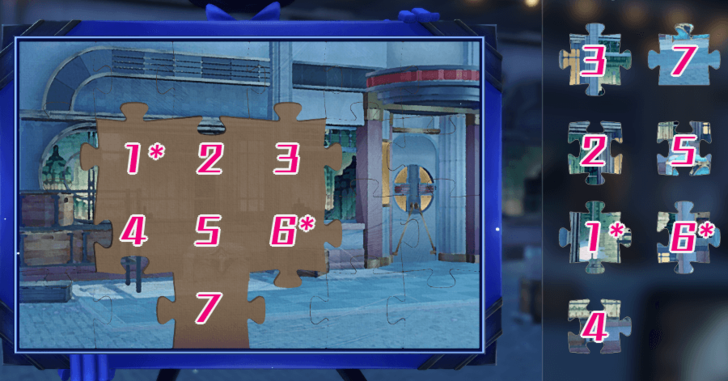 Put the jigsaw pieces that match the number within the frame as shown in the image. The asterisk (*) are pieces that need to be rotated a few times. Click to see the full image! |
| 3 | 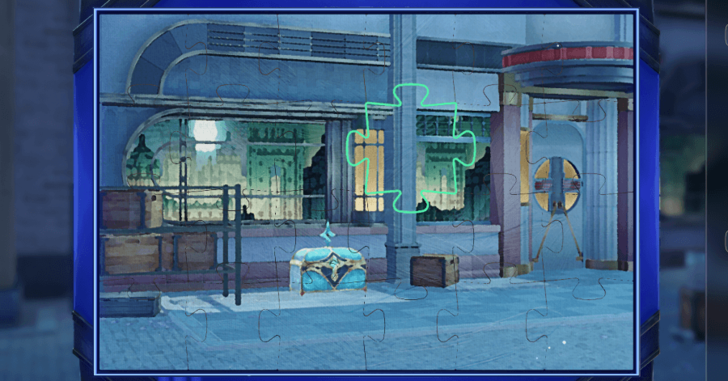 A chest will appear nearby after solving the Dream Jigsaw! |
Back to All Theme Park Puzzles ▲
Clock Studios Theme Park Jigsaw Puzzle 4
| 1 | 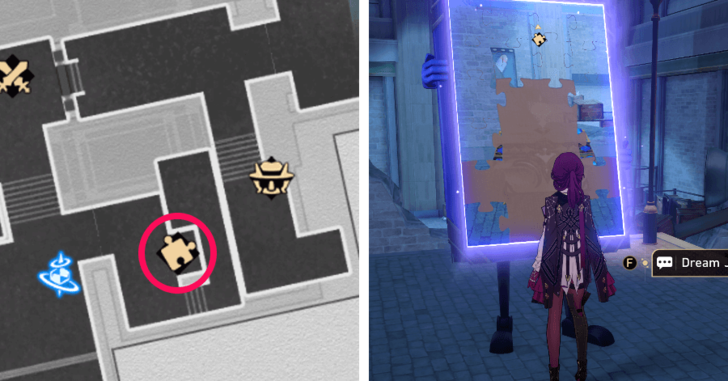 Use the Hanu Gang Base Space Anchor then walk a few steps eastward to find Puzzle 4. You'll need to gather some scattered puzzle pieces by transforming with the Hanu's Adventure TV nearby. |
|---|---|
| 2 | 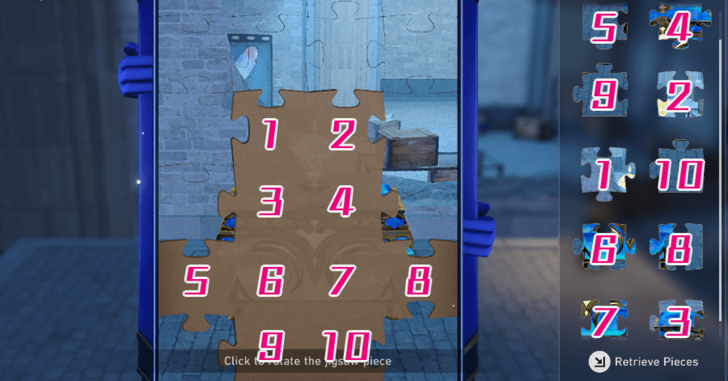 Put the jigsaw pieces that match the number within the frame as shown in the image. The asterisk (*) are pieces that need to be rotated a few times. Click to see the full image! |
| 3 | 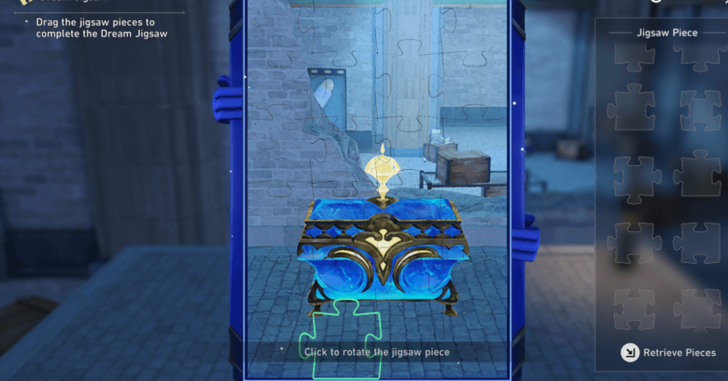 After solving the puzzle, a chest will spawn in the area! |
Back to All Theme Park Puzzles ▲
SoulGlad Scorchsand Audition Venue Dream Jigsaw Solutions
SoulGlad Audition Venue Jigsaw Puzzle Solutions
| SoulGlad Audition Venue Jigsaw Puzzles | |
|---|---|
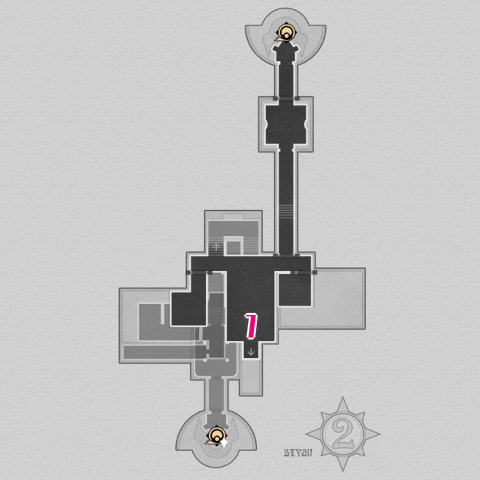 See the full map image! |
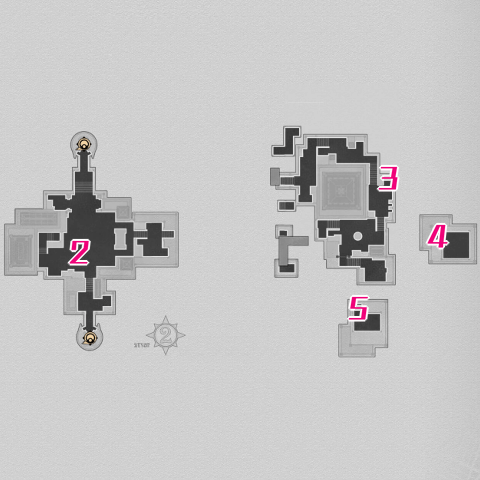 See the full map image! |
| Jigsaw 1 | Jigsaw 2 |
| Jigsaw 3 | Jigsaw 4 |
| Jigsaw 5 | |
SoulGlad Audition Venue Jigsaw Puzzle 1
| 1.1 | 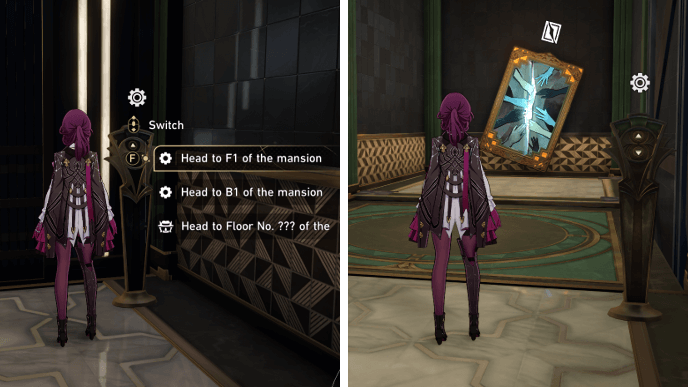 Teleport to the Gunfire Trial area and bring down the elevator to F1. Instead of riding the elevator to F2, take the stairs and use the Hanu's Adventure TVs to transform when needed. There will be an Arcane Artwork behind the spot where the elevator is. Interact with it to enter the locked room on F2. |
|---|---|
| 1.2 | 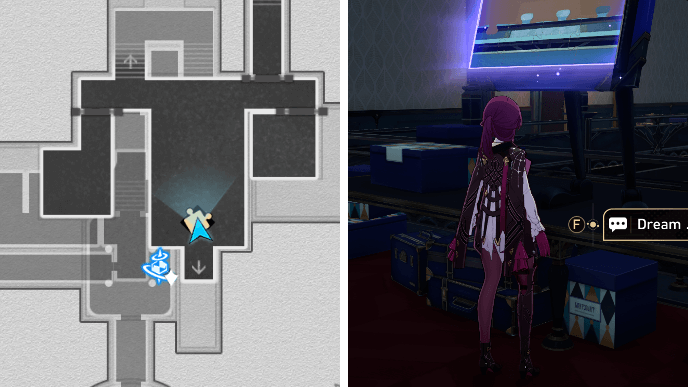 There will be a Hanu's Adventure Vent in the locked room. Transform with the TV in the nearby hallway and enter the vent to be teleported to a balcony area. Dream Jigsaw 1 will be by a pile of boxes. |
| 2 | 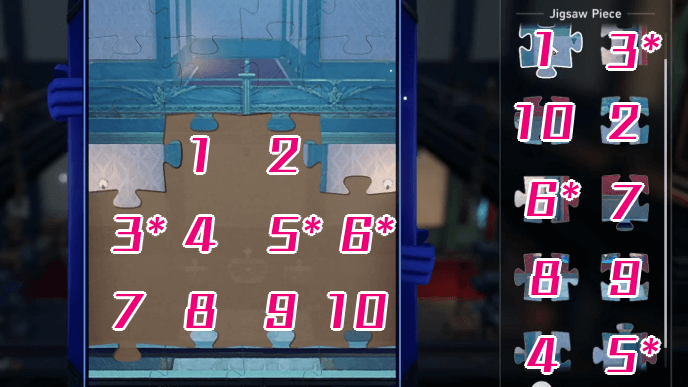 Put the jigsaw pieces that match the number within the frame as shown in the image. The asterisk (*) are pieces that need to be rotated a few times. Click to see the full image! |
| 3 | 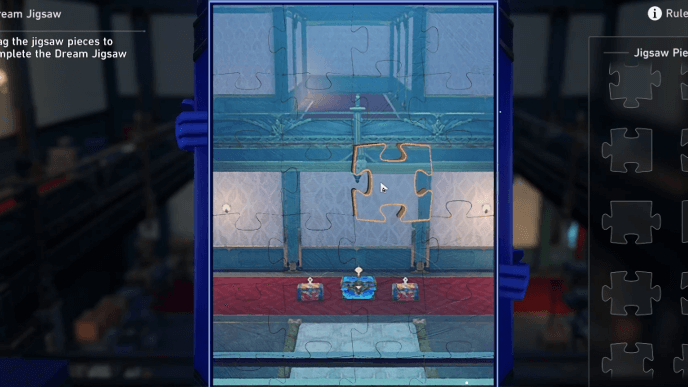 This is what the full image should look like. 3 chests will spawn down in the central area of Gunfire Trial F2! |
Back to All Audition Venue Puzzles ▲
SoulGlad Audition Venue Jigsaw Puzzle 2
| 1 | 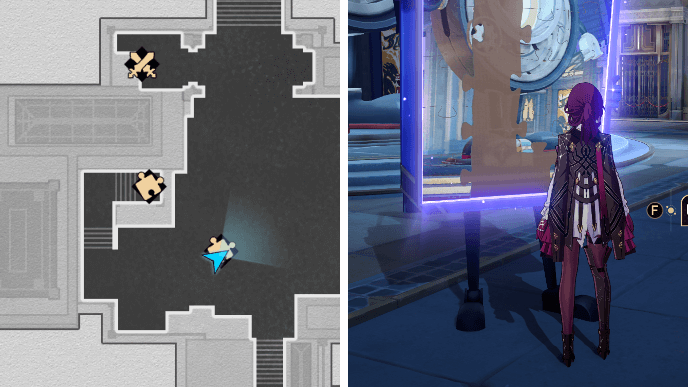 Teleport to the Time Trial area and head a few steps north. You'll find Dream Jigsaw 2 near the giant Clockie Statue. |
|---|---|
| 2 | 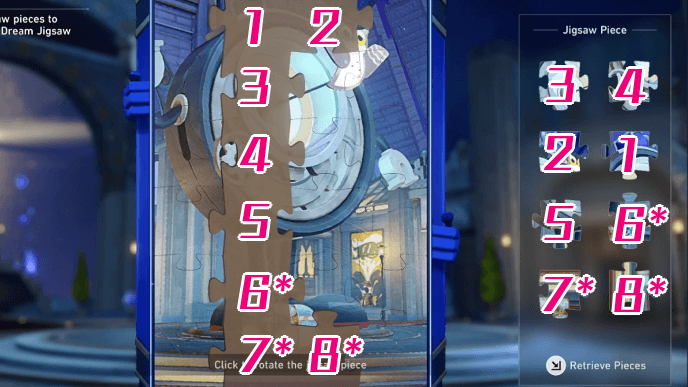 Put the jigsaw pieces that match the number within the frame as shown in the image. The asterisk (*) are pieces that need to be rotated a few times. Click to see the full image! |
| 3 |  After solving the jigsaw puzzle, a chest will appear by the Clockie Statue! |
Back to All Audition Venue Puzzles ▲
SoulGlad Audition Venue Jigsaw Puzzle 3
| 1 | 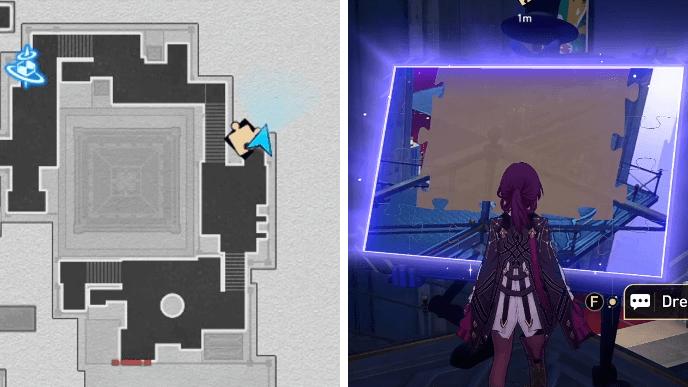 Dream Jigsaw Puzzle 3 is located northeast of the smaller Clockie Statue on the eastern side of the Time Trial area. |
|---|---|
| 2 | 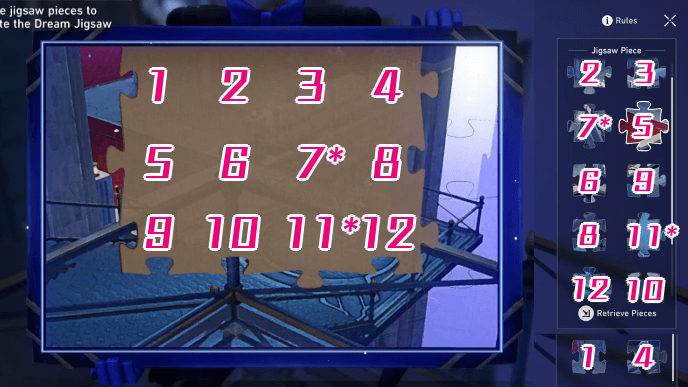 Put the jigsaw pieces that match the number within the frame as shown in the image. The asterisk (*) are pieces that need to be rotated a few times. Click to see the full image! |
| 3 | 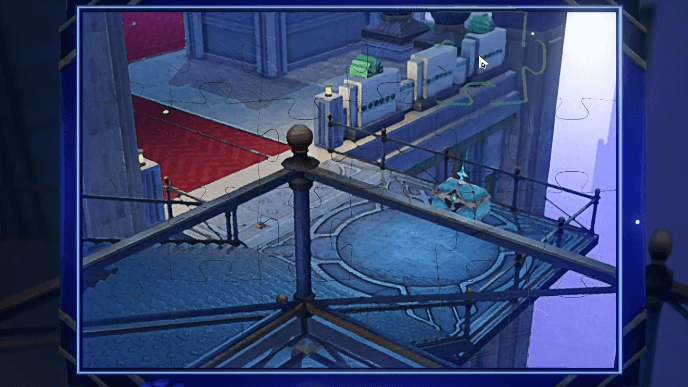 A chest will appear nearby after solving the Dream Jigsaw! |
Back to All Audition Venue Puzzles ▲
SoulGlad Audition Venue Jigsaw Puzzle 4
| 1.1 | 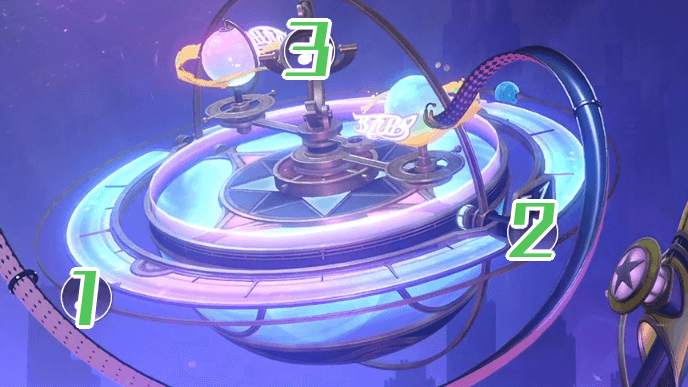 Dream Jigsaw Puzzle 4 is part of a Mr. Soda Hidden Challenge in the Time Trial. To access it, you'll need to adjust the spheroid leading to the area as shown above. |
|---|---|
| 1.2 | 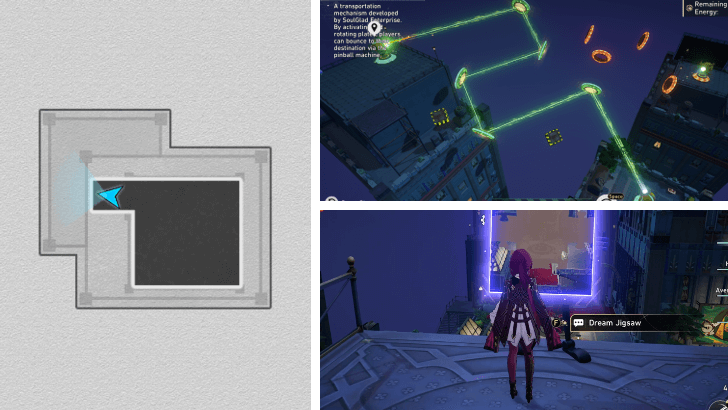 After unlocking the hidden challenge, head into the area south of the smaller Clockie Statue and take the Bubble Pinball to the first platform where Jigsaw 4 is. |
| 2 | 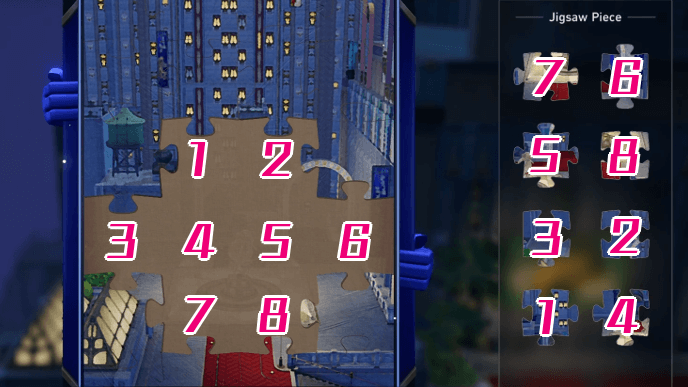 Put the jigsaw pieces that match the number within the frame as shown in the image. The asterisk (*) are pieces that need to be rotated a few times. Click to see the full image! |
| 3 |  Shown above is the full image of Puzzle 4. However, the chest won't spawn yet until you solve the next Dream Jigsaw puzzle. |
Back to All Audition Venue Puzzles ▲
SoulGlad Audition Venue Jigsaw Puzzle 5
| 1 | 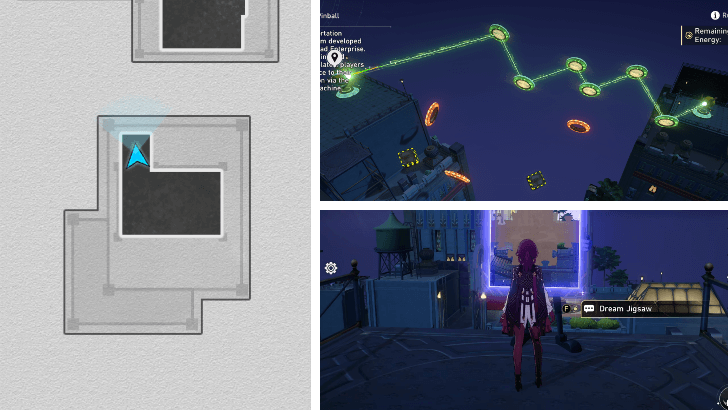 After solving Puzzle 4, use the Bubble Pinball to reach the next platform where Dream Jigsaw 5 is. |
|---|---|
| 2 | 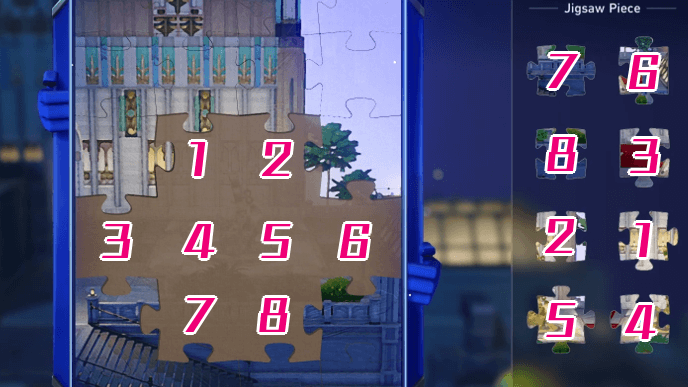 Put the jigsaw pieces that match the number within the frame as shown in the image. The asterisk (*) are pieces that need to be rotated a few times. Click to see the full image! |
| 3 |  After solving this puzzle, the hidden challenge chest will spawn by the smaller Clockie Statue! |
Back to All Audition Venue Puzzles ▲
Penacony Grand Theater Dream Jigsaw Solutions
Penacony Grand Theater Jigsaw Puzzle Solutions
| Penacony Grand Theater Jigsaw Puzzles | |
|---|---|
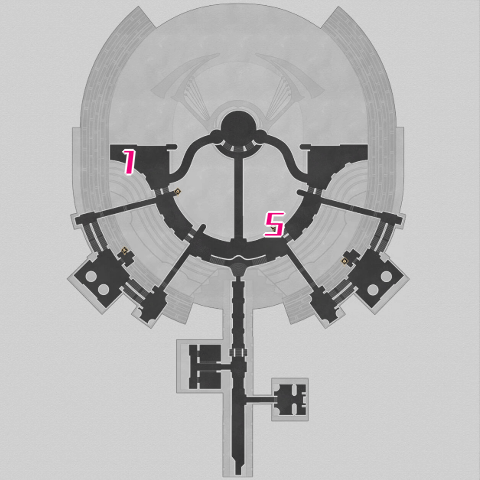 See the full map image! |
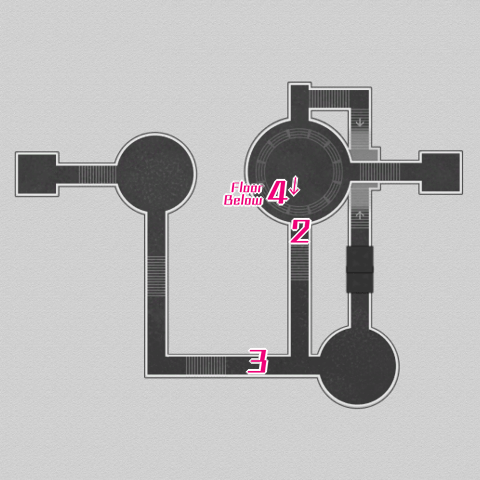 See the full map image! |
| Jigsaw 1 | Jigsaw 2 |
| Jigsaw 3 | Jigsaw 4 |
| Jigsaw 5 | |
Penacony Grand Theater Jigsaw Puzzle 1
| 1 | 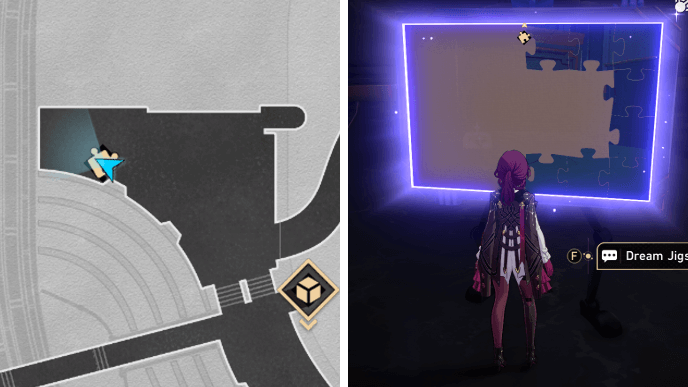 Teleport to the Hall of Chords Space Anchor and head all the way northwest. Dream Jigsaw 1 will be guarded by a few enemies. |
|---|---|
| 2 | 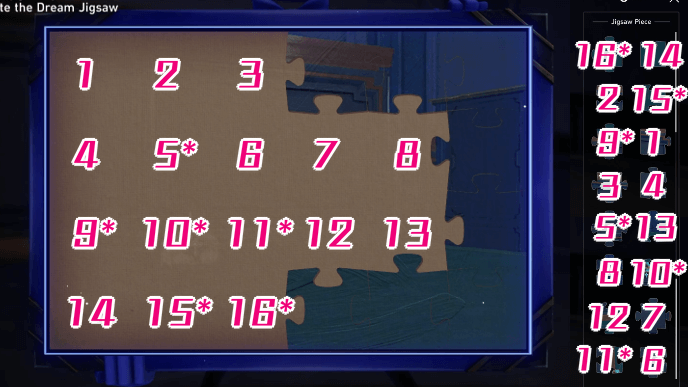 Put the jigsaw pieces that match the number within the frame as shown in the image. The asterisk (*) are pieces that need to be rotated a few times. Click to see the full image! |
| 3 | 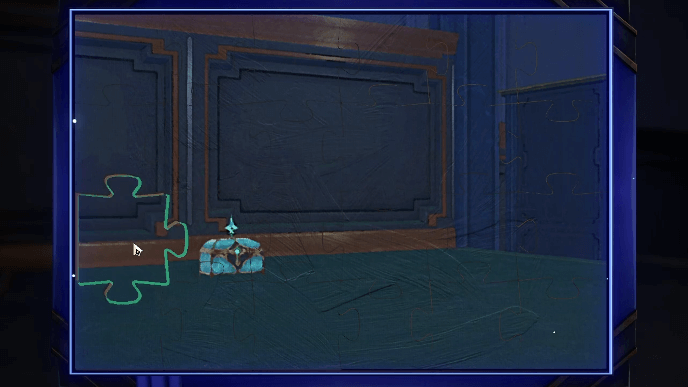 This is what the full image should look like. After solving the puzzle, a chest will spawn nearby! |
Back to All Grand Theater Puzzles ▲
Penacony Grand Theater Jigsaw Puzzle 2
| 1 | 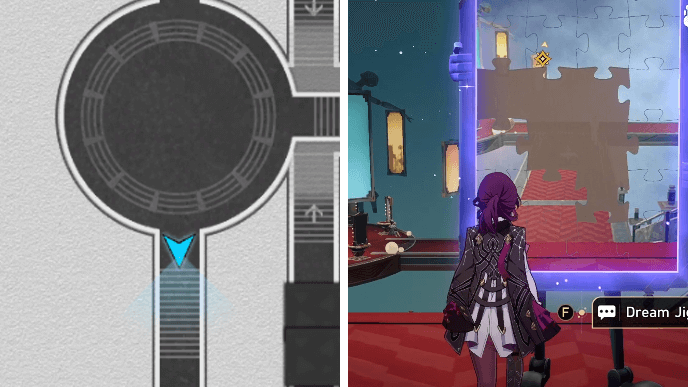 Go into the southwestern puzzle room near the Saloon of Gospels Space Anchor. Dream Jigsaw 2 will be on the platform nearest to the entrance of the area. |
|---|---|
| 2 | 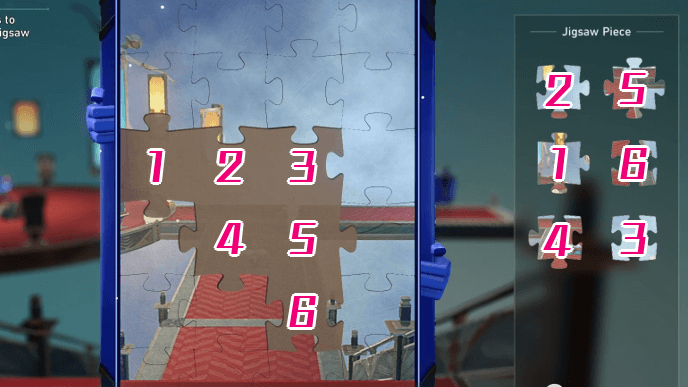 Put the jigsaw pieces that match the number within the frame as shown in the image. The asterisk (*) are pieces that need to be rotated a few times. Click to see the full image! |
| 3 | 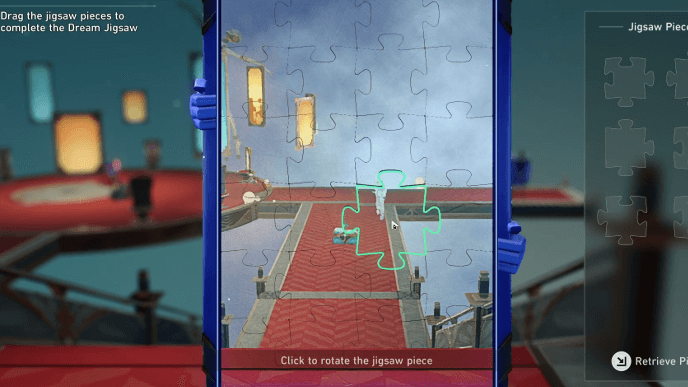 Solving the puzzle will bridge the gap leading to the other side and spawn a chest! |
Back to All Grand Theater Puzzles ▲
Penacony Grand Theater Jigsaw Puzzle 3
| 1 | 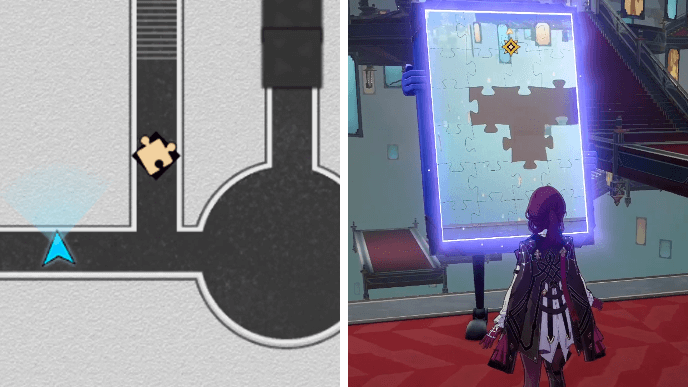 After solving the second Jigsaw puzzle, head straight and you'll find Dream Jigsaw 3 nearby. |
|---|---|
| 2 | 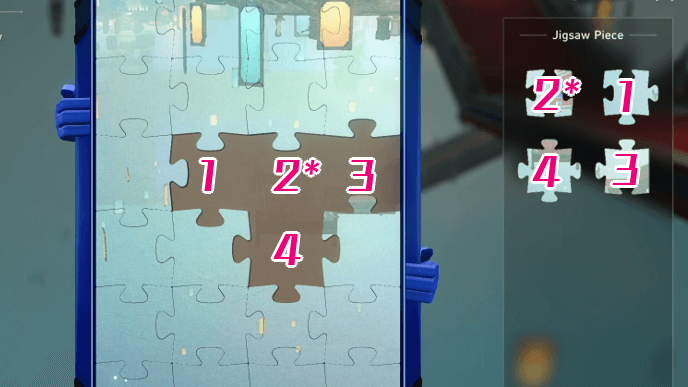 Put the jigsaw pieces that match the number within the frame as shown in the image. The asterisk (*) are pieces that need to be rotated a few times. Click to see the full image! |
| 3 | 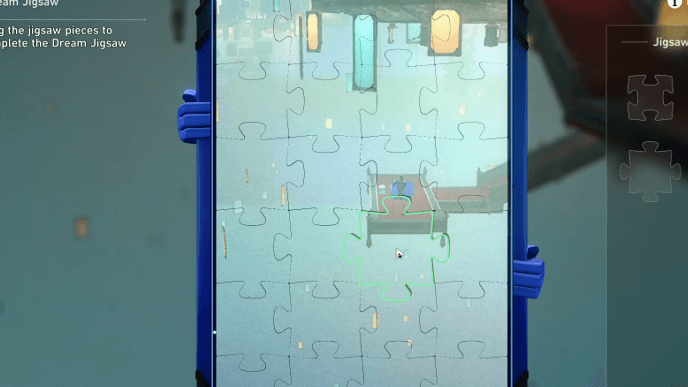 The full image should appear like this. Solving the puzzle will spawn a chest and the next Jigsaw puzzle on F2 of the puzzle room! |
Back to All Grand Theater Puzzles ▲
Penacony Grand Theater Jigsaw Puzzle 4
| 1 | 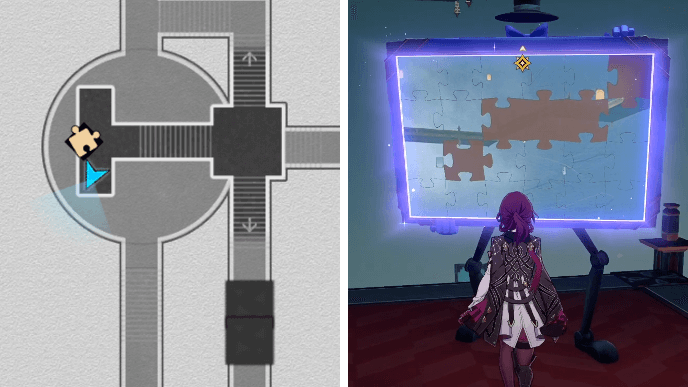 From the third puzzle, head east and activate the control panel to form a bridge leading to F2. There, you'll find Dream Jigsaw 4. |
|---|---|
| 2 |  Put the jigsaw pieces that match the number within the frame as shown in the image. The asterisk (*) are pieces that need to be rotated a few times. Click to see the full image! |
| 3 | 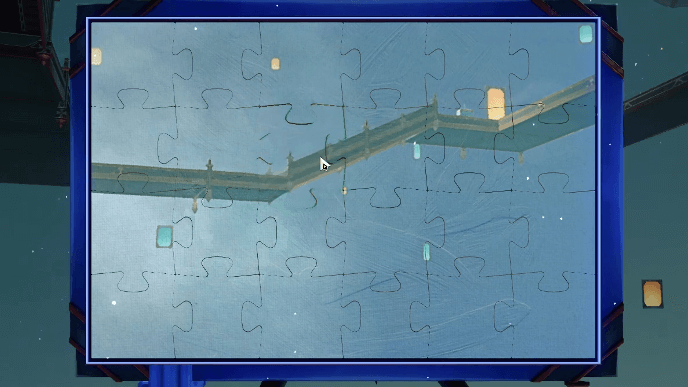 Shown above is the full image of Puzzle 4. After solving the puzzle, a staircase leading to the room's exit and another chest will appear. |
Back to All Grand Theater Puzzles ▲
Penacony Grand Theater Jigsaw Puzzle 5
| 1 | 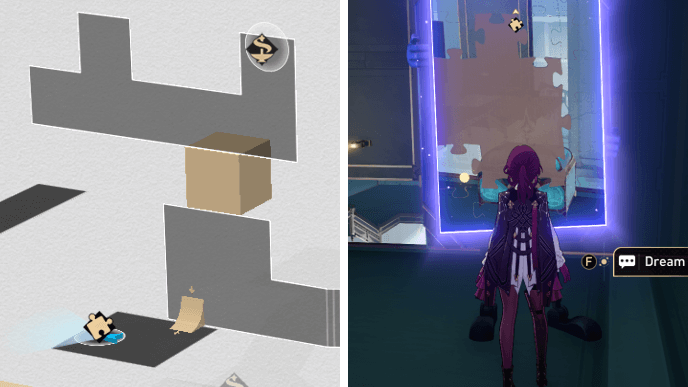 Go into the northeastern puzzle room near the Hall of Chords Space Anchor. Use the Bubble Bridges to go up the walls on the left side of the room and you'll find Jigsaw 5. |
|---|---|
| 2 | 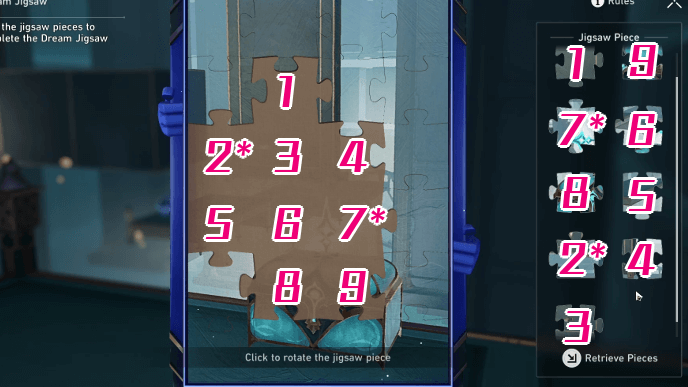 Put the jigsaw pieces that match the number within the frame as shown in the image. The asterisk (*) are pieces that need to be rotated a few times. Click to see the full image! |
| 3 | 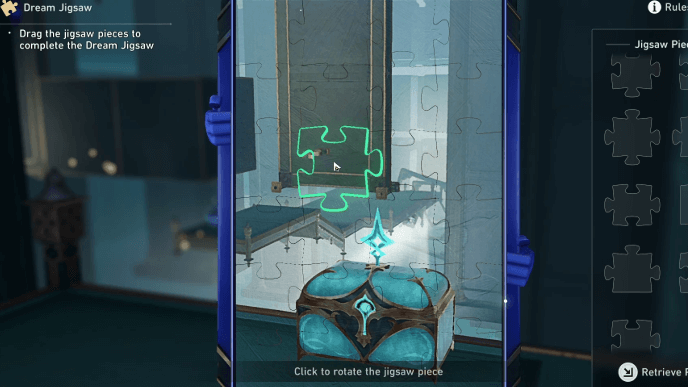 After solving Dream Jigsaw 5, a chest will appear nearby! |
Back to All Grand Theater Puzzles ▲
How to Solve Dream Jigsaw Puzzles
Unlock the Penacony Map First
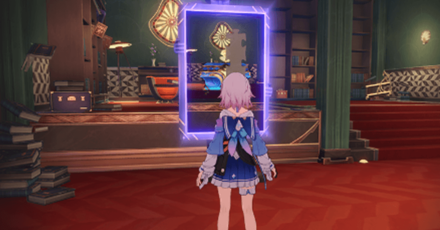
Dream Jigsaws is a puzzle native in Penacony. This means you must unlock the entirety of the map through the Penacony Trailblaze Mission Series!
Penacony Reality & Dreamscape Map Guide
Find Puzzle Gentlemen
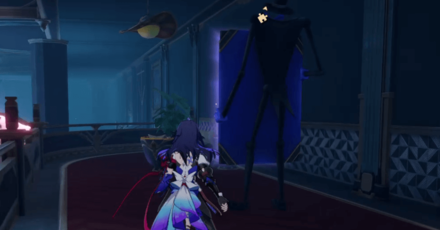
Dream Jigsaws appear as large portraits being held by a Puzzle Gentleman. Solving the puzzle will make whatever object in the picture appear in the Dreamscape.
Puzzle Gentlemen holding Dream Jigsaws are most prevalent in Dream's Edge, A Child's Dream, and The Reverie (Dreamscape) Maps.
Drag and Rotate Puzzle Pieces
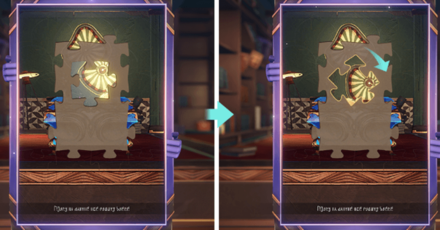
To solve Dream Jigsaws, you must drag a piece towards the frame and make it fit by moving it or pressing on it to rotate it!
Look for Jigsaw Pieces
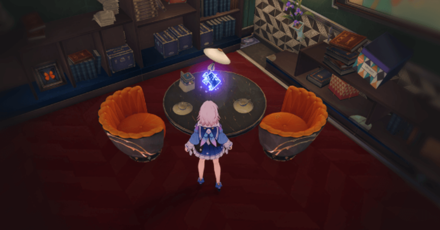
Certain Dream Jigsaw pieces will float away to another place before you can solve the puzzle. You must simply locate the piece and bring it back to the frame to start piecing it together.
Missions Featuring Dream Jigsaws
The Sound and the Fury Mission Series
The first Penacony Trailblaze Mission Series, The Sound and the Fury, has three mission where there are Dream Jigsaw you must solve to make a path or mechanism appear. The following missions are:
The Sound and the Fury Mission Guide
Slaughterhouse Mission
Slaughterhouse has many Dream Jigsaw puzzles within it's 3D Layered map! See the full guide here:
Honkai: Star Rail Related Guides

All Tips and Tricks Guides
Comment
Author
All Dream Jigsaw Puzzle Solutions and Locations
improvement survey
03/2026
improving Game8's site?

Your answers will help us to improve our website.
Note: Please be sure not to enter any kind of personal information into your response.

We hope you continue to make use of Game8.
Premium Articles
Rankings
Gaming News
Popular Games

Genshin Impact Walkthrough & Guides Wiki

Honkai: Star Rail Walkthrough & Guides Wiki

Umamusume: Pretty Derby Walkthrough & Guides Wiki

Pokemon Pokopia Walkthrough & Guides Wiki

Resident Evil Requiem (RE9) Walkthrough & Guides Wiki

Monster Hunter Wilds Walkthrough & Guides Wiki

Wuthering Waves Walkthrough & Guides Wiki

Arknights: Endfield Walkthrough & Guides Wiki

Pokemon FireRed and LeafGreen (FRLG) Walkthrough & Guides Wiki

Pokemon TCG Pocket (PTCGP) Strategies & Guides Wiki
Recommended Games

Diablo 4: Vessel of Hatred Walkthrough & Guides Wiki

Fire Emblem Heroes (FEH) Walkthrough & Guides Wiki

Yu-Gi-Oh! Master Duel Walkthrough & Guides Wiki

Super Smash Bros. Ultimate Walkthrough & Guides Wiki

Pokemon Brilliant Diamond and Shining Pearl (BDSP) Walkthrough & Guides Wiki

Elden Ring Shadow of the Erdtree Walkthrough & Guides Wiki

Monster Hunter World Walkthrough & Guides Wiki

The Legend of Zelda: Tears of the Kingdom Walkthrough & Guides Wiki

Persona 3 Reload Walkthrough & Guides Wiki

Cyberpunk 2077: Ultimate Edition Walkthrough & Guides Wiki
All rights reserved
Copyright © 2024 HoYoverse, COGNOSPHERE. All Rights Reserved.
The copyrights of videos of games used in our content and other intellectual property rights belong to the provider of the game.
The contents we provide on this site were created personally by members of the Game8 editorial department.
We refuse the right to reuse or repost content taken without our permission such as data or images to other sites.
