This survey will take about 1 minute.
Your answers will help us to improve our website.
Death Stranding 2 On the Beach (DS2)
How to Increase Connection Levels
★ Best Weapons | Best Backpack Component
☆ Outfits | Best Stats to Upgrade
★ Hats, Suits, Glasses, Waist & Chest Accessories
☆ Get all Unlockables and Upgrades
★ All Actors | Cameos
☆ List of Orders and Bosses
Connection levels with facilities in Death Stranding 2: On the Beach (DS2) can be increased by earning likes for completing tasks given by each facility. Read on to learn how to increase your connection level and the rewards you can earn.
 Attention! Attention! |
This page is under construction! Sign in and select  under the page's title to be notified of any updates! under the page's title to be notified of any updates! |
|---|
How to Increase Connection Levels
|
|
Complete Orders
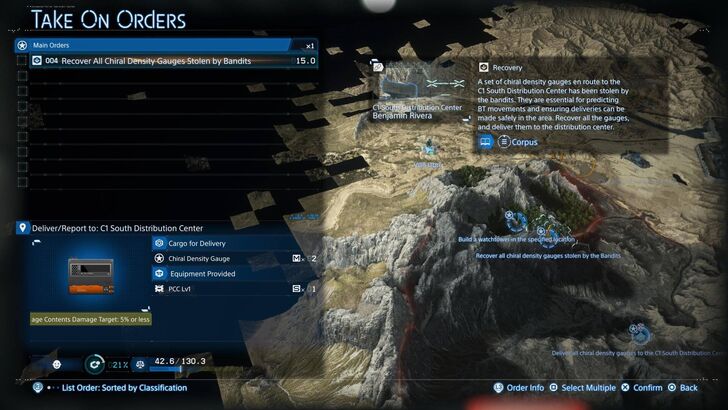
Fulfilling main orders, sub orders, and standard orders will net you Likes. These Likes raise your connection level with the target facility or prepper NPC. The more Likes you get, the more the connection level bar progresses. Connection levels max out at 5★.
To max out the number of likes you can get for an order, you'll want to deliver your cargo in pristine condition. Remember, all that matters is the condition of the cargo contents. Deliver 100% condition cargo and you're guaranteed to get an S rating which equals more Likes.
Fulfill Aid Requests
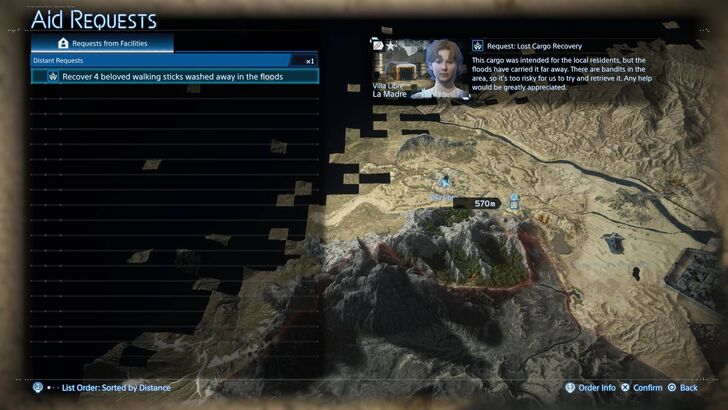
Aid Requests are tasks issued by facilities and other players, asking for Sam's help. Tasks can vary from retrieving items, defeating different types of enemies, or building structures.
Unlike orders, requests don't need to be accepted. They are marked as complete once you accomplish them.
They also do not use a ranking system; instead, you will receive Likes for responding to them, which adds up to your connection level.
You'll unlock Aid Requests once you establish a Chiral Network connection to Villa Libre, the first location to issue one.
Return Lost Cargo
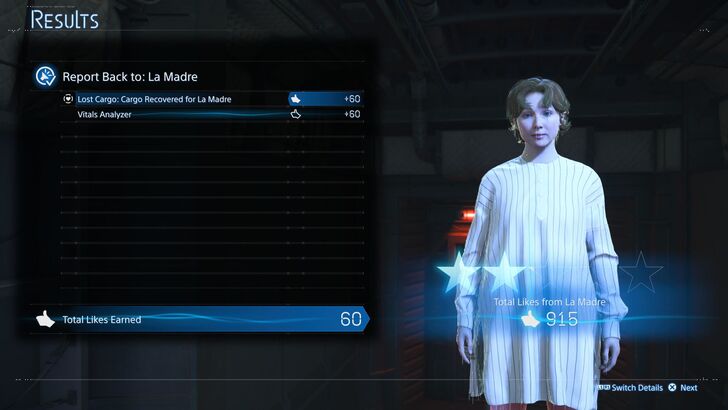
Throughout Sam's journey, you'll encounter Lost Cargo – items for delivery that were lost during transit. When found, pick them up and deliver them to their intended destination.
Successfully returning Lost Cargo in pristine condition earns you Likes from the receiver and contributes to your connection level.
Connection Level Rewards
Mexico Facilities
| Facility / NPC | Connection Lv. and Reward |
|---|---|
| Ciudad Nudo del Norte (C1) |
2★: Machine Pistol [MP] 3★: SL Machine Pistol [MP] 4★: Big Bore Handgun [MP] |
| Villa Libre |
2★: Custom Electric Rod 3★: Custom High-Voltage Rod 4★: Custom Twin Rod |
| Former Geophysics Research Lab |
2★: Additional Armor for Tri-Cruiser (Vehicle Upgrade) 3★: LW Assault Rifle [MP] Lv1 4★ LW Assault Rifle [MP] Lv2 |
| The Artist |
2★: Navy Blue and Volcano Orange (Color Data), Wallpaper 3★: Desert Pink and Ghost Green (Color Data), Wallpaper 4★: Express Purple and Signal Green (Color Data), Wallpaper |
| The Bokka |
2★: Sticky Gun 3★: Patch 9: Porter 4★: Porter (Backpack Charm) |
Australia Facilities
| The Government's Base |
2★: Chiral Antigravity Device (Backpack Component) 3★: Large Spare Ammo Container Lv1 (Backpack Component) 4★: Large Spare Ammo Container Lv2 (Backpack Component) 5★: Custom Hologram: Old Oz, Patch 32: Australian Cryptobiote, Unlocks private room in the facility. |
|---|---|
| Western Environmental Observatory |
2★: Electric Shock Absorber (Backpack Component) 3★: Battle Skeleton Lv2, Battle Skeleton: Silver Lv2 Battle Skeleton: Silver Lv2 Pre-order bonus for all editions of Death Stranding 2. , Battle Skeleton: Gold Lv2 Battle Skeleton: Gold Lv2 Bonus item for Digital Deluxe and Collector's editions of Death Stranding 2. 4★: Battle Skeleton Lv3, Battle Skeleton: Silver Lv3 Battle Skeleton: Silver Lv3 Pre-order bonus for all editions of Death Stranding 2. , Battle Skeleton: Gold Lv3 Battle Skeleton: Gold Lv3 Bonus item for Digital Deluxe and Collector's editions of Death Stranding 2. 5★: Custom Hologram: Peter Gates (Hologram Data), Patch 58: Pickup Off-Roader, Unlocks Private Room in the facility. |
| The Lone Commander |
3★: SL Tranq Handgun 4★: LW Tranq Sniper Rifle |
| The Musician |
2★: LW Shotgun [MP] Lv1, Miira No Sakebi (Music Data) 3★: Shotgun [MP] Lv2, Kaiju Muhou Chitai (Music Data) 4★: LW Shotgun [MP] Lv2, Ultra Sakusen Dai Ichigou (Music Data), Licky Stick (Special Item). |
| West Fort Knot (F1) |
2★: Battery Unity Lv1 (Vehicle Modification) 3★: Floating Carrier Lv2 4★: Battery Unit Lv2 |
| Rainbow Valley |
2★: Solar Generator (Backpack Component) 3★: Mini Extra Battery (Backpack Component) 4★: Electrobiote (Backpack Charm) |
| Animal Shelter |
2★: Stealth Hologrenade 3★: BT Hologrenade 4★: Quokka (Backpack Charm) |
| Northern Environmental Observatory |
2★: Guidepost (PCC Building) and 80-Meter Bridges 3★: Utility Pouch (Backpack Component) 4★: Bell (Backpack Charm) |
| The Inventor |
2★: Stun Bomb 3★: Remote Stun Bomb 4★: Bola Stun Gun |
| F2 South Distribution Center |
2★: Combat Power Glove Lv1 3★: Combat Power Gloves Lv2 |
| The Dowser |
2★: Porter Suit: Desert Green 3★: Boost Skeleton Lv2, Boost Skeleton: Silver Lv2 Boost Skeleton: Silver Lv2 Pre-order bonus for all editions of Death Stranding 2. , Boost Skeleton: Gold Lv2 Boost Skeleton: Gold Lv2 Bonus item for Digital Deluxe and Collector's editions of Death Stranding 2. 4★: Boost Skeleton Lv3, Boost Skeleton: Silver Lv3 Boost Skeleton: Silver Lv3 Pre-order bonus for all editions of Death Stranding 2. , Boost Skeleton: Gold Lv3 Boost Skeleton: Gold Lv3 Bonus item for Digital Deluxe and Collector's editions of Death Stranding 2.
|
Death Stranding 2 Interactive Map
Bandwidth and Material Allotment Boosts
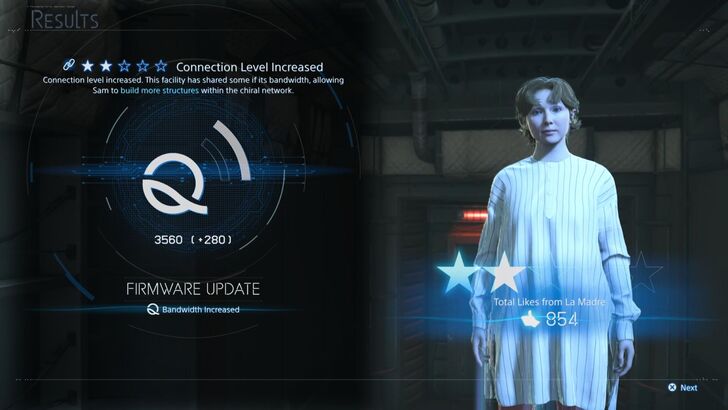
Aside from unlocking various rewards when you increase your connection level with each location, you will also get a boost in bandwidth (more bandwidth means you can build more structures) and increased material allotment (means you can withdraw more materials from the facility or prepper base).
Connecting Hearts and Minds Trophy
|
|
Connecting Hearts and Minds |
|---|---|
| Maximize your connection level with all facilities. ・How to Increase Connection Levels |
Players looking to Platinum Death Stranding 2 will need to achieve a 5★ connection level with all facilities - a tall task especially on higher difficulties. Getting 5★ connection levels with all facilities will reward you with the Connecting Hearts and Minds trophy.
Death Stranding 2 Related Guides
Beginner's Guide: Tips and Tricks
All Beginner's Guides
Comment
Author
Death Stranding 2: On the Beach (DS2) Walkthrough & Guides Wiki
How to Increase Connection Levels
Please participate in our site
improvement survey
04/2026
improvement survey
04/2026
Would you assist in
improving Game8's site?
improving Game8's site?

×
We are listening to our users' valuable opinions and discussing how to act on them.
The information collected through this survey will be used for the purpose of improving our services. In addition, the information will only be disclosed a part of a statistic in a format that will not allow identification of personal information.
Begin Survey
Not Now
×
Please rate each item regarding Game8.co's Advertisements.
Amount of Ads
Very Dissatisfied
Somewhat Dissatisfied
Fine
Somewhat Satisfied
Highly Satisfied
Placement of Ads
Timing of Ad Display
Ad Loading Speed
Safeness of Ads
Content of Ads
×
Please rate each item regarding Game8.co's Quality of Articles.
Amount of information
Very Dissatisfied
Somewhat Dissatisfied
Fine
Somewhat Satisfied
Highly Satisfied
Frequency of updates
Speed of new information
Accuracy of articles
Understandibility of articles
Readability of sentences
×
Please rate each item regarding Game8.co's Usability of the Site.
Ease of finding information
Very Dissatisfied
Somewhat Dissatisfied
Fine
Somewhat Satisfied
Highly Satisfied
Loading Speed
Use of Color
Font Size
Visibility of Images
Easy to Understand Layout
×
Please rate each item regarding Game8.co's Message Boards, Comments.
Ease of Writing
Very Dissatisfied
Somewhat Dissatisfied
Fine
Somewhat Satisfied
Highly Satisfied
Readability
Ease in Finding Information
Comment Quality
Comment Quantity
Admin Response
×
Please rate each item regarding Game8.co's Site's new design.
Please rate our site's new design
Very Dissatisfied
Somewhat Dissatisfied
Fine
Somewhat Satisfied
Highly Satisfied
Do you think that the website's design change makes the site easier to use?
Has the new design made it easier for you to find information on the site?
Has the new design improved the overall visual appeal of the site?
How would you rate your overall satisfaction with the new design of the site?
×
How likely are you to recommend Game8 to someone you know?
Very Unlikely
0
1
2
3
4
5
6
7
8
9
10
Very Likely
If you have other opinions regarding potential improvement to the website, please share them with us. We would appreciate your honest opinion.
Note: This is a free response section, so you can proceed without entering anything.
Note: Please be sure not to enter any kind of personal information into your response.
Note: Please be sure not to enter any kind of personal information into your response.
×
Thank You
×
Thank you for participating in our survey! Your answers will help us to improve the quality of our website and services.
We hope you continue to make use of Game8.
We hope you continue to make use of Game8.
Close
Rankings
- We could not find the message board you were looking for.
Gaming News


![Forza Horizon 6 Review [Preview] | Beautiful Roads With a Whole Lot of Oversteer](https://img.game8.co/4460981/a7254c24945c43fbdf6ad9bea52b5ce9.png/thumb)
![Borderlands Mobile Review [Playtest] | The Same Borderlands Made Easy](https://img.game8.co/4465500/aac0c880a39ec5cd46073e49d18f3ed5.png/thumb)
Popular Games

Genshin Impact Walkthrough & Guides Wiki
Crimson Desert Walkthrough & Guides Wiki
Umamusume: Pretty Derby Walkthrough & Guides Wiki
Honkai: Star Rail Walkthrough & Guides Wiki
Monster Hunter Stories 3: Twisted Reflection Walkthrough & Guides Wiki
Wuthering Waves Walkthrough & Guides Wiki
The Seven Deadly Sins: Origin Walkthrough & Guides Wiki
Pokemon TCG Pocket (PTCGP) Strategies & Guides Wiki
Pokemon Pokopia Walkthrough & Guides Wiki
Zenless Zone Zero Walkthrough & Guides Wiki


Recommended Games
Fire Emblem Heroes (FEH) Walkthrough & Guides Wiki
Pokemon Brilliant Diamond and Shining Pearl (BDSP) Walkthrough & Guides Wiki
Super Smash Bros. Ultimate Walkthrough & Guides Wiki
Diablo 4: Vessel of Hatred Walkthrough & Guides Wiki
Cyberpunk 2077: Ultimate Edition Walkthrough & Guides Wiki
Yu-Gi-Oh! Master Duel Walkthrough & Guides Wiki
Elden Ring Shadow of the Erdtree Walkthrough & Guides Wiki
Monster Hunter World Walkthrough & Guides Wiki
The Legend of Zelda: Tears of the Kingdom Walkthrough & Guides Wiki
Persona 3 Reload Walkthrough & Guides Wiki


All rights reserved
© KOJIMA PRODUCTIONS Co., Ltd. 2022 All Rights Reserved
The copyrights of videos of games used in our content and other intellectual property rights belong to the provider of the game.
The contents we provide on this site were created personally by members of the Game8 editorial department.
We refuse the right to reuse or repost content taken without our permission such as data or images to other sites.