 Cyndaquil
 Treecko
 Psyduck
 Chikorita
 Bulbasaur
 Torchic
 Eevee
Eevee Skitty
 Minun
Minun Plusle
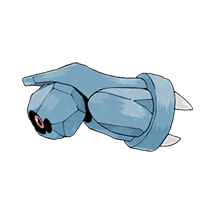 Beldum
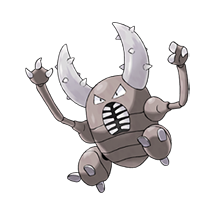 Pinsir
 Slakoth
 Exeggutor
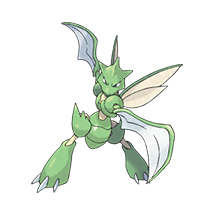 Scyther
 Ledyba
 Linoone
 Shroomish
 Sunflora
 Beedrill
 Trapinch
 Spinarak
 Houndour
 Dustox
 Weedle
 Teddiursa
 Farfetch'd
 Gligar
 Stantler
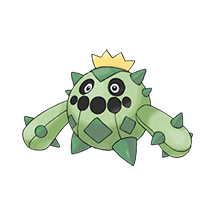 Cacnea
 Houndoom
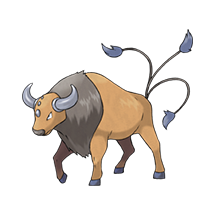 Tauros
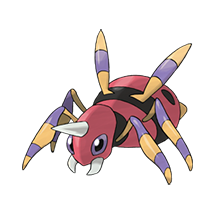 Ariados
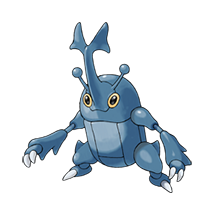 Heracross
 Breloom
 Doduo
Doduo Dunsparce
 Skiploom
 Bagon
Bagon Tangela
 Nincada
 Pidgeot
 Magby
Magby Torkoal
 Rapidash
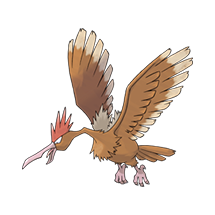 Fearow
 Pineco
 Ditto
Ditto Mightyena
 Snorunt
 Lairon
 Rhyhorn
 Metang
 Glalie
 Seviper
 Slaking
 Pupitar
 Shelgon
 Swablu
 Grimer
 Rhydon
 Arbok
Arbok Magmar
 Golem
Golem Graveler
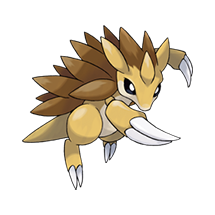 Sandslash
 Sandshrew
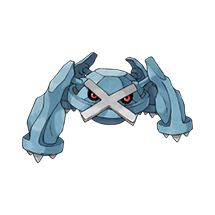 Metagross
 Salamence
 Tropius
 Claydol
 Flygon
 Aerodactyl
 Dusclops
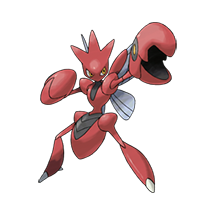 Scizor
 Altaria
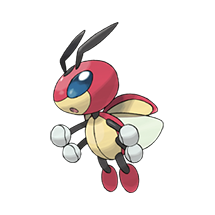 Ledian
 Lunatone
 Masquerain
 Shuppet
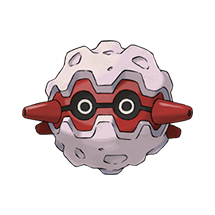 Forretress
 Shedinja
 Ponyta
 Victreebel
 Persian
 Dugtrio
 Diglett
 Wigglytuff
 Jigglypuff
 Clefable
 Clefairy
 Metapod
 Azumarill
 Bellossom
 Igglybuff
 Pichu
Pichu Kangaskhan
 Chansey
 Weezing
 Electrode
 Gardevoir
 Blissey
 Smoochum
 Porygon2
 Granbull
 Kecleon
 Camerupt
 Happiny
This survey will take about 1 minute.
Your answers will help us to improve our website.
Pokemon Mystery Dungeon DX Switch
Joyous Tower Dungeon Strategy Guide and Encountered Pokemon
☆ Game8's Pokemon TCG Pocket Wiki is live!
Check Game8's Guide for all your needs at lightning speed!
This is a page about the Dungeon Joyous Tower in the game Pokemon Mystery Dungeon: Rescue Team DX for the Nintendo Switch. Read on for information about its boss, the number of floors and which Pokemon can be found here.
List of Contents
Basic Information
| Basic Information | |
|---|---|
| No. of Floors | 99 |
| Boss | - |
| Required? | No |
| Recommended Level | - |
Related Story Missions
No Story Missions take place in this Dungeon.
Encountered Pokemon
Tips and Strategies
Best Pokemon to Use
|
|
Once Cloyster reaches level 13, it should be able to take care of tons of enemies with Spike Cannon due to its Skill Link ability. However, Cloyster can be a bit hard to use before level 13 as starting moves are randomized. |
|
|
You may have to recruit a couple of different Masquerain for this build, but this Pokemon can be very useful for Joyous Tower as it can get Quiver Dance, Ominous Wind, and Bug Buzz as its starting moves. Masquerain can also resist physical attacks as it has the Intimidate ability. |
|
|
Scizor's moveset works well in Joyous Tower. It's Technician ability works well with Pursuit, Quick Attack, and Bullet Punch, which are all potential starting moves. It also learns Agility at level 17, which can be very useful for the later parts of the dungeon. It's only downside is its weakness to Fire-type moves, but it makes up for it with many resistances. |
Find Pokemon with Excellent Starting Moves
Since you'll be starting from level 5 in Joyous Tower, we recommend recruiting Pokemon that have great starting moves like the ones we recommend above. Note that the level of your moves will start from level 1, so we don't recommend using moves that initially have low power.
Learn Speed-Boosting Moves
Speed is very important in Joyous Tower as you will want to escape from fights in the later parts of the dungeon. As such, we recommend using Pokemon that can learn moves like Agility or Rock Polish.
Rely on Long-Range Attacks
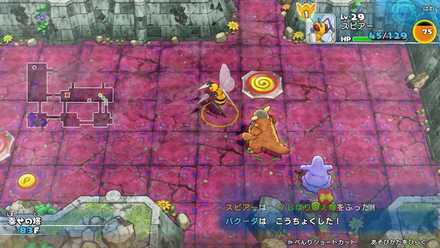
Joyous Tower has big open rooms, so you can easily create situations where you can safely attack enemy Pokemon from the corridor.
Recommended Rare Qualities
Narrow Focus works well with our attack from the corridor strategy, and Riled Up makes it easier to explore a floor since the boost lasts as long as you stay on the same floor.
XP Boost is also really useful as you will have access to more moves faster.
Joyous Tower Strategy
Enemy Pokemon Can Pick Up Items

Watch out! Enemy Pokemon in Joyous Tower can pick up and throw projectiles like Silver Spike at you, so be careful unless you want a half-dead team.
In addition, be careful when you use your own projectiles, as enemy Pokemon can pick those up too.
Prioritize Collecting Items from 1F-9F

In the early stages of the dungeon, you don't need to worry about leveling up too much, so focus on collecting as many items as possible.
Watch Out for Strong Pokemon from 10F-19F

Be careful as you go through these floors as many of the Pokemon here can attack from long-range. However, if you're able to recruit some of these Pokemon, you should be safe until around 60F.
| Pokemon to Watch Out For | Description |
|---|---|
|
|
Appears until 15F. These are able to attack from afar with moves like Razor Leaf, Ember, and Water Gun, so be careful. |
|
|
Be careful with how you position your team, or else you might fall victim to a Focus Energy + Quick Attack combo from a Scyther with Technician. |
|
|
Linoone can be deadly if you aren't careful as it can use the multi-strike Fury Swipes and long-range Quick Attack. Approach these with caution and make sure you have enough HP when you do so. |
Watch Out for Magnitude from Dugtrio from 20F-29F
Use these floors to collect more items and to level up as the only Pokemon to really watch out for here is Dugtrio.
| Pokemon to Watch Out For | Description |
|---|---|
|
|
Appears from 24F-29F. Be careful as the room-affecting Magnitude can kill you outright if it's powerful enough, so deal with these Pokemon from the corridors. |
The Toughest Section in Joyous Tower (30F-39F)

These floors are some of the toughest in Joyous Tower, and if you can go through these safely, you should be good up until 90F.
For dangerous enemy Pokemon, including those that can mega evolve, we recommend attacking them with Two-Edge Wands and Silver Spikes from the corridors. You do not want to fight them head-on.
| Pokemon to Watch Out For | Description |
|---|---|
|
|
With its Chlorophyll ability, Bellossom can be very dangerous with its Sunny Day + Leaf Storm combo where it can attack you twice in one turn from afar. Attack it from corridors using items. |
|
|
Gardevoir can be a pain to deal with since it can heal other enemies with Heal Pulse. Attack it with items from afar as it can cause status conditions that will have you attacking your teammates |
Blast Through 41F-89F
Your main priority for these floors is to get to the stairs as fast as possible by using the items and speed-boosting moves that you've collected and learned so far. Try to avoid enemies if you can, but if you have to face them, use items.
| Pokemon to Watch Out For | Description |
|---|---|
|
|
Appears in 80F-84F. They can be very dangerous as not only do they have the room-affecting Earth Power but they mega evolve too. |
|
|
Appears in 77F. While these Kecleon may look identical to the unbeatable shopkeepers that attack you when you steal from them, these are much easier to defeat, so don't waste any items on them. |
Running Away Is the Best Option (90F-98F)

A lot of the Pokemon you will see in these floors come from Sky Tower, so it may be hard to escape from them. However, use your items wisely and apply speed-boosts when necessary, and you should be able to escape to the next floor.
| Pokemon to Watch Out For | Description |
|---|---|
|
|
Altaria appears in the first half on 90F-98F. Through Natural Recovery and Refresh, it can heal itself and other enemy Pokemon of Status Conditions. It can also buff itself using Dragon Dance and Cotton Guard. |
|
|
Appears at 94F onwards, it is dangerous because of Agility. Aerodactyls tend to use Agility more often than Scizors. It also has Pressure drains your PP as you use moves against it. |
|
|
Appears at 95F, Flygons are very dangerous because of Earth Power and Hyper Beam moves that can easily destroy your team. It also has Dragon Dance that allows it to boost its travel speed. Flygons are very uncommon but if you see one, prevent it from dealing damage by knocking it out as soon as possible. |
|
|
Its STAB Technician Bullet Punch is very powerful. However, it is fairly low in health. |
|
|
It can raise its stats with Cosmic Power so knock it out as soon as possible. It can damage your Pokemon at long range using Psybeam so beware. |
Items Found in Joyous Tower
Coming soon.
Joyous Tower Rewards: 99F Items

On the last floor, there are 12 Deluxe Boxes and 3 Joy Seeds waiting to be claimed. Be sure to collect everything!
Related Links
| Main Story Dungeons | ||
|---|---|---|
| Tiny Woods | Thunderwave Cave | Mt. Steel |
| Sinister Woods | Silent Chasm | Mt. Thunder |
| Great Canyon | Lapis Cave | Mt. Blaze |
| Frosty Forest | Mt. Freeze | Uproar Forest |
| Magma Cavern | Sky Tower | - |
| Optional Dungeons | ||
| Oddity Cave | Rock Path | Snow Path |
| Illusory Grotto | - | - |
Comment
Author

Joyous Tower Dungeon Strategy Guide and Encountered Pokemon
Please participate in our site
improvement survey
03/2026
improvement survey
03/2026
Would you assist in
improving Game8's site?
improving Game8's site?

×
We are listening to our users' valuable opinions and discussing how to act on them.
The information collected through this survey will be used for the purpose of improving our services. In addition, the information will only be disclosed a part of a statistic in a format that will not allow identification of personal information.
Begin Survey
Not Now
×
Please rate each item regarding Game8.co's Advertisements.
Amount of Ads
Very Dissatisfied
Somewhat Dissatisfied
Fine
Somewhat Satisfied
Highly Satisfied
Placement of Ads
Timing of Ad Display
Ad Loading Speed
Safeness of Ads
Content of Ads
×
Please rate each item regarding Game8.co's Quality of Articles.
Amount of information
Very Dissatisfied
Somewhat Dissatisfied
Fine
Somewhat Satisfied
Highly Satisfied
Frequency of updates
Speed of new information
Accuracy of articles
Understandibility of articles
Readability of sentences
×
Please rate each item regarding Game8.co's Usability of the Site.
Ease of finding information
Very Dissatisfied
Somewhat Dissatisfied
Fine
Somewhat Satisfied
Highly Satisfied
Loading Speed
Use of Color
Font Size
Visibility of Images
Easy to Understand Layout
×
Please rate each item regarding Game8.co's Message Boards, Comments.
Ease of Writing
Very Dissatisfied
Somewhat Dissatisfied
Fine
Somewhat Satisfied
Highly Satisfied
Readability
Ease in Finding Information
Comment Quality
Comment Quantity
Admin Response
×
Please rate each item regarding Game8.co's Site's new design.
Please rate our site's new design
Very Dissatisfied
Somewhat Dissatisfied
Fine
Somewhat Satisfied
Highly Satisfied
Do you think that the website's design change makes the site easier to use?
Has the new design made it easier for you to find information on the site?
Has the new design improved the overall visual appeal of the site?
How would you rate your overall satisfaction with the new design of the site?
×
How likely are you to recommend Game8 to someone you know?
Very Unlikely
0
1
2
3
4
5
6
7
8
9
10
Very Likely
If you have other opinions regarding potential improvement to the website, please share them with us. We would appreciate your honest opinion.
Note: This is a free response section, so you can proceed without entering anything.
Note: Please be sure not to enter any kind of personal information into your response.
Note: Please be sure not to enter any kind of personal information into your response.
×
Thank You
×
Thank you for participating in our survey! Your answers will help us to improve the quality of our website and services.
We hope you continue to make use of Game8.
We hope you continue to make use of Game8.
Close
Rankings
- We could not find the message board you were looking for.
Gaming News


![Monster Hunter Stories 3 Review [First Impressions] | Simply Rejuvenating](https://img.game8.co/4438641/2a31b7702bd70e78ec8efd24661dacda.jpeg/thumb)
Popular Games

Genshin Impact Walkthrough & Guides Wiki
Honkai: Star Rail Walkthrough & Guides Wiki
Umamusume: Pretty Derby Walkthrough & Guides Wiki
Pokemon Pokopia Walkthrough & Guides Wiki
Resident Evil Requiem (RE9) Walkthrough & Guides Wiki
Monster Hunter Wilds Walkthrough & Guides Wiki
Wuthering Waves Walkthrough & Guides Wiki
Arknights: Endfield Walkthrough & Guides Wiki
Pokemon FireRed and LeafGreen (FRLG) Walkthrough & Guides Wiki
Pokemon TCG Pocket (PTCGP) Strategies & Guides Wiki


Recommended Games
Diablo 4: Vessel of Hatred Walkthrough & Guides Wiki
Cyberpunk 2077: Ultimate Edition Walkthrough & Guides Wiki
Fire Emblem Heroes (FEH) Walkthrough & Guides Wiki
Yu-Gi-Oh! Master Duel Walkthrough & Guides Wiki
Super Smash Bros. Ultimate Walkthrough & Guides Wiki
Pokemon Brilliant Diamond and Shining Pearl (BDSP) Walkthrough & Guides Wiki
Elden Ring Shadow of the Erdtree Walkthrough & Guides Wiki
Monster Hunter World Walkthrough & Guides Wiki
The Legend of Zelda: Tears of the Kingdom Walkthrough & Guides Wiki
Persona 3 Reload Walkthrough & Guides Wiki


All rights reserved
©2020 Pokémon. ©1995–2020 Nintendo / Creatures Inc. / GAME FREAK inc. ©1993–2020 Spike Chunsoft. Pokémon and Nintendo Switch are trademarks of Nintendo.
The copyrights of videos of games used in our content and other intellectual property rights belong to the provider of the game.
The contents we provide on this site were created personally by members of the Game8 editorial department.
We refuse the right to reuse or repost content taken without our permission such as data or images to other sites.