Dungeon Crawling Strategy Guide
☆ Game8's Pokemon TCG Pocket Wiki is live!
Check Game8's Guide for all your needs at lightning speed!

This is a guide page that provides tips and tricks on how to crawl through the dungeons in Pokemon Mystery Dungeon: Rescue Team DX for the Nintendo Switch efficiently. Read on!
List of Contents
Tactics Meeting

Through tactics meeting, you will be able to somehow control all your team mates by giving their AI specific directions. Depending on the situation or you goals, these tactics can be extremely useful especially in Rescue Team DX where your party can cater to a bigger number of Pokemon.
Let's Go Together

Pokemon who select this tactic will simply follow the team leader. It is the strategy recommended for all starting players since you do not have a lot to play with in the early parts of the game. They will also battle whatever Pokemon the team leader is battling.
Follow Me

Follow Me is a similar tactic to Let's Go Together. However, Pokemon under this tactic will prioritze staying behind the leader rather than helping the leader battle the wild Pokemon.
Don't Use Moves
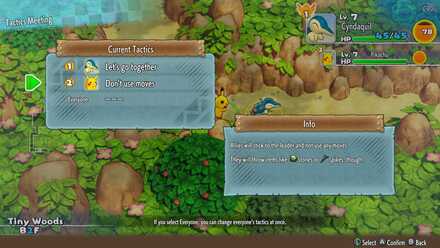
Pokemon using this tactic will not use moves. They will try to help in battles using thrown items, however. This can be used to preserve PP for a boss fight or if your Pokemon has no effective moves on the enemies in that specific dungeon.
Go After Foes

Pokemon using this tactic but they will aggressively part ways if there is an enemy Pokemon nearby. Use this if you are trying to reserve the resources of your leader or you are lazy to fight using your Pokemon.
Go Other Way

Allies will not follow the leader and explore the dungeon on their own. Do not use this on your weaker members.
Wait There

Allies will stay in the position they are currently in and they will not follow the leader. However, they will defend themselves if a wild Pokemon gets near them.
Run Away From Enemies

Pokemon using this tactic will follow the leader but will run away for a bit or keep distance when there are enemies nearby. If the enemies are dealt with, they will follow the leader again.
Useful Features in the Dungeon Menu
Move: On/Off

If you go to this section in the Dungeon Menu, you can turn off the moves of some Pokemon. This means that the AI will not use these moves.

You can select a Pokemon and toggle the moves their AI is going to use.

In this photo, all of Cyndaquil's moves except Ember are toggled on. This would be useful in a situation wherein the Pokemon are weak to fire moves or there are many Ghost types in the dungeon as other than Ember, his moves cannot hit Ghost types.
Changing Party Leaders

Remember that you can change party leaders right from the start! If you don't want to use the Tactics Meeting tab, this feature will give you a layer of strategy that you can use to your advantage.
Look Around
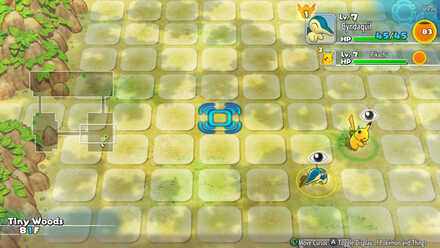
This is a feature where you can look around the room that you are currently in.

This allows you to scan the rooms on what items are there and more importantly see the hostile Pokemon inside that room so you can plan out your strategy. In this photo, we are ble to see a Sunkern and scout out its typing. In harder dungeons where Monster Houses are common, this can be a very useful feature.
Party Tips

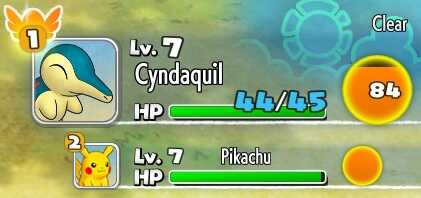
Mind Your Teammates
Depending on the tactics that you are using in the Tactics Meeting tab, you might need to pay attention to your teammates more. Some of them that are away from the party might be taking too much damage. You do not want any of your team mates to faint. Regardless of how far they are, you can always see their status bars at the top right corner of the screen.
Recruitment Reminder
You cannot recruit Pokemon if you do not have the Rescue Camp associated them. You also cannot recruit Pokemon when your party is full since you need to go through the dungeon with them alive in order for them to stay.
Party Size and Composition
Remember to compose your team in such a way that covers each others weaknesses. If you prefer, bring as much teammates as possible, this way you can find the stairs a lot faster when using Go Other Way tactic.
Items
Make sure to collect the items in the dungeon! You can both use them inside that dungeon or the dungeons you are raiding. Below are some items types that you should take note of.
Held Item
![]()
Held Items provide useful passive abilities to your Pokemon. They have a huge variety when it comes to use. Some held items even make the dungeon harder for you. Below is an example of a Held Item.
| Item | Effect |
|---|---|
| When equipped, it boosts the wearer's Attack, increasing the power of physical moves! |
Ethers and Elixirs
![]()
Drinking an Ether restores all PP of one move. Ethers are one of the most important items in the game as we rely heavilly in our Pokemon's moves to be able to make our way throughout dungeons.
| Item | Effect |
|---|---|
| Drinking it completely restores the PP of one of your moves. |
Apples
![]()
With the removal of the option to eat gummies to fill up the Belly, Apples are the number one go to in filling up our Pokemon's belly. It is important to keep Apples in the inventory as a Pokemon would not last long if their belly is empty.
| Item | Effect |
|---|---|
|
|
Eating this fills your Belly a little tiny bit. If you eat it when your Belly is full, it increases your Belly's capacity ever so slightly uring that adventure. |
| Item | Effect |
|---|---|
|
|
Eating this fills your Belly completely, and it increases your Belly's capacity by a lot during that adventure. |
Seeds
![]()
Seeds can be either thrown or eaten for interesting effects. Below are some useful seeds.
| Item | Effect |
|---|---|
| Eating it makes you attack 1 tile in front of your with a blast, causing huge damage. You can also throw it to use it, but the power is weaker. |
| Item | Effect |
|---|---|
| If you throw it at an enemy and hit them, you can make them Infatuated for a little while, which will make their moves more likely to fail. If this seed is in your Toolbox, it will be targeted first by Pluck, a Sticky Trap, or the like. |
| Item | Effect |
|---|---|
| Eating it causees the Pokemon to become Awakened, making them very strong! |
Orbs
![]()
Similar to Seeds, Orbs posses some interesting qualities that provide so much utility.
| Item | Effect |
|---|---|
| Using it draws all teammates to you. |
| Item | Effect |
|---|---|
| Using it boosts the user's evasiveness greatly. The effect continues while you're on the floor you used the orb on. |
Wands
![]()
Wands also provide utility, but they can be used for multiple times.
| Item | Effect |
|---|---|
| Waving it at a Pokemon makes that Pokemon Sleep for a while. |
Thrown Items
![]()
If moves are not an option, Thrown Items are the only other sustainable way to deal damage to your opponents. Some items deal more damage than others and some can fly over terrain enabling you to hit Pokemon that are otherwise unreachable.
| Item | Effect |
|---|---|
| When throw, it flies toward enemies and deals a fixed amount of damage to them, even if they're in walls. |
| Item | Effect |
|---|---|
| When hurled, it flies in a straight line through walls and Pokemon to damage any enemy it hits. |
Berries
![]()
Berries can cure you of your status conditions.
| Item | Effect |
|---|---|
| When hurled, it flies in a straight line through walls and Pokemon to damage any enemy it hits. |
Auto Mode and Dashing
Auto Mode

Auto Mode is a great way of running dungeons if you do not want to pay much attention to the game. Remember that you can set the movement priority to either Stair or Item priority. The former would mean that the AI will prioritize finding the stairs and the former means that your Pokemon would make sure to collect all of the items present in that floor.
Dashing

If you hold B while trying to move in a direction, you will move to the next intersection of either a corridor and a room or two or more corridors. You will also stop when you hit a wall or an unpassable terrain. Dashing will also stop when a hostile Pokemon is near. This can speed up your dungeon crawling. Both your team and all the hostile Pokemon will speed up too as this counts as going through all of those tiles as a turn per tile.
Belly
Be warned as using Dash recklessly and loitering around the dungeon too much will cause your Belly to go down. This means you will be close to fainting so pick up your pace! Many Pokemon are in need of a rescue!
Dungeon Midpoint

Some of the larger dungeons have a checkpoint wherein you can use a Kangaskhan statue to heal up, store and take items. Do not forget to do these things!
Related Links

Author
Dungeon Crawling Strategy Guide
Rankings
- We could not find the message board you were looking for.
Gaming News

![Monster Hunter Stories 3 Review [First Impressions] | Simply Rejuvenating](https://img.game8.co/4438641/2a31b7702bd70e78ec8efd24661dacda.jpeg/show)


![Monster Hunter Stories 3 Review [First Impressions] | Simply Rejuvenating](https://img.game8.co/4438641/2a31b7702bd70e78ec8efd24661dacda.jpeg/thumb)
Popular Games

Genshin Impact Walkthrough & Guides Wiki
Honkai: Star Rail Walkthrough & Guides Wiki
Umamusume: Pretty Derby Walkthrough & Guides Wiki
Pokemon Pokopia Walkthrough & Guides Wiki
Resident Evil Requiem (RE9) Walkthrough & Guides Wiki
Monster Hunter Wilds Walkthrough & Guides Wiki
Wuthering Waves Walkthrough & Guides Wiki
Arknights: Endfield Walkthrough & Guides Wiki
Pokemon FireRed and LeafGreen (FRLG) Walkthrough & Guides Wiki
Pokemon TCG Pocket (PTCGP) Strategies & Guides Wiki


Recommended Games
Diablo 4: Vessel of Hatred Walkthrough & Guides Wiki
Cyberpunk 2077: Ultimate Edition Walkthrough & Guides Wiki
Fire Emblem Heroes (FEH) Walkthrough & Guides Wiki
Yu-Gi-Oh! Master Duel Walkthrough & Guides Wiki
Super Smash Bros. Ultimate Walkthrough & Guides Wiki
Pokemon Brilliant Diamond and Shining Pearl (BDSP) Walkthrough & Guides Wiki
Elden Ring Shadow of the Erdtree Walkthrough & Guides Wiki
Monster Hunter World Walkthrough & Guides Wiki
The Legend of Zelda: Tears of the Kingdom Walkthrough & Guides Wiki
Persona 3 Reload Walkthrough & Guides Wiki


All rights reserved
©2020 Pokémon. ©1995–2020 Nintendo / Creatures Inc. / GAME FREAK inc. ©1993–2020 Spike Chunsoft. Pokémon and Nintendo Switch are trademarks of Nintendo.
The copyrights of videos of games used in our content and other intellectual property rights belong to the provider of the game.
The contents we provide on this site were created personally by members of the Game8 editorial department.
We refuse the right to reuse or repost content taken without our permission such as data or images to other sites.