All Puzzles in Radiant Scarwood Grove of Epiphany
★ Exclusive: Check out the State of Meta in 4.0!
♦ Latest: 4.1 Livestream Redeem Codes
♦ Phase 2: Sparkxie, Sparkle, Cerydra, Rappa
♦ Upcoming: Ashveil, Silver Wolf Lv.999, Evanescia
♦ Events: Cosmicon, Roll On!, Ding! Arcadia Fun-Time Clock-In Essentials
Here are all the Radiant Scarwood Grove of Epiphany puzzles in Honkai: Star Rail. Check out solutions for Radiant Scarwood Golden Scapegoats, Prophecy Tablets, along with Golden Short Spear and Coins of Whimsy locations!
| Amphoreus Map Guide | |
|---|---|
| Radiant Scarwood Chests | Radiant Scarwood Puzzles |
List of Contents
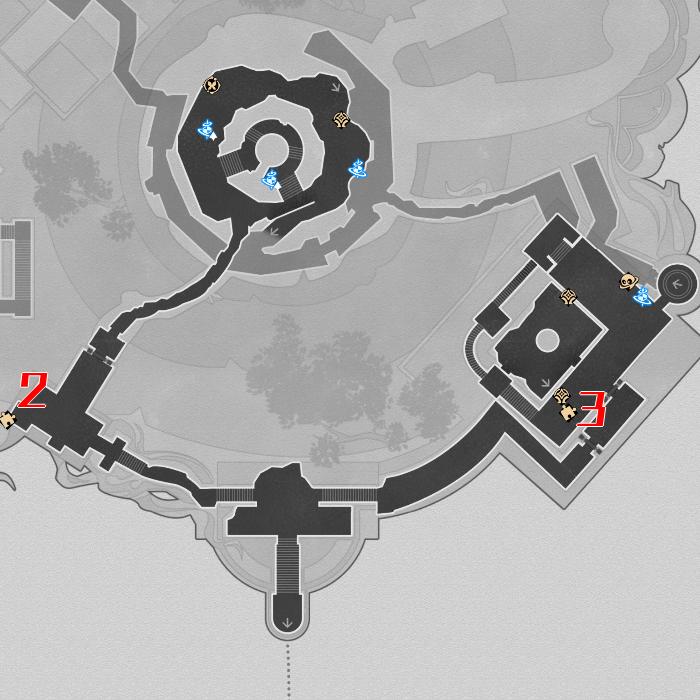
All Radiant Scarwood Grove of Epiphany Puzzles
Puzzles in Radiant Scarwood Grove of Epiphany
Shown above are the puzzles and collectibles found in Radiant Scarwood Grove of Epiphany! Click on the puzzles in the list to jump to a section and see guides on how to solve them!
Radiant Scarwood Chest Locations
Radiant Scarwood Grove of Epiphany Golden Scapegoat
All Radiant Scarwood Grove of Epiphany Golden Scapegoat Puzzles
| Radiant Scarwood Golden Scapegoats | |
|---|---|
 Radiant Scarwood F2 |
 Radiant Scarwood F1 North |
 Radiant Scarwood F1 South |
|
| Radiant Scarwood Puzzle Solutions | |
| Golden Scapegoat 1 | Golden Scapegoat 2 |
| Golden Scapegoat 3 | Golden Scapegoat 4 |
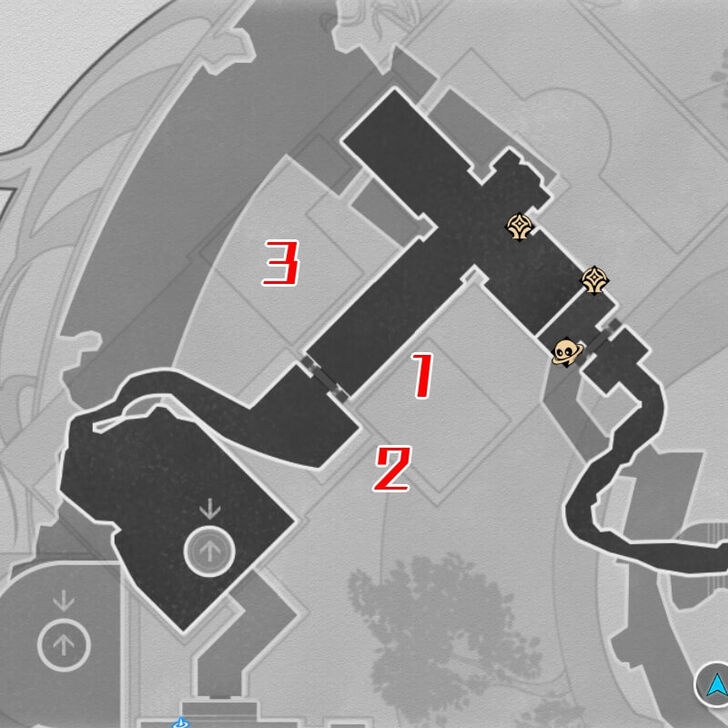
There are 4 Golden Scapegoat puzzles found in Radiant Scarwood Grove of Epiphany. Click on the links in the table to jump to a puzzle solution!
▲ All Radiant Scarwood Puzzles ▲
Radiant Scarwood Golden Scapegoat 1
| Radiant Scarwood Golden Scapegoat 1 Solution |
|---|
Input the commands: Right, Down, Right, Right, Right. When your past self shows up, head to the right and enter the portal. Next, head right once and left once. Now that you're directly above your past self, you can move right all the way to the altar. |
▲ Back to All Golden Scapegoats ▲
Radiant Scarwood Golden Scapegoat 2
| Radiant Scarwood Golden Scapegoat 2 Solution |
|---|
Input the commands: Right, Right, Right, Right, Left. When your past self shows up, go right once and press the orange button. Then, go up the ladder and through the portal. Now, you can head all the way right towards the altar. |
▲ Back to All Golden Scapegoats ▲
Radiant Scarwood Golden Scapegoat 3
| Radiant Scarwood Golden Scapegoat 3 Solution |
|---|
Input the commands: Right, Right, Left, Left, Right, Right, Right, Right, Right, Left. When your past self shows up, head left and enter the portal. Go right and fall through the hole to press the blue button again. |
▲ Back to All Golden Scapegoats ▲
Radiant Scarwood Golden Scapegoat 4
| Radiant Scarwood Golden Scapegoat 4 Solution |
|---|
Input the commands: Left, Down, Right, Right, Right, Right, Right. When your past self shows up, go all the way right and through the portal. After being teleported, keep going right until you fall down to the altar. |
▲ Back to All Golden Scapegoats ▲
Radiant Scarwood Grove of Epiphany Chirping Secret
Radiant Scarwood Chirping Secret Puzzle
| Radiant Scarwood Chirping Secret Puzzle | |
|---|---|
| 1 |  Engage with the portal at F1 North to enter Bartholos's POV. |
| 2 |  Fly up to the area high above the Shrine of Prayers. There should be a large group of shields on the wall. |
| 3 | 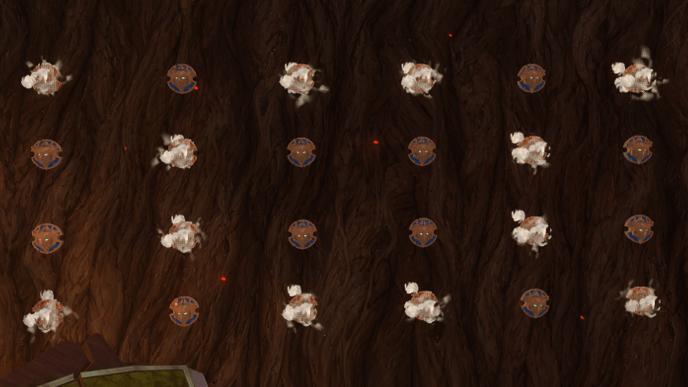 Shoot the shields marked with smoke above to turn them red. Doing so will remove them from the group and leave behind an infinity symbol made out of the remaining blue shields. |
| 4 | 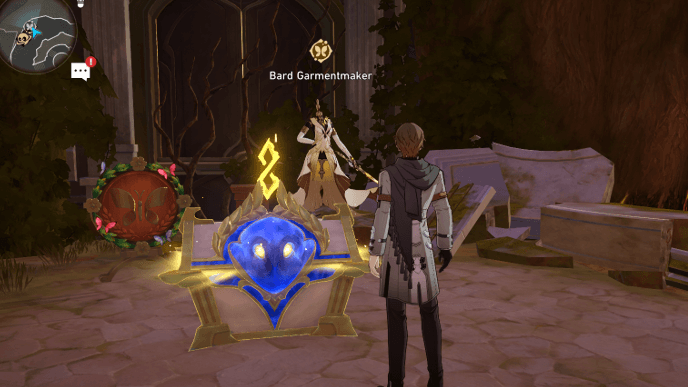 A chest will spawn by the Garmentmaker. Open it to claim its rewards and the Chirping Secret: Wisdom in Confinement achievement! |
Chirping Secret: Wisdom in Confinement is located in the circular area of F1 North in Radiant Scarwood. To start the puzzle, you must bring back the Spirithief in the area first so that it spawns the Bartholos's POV portal.
▲ All Radiant Scarwood Puzzles ▲
Radiant Scarwood Grove of Epiphany Prophecy Tablets
All Radiant Scarwood Grove of Epiphany Prophecy Tablets
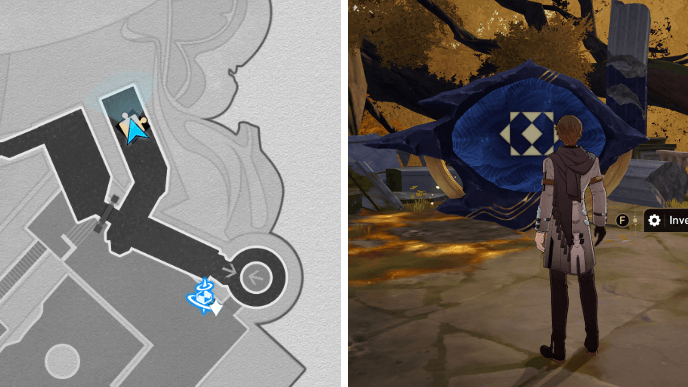
There is only 1 Prophecy Tablet, which is found in F2 of Radiant Scarwood Grove of Epiphany. Check out the guide below for its solution!
Radiant Scarwood Grove of Epiphany Prophecy Tablet Solution
| Radiant Scarwood Prophecy Tablet | |
|---|---|
| 1 | 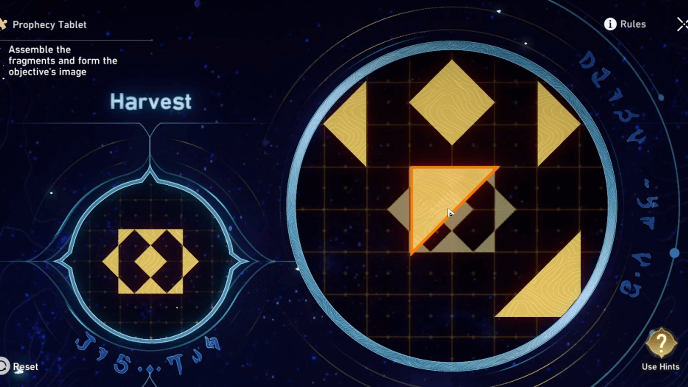 Place the triangle piece from the bottom left at the center of the image. |
| 2 | 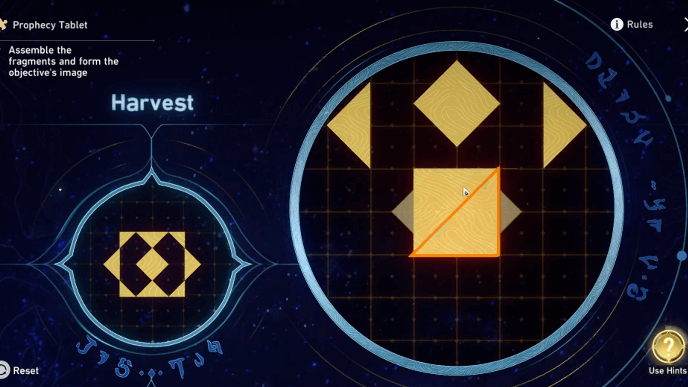 Place the triangle piece from the bottom right next to the previous piece to form a square in the middle. |
| 3 | 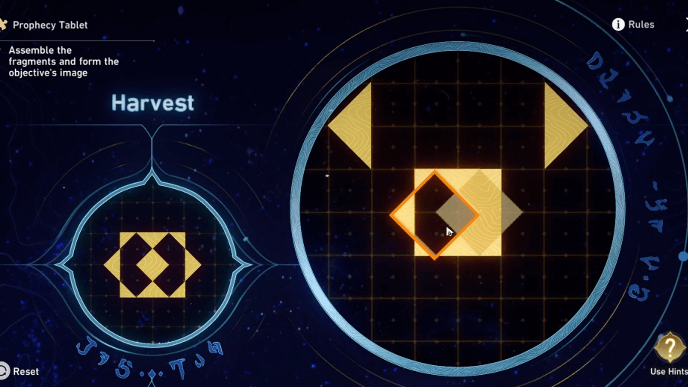 Make the diamond piece overlap with the left half of the square. |
| 4 |  Make the left-facing triangle overlap the right half of the square so that it forms a smaller diamond in the middle of the image. |
| 5 | 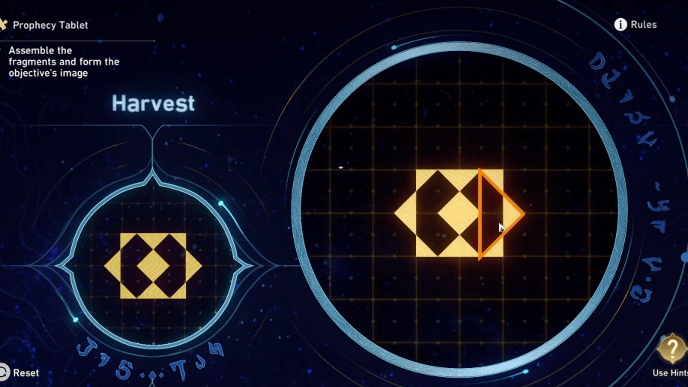 Place the right-facing triangle next to the previous piece to complete the image. |
▲ All Radiant Scarwood Puzzles ▲
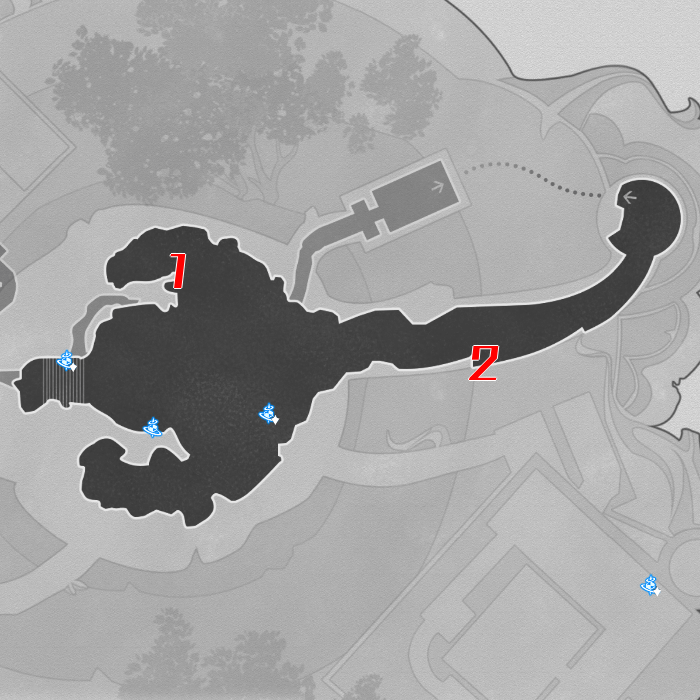
Radiant Scarwood Grove of Epiphany Coins of Whimsy
All Radiant Scarwood Grove of Epiphany Coins of Whimsy
| Radiant Scarwood Coins of Whimsy | |
|---|---|
 Radiant Scarwood F3 |
 Radiant Scarwood F1 North |
There are 6 Coins of Whimsy to collect in Radiant Scarwood Grove of Epiphany. Instead of using the Hand of Zagreus, these can be collected through Bartholos's POV. Check out the table below to see how to find each coin!
How to Get Radiant Scarwood Coins
| No. | Image | How to Find |
|---|---|---|
| 1 | 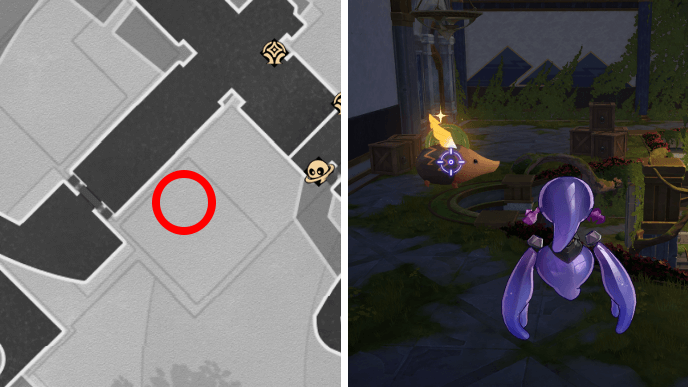 |
Fly up to the left side of the topmost floor to find a Flying Amphora with the coin. |
| 2 | 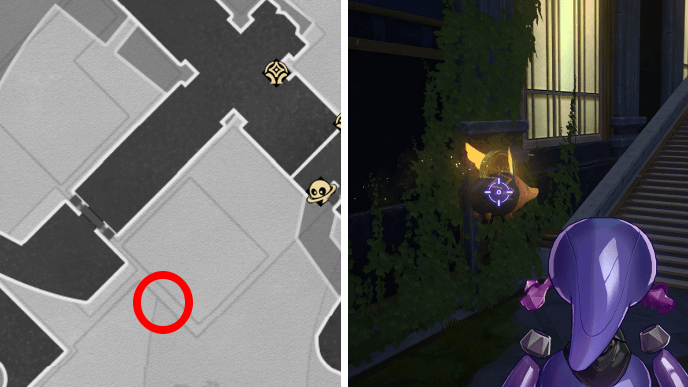 |
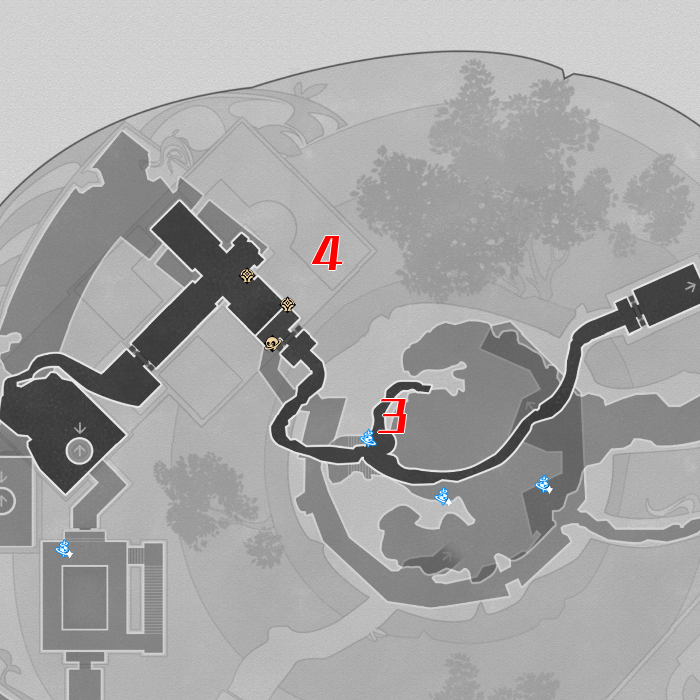
Go to the left side of the middle floor to find a Flying Amphora flying back and forth by a staircase. |
| 3 | 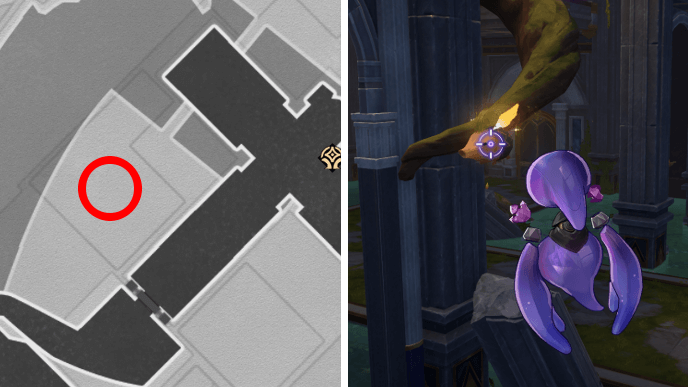 |
Fly down to the bottom floor. The Flying Amphora with the coin will be moving around the perimeter of the room. |
| 4 | 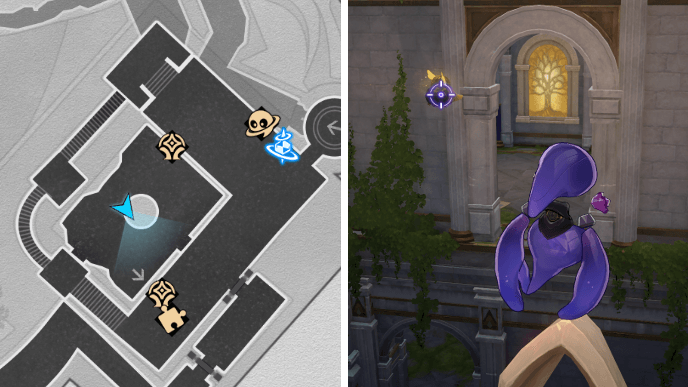 |
Fly up to the top of the giant statue in the area. You should spot the Flying Amphora with a coin moving around the perimeter of the upper floor. |
| 5 | 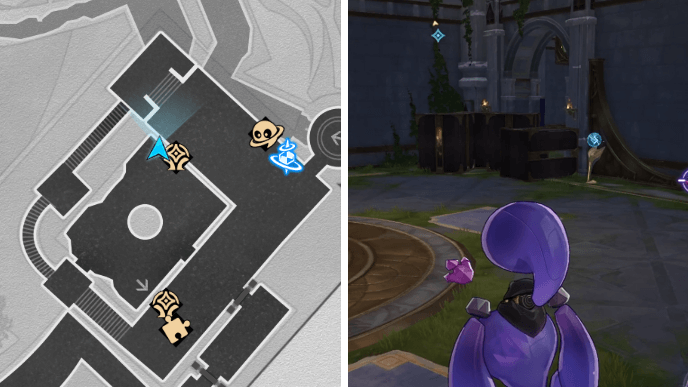 |
The coin is trapped in a box on the lower floor. Use the Ichor Vessel to destroy the boxes and get the coin. |
| 6 | 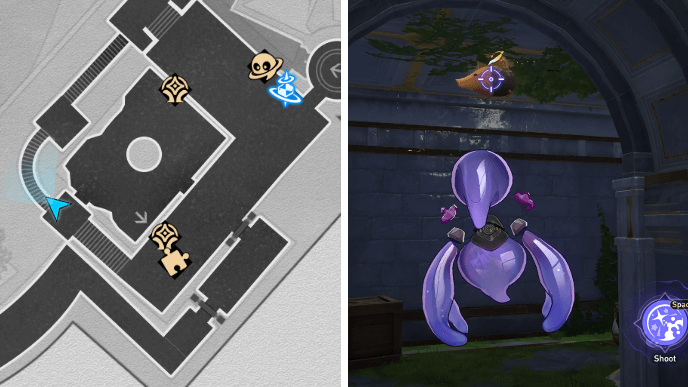 |
Look for the Flying Amphora by the ceiling in the passage where Chest 23 is. |
▲ All Radiant Scarwood Puzzles ▲
Radiant Scarwood Grove of Epiphany Golden Short Spear
All Radiant Scarwood Golden Short Spears
There's only 1 Golden Short Spear, which is found in F2 of Radiant Scarwood Grove of Epiphany. See how to catch the spear in the guide below!
| Radiant Scarwood Golden Short Spear Location |
|---|
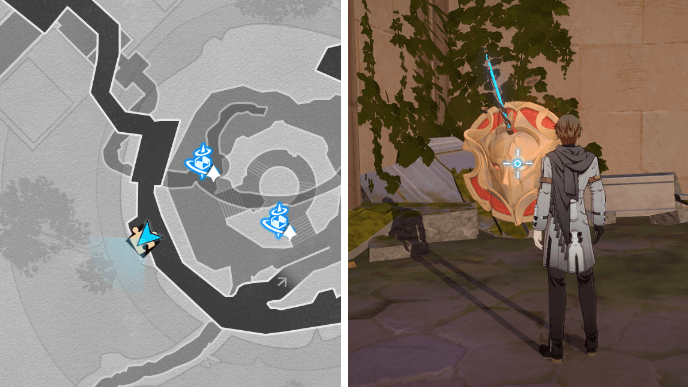 |
▲ All Radiant Scarwood Puzzles ▲
Radiant Scarwood Grove of Epiphany Creation Nymphs
All Radiant Scarwood Nymphs
| Radiant Scarwood Creation Nymphs Map | |
|---|---|
 See Full Image |
 See Full Image |
 See Full Image |
 See Full Image |
 See Full Image |
 See Full Image |
There are a total of 20 Creation Nymphs that can be found in Radiant Scarwood Grove of Epiphany.
▲ All Radiant Scarwood Puzzles ▲
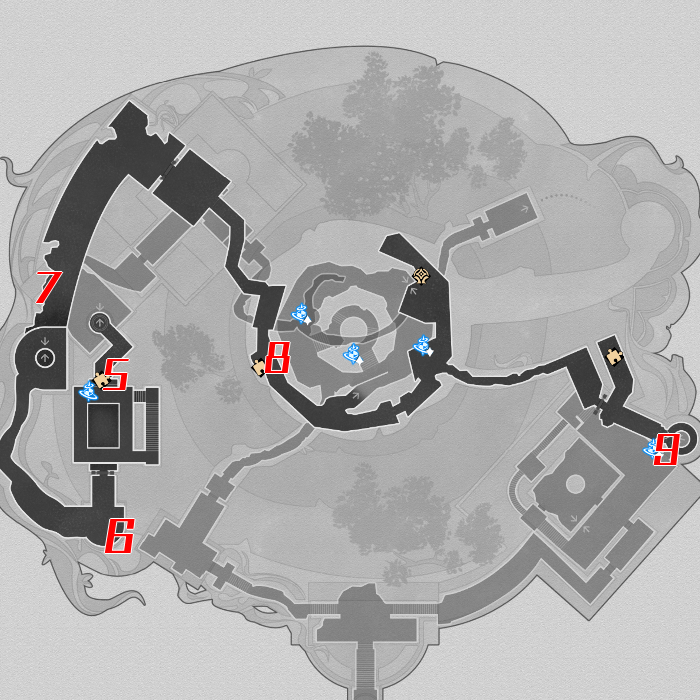
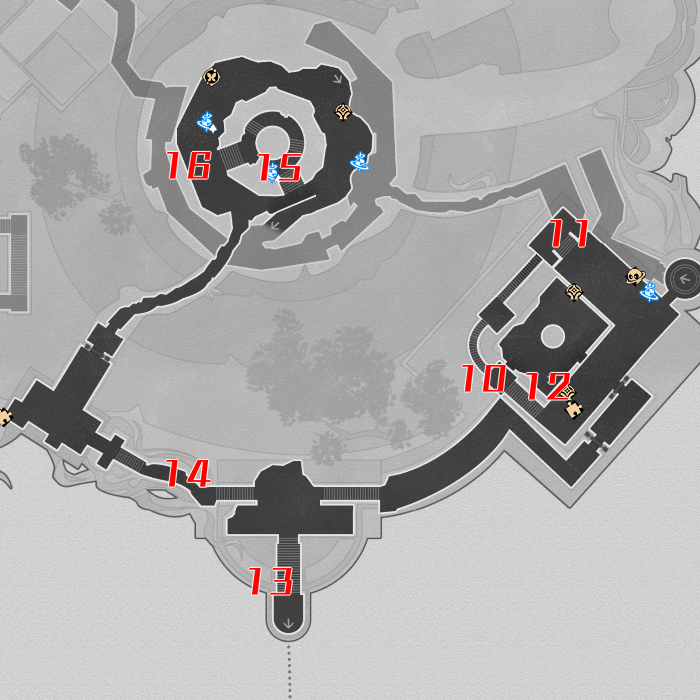
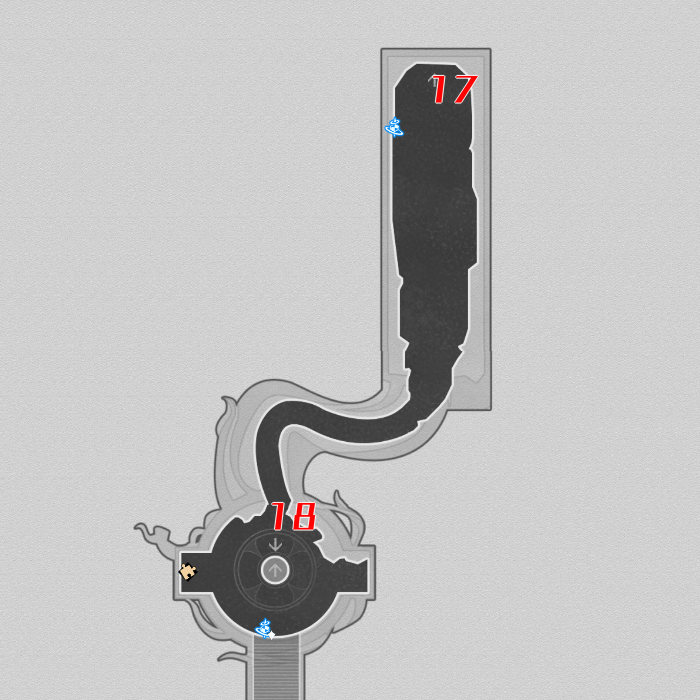
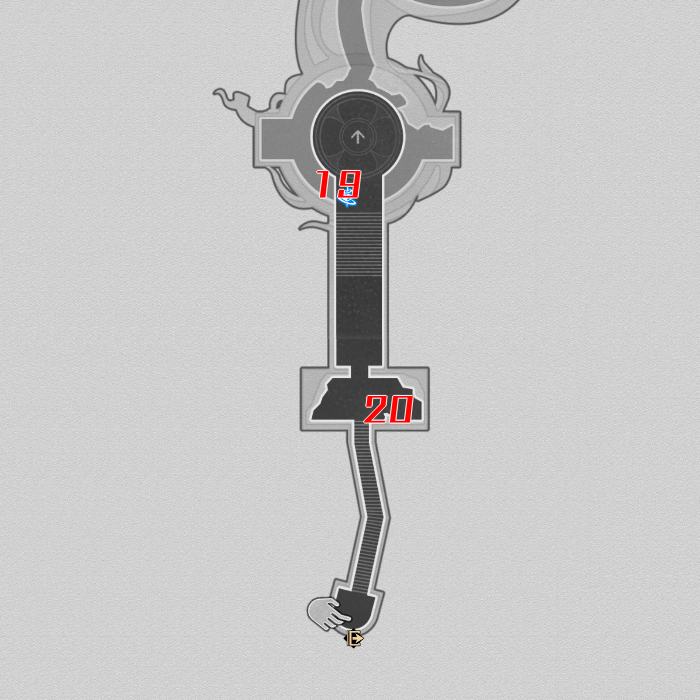
Radiant Scarwood Creation Nymph Locations
| No. | Image | How to Find |
|---|---|---|
| 1 | 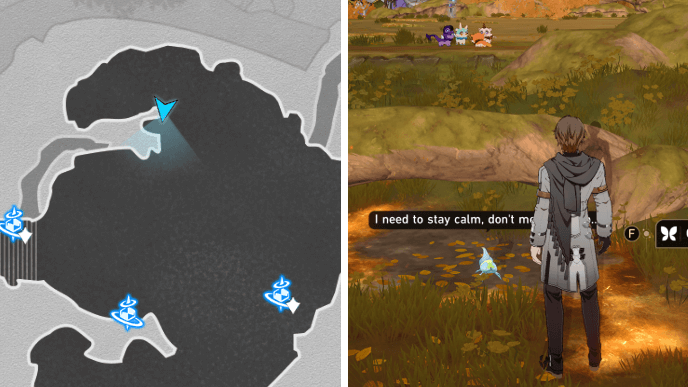 |
From the Ashen Throne Space Anchor, head north until you see a big branch past the group of manticores. The nymph is located under the branch. |
| 2 | 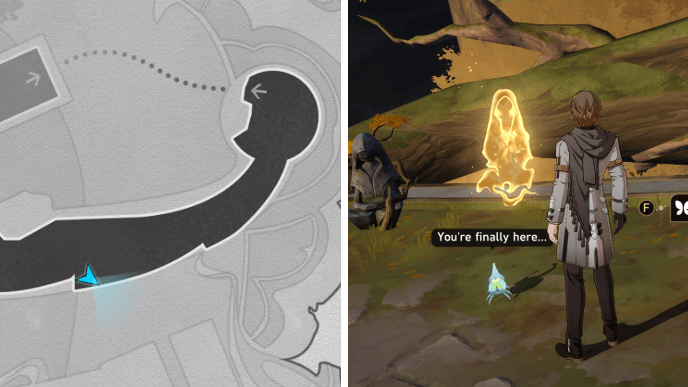 |
From the Ashen Throne Space Anchor, head to the right and follow the path until you see a two small statues and a gold spirit. The nymph will be just beside them. |
| 3 |  |
From the Butterfly Husk Embers Space Anchor, you'll see a nymph just nearby facing the heart of the Grove. |
| 4 | 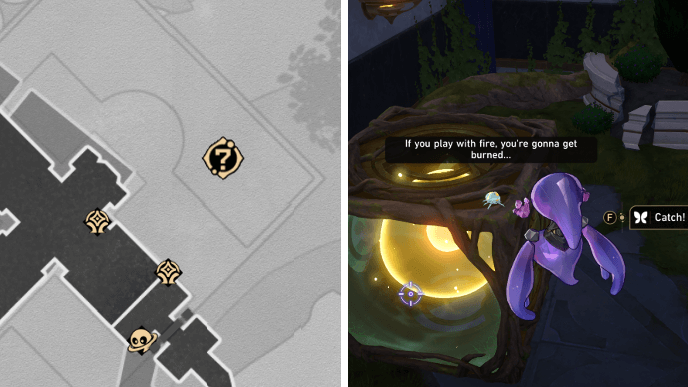 |
From the Butterfly Husk Embers Space Anchor, follow the path to the left and use Bartholos POV. Rise up and go to the right where you'll see the nymph on a big box. |
| 5 | 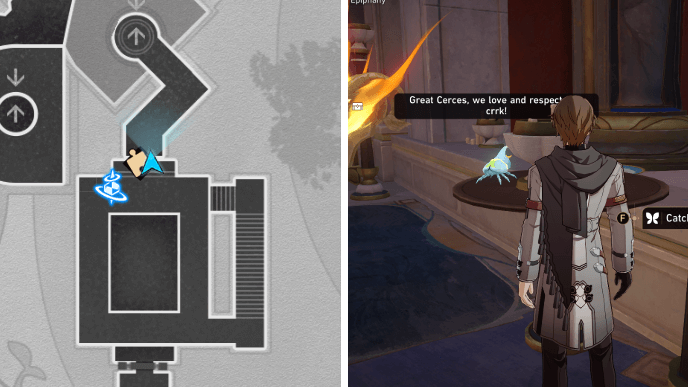 |
From the Golden Bough of Gnosis Space Anchor, climb up the stairs and you'll see the nymph on a small table near a stone statue and a person. |
| 6 |  |
From the Golden Bough of Gnosis Space Anchor, head south and go through the door. The nymph will be on the stone railing near a treasure chest. |
| 7 |  |
From the sixth nymph, follow the path to the left and head down the elevator. You'll see the nymph on a giant burned vine just after you exit the elevator. |
| 8 | 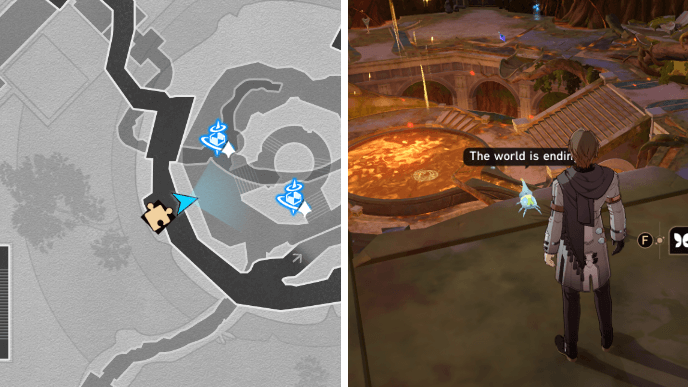 |
From the seventh nymph, follow the path to the right and until you go back inside the Grove. You'll see a Golden Short Spear and the nymph just in front of it. |
| 9 | 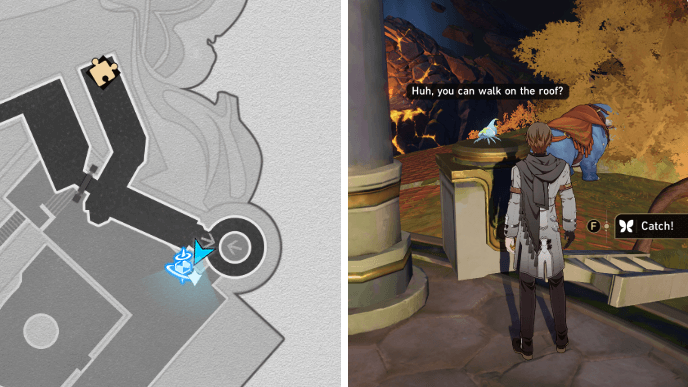 |
From the Teary Court Ruins Space Anchor, use the elevator to its right and you'll see the nymph on a broken pillar watching a Dromas after you exit the elevator. |
| 10 | 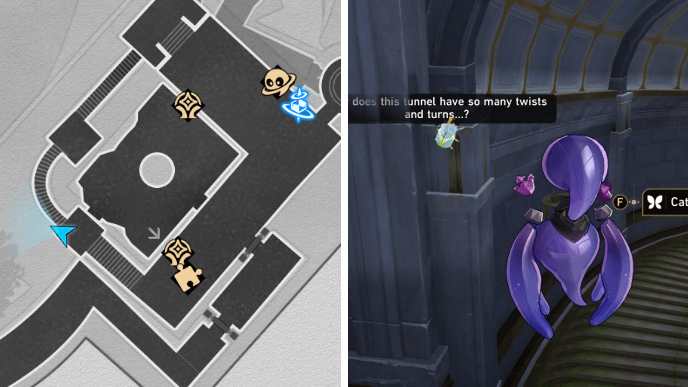 |
Use the Teary Court Ruins Space Anchor and do the Bartholos's Troubles Adventure Mission to gain access to its POV. Use it and drain the water, then you'll see the nymph on the left wall of the tunnel. |
| 11 |  |
From the tenth nymph, follow the tunnel using Bartholos after you drain the water and you'll see the nymph on a big box on the ceiling. |
| 12 | 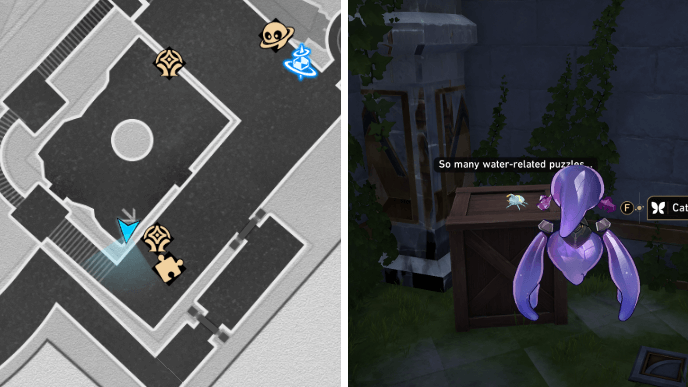 |
From the eleventh nymph, head back to the room where the giant statue is and you'll see the nymph on one of the wooden crates in the corner. |
| 13 | 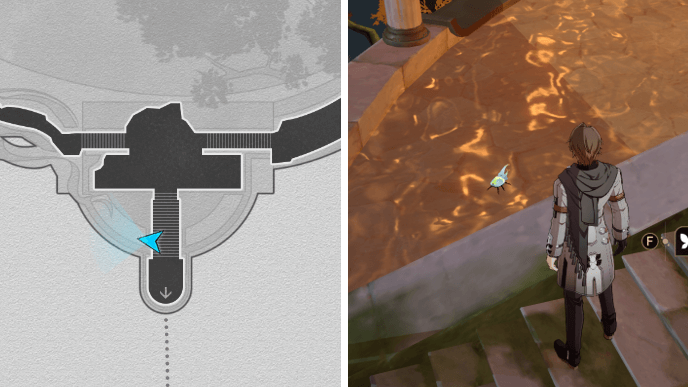 |
From the Chasmic Geocore Space Anchor, use the Janus Passage and cross to the other side. Climb the stairs and look at the pool of gold to the left. You'll see the nymph in the pool of gold. |
| 14 |  |
From the thirteenth nymph, head to the left and follow the big branch until you see two small statues to the right. You'll see the nymph just beside the small statues. |
| 15 | 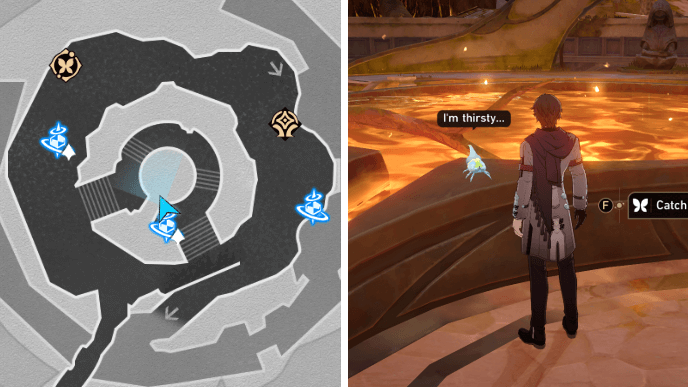 |
From the Heartburn Wound Space Anchor, go down to the pool of gold in the center and you'll see the nymph just next to it. |
| 16 |  |
From the Heartburn Wound Space Anchor, head to the left of the pool of gold and you'll see the nymph near the broken waterwheel. |
| 17 | 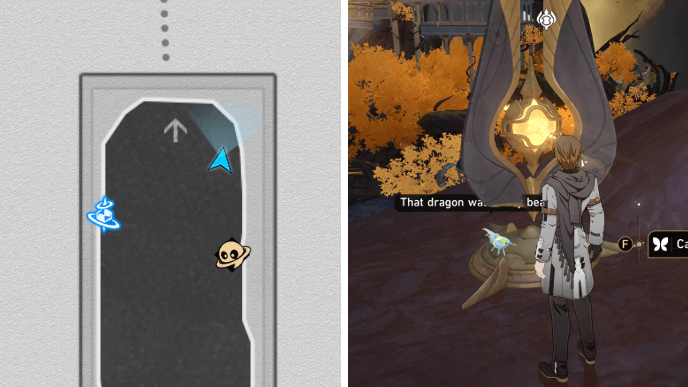 |
Use the Chasmic Geocore Space Anchor and approach the Janus Passage. You'll see the nymph by the base of the Janus Passage. |
| 18 | 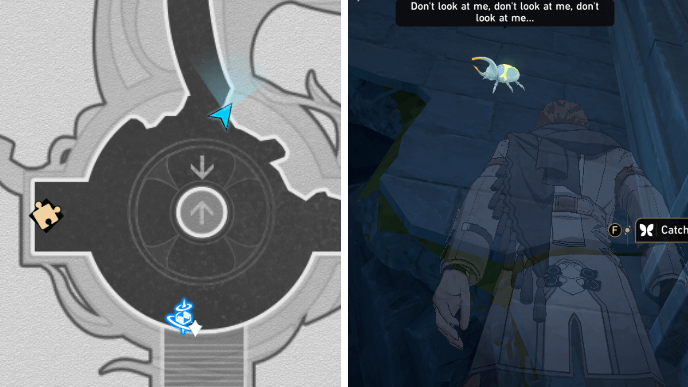 |
Use the Sealed Chamber Space Anchor and use the elevator to go down. After exiting the elevator, you'll see the nymph near on the wall just before the tunnel. |
| 19 | 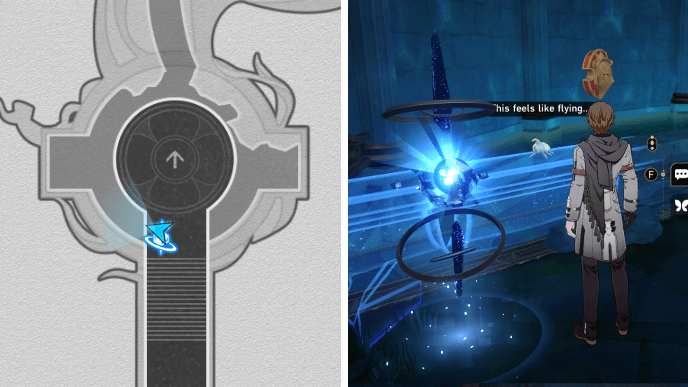 |
Use the Sealed Chamber Space Anchor and you'll see the nymph just beside it, on the holographic railing. |
| 20 | 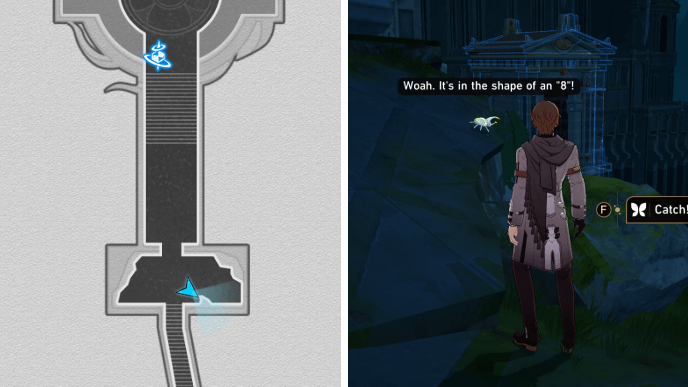 |
Use the Sealed Chamber Space Anchor and head south. Just before the stairs, head left and you'll see the nymph just by the edge. |
▲ Back to All Creation Nymphs ▲
Honkai: Star Rail Related Guides

List of All Maps
| List of Maps | |
|---|---|
| Herta Space Station | Jarilo-VI |
| The Xianzhou Luofu | Penacony |
| Amphoreus | Planarcadia |
Treasure Chest Locations
Comment
Author

All Puzzles in Radiant Scarwood Grove of Epiphany
Premium Articles

Rankings
Gaming News

![The Liar Princess and the Blind Prince Review [PC] | Lovely to Look at but Tedious to Play](https://img.game8.co/4442586/8d95f5faf05780f1765ce7e0938bd825.jpeg/show)
![Monster Hunter Stories 3 Review [First Impressions] | Simply Rejuvenating](https://img.game8.co/4438641/2a31b7702bd70e78ec8efd24661dacda.jpeg/thumb)
![The Seven Deadly Sins: Origin [First Impressions] | A Promising Start](https://img.game8.co/4440581/584e0bfb87908f12c4eab6e846eb1afd.png/thumb)

Popular Games

Genshin Impact Walkthrough & Guides Wiki
Umamusume: Pretty Derby Walkthrough & Guides Wiki
Pokemon Pokopia Walkthrough & Guides Wiki
Honkai: Star Rail Walkthrough & Guides Wiki
Monster Hunter Stories 3: Twisted Reflection Walkthrough & Guides Wiki
Arknights: Endfield Walkthrough & Guides Wiki
Wuthering Waves Walkthrough & Guides Wiki
Zenless Zone Zero Walkthrough & Guides Wiki
Pokemon TCG Pocket (PTCGP) Strategies & Guides Wiki
Monster Hunter Wilds Walkthrough & Guides Wiki


Recommended Games
Diablo 4: Vessel of Hatred Walkthrough & Guides Wiki
Cyberpunk 2077: Ultimate Edition Walkthrough & Guides Wiki
Fire Emblem Heroes (FEH) Walkthrough & Guides Wiki
Yu-Gi-Oh! Master Duel Walkthrough & Guides Wiki
Super Smash Bros. Ultimate Walkthrough & Guides Wiki
Pokemon Brilliant Diamond and Shining Pearl (BDSP) Walkthrough & Guides Wiki
Elden Ring Shadow of the Erdtree Walkthrough & Guides Wiki
Monster Hunter World Walkthrough & Guides Wiki
The Legend of Zelda: Tears of the Kingdom Walkthrough & Guides Wiki
Persona 3 Reload Walkthrough & Guides Wiki


All rights reserved
Copyright © 2024 HoYoverse, COGNOSPHERE. All Rights Reserved.
The copyrights of videos of games used in our content and other intellectual property rights belong to the provider of the game.
The contents we provide on this site were created personally by members of the Game8 editorial department.
We refuse the right to reuse or repost content taken without our permission such as data or images to other sites.