Shackling Prison Map - All Chests and Warp Trotter
★ Exclusive: Check out the State of Meta in 4.0!
♦ Latest: 4.0 Redeem Codes
♦ Phase 2: Sparkxie, Sparkle, Cerydra, Rappa
♦ Upcoming: Ashveil, Silver Wolf Lv.999, Evanescia
♦ Events: Cosmicon, Roll On!, Ding! Arcadia Fun-Time Clock-In Essentials
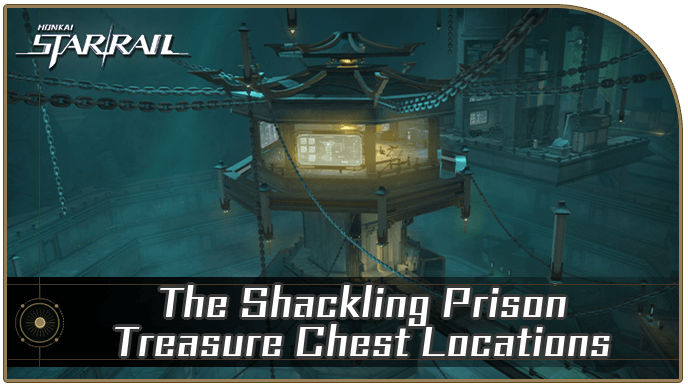
There are 38 Shackling Prison Chests to collect in Honkai: Star Rail. See locations for Shackling Prison chests, Warp Trotter, and collectibles in our Shackling Prison interactive map!
List of Contents
Shackling Prison Chest Locations
Shackling Prison Interactive Map
Select icons to toggle them on/off
| Space Anchor | Treasure Chest | ||
| Warp Trotter | Bookshelf Readable | ||
| Hidden Mission | - | ||
Shackling Prison Chests
| The Shackling Prison Maps | |||||||||||
|---|---|---|---|---|---|---|---|---|---|---|---|
 See Full Image |
 See Full Image |
||||||||||
 See Full Image |
 See Full Image |
||||||||||
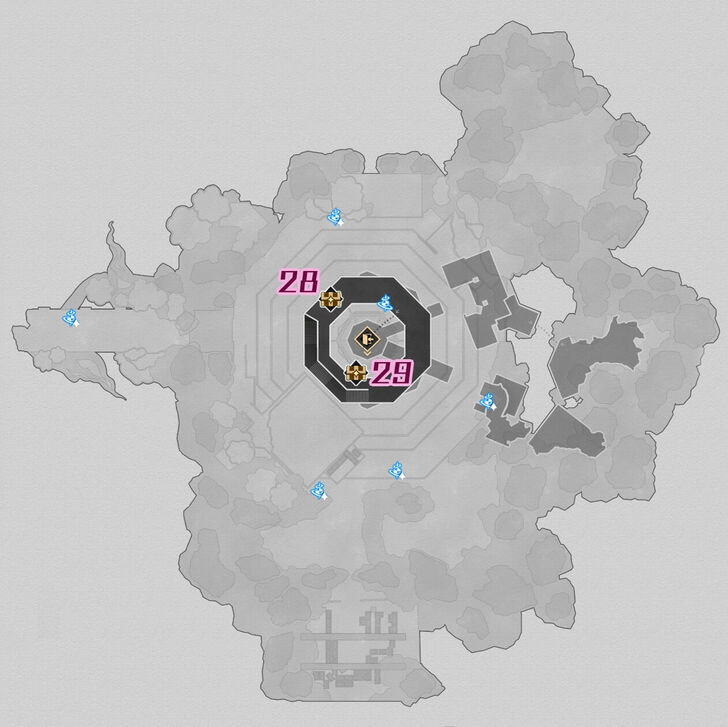 See Full Image |
 See Full Image |
||||||||||
| The Shackling Prison Chests | |||||||||||
| Chest 1 | Chest 2 | Chest 3 | Chest 4 | ||||||||
| Chest 5 | Chest 6 | Chest 7 | Chest 8 | ||||||||
| Chest 9 | Chest 10 | Chest 11 | Chest 12 | ||||||||
| Chest 13 | Chest 14 | Chest 15 | Chest 16 | ||||||||
| Chest 17 | Chest 18 | Chest 19 | Chest 20 | ||||||||
| Chest 21 | Chest 22 | Chest 23 | Chest 24 | ||||||||
| Chest 25 | Chest 26 | Chest 27 | Chest 28 | ||||||||
| Chest 29 | Chest 30 | ||||||||||
| Hexanexus: Remake Extra Chests (31-36) | |||||||||||
| Shackling Prison Trotter & Formidable Foe | |||||||||||
| Warp Trotter | Formidable Foe | ||||||||||
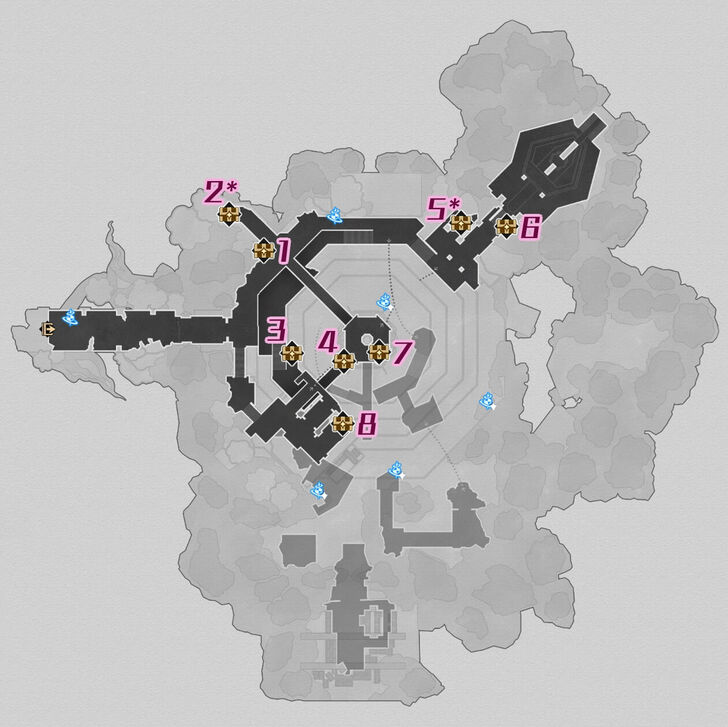
Chests marked with an Asterisk come from Hexanexus: Remake puzzles that can be solved twice for extra chests.
How to Get Shackling Prison Chests
Shackling Prison Chest 1
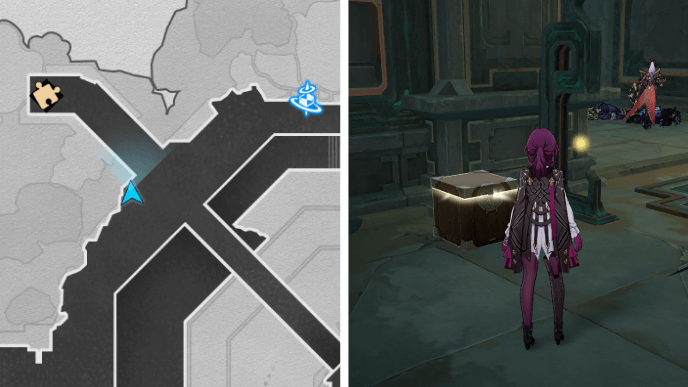
From the Scriptorium: Plankway Front Space Anchor, head southwest and you'll find Chest 1 near a guard.
Shackling Prison Chest 2
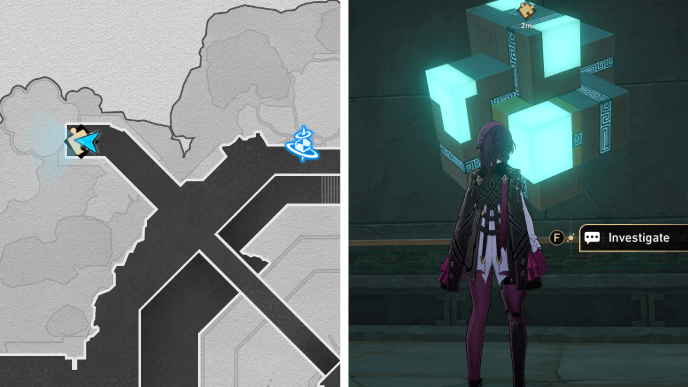
After getting Chest 1, go into the nearby space to reach a Hexanexus: Remake puzzle. You must solve the puzzle to get Chest 2.
Shackling Prison Chest 2 Hexanexus Remake
You can solve the Hexanexus: Remake puzzle by following the steps above. Chest 2 will spawn after it's solved.
Shackling Prison Chest 3
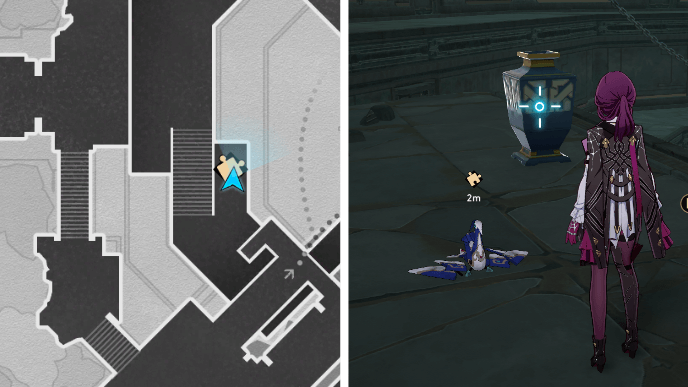
Go down the stairs near the Scriptorium: Plankway Front Space Anchor and continue following the path forward. At the bottom of the second set of stairs, there'll be a broken Courier Cycrane in the corner space. Repair it by solving the Abacus Circuitry puzzle to get Chest 3.
Shackling Prison Chest 3 Abacus Circuitry
Follow the steps shown above to solve the Abacus Circuitry puzzle. Once the Cycrane is repaired, it'll lead you to Chest 3.
Shackling Prison Chest 4
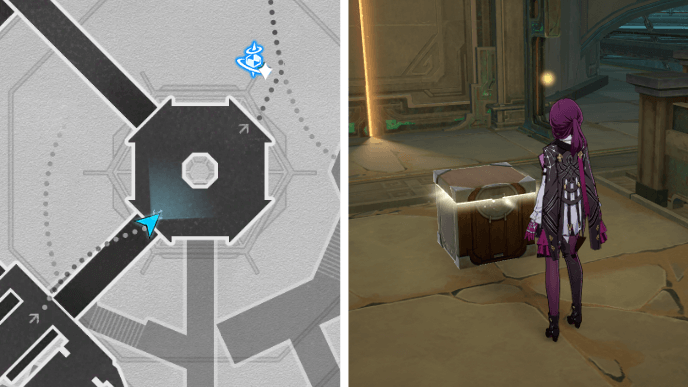
From the spot you found Chest 4's Courier Cycrane, head towards the central elevator area and you'll find Chest 4.
Shackling Prison Chest 5
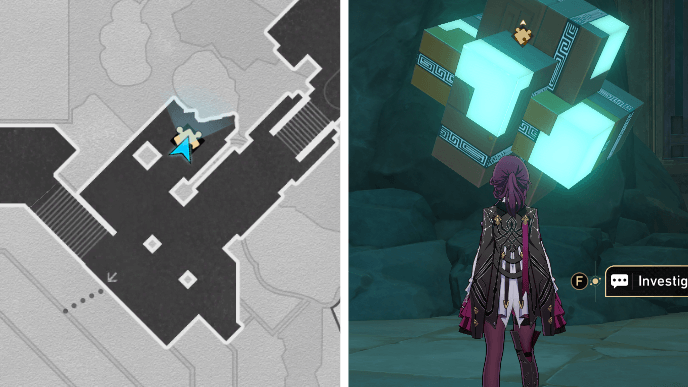
Head east from the Scriptorium: Plankway Front Space Anchor and go up the stairs. You must solve the Hexanexus: Remake puzzle to get the chest.
Shackling Prison Chest 5 Hexanexus Remake
You can solve the Hexanexus: Remake puzzle by following the steps above. Chest 5 will spawn after it's solved.
Shackling Prison Chest 6
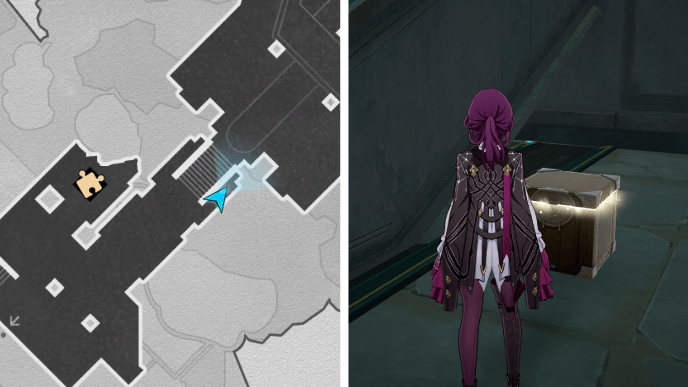
From Chest 5, go further into the northeastern area of F1 and stop just before the stairs. Chest 6 will be tucked away in the small space next to it.
Shackling Prison Chest 7
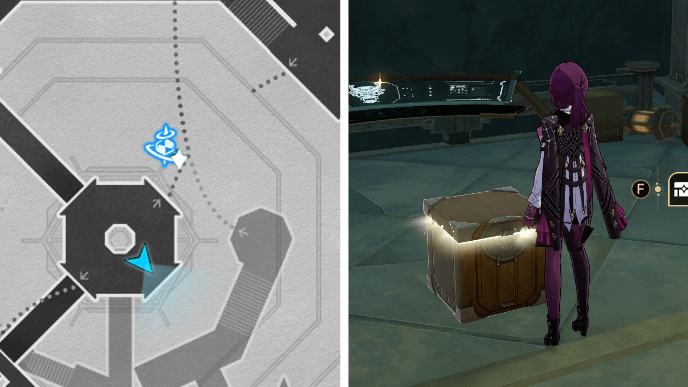
Use the Shifting Screen near Chest 5 to teleport to the central platform on F1. You'll find Chest 7 in front of a control panel.
Shackling Prison Chest 8
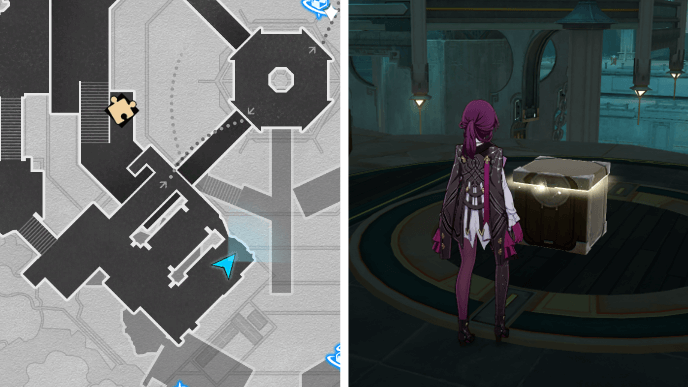
From the F1 central platform, take the southwestern Shifting Screen to reach the area below. Walk a few steps forward, turn left, then turn left again once you hit the corner. Chest 8 will be near Danbi the Chief Scribe.
Shackling Prison Chest 9
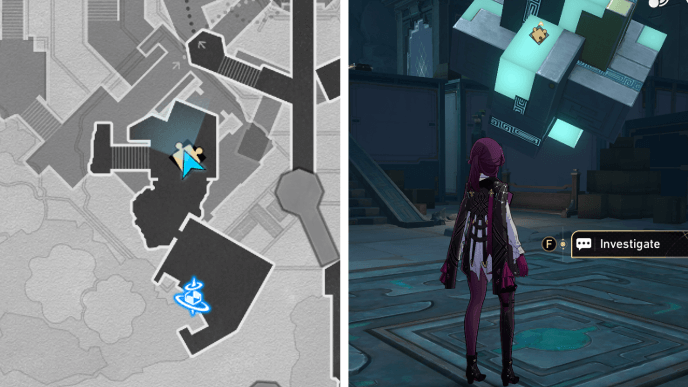
Teleport to the Grimfrost Hold (I) Space Anchor and head north to find a Hexanexus: Remake puzzle. You'll get Chest 9 after solving it.
Shackling Prison Chest 9 Hexanexus Remake
You can solve the Hexanexus: Remake puzzle by following the steps above. Chest 9 will spawn after it's solved.
Shackling Prison Chest 10
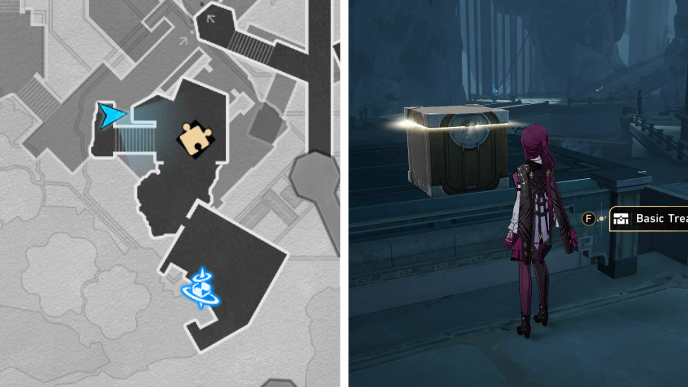
Go up the stairs west of Chest 9 and you'll find Chest 10 at the top.
Shackling Prison Chest 11
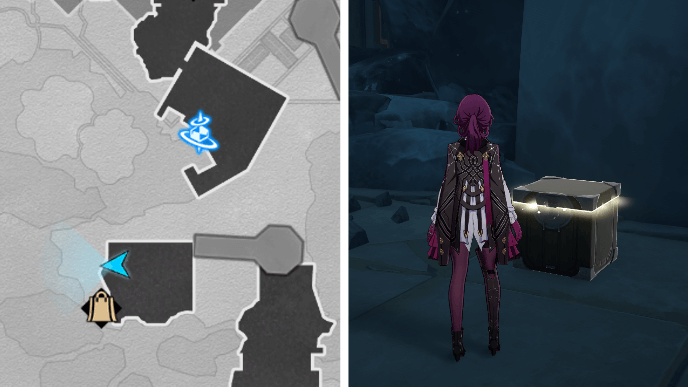
Use the control panel near the Grimfrost Hold (I) Space Anchor to form a path leading to the southern area of B1. Once you reach the next control panel, rotate the platform again to reach the area with Gouteng the Captured Disciple. Chest 11 will be in the same area.
Shackling Prison Chest 12
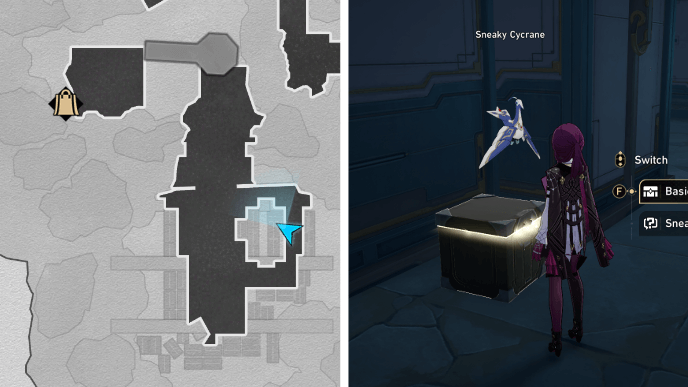
From Chest 11, cross the platform again and head further into the southern area of B1. Take the left path near the courier packages and you'll find Chest 12 near the Sneaky Cycrane.
Shackling Prison Chest 13
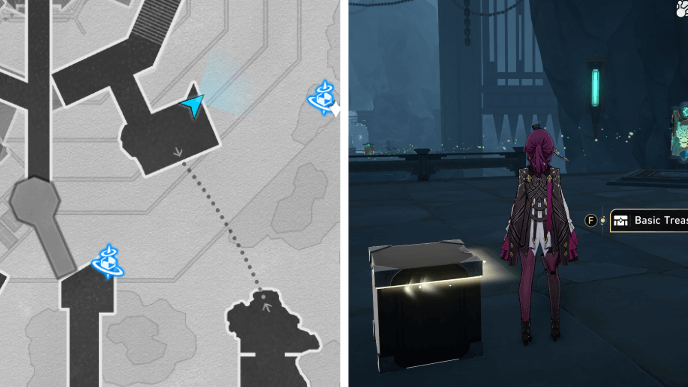
Teleport to the Grimfrost Hold (II) Space Anchor and follow the path forward while avoiding enemies. After using the Shifting Screen to reach the next platform, you'll spot Chest 13 nearby.
Shackling Prison Chest 14
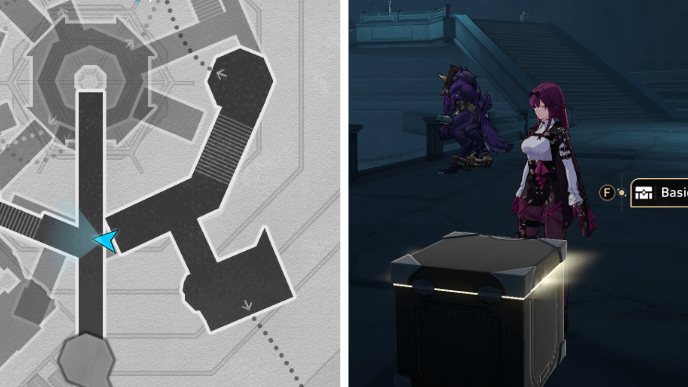
From Chest 13, continue onwards and turn left to find Chest 14 by the edge of the walkway. Be careful of the enemy nearby.
Shackling Prison Chest 15
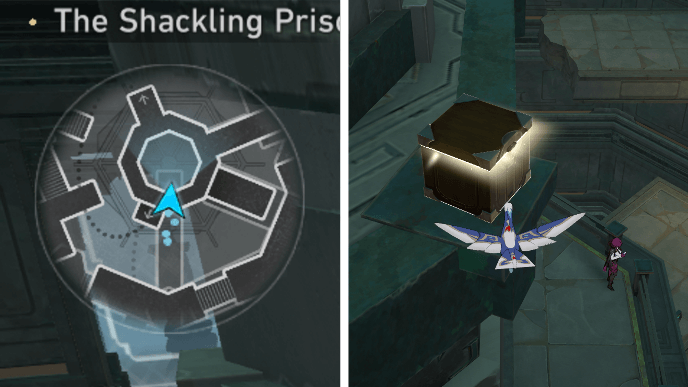
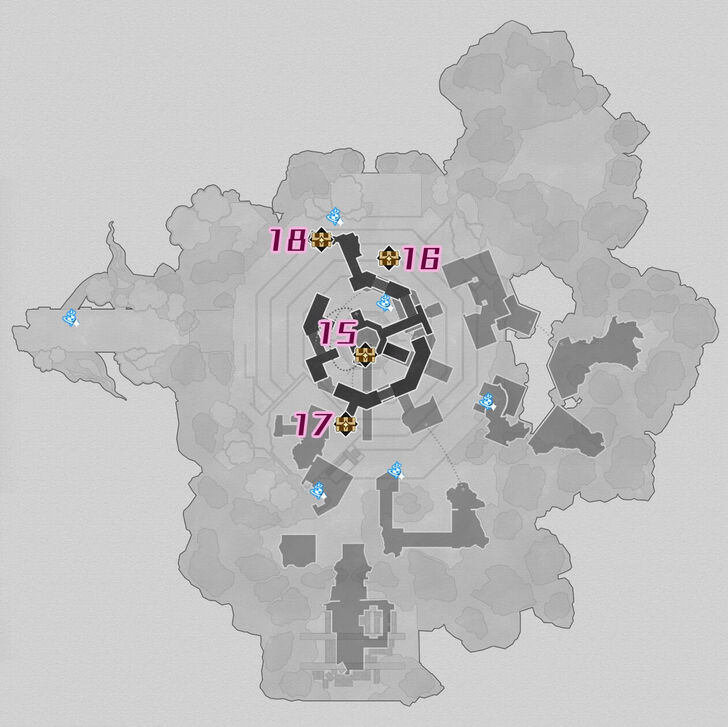
From the Grimfrost Hold (II) Space Anchor, head north and take the elevator down to B2 or the Transitory Hold. Look for the Cycrane near the elevator doors and fly it upwards to find Chest 15 above your character.
Shackling Prison Chest 16
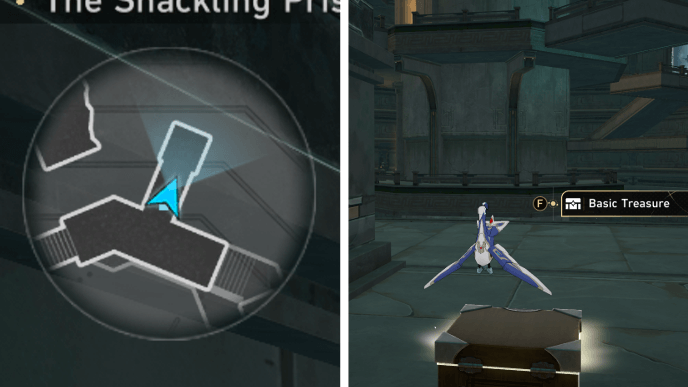
While still in control of the Cycrane, make sure that the lower control panel is yellow. Head northeast from the elevator and you'll find Chest 16 in an opening in the wall.
Shackling Prison Chest 17
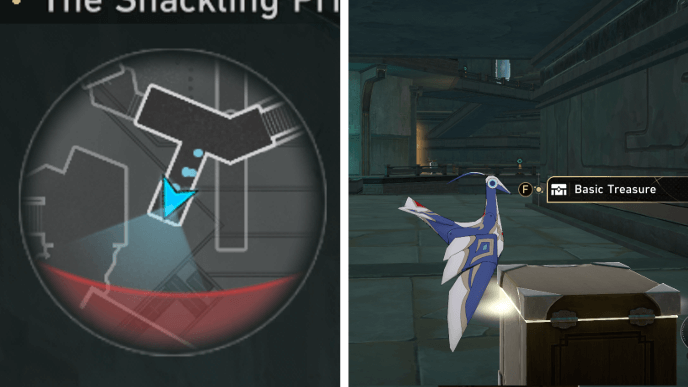
After getting Chest 16, make the lower control panel green and fly the Cycrane southwest from the elevator. You'll find Chest 17 in the other opening.
Shackling Prison Chest 18
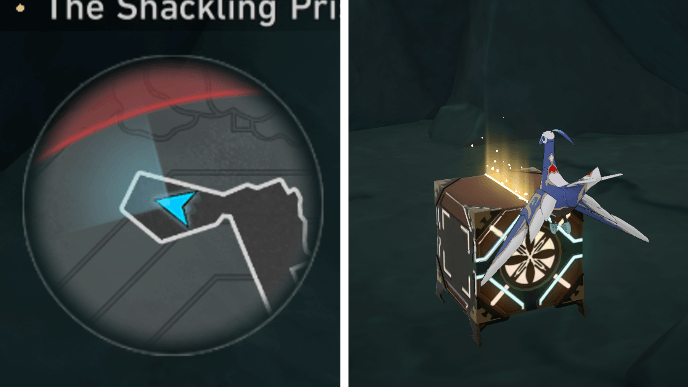
From Chest 17, fly the Cycrane north and you'll see a room with many vases in it. Enter the room and you'll find Chest 18 at the far end.
Shackling Prison Chest 19
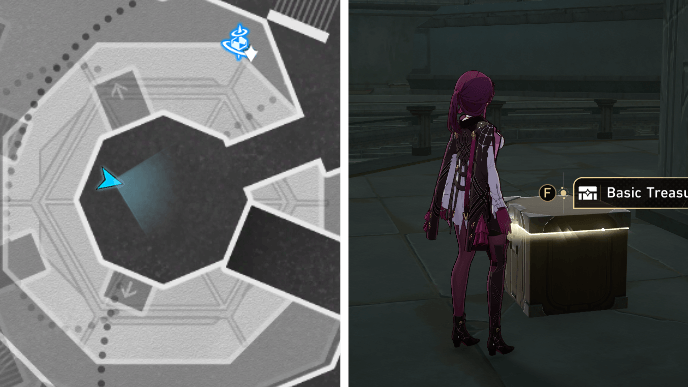
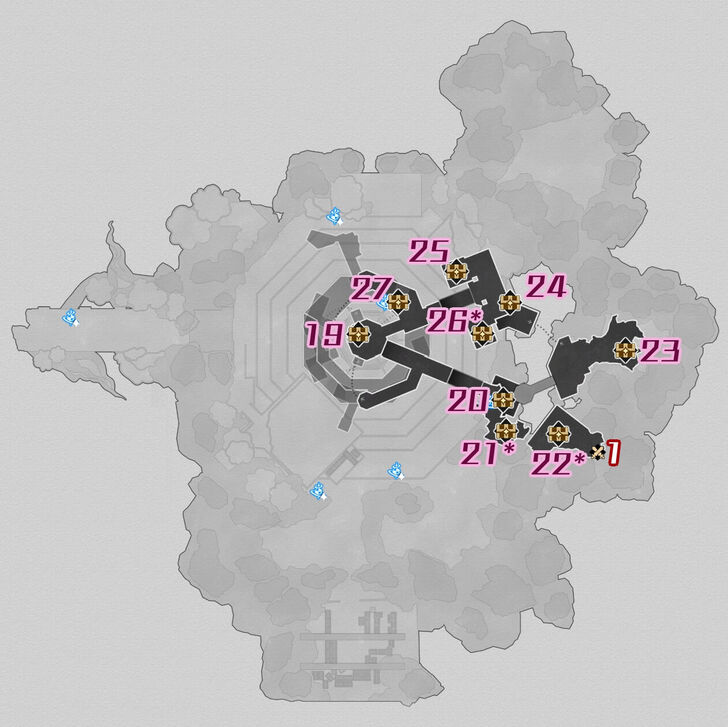
Teleport to the Pyroscape Hold Space Anchor and make the control panel next to it green so it forms a path leading to the elevator. Chest 19 will be behind the elevator.
Shackling Prison Chest 20
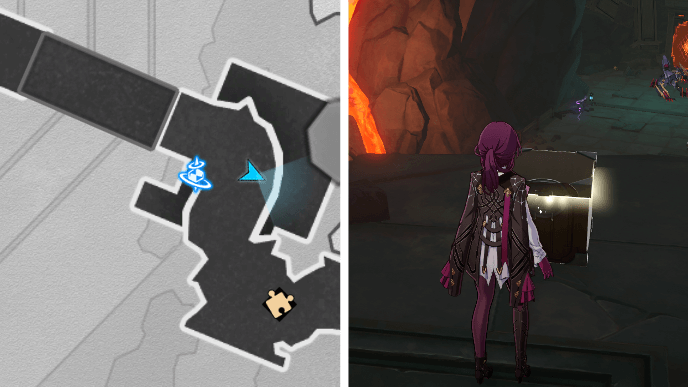
From Chest 19, use the nearest control panel to raise the platform and reach the area where Chest 20 is. Be careful of the invisible enemies nearby.
Shackling Prison Chest 21
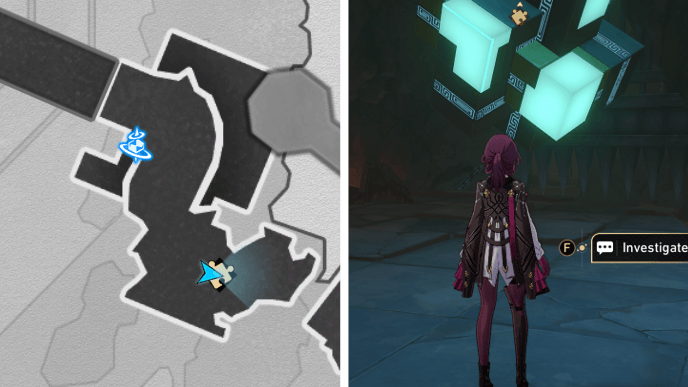
After getting Chest 20, head further into the area and you'll find a Hexanexus: Remake puzzle. Solve it to get Chest 21.
Shackling Prison Chest 21 Hexanexus Remake
You can solve the Hexanexus: Remake puzzle by following the steps above. Chest 21 will spawn after it's solved.
Shackling Prison Chest 22

Head back to the Pyroscape Hold Space Anchor and use the control panel to rotate the platform to the right. Solve the Hexanexus: Remake puzzle to get Chest 21.
Shackling Prison Chest 22 Hexanexus Remake
You can solve the Hexanexus: Remake puzzle by following the steps above. Chest 22 will spawn after it's solved.
Shackling Prison Chest 23
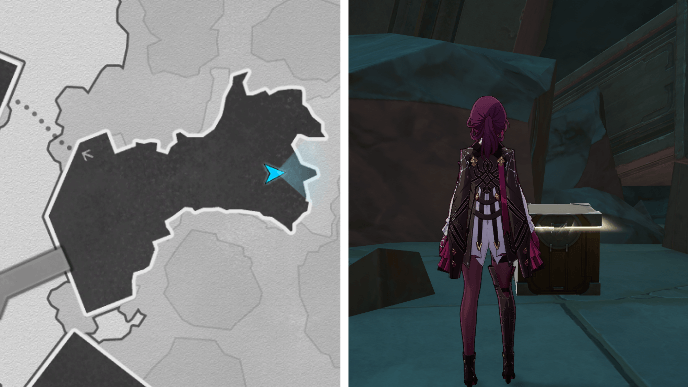
Return to the Pyroscape Hold Space Anchor and use the control panel to rotate the platform to the left this time. Chest 22 will be at the far end of the area by the wall of rubble. Be careful of the enemies nearby.
Shackling Prison Chest 24

From Chest 23, use the nearby Shifting Screen to reach the other area. Continue onwards until you spot Chest 24 on your right by a pile of rubble. You may need to get rid of the surrounding enemies first.
Shackling Prison Chest 25
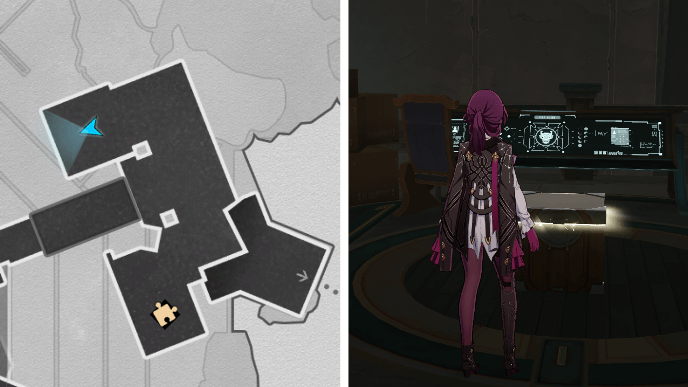
From Chest 24, keep going forward and use the control panel nearest to the elevator. Once you're in the control room area, turn left and you'll find Chest 25 nearby.
Shackling Prison Chest 26
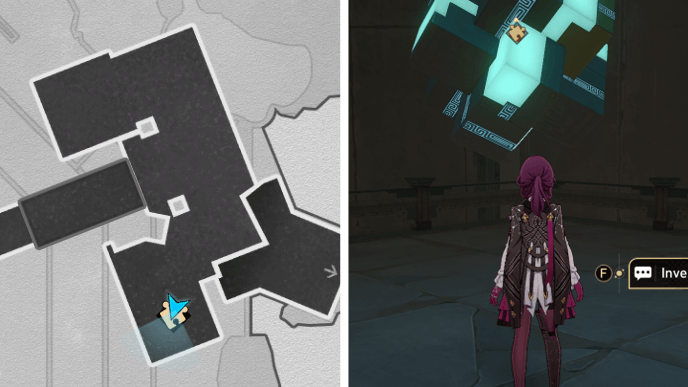
After getting Chest 24, head towards the right side of the area this time and you'll find a Hexanexus: Remake puzzle. Solve it to get Chest 26.
Shackling Prison Chest 26 Hexanexus Remake
You can solve the Hexanexus: Remake puzzle by following the steps above. Chest 26 will spawn after it's solved.
Shackling Prison Chest 27
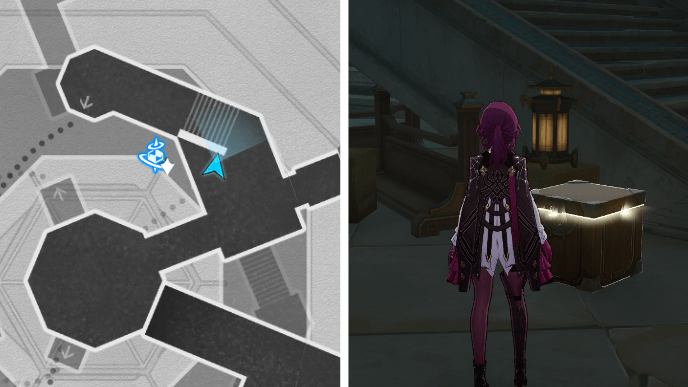
From Chest 26, head back towards the elevator and you'll find Chest 27 near a pile of cardboard boxes by the stairs.
Shackling Prison Chest 28
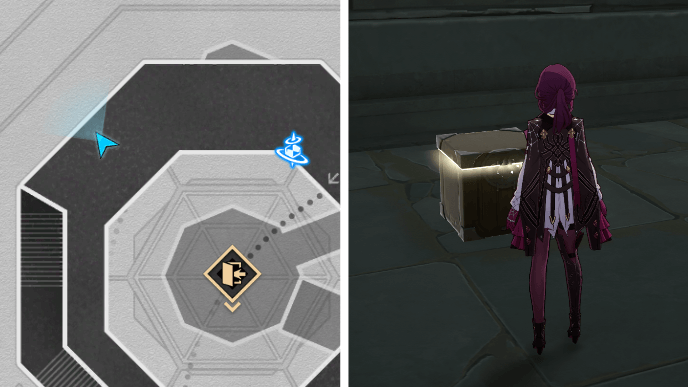
Head west from the Nether Key Space Anchor and you'll find Chest 28 by the wall.
Shackling Prison Chest 29
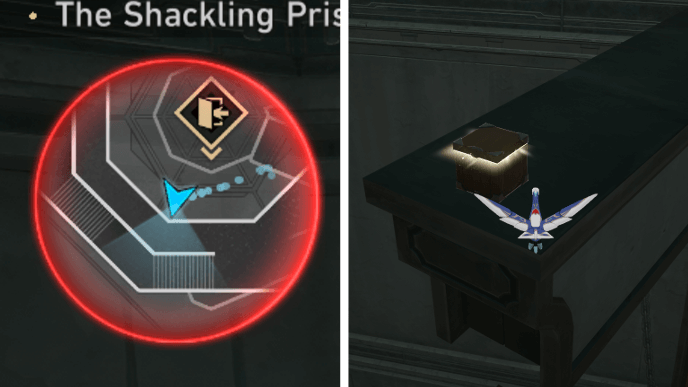
You'll need to use the Cycrane on B4 and fly it upwards as much as you can. Chest 29 will be on top of one of the pillars.
Shackling Prison Chest 30
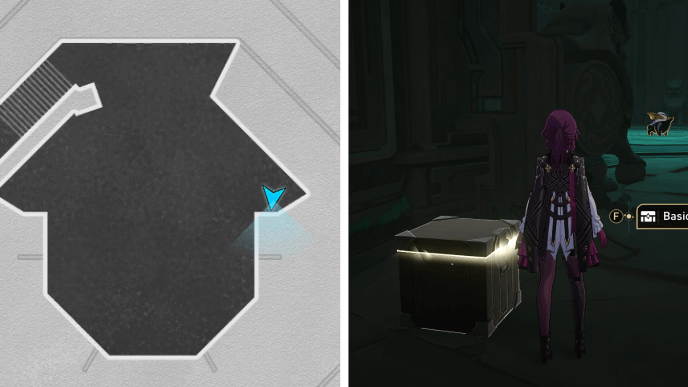
From B4, head further down to the bottom floor where Hoolay's Prison is. You'll find Chest 30 near a stone lion.
Hexanexus: Remake Extra Chests
From the Hexanexus: Development Team Interview Mission
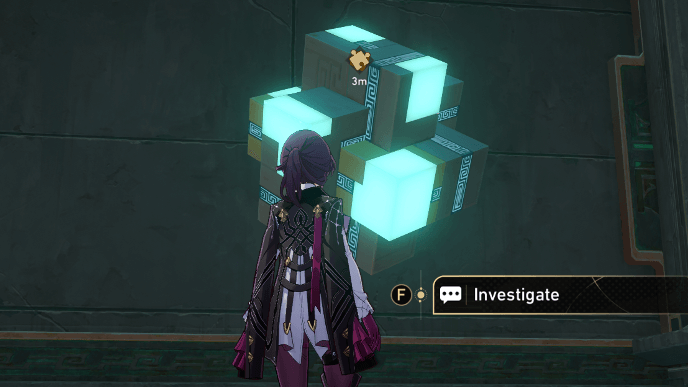
After solving all 6 Hexanexus: Remake puzzles in the Shackling Prison, you'll get a message from the Hex Club. This starts the Hexanexus: Development Team Interview Adventure Mission.
Once you've talked to Seymour, the Hexanexus: Remake puzzles will reset and you can solve them all again for 6 extra chests in total!
Hexanexus Remake Puzzle Solutions
Shackling Prison Warp Trotter Location
The Shackling Prison Warp Trotter
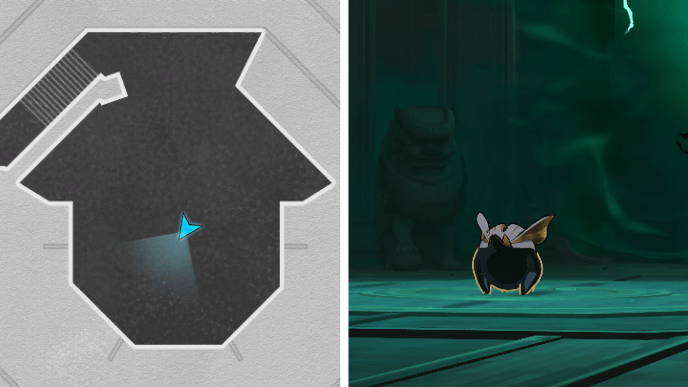
The Shackling Prison Warp Trotter can be found at the bottom floor. It'll be roaming around by the entrance to Hoolay's Prison. Defeat the Trotter to get the chest!
Formidable Foe Challenge Chests
Shackling Prison Challenge
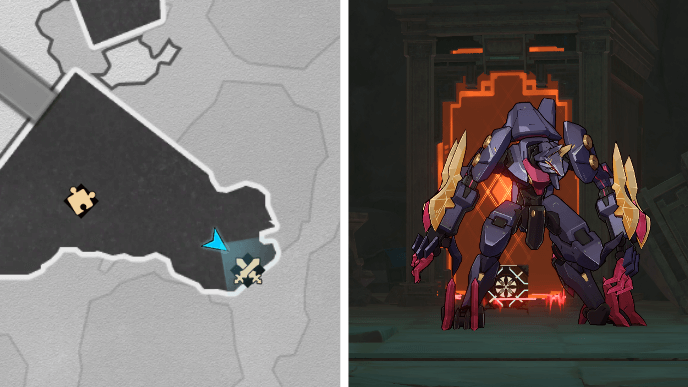
The Formidable Foe challenge of the Shackling Prison can be found in B3 at the area southeast of the Pyroscape Hold Space Anchor.
The enemies in this challenge are weak to Wind and Imaginary, so characters of these elements are recommended for this fight!
Shackling Prison Hidden Missions
All Shackling Prison Hidden Missions
There are multiple hidden missions and achievements that come from The Shackling Prison. Check out the links above for full guides on how to complete each one!
How to Unlock Shackling Prison
Progress Inquisition to Rectitude

You can unlock the Shackling Prison by progressing through the Inquisition to Rectitude mission. This is part of the Finest Duel Under the Pristine Blue: Part I Trailblaze Continuance.
Finest Duel Under the Pristine Blue: Part I
Honkai: Star Rail Related Guides
List of All Maps
| List of Maps | |
|---|---|
| Herta Space Station | Jarilo-VI |
| The Xianzhou Luofu | Penacony |
| Amphoreus | Planarcadia |
Treasure Chest Locations
Author
Shackling Prison Map - All Chests and Warp Trotter
improvement survey
03/2026
improving Game8's site?

Your answers will help us to improve our website.
Note: Please be sure not to enter any kind of personal information into your response.

We hope you continue to make use of Game8.
Premium Articles
Rankings
Gaming News
Popular Games

Genshin Impact Walkthrough & Guides Wiki

Honkai: Star Rail Walkthrough & Guides Wiki

Umamusume: Pretty Derby Walkthrough & Guides Wiki

Pokemon Pokopia Walkthrough & Guides Wiki

Resident Evil Requiem (RE9) Walkthrough & Guides Wiki

Monster Hunter Wilds Walkthrough & Guides Wiki

Wuthering Waves Walkthrough & Guides Wiki

Arknights: Endfield Walkthrough & Guides Wiki

Pokemon FireRed and LeafGreen (FRLG) Walkthrough & Guides Wiki

Pokemon TCG Pocket (PTCGP) Strategies & Guides Wiki
Recommended Games

Diablo 4: Vessel of Hatred Walkthrough & Guides Wiki

Fire Emblem Heroes (FEH) Walkthrough & Guides Wiki

Yu-Gi-Oh! Master Duel Walkthrough & Guides Wiki

Super Smash Bros. Ultimate Walkthrough & Guides Wiki

Pokemon Brilliant Diamond and Shining Pearl (BDSP) Walkthrough & Guides Wiki

Elden Ring Shadow of the Erdtree Walkthrough & Guides Wiki

Monster Hunter World Walkthrough & Guides Wiki

The Legend of Zelda: Tears of the Kingdom Walkthrough & Guides Wiki

Persona 3 Reload Walkthrough & Guides Wiki

Cyberpunk 2077: Ultimate Edition Walkthrough & Guides Wiki
All rights reserved
Copyright © 2024 HoYoverse, COGNOSPHERE. All Rights Reserved.
The copyrights of videos of games used in our content and other intellectual property rights belong to the provider of the game.
The contents we provide on this site were created personally by members of the Game8 editorial department.
We refuse the right to reuse or repost content taken without our permission such as data or images to other sites.


![Monster Hunter Stories 3 Review [First Impressions] | Simply Rejuvenating](https://img.game8.co/4438641/2a31b7702bd70e78ec8efd24661dacda.jpeg/thumb)


How do you do the hidden quests?