All Puzzles in Bloodbathed Battlefront Castrum Kremnos
★ Exclusive: Check out the State of Meta in 4.0!
♦ Latest: 4.1 Livestream Redeem Codes
♦ Phase 2: Sparkxie, Sparkle, Cerydra, Rappa
♦ Upcoming: Ashveil, Silver Wolf Lv.999, Evanescia
♦ Events: Cosmicon, Roll On!, Ding! Arcadia Fun-Time Clock-In Essentials
Here are all the Bloodbathed Battlefront Castrum Kremnos puzzles in Honkai: Star Rail. Check out solutions for Bloodbathed Battlefront Castrum Kremnos Prophecy Tablets, Golden Scapegoats, along with Golden Short Spear, Coins of Whimsy, and Creation Nymph locations!
| Amphoreus Map Guide | |
|---|---|
| Bloodbathed Battlefront Chests | Bloodbathed Battlefront Puzzles |
List of Contents
All Bloodbathed Battlefront Castrum Kremnos Puzzles
Puzzles in Bloodbathed Battlefront Castrum Kremnos
Shown above are the puzzle types found in Bloodbathed Battlefront Castrum Kremnos! Click on the puzzles in the list to jump to a section and see guides on how to solve them!
Bloodbathed Battlefront Chest Locations
Bloodbathed Battlefront Castrum Kremnos Prophecy Tablets
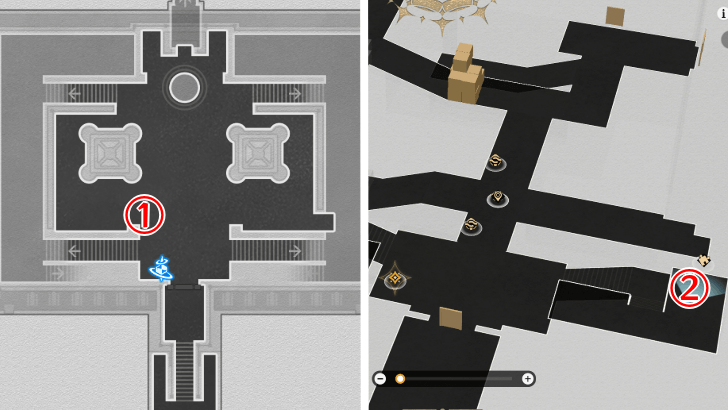
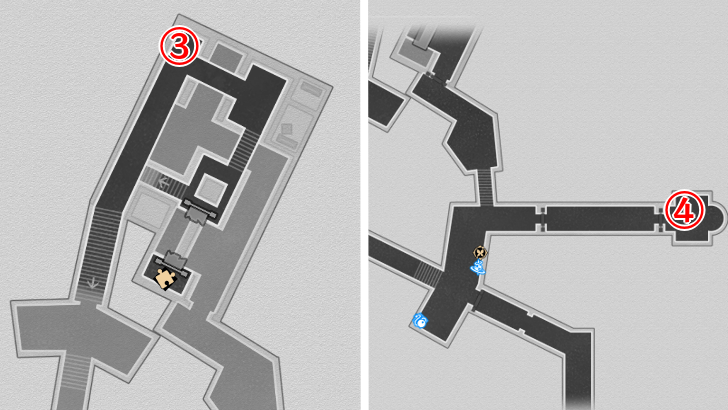
All Bloodbathed Battlefront Prophecy Tablets
| Bloodbathed Battlefront Prophecy Tablets | |
|---|---|
 |
 |
| Bloodbathed Battlefront Puzzle Solutions | |
| Prophecy Tablet 1 | Prophecy Tablet 2 |
| Prophecy Tablet 3 | Prophecy Tablet 4 |
There are 4 Prophecy Tablet puzzles found in Bloodbathed Battlefront Castrum Kremnos. Click on the links in the table to jump to a puzzle solution!
▲ All Bloodbathed Battlefront Puzzles ▲
Bloodbathed Battlefront Prophecy Tablet 1 Solution
| Bloodbathed Battlefront Tablet 1 Solution | |
|---|---|
| 1 |  Use the huge downward triangle to cover the entire projected image. |
| 2 | 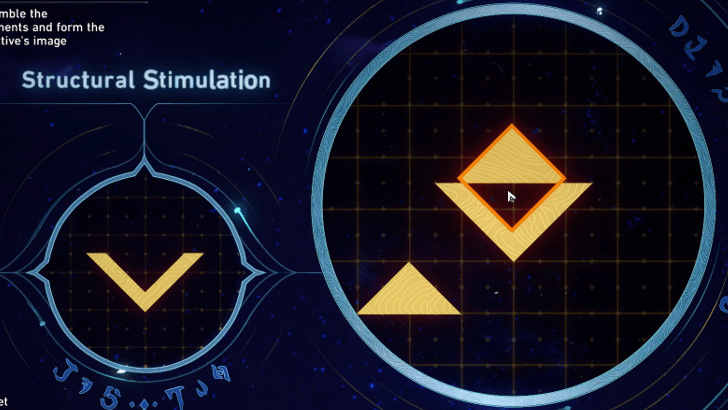 Use the diamond to cover the triangle you used in step 1. This will create an arrow shape. |
| 3 | 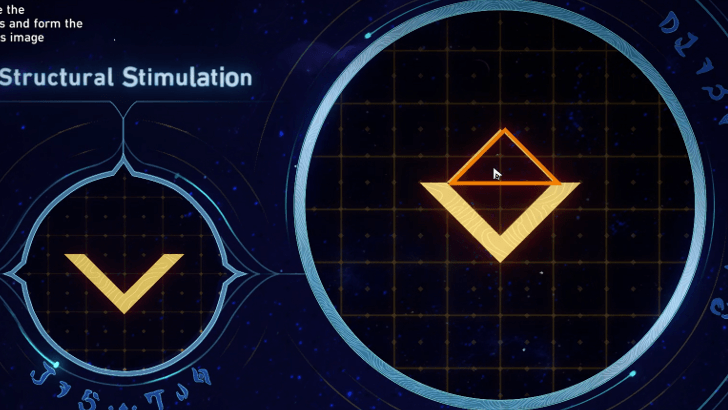 Place the last triangle on the top. |
▲ Back to All Prophecy Tablets ▲
Bloodbathed Battlefront Prophecy Tablet 2 Solution
| Bloodbathed Battlefront Tablet 2 Solution | |
|---|---|
| 1 |  Put one of the small diamonds on the left side of the projected image. |
| 2 | 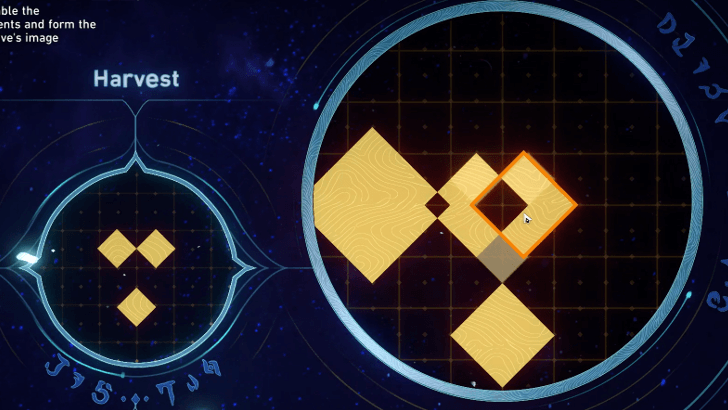 Place one of the small diamonds on the opposite side. Make sure its left tip is overlapping with the right tip of the triangle from step 1. |
| 3 | 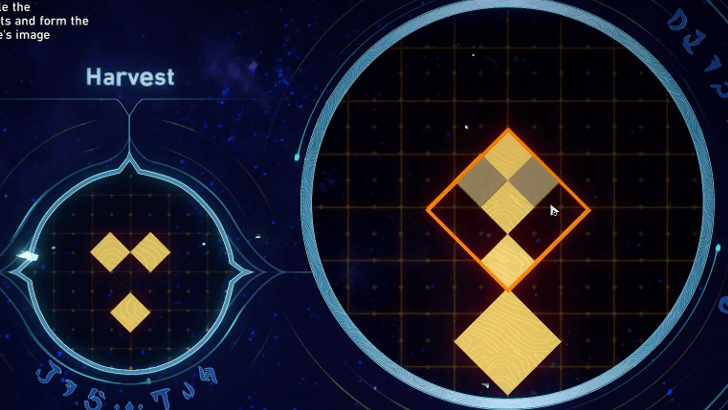 Place the huge diamond in front of everything. Make sure it covers the entire projected image and the diamonds from step 1 and 2. |
| 4 | 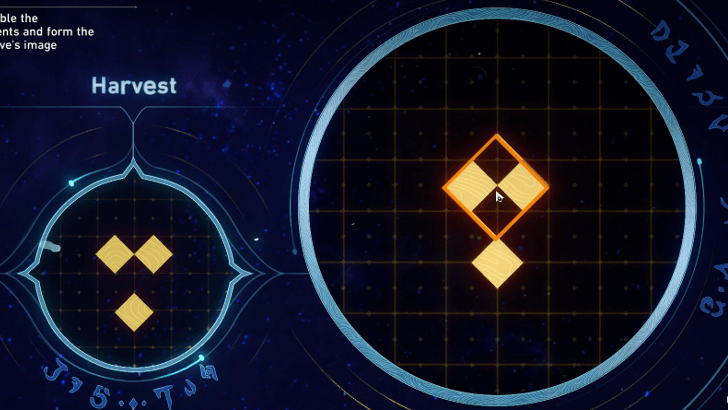 Put the last diamond on the very top. |
▲ Back to All Prophecy Tablets ▲
Bloodbathed Battlefront Prophecy Tablet 3 Solution
| Bloodbathed Battlefront Tablet 3 Solution | |
|---|---|
| 1 |
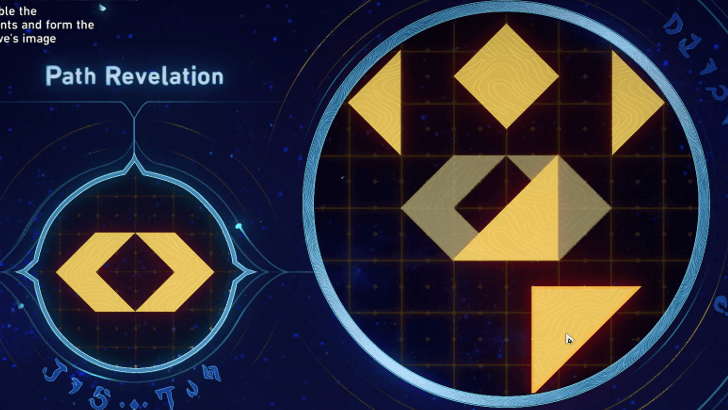 Use one of the right triangles to create half of a square in the center of the projected image. |
| 2 | 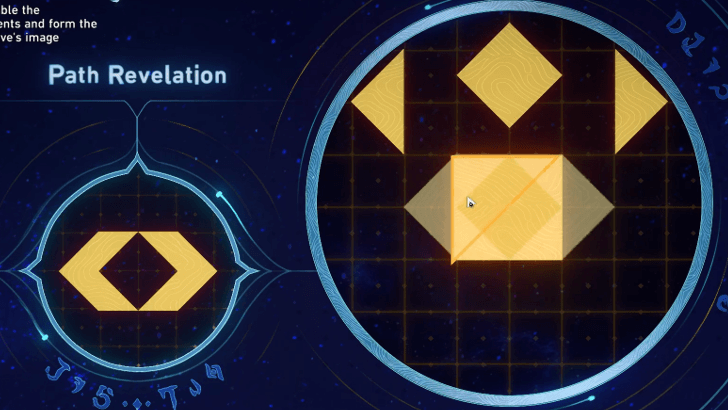 Use the other right triangle to complete the square in the center. |
| 3 | 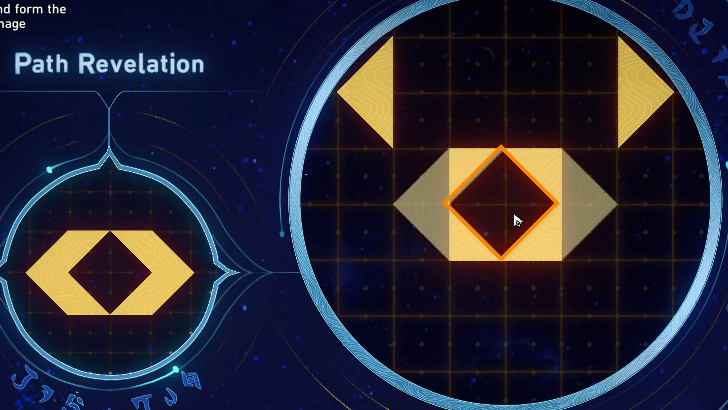 Place the diamond on the center of the square you created. |
| 4 | 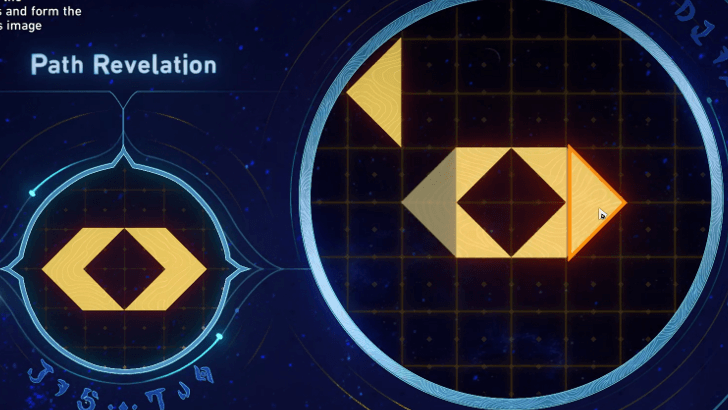 Grab the triangle that looks like a play button and place it at the far right side. |
| 5 | 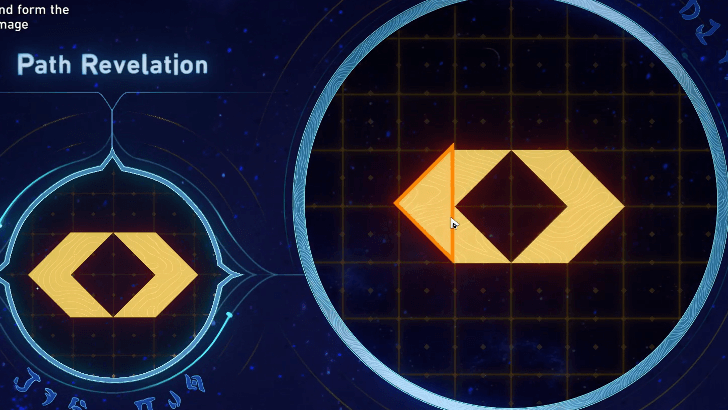 Place the last piece on the far left side. |
▲ Back to All Prophecy Tablets ▲
Bloodbathed Battlefront Prophecy Tablet 4 Solution
| Bloodbathed Battlefront Tablet 4 Solution | |
|---|---|
| 1 |
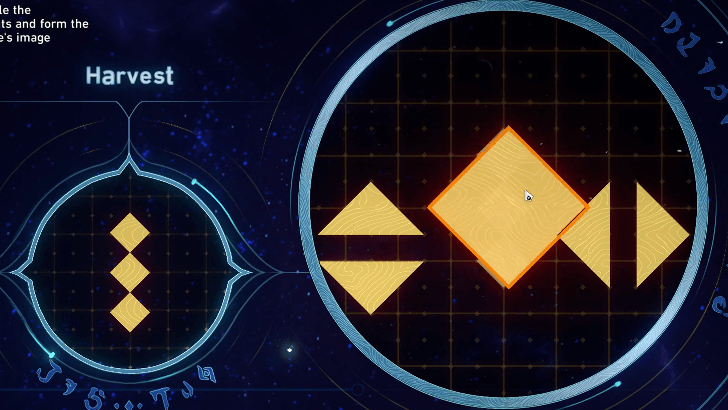 Put the huge diamond on the center. Make sure it covers the entire projected image. |
| 2 | 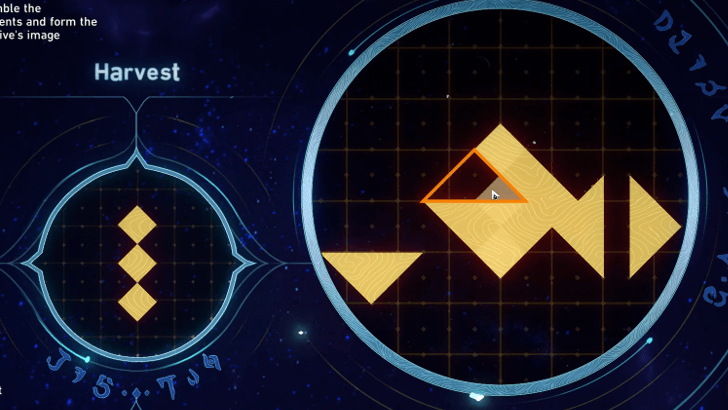 Place the small triangle on the upper-left quadrant of the diamond. |
| 3 | 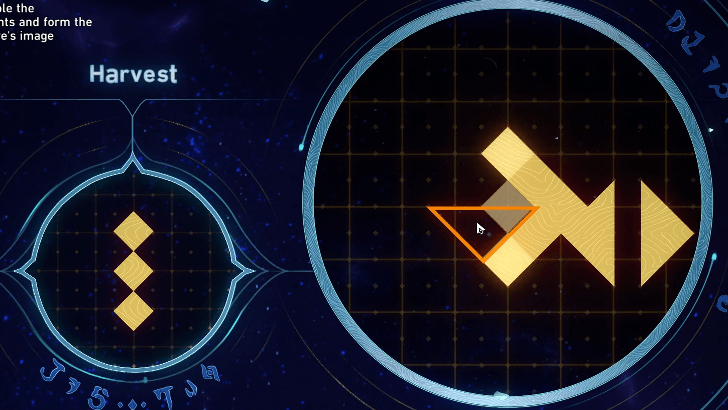 Put the downward triangle below the triangle you used in step 2. |
| 4 | 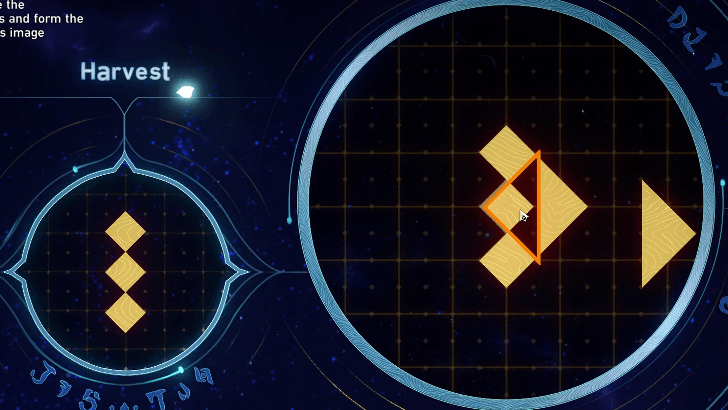 Drag the shape that looks like an inverted play button to the right side of the huge diamond you placed in step 1. |
| 5 | 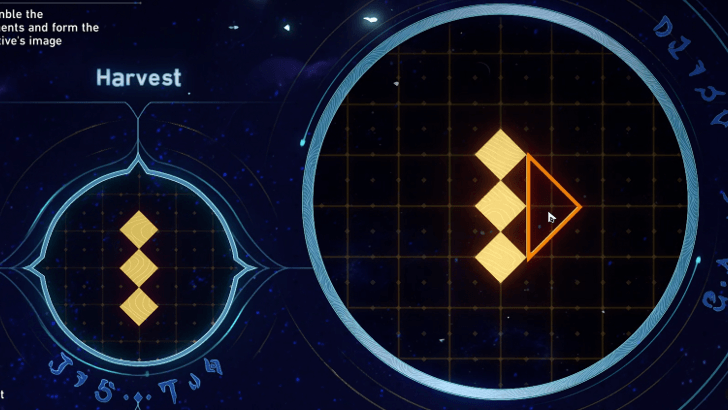 Place the last triangle that looks like play button on the far right of the diamond in step 1. |
▲ Back to All Prophecy Tablets ▲
Bloodbathed Battlefront Castrum Kremnos Golden Scapegoat
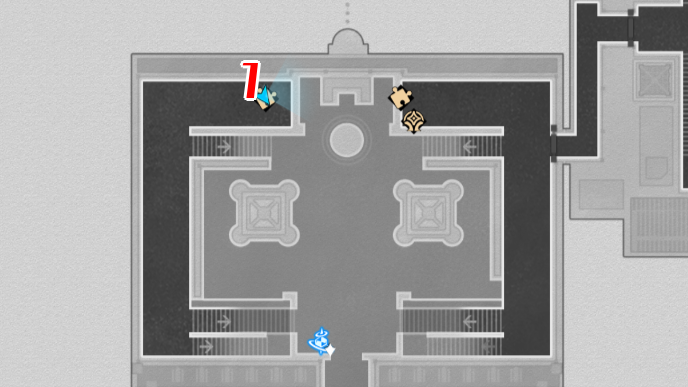
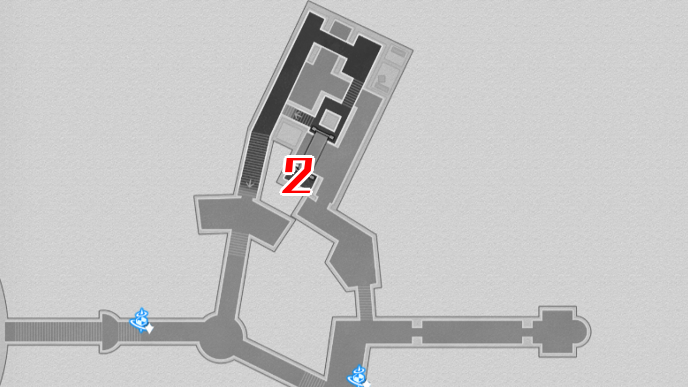
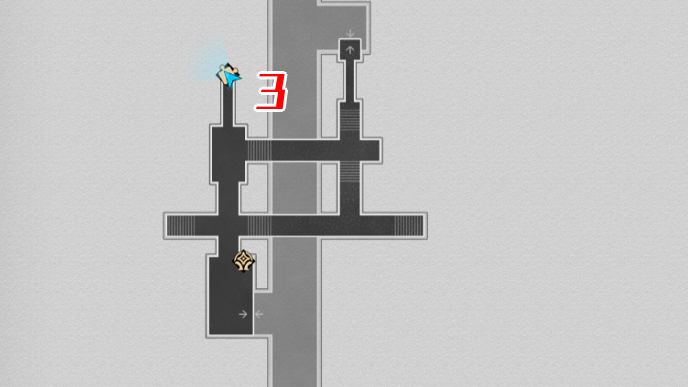
All Bloodbathed Battlefront Golden Scapegoat Puzzles
| Bloodbathed Battlefront F2 Southwest | Bloodbathed Battlefront F2 Northeast |
|---|---|
 |
 |
| Bloodbathed Battlefront B1 | |
 |
|
| Bloodbathed Battlefront Puzzle Solutions | |
| Golden Scapegoat 1 | Golden Scapegoat 2 |
| Golden Scapegoat 3 | |
There are 3 Golden Scapegoat puzzles found in Bloodbathed Battlefront Castrum Kremnos. Click on the links in the table to jump to a puzzle solution!
▲ All Bloodbathed Battlefront Puzzles ▲
Bloodbathed Battlefront Golden Scapegoat 1 Solution
| Bloodbathed Battlefront Golden Scapegoat 1 |
|---|
Input the commands: Left, Right, Right, Down, Right. This allows you to jump off and press the yellow button which makes your past self fall through the gap. Your past self will then make its way to the blue button, which allows you to fall through and light up the altar. |
▲ Back to All Golden Scapegoats ▲
Bloodbathed Battlefront Golden Scapegoat 2 Solution
| Bloodbathed Battlefront Golden Scapegoat 2 |
|---|
Input the commands: Left, Right, Right, Right, Right, Right. Now, go down the ladder then up to avoid your past self. Jump down the button so your past self falls and presses the other button, then make your way to the altar. |
▲ Back to All Golden Scapegoats ▲
Bloodbathed Battlefront Golden Scapegoat 3 Solution
| Bloodbathed Battlefront Golden Scapegoat 3 |
|---|
Input the commands: Right, Right, Down, Right, Right. Go up the ladder and cross the bridges to reach the altar. |
▲ Back to All Golden Scapegoats ▲
Bloodbathed Battlefront Castrum Kremnos Golden Short Spear
All Bloodbathed Battlefront Golden Short Spears
There are 3 Golden Short Spears to collect in Bloodbathed Battlefront Castrum Kremnos. Use the table below as a guide on where to find them!
| Location and Solution | |
|---|---|
| 1 | 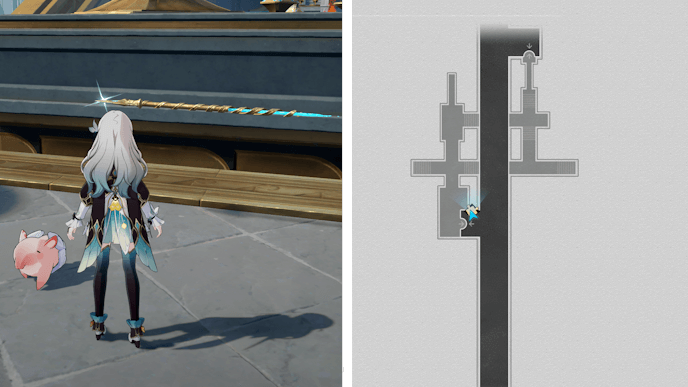 |
| 2 | 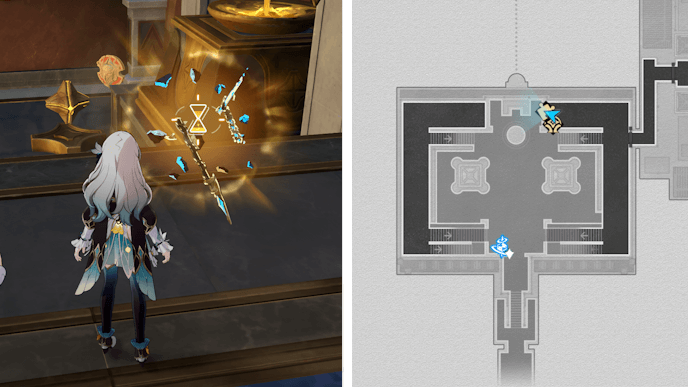 |
| 3 |  |
▲ All Bloodbathed Battlefront Puzzles ▲
Bloodbathed Battlefront Castrum Kremnos Coins of Whimsy
All Bloodbathed Battlefront Coins of Whimsy
There are 8 Coins of Whimsy to collect in Bloodbathed Battlefront Castrum Kremnos. Use the table below as a guide on where to find them!
| No. | Image | How to Find |
|---|---|---|
| 1 | 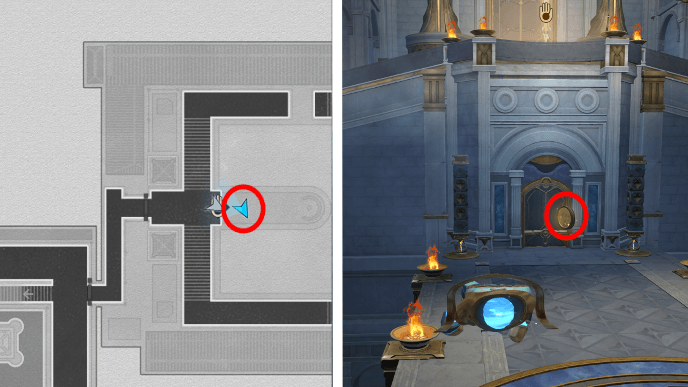 |
Use the Hand of Zagreus and traverse to see the coin. You'll find it near a door just below its control mechanism. |
| 2 | 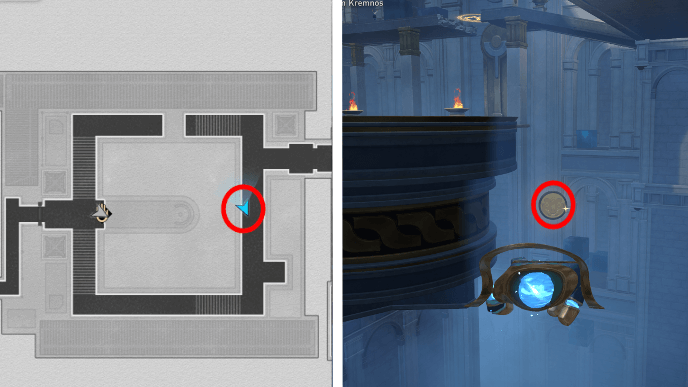 |
Use the Hand of Zagreus and fly down to round platform. You'll find the coin just below the edge of the platform. |
| 3 | 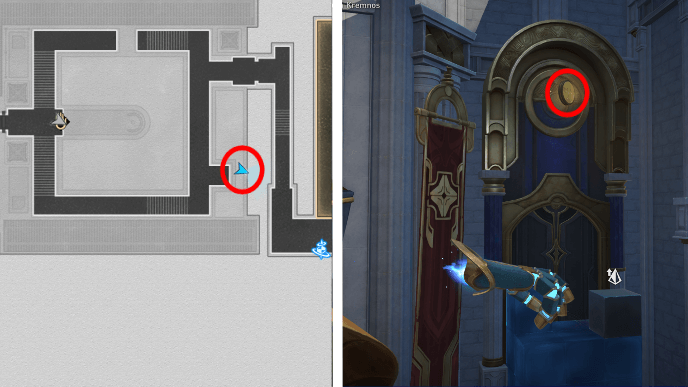 |
Use the Hand of Zagreus and fly across to grab the stone cube nearby. Place it down on the pile shown and the coid will appear above the huge gate. |
| 4 | 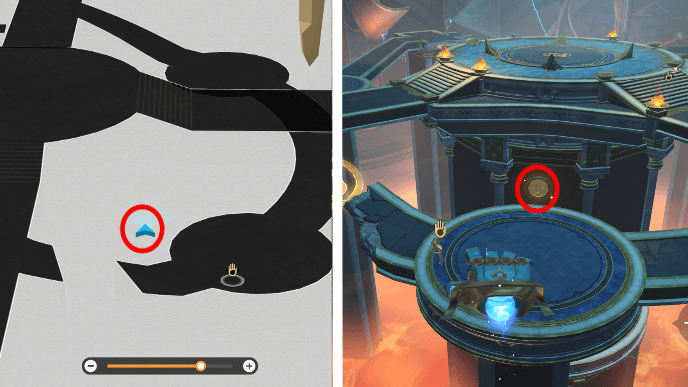 |
This coin is located in the Soul-Forging Zone during Evernight. Use the Hand of Zagreus nearby and fly to grab the coin from the platform's edge. |
| 5 | 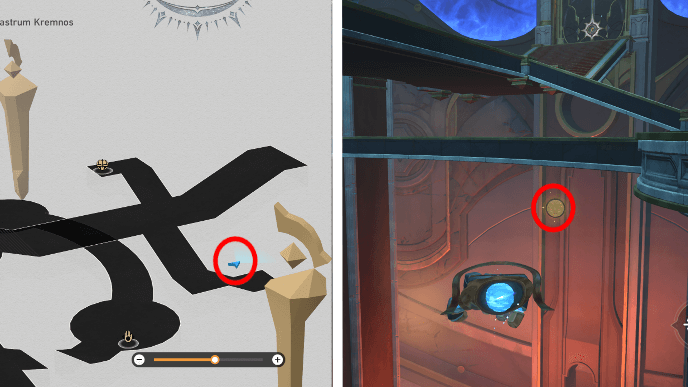 |
This coin is located in the Soul-Forging Zone during Evernight. Use the Hand of Zagreus nearby and you'll see the coin under the platforms and stairs. |
| 6 | 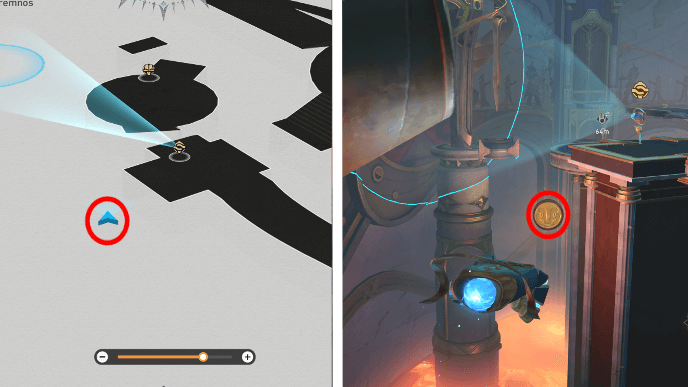 |
This coin is located in the Soul-Forging Zone during Evernight. Use the Hand of Zagreus and you'll see the coin near one of the statues and Miracle Orb. |
| 7 | 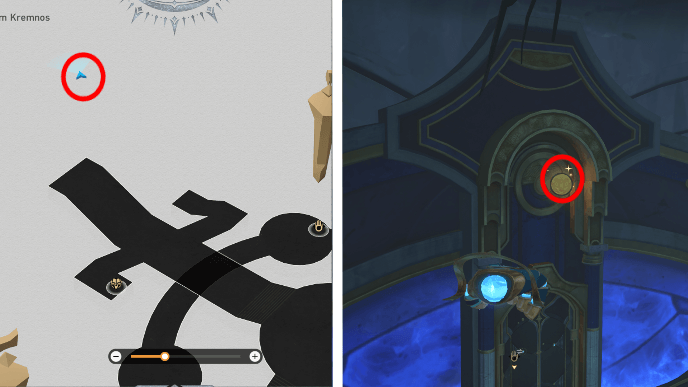 |
This coin is located in the Soul-Forging Zone during Evernight. Use the Hand of Zagreus and above the giant door. |
| 8 | 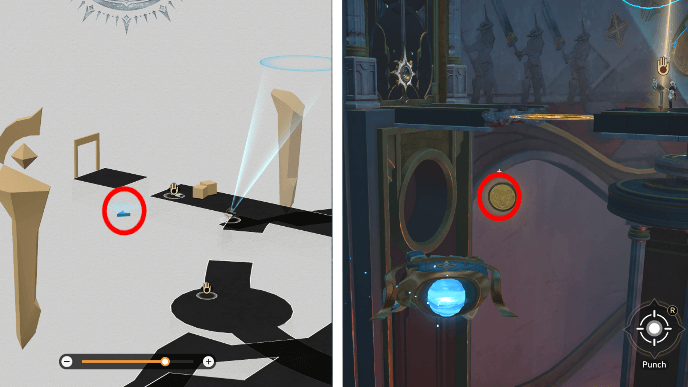 |
This coin is located in the Soul-Forging Zone during Evernight. Use the Hand of Zagreus and you'll find the coin under the platform in between two statues. |
▲ All Bloodbathed Battlefront Puzzles ▲
Bloodbathed Battlefront Castrum Kremnos Creation Nymphs
All Bloodbathed Battlefront Nymphs
| Bloodbathed Battlefront Creation Nymphs Map | |
|---|---|
 See Full Image |
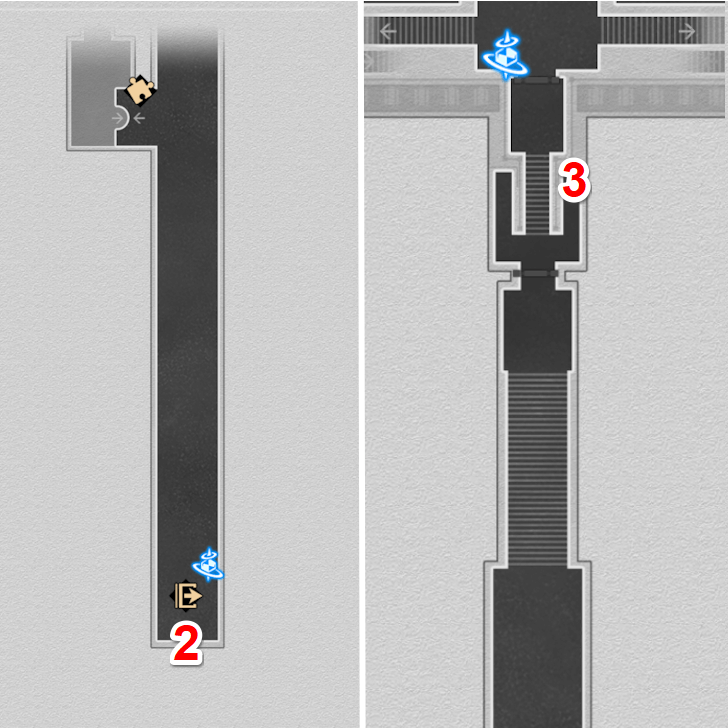 See Full Image |
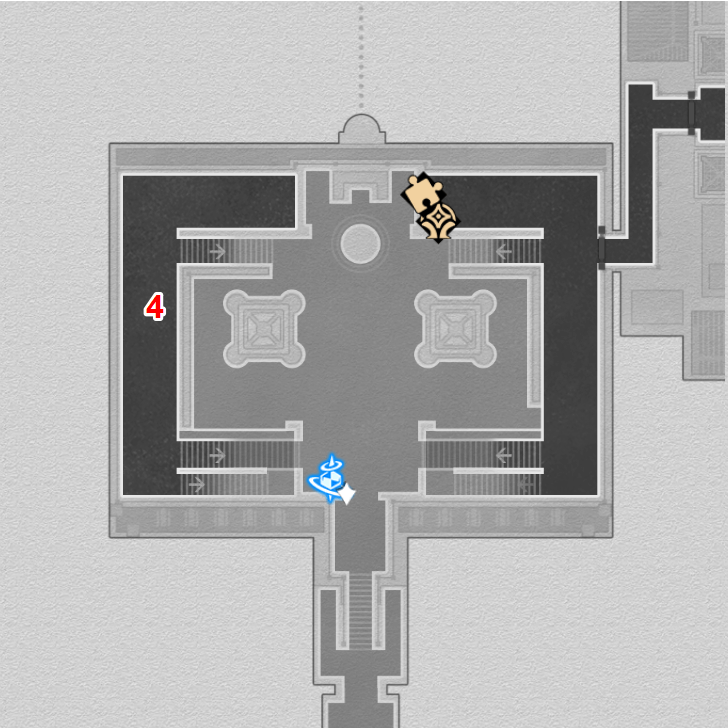 See Full Image |
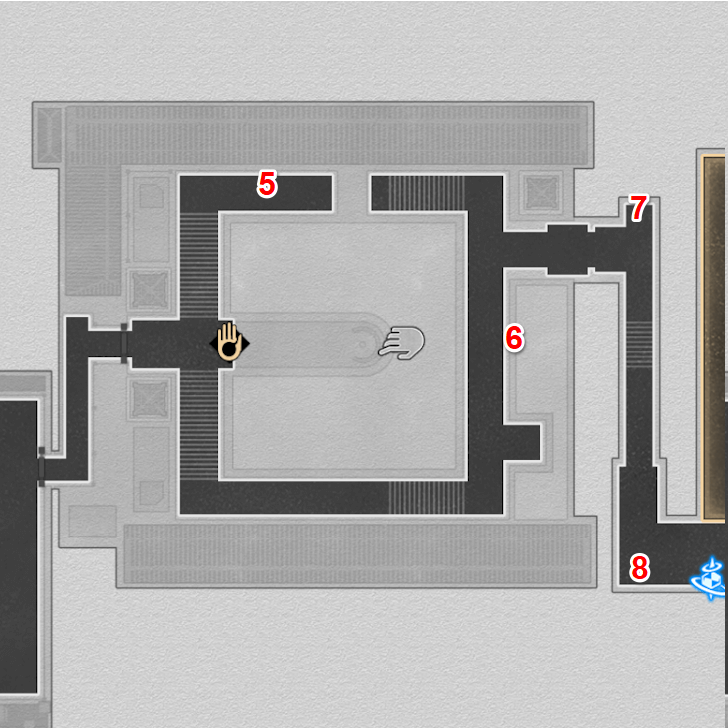 See Full Image |
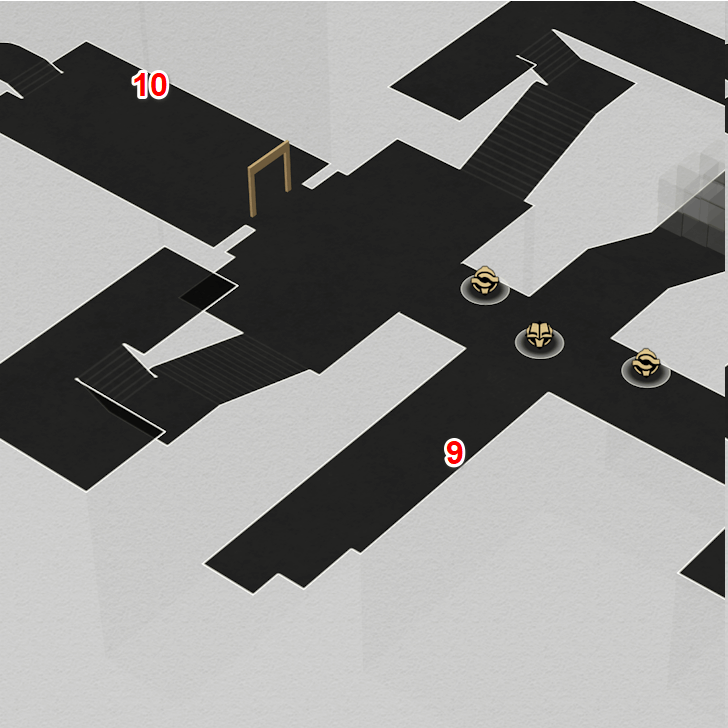 See Full Image |
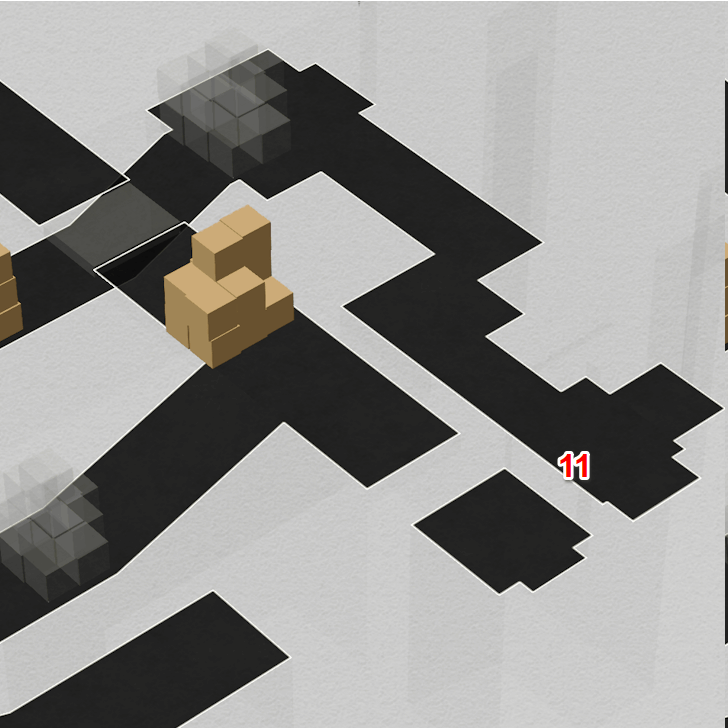 See Full Image |
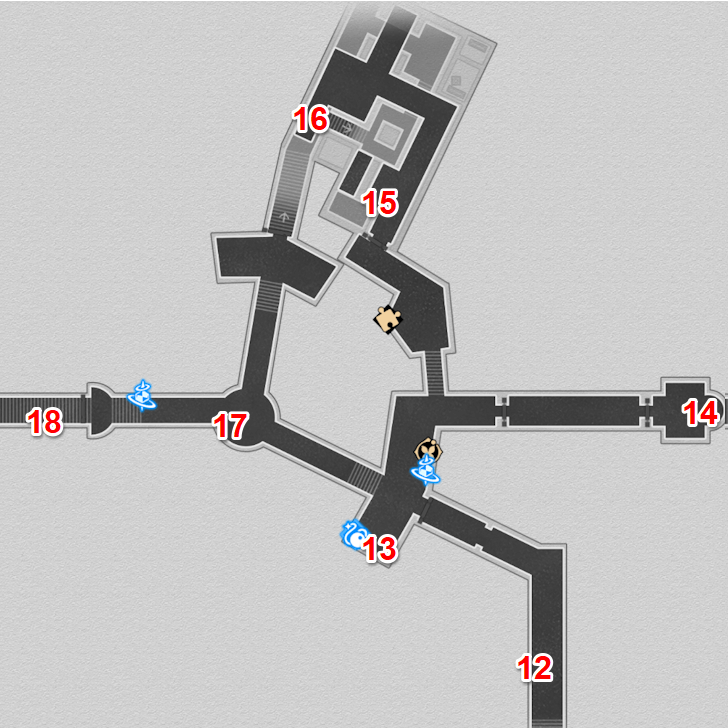 See Full Image |
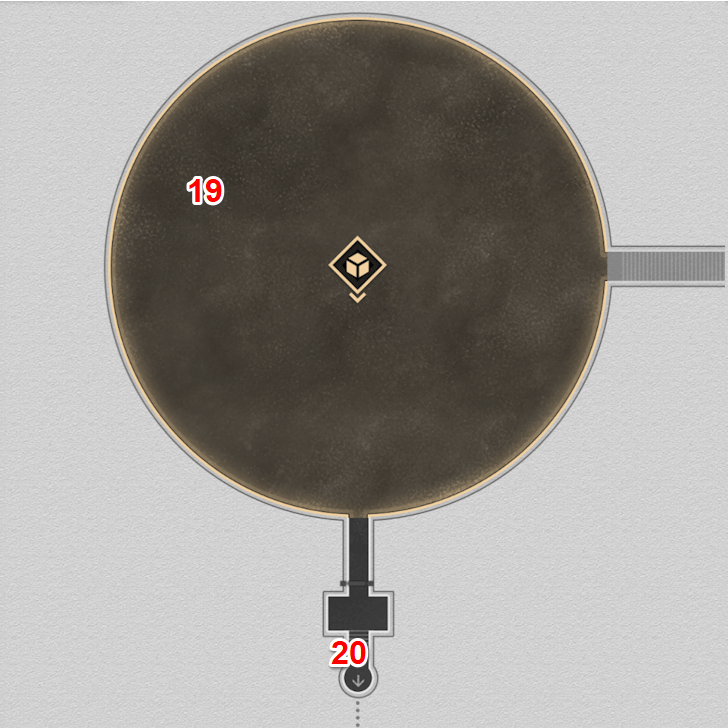 Bloodbathed Battlefront B1 North Bloodbathed Battlefront B1 North See Full Image |
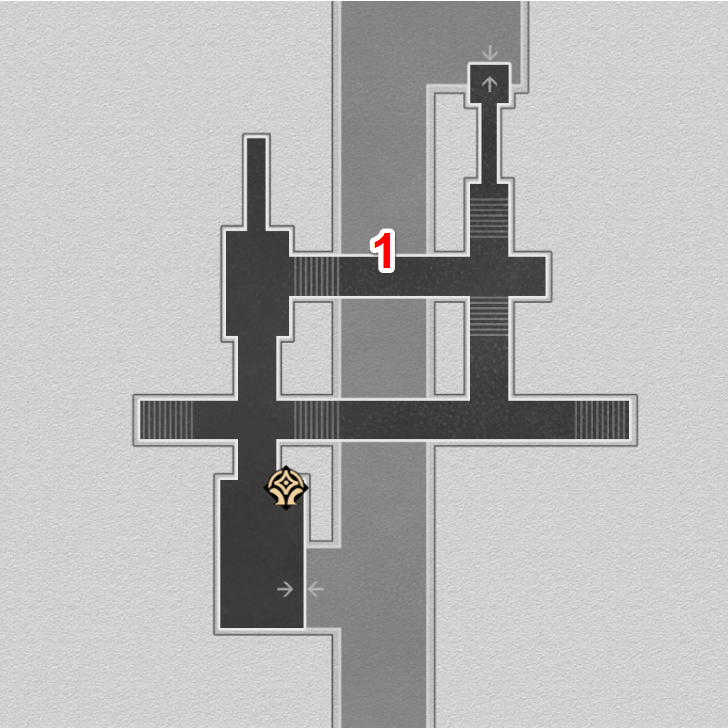
There are a total of 20 Creation Nymphs that can be found in Bloodbathed Battlefront Castrum Kremnos.
▲ All Bloodbathed Battlefront Puzzles ▲
Bloodbathed Battlefront Creation Nymph Locations
| No. | Image | How to Find |
|---|---|---|
| 1 | 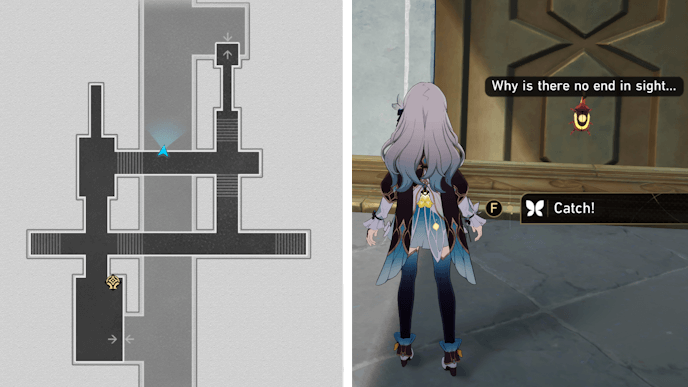 |
Use the elevator that leads to the basement and talk to the Nymph on the wall. |
| 2 | 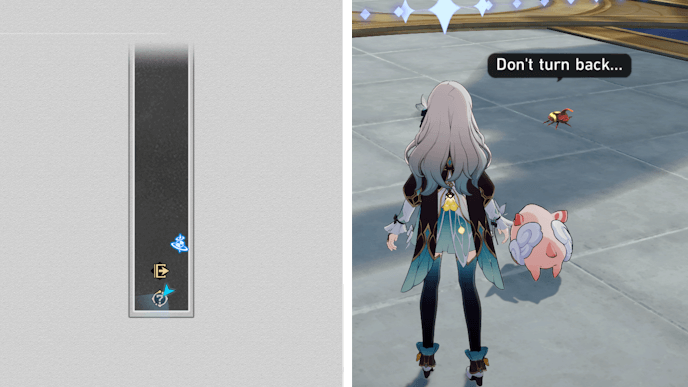 |
Turn around after teleporting to the Path of Conquest Space Anchor. |
| 3 | 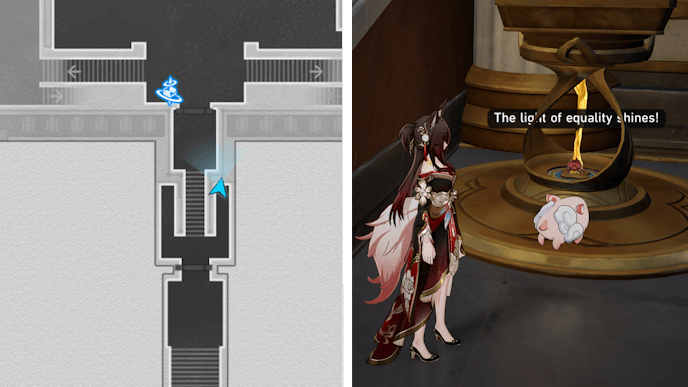 |
Go to the right side of the stairs leading up to the Hall of Strife. |
| 4 |  |
Walk up to the Creation Nymph on the floor. |
| 5 | 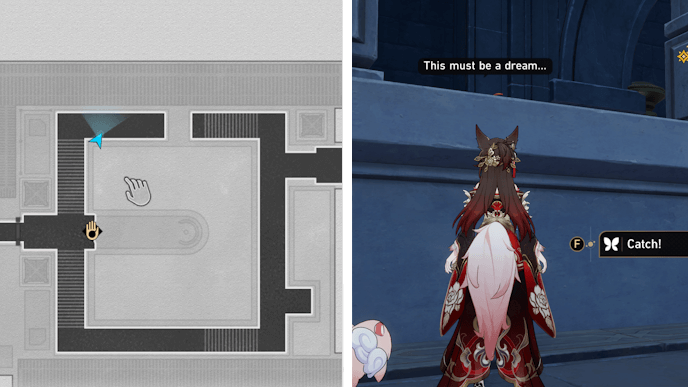 |
Walk up to the Creation Nymph on the ledge. |
| 6 | 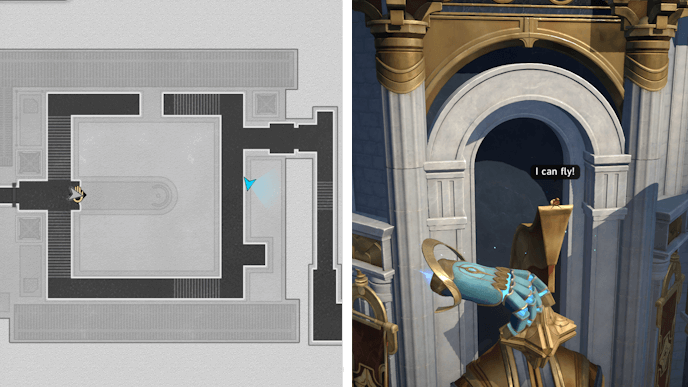 |
Take control of the Hand of Zagreus and head to the head of the statue. The Nymph is on the Statue's head. |
| 7 | 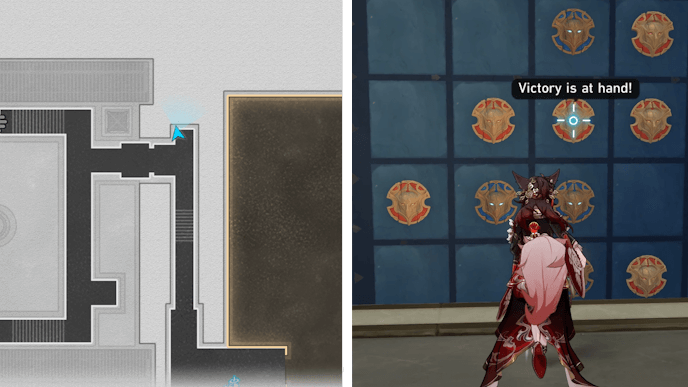 |
Shoot the shields on the wall to claim the Creation Nymph. |
| 8 | 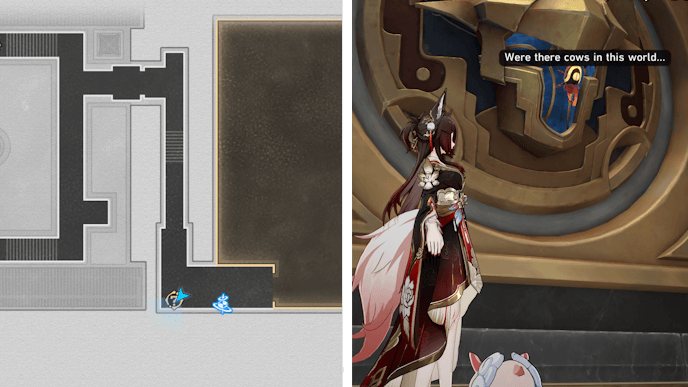 |
Talk to the Creation Nymph on the wall. |
| 9 | 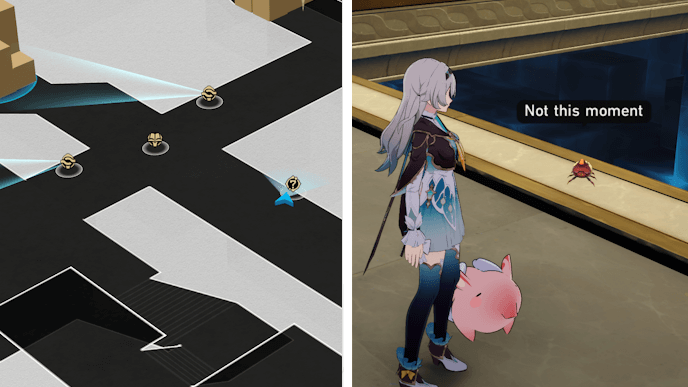 |
Walk up to the Creation Nymph on the floor. |
| 10 | 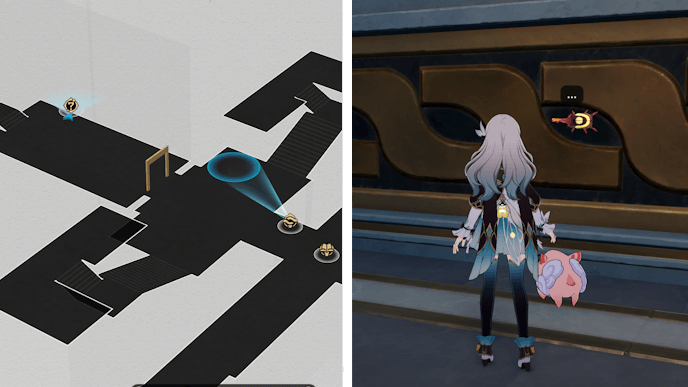 |
Once you have opened the door, head to the wall on the right and pick up the Creation Nymph on the wall. You can choose to defeat the enemies before picking the Nymph up. |
| 11 |  |
Point the Miracle Orb on the right toward the boxes on the left. Follow the now open path to the end and pick up the Creation Nymph. |
| 12 | 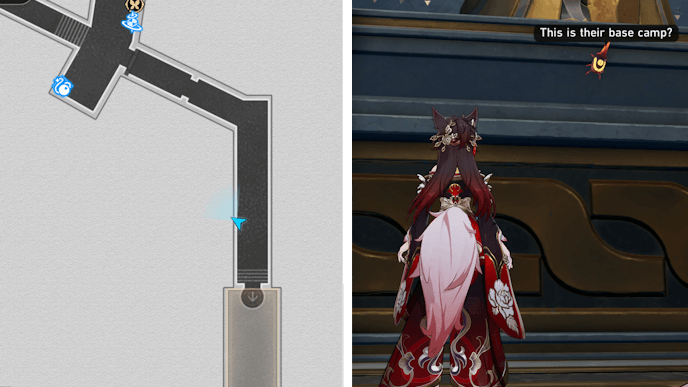 |
Pick up the Creation Nymph on the wall. A Spirithief will steal the Nymph, so deal with it before interacting with the Nymph again. |
| 13 |  |
Pick up the Creation Nymph on the floor beside the Cavern of Corrosion. |
| 14 | 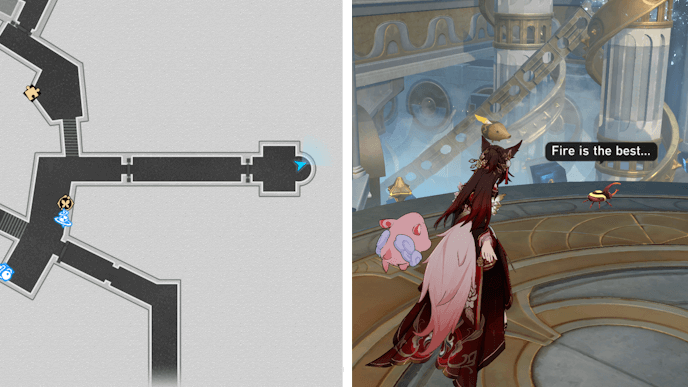 |
Walk to the end of the hallway and pick up the Creation Nymph. Tell it that there is no fire. |
| 15 | 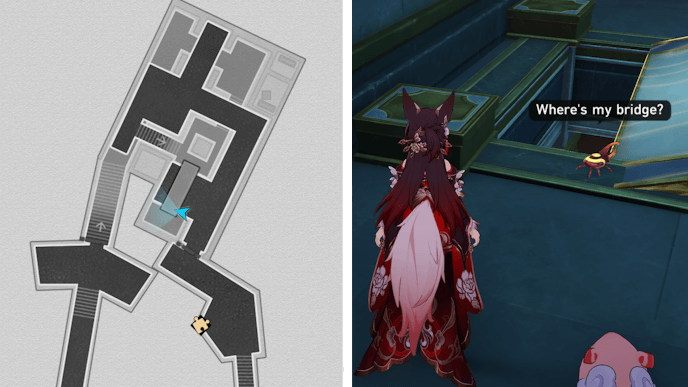 |
The Creation Nymph is located beside the hole in the floor. |
| 16 | 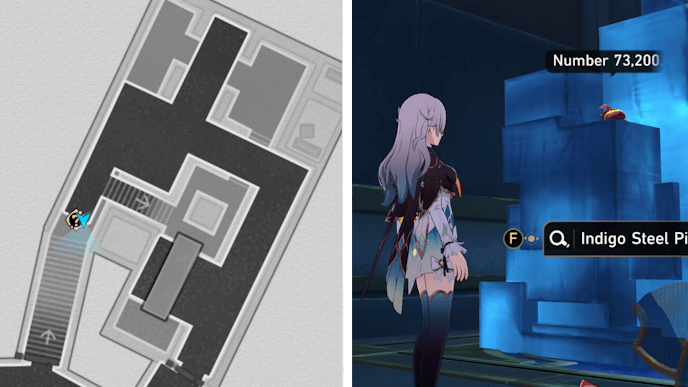 |
Get the Creation Nymph on top of the Indigo Steel Pile. |
| 17 |  |
The Creation Nymph is located on top of the unlit brazier. |
| 18 | 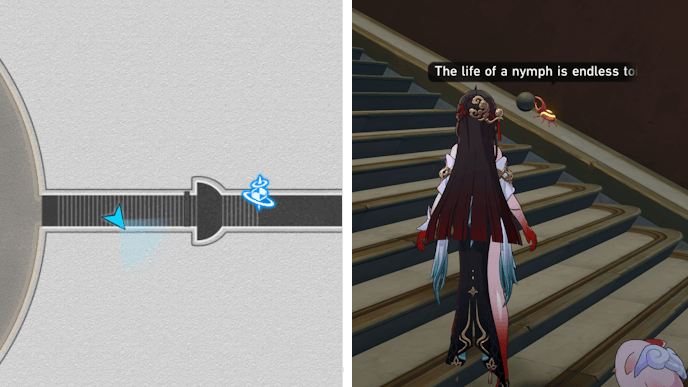 |
Halfway down the staircase is a Creation Nymph endlessly pushing a round rock. |
| 19 | 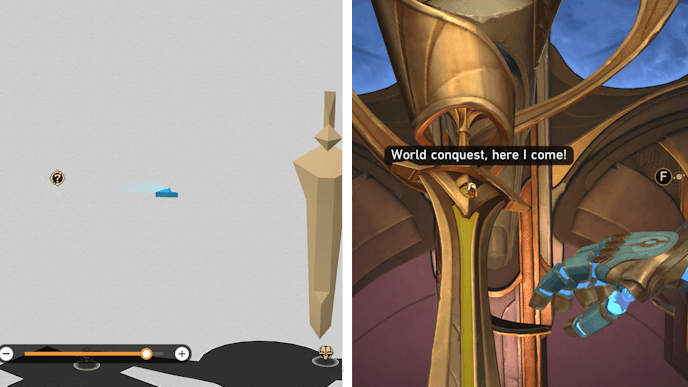 |
Control a Hand of Zagreus during Dawn and fly to the sword pointing towards the center. The Creation Nymph is on the hilt of the sword. |
| 20 | 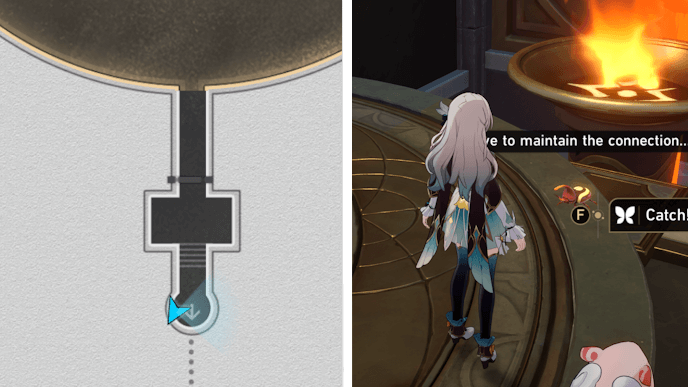 |
The Creation Nymph is on the floor near the lit brazier. |
▲ Back to All Creation Nymphs ▲
Honkai: Star Rail Related Guides
List of All Maps
| List of Maps | |
|---|---|
| Herta Space Station | Jarilo-VI |
| The Xianzhou Luofu | Penacony |
| Amphoreus | Planarcadia |
Treasure Chest Locations
Comment
Author
All Puzzles in Bloodbathed Battlefront Castrum Kremnos
improvement survey
03/2026
improving Game8's site?

Your answers will help us to improve our website.
Note: Please be sure not to enter any kind of personal information into your response.

We hope you continue to make use of Game8.
Premium Articles
Rankings
Gaming News
Popular Games

Genshin Impact Walkthrough & Guides Wiki

Honkai: Star Rail Walkthrough & Guides Wiki

Umamusume: Pretty Derby Walkthrough & Guides Wiki

Pokemon Pokopia Walkthrough & Guides Wiki

Resident Evil Requiem (RE9) Walkthrough & Guides Wiki

Monster Hunter Wilds Walkthrough & Guides Wiki

Wuthering Waves Walkthrough & Guides Wiki

Arknights: Endfield Walkthrough & Guides Wiki

Pokemon FireRed and LeafGreen (FRLG) Walkthrough & Guides Wiki

Pokemon TCG Pocket (PTCGP) Strategies & Guides Wiki
Recommended Games

Diablo 4: Vessel of Hatred Walkthrough & Guides Wiki

Fire Emblem Heroes (FEH) Walkthrough & Guides Wiki

Yu-Gi-Oh! Master Duel Walkthrough & Guides Wiki

Super Smash Bros. Ultimate Walkthrough & Guides Wiki

Pokemon Brilliant Diamond and Shining Pearl (BDSP) Walkthrough & Guides Wiki

Elden Ring Shadow of the Erdtree Walkthrough & Guides Wiki

Monster Hunter World Walkthrough & Guides Wiki

The Legend of Zelda: Tears of the Kingdom Walkthrough & Guides Wiki

Persona 3 Reload Walkthrough & Guides Wiki

Cyberpunk 2077: Ultimate Edition Walkthrough & Guides Wiki
All rights reserved
Copyright © 2024 HoYoverse, COGNOSPHERE. All Rights Reserved.
The copyrights of videos of games used in our content and other intellectual property rights belong to the provider of the game.
The contents we provide on this site were created personally by members of the Game8 editorial department.
We refuse the right to reuse or repost content taken without our permission such as data or images to other sites.


![Everwind Review [Early Access] | The Shaky First Step to A Very Long Journey](https://img.game8.co/4440226/ab079b1153298a042633dd1ef51e878e.png/thumb)

![Monster Hunter Stories 3 Review [First Impressions] | Simply Rejuvenating](https://img.game8.co/4438641/2a31b7702bd70e78ec8efd24661dacda.jpeg/thumb)


