All Puzzles in Universal Matrix Great Tomb of the Nameless Titan
★ Exclusive: Check out the State of Meta in 4.0!
♦ Latest: 4.1 Livestream Redeem Codes
♦ Phase 2: Sparkxie, Sparkle, Cerydra, Rappa
♦ Upcoming: Ashveil, Silver Wolf Lv.999, Evanescia
♦ Events: Cosmicon, Roll On!, Ding! Arcadia Fun-Time Clock-In Essentials

Here are all the Universal Matrix Great Tomb of the Nameless Titan puzzles in Honkai: Star Rail. Check out solutions for Universal Matrix Golden Scapegoats, Prophecy Tablets, Hand of Zagreus, along with Coins of Whimsy and Creation Nymph locations!
| Amphoreus Map Guide | |
|---|---|
| Universal Matrix Chests | Universal Matrix Puzzles |
List of Contents
All Universal Matrix Great Tomb of the Nameless Titan Puzzles
Puzzles in Universal Matrix
Shown above are the puzzle types found in Universal Matrix Great Tomb of the Nameless Titan! Click on the puzzles in the list to jump to a section and see guides on how to solve them!
Universal Matrix Chest Locations
Universal Matrix Great Tomb of the Nameless Titan Golden Scapegoat
All Universal Matrix Golden Scapegoat Puzzles
| Universal Matrix F2 Puzzle Room Evernight | Universal Matrix F1 West |
|---|---|
 |
 |
| Universal Matrix F1 East | |
 |
|
| Universal Matrix Great Tomb Puzzle Solutions | |
| Golden Scapegoat 1 | Golden Scapegoat 2 |
| Golden Scapegoat 3 | Golden Scapegoat 4 |
There are 4 Golden Scapegoat puzzles found in Universal Matrix Great Tomb of the Nameless Titan. Click on the links in the table to jump to a puzzle solution!
▲ All Universal Matrix Great Tomb Puzzles ▲
Universal Matrix Golden Scapegoat 1 Solution
| Universal Matrix Golden Scapegoat 1 |
|---|
Input the commands: Left, Left, Right, Down, Right, Right, Left. When your past self appears, go left twice to press the yellow button so your past self falls down. Immediately proceed towards the ladder since your past self will be pressing the button for you to cross for the next two moves. Then you can safely go up the ladder and light the altar. |
▲ Back to All Golden Scapegoats ▲
Universal Matrix Golden Scapegoat 2 Solution
| Universal Matrix Golden Scapegoat 2 |
|---|
Input the commands: Left, Left, Left, Right, Right. When your past self appears, keep moving towards the portal to the left. Once you've teleported, go right to fall down onto the altar. |
▲ Back to All Golden Scapegoats ▲
Universal Matrix Golden Scapegoat 3 Solution
| Universal Matrix Golden Scapegoat 3 |
|---|
Input the commands: Left, Left, Right, Down, Right, Right, Right. When your past self appears, move left so your past self can cross and then right since your past self will press the button at the same time, letting you fall to the lower platform. Move left, right, and then all the way left towards the altar. |
▲ Back to All Golden Scapegoats ▲
Universal Matrix Golden Scapegoat 4 Solution
| Universal Matrix Golden Scapegoat 4 |
|---|
Input the commands: Left, Left, Left, Right, Right, Left, Right, Right. When your past self appears, go right to fall down, left, and then right again to fall onto the altar. |
▲ Back to All Golden Scapegoats ▲
Universal Matrix Great Tomb of the Nameless Titan Hand of Zagreus
All Universal Matrix Hand of Zagreus
| Universal Matrix Hand of Zagreus Puzzles | |
|---|---|
| Precious Chest | Chirping Secret |
There are 2 puzzles in Universal Matrix that makes use of the Hand of Zagreus! Both can be found in F2 of Universal Matrix. Once you do the first three steps for one, you won't need to repeat it for the other puzzle.
▲ All Universal Matrix Great Tomb Puzzles ▲
Universal Matrix Precious Chest Puzzle
| # | How to Solve |
|---|---|
| 1 | 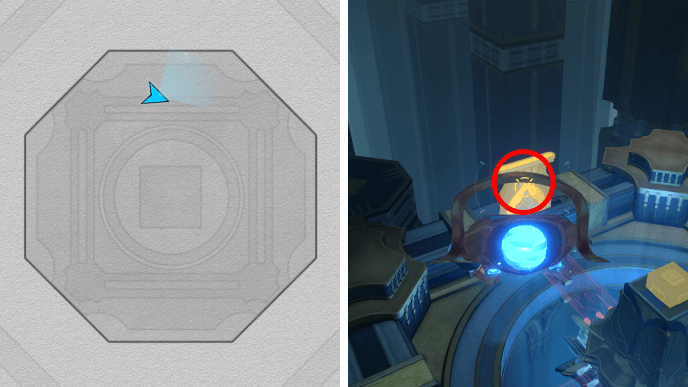 Use the Hand of Zagreus and go to the northmost platform to punch the memory stick that's sticking out on top of the platform. |
| 2 | 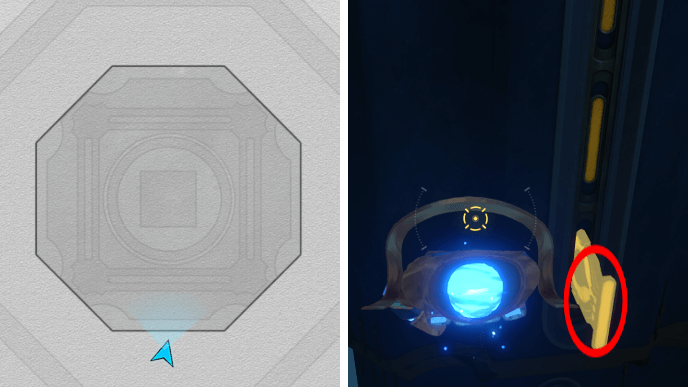 Punch the memory stick that's sticking out below on the south side of the platform. |
| 3 | 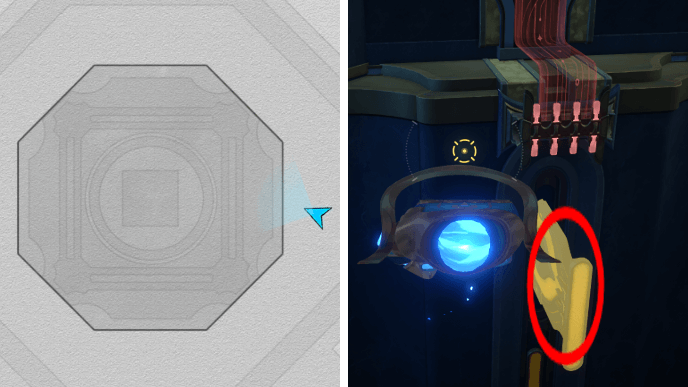 Punch the memory stick that's sticking out below on the east side of the platform. A short cutscene will play upon punching in all memory sticks. |
| 4 | 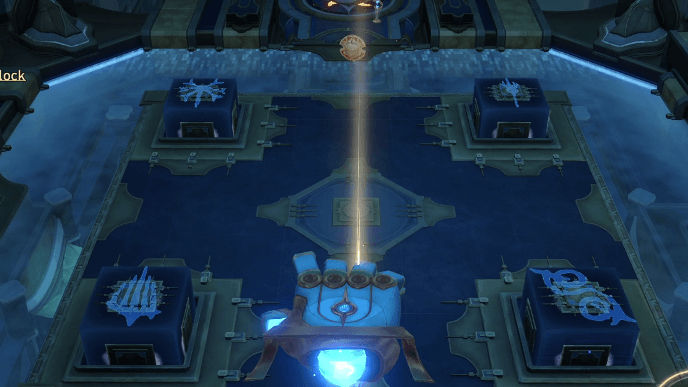 You will need to match the symbols on the cubes in F2 with the symbols shown near the chest in F1. Go to the southmost platform and use the Hand of Zagreus to punch the cubes until they match their respective symbols. The correct symbols are: Upper Left - Reason, Upper Right - Strife, Lower Left - Death, Lower Right - Trickery |
▲ Back to All Hand of Zagreus Puzzles ▲
Universal Matrix Chirping Secret Puzzle
| # | How to Solve |
|---|---|
| 1 | Use the Hand of Zagreus and go to the northmost platform to punch the memory stick that's sticking out on top of the platform. |
| 2 | Punch the memory stick that's sticking out below on the south side of the platform. |
| 3 | Punch the memory stick that's sticking out below on the east side of the platform. A short cutscene will play upon punching in all memory sticks. |
| 4 | 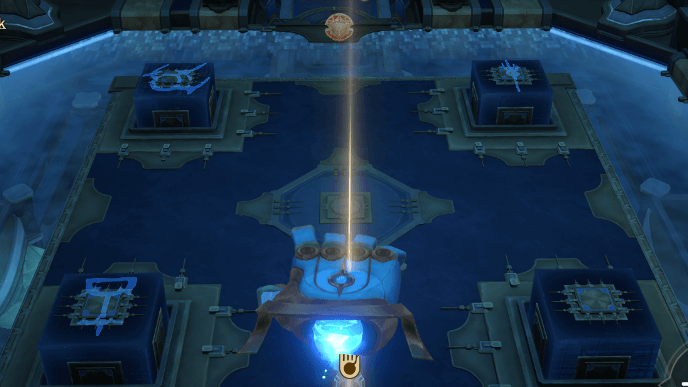 You will need to match the symbols on the cubes in F2 with the symbols hinted by the Garmentmaker. The correct symbols are: Upper Left - Romance, Upper Right - Strife, Lower Left - Ocean, Lower Right - Blank |
Chirping Secret: The System of Four can be found within the West side of Universal Matrix Great Tomb of the Nameless Titan. The player must use the Hand of Zagreus to punch objects to solve the puzzle.
▲ All Universal Matrix Great Tomb Puzzles ▲
Universal Matrix Great Tomb of the Nameless Titan Prophecy Tablet
All Universal Matrix Prophecy Tablet
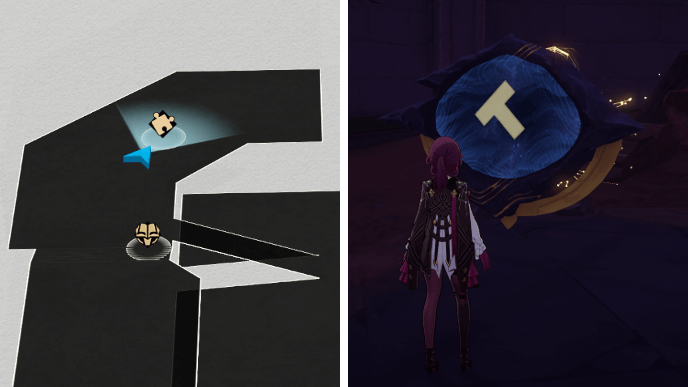
There is only one Prophecy Tablet in Universal Matrix Great Tomb of the Nameless Titan and it can be found in the F2 puzzle room during Evernight.
Universal Matrix Prophecy Tablet Solution
| Universal Matrix Prophecy Tablet Solution | |
|---|---|
| 1 | 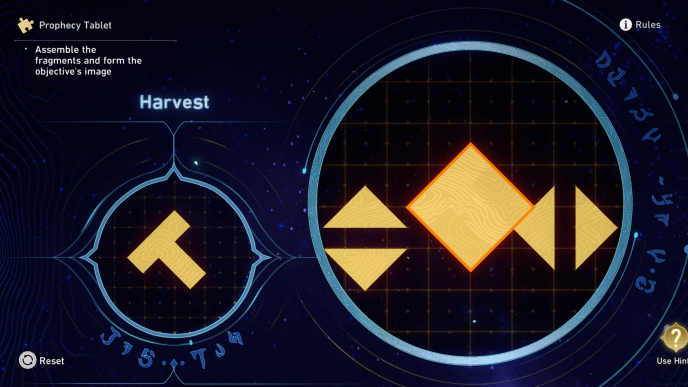 Place the diamond in the center. |
| 2 | 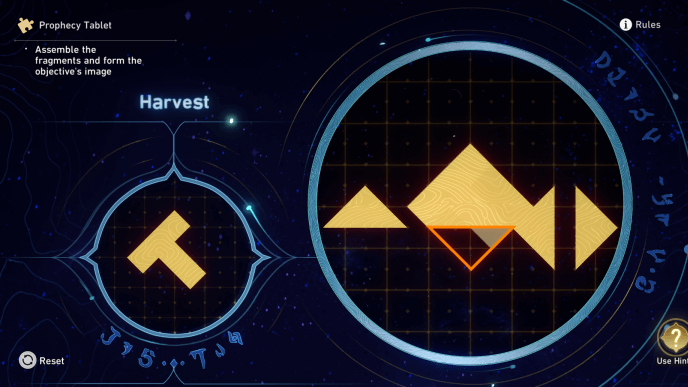 Place the triangle facing downwards at the bottom of the diamond. |
| 3 | 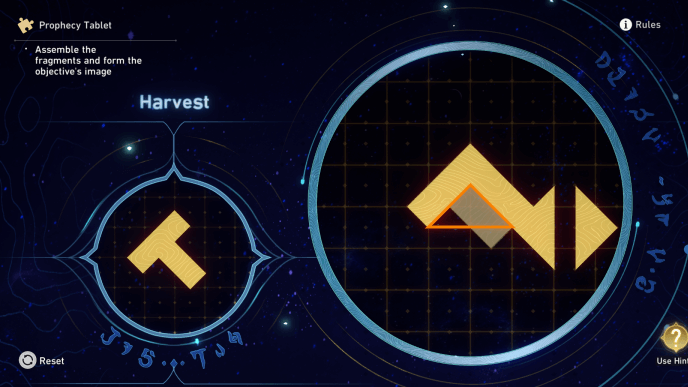 Place the triangle facing up above where you put the previous triangle. |
| 4 | 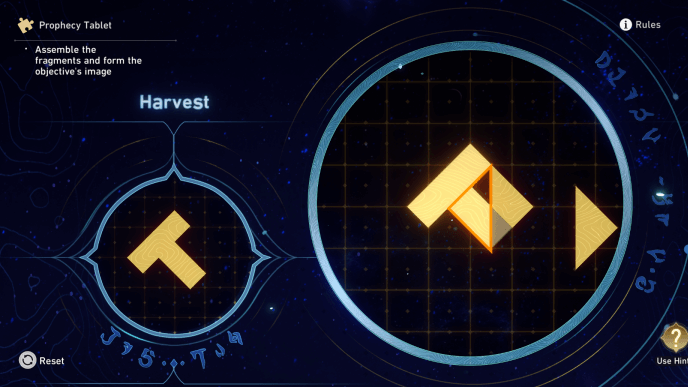 Align the bottom of the triangle facing left with the bottom of the outline. |
| 5 | 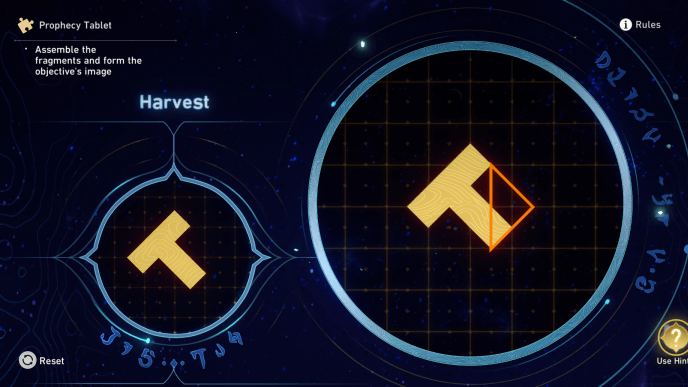 Align the bottom of the triangle facing right with the bottom of the outline. |
▲ All Universal Matrix Great Tomb Puzzles ▲
Universal Matrix Great Tomb of the Nameless Titan Coins of Whimsy
All Universal Matrix Coins of Whimsy Locations
| Universal Matrix Great Tomb Coins of Whimsy |
|---|
 See Full Image |
There are 3 Coins of Whimsy to collect in Universal Matrix Great Tomb of the Nameless Titan. Use the table below as a guide on where to find them!
▲ All Universal Matrix Great Tomb Puzzles ▲
How to Get Universal Matrix Coins
| No. | Image | How to Find |
|---|---|---|
| 1 | 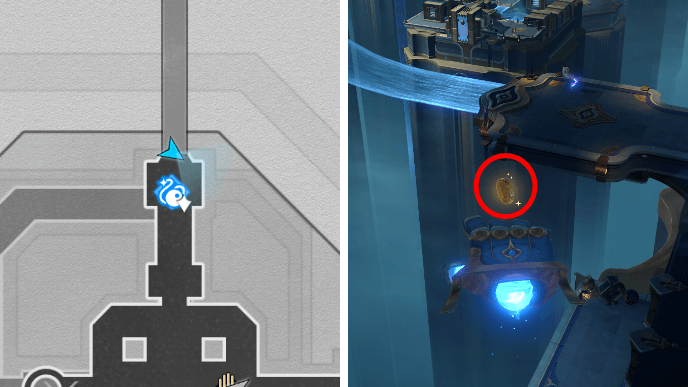 |
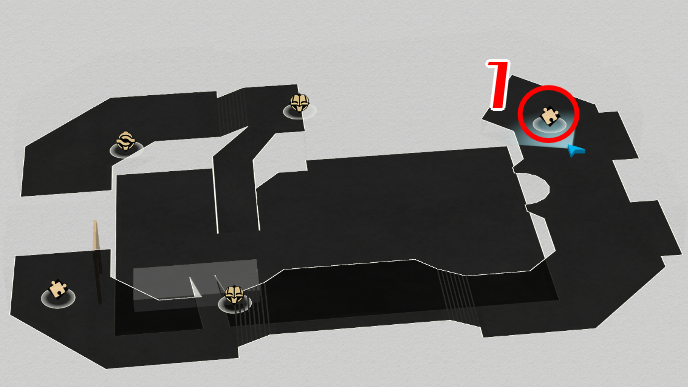
Coin 1 can be found under the southmost platform, near the Cavern of Corrosion. |
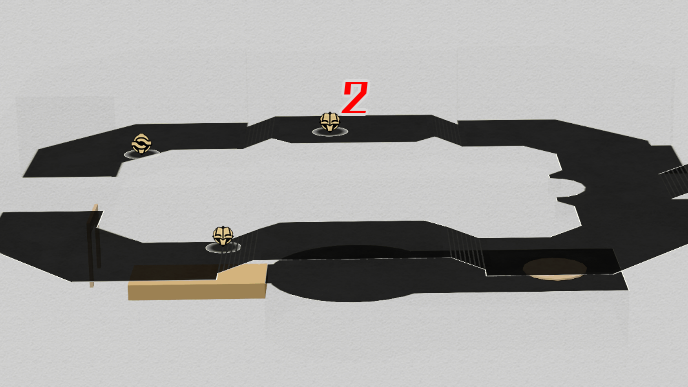
| 2 | 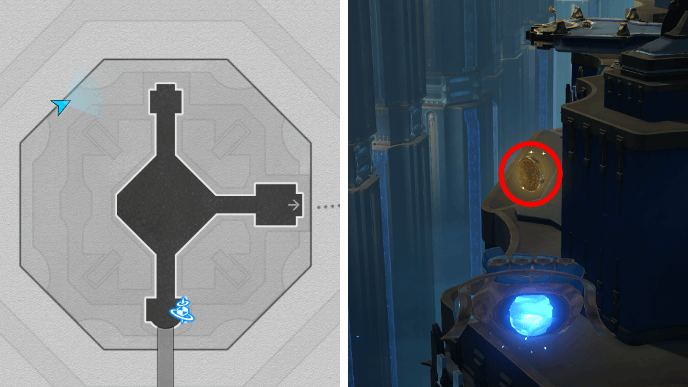 |
Coin 2 can be found on the upper left side of the middle platform, with the Data Advection Sector: Connection Point Space Anchor. |
| 3 | 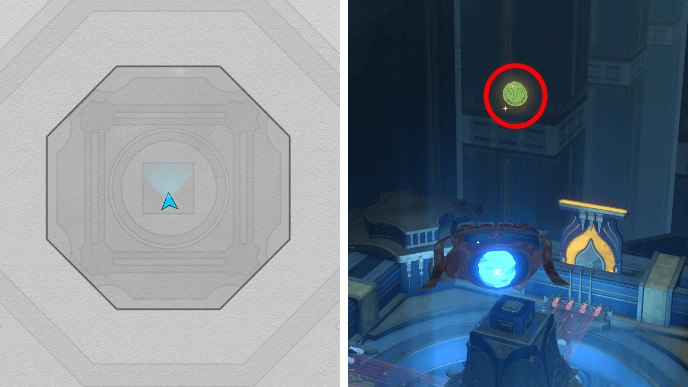 |
Coin 3 can be found on top of the northmost platform. |
▲ Back to All Coins of Whimsy ▲
Universal Matrix Great Tomb of the Nameless Titan Creation Nymphs
Universal Matrix Creation Nymph Locations
| Universal Matrix Creation Nymphs Map | |
|---|---|
 See Full Image |
 See Full Image |
 See Full Image |
 See Full Image |
 See Full Image |
 See Full Image |
 See Full Image |
 See Full Image |
There are 10 Creation Nymphs to collect in Universal Matrix Great Tomb of the Nameless Titan. Use the table below as a guide on where to find them!
▲ All Universal Matrix Great Tomb Puzzles ▲
How to Get Universal Matrix Nymphs
| No. | Image | How to Find |
|---|---|---|
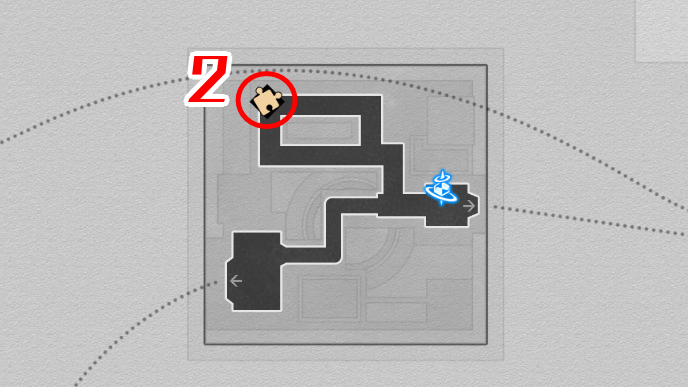
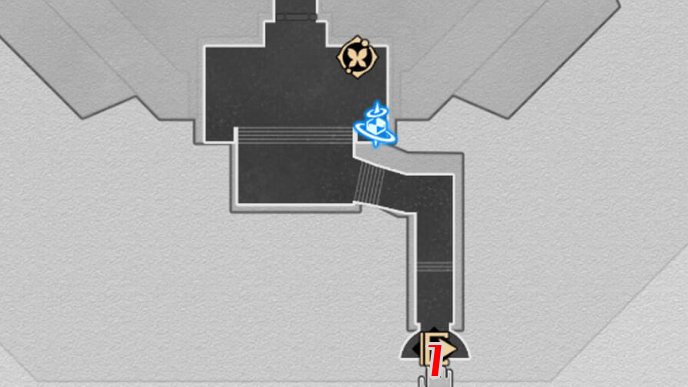
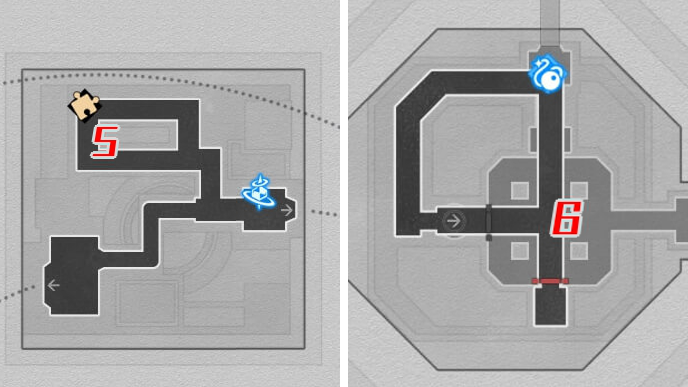
| 1 | 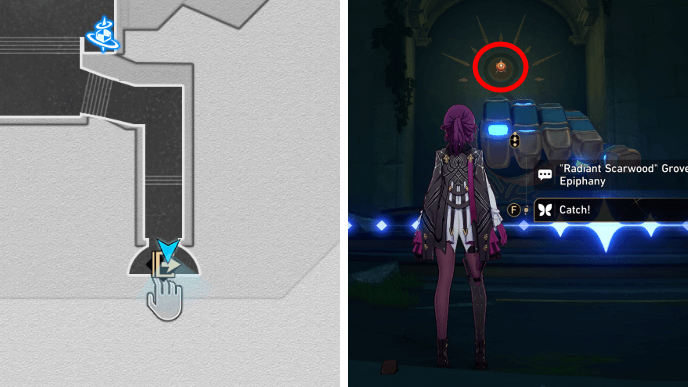 |
Use the Tranquil Tomb Gate Space Anchor and go back towards the Radiant Scarwood Grove of Epiphany area. The nymph should be on the wall of the exit. |
| 2 | 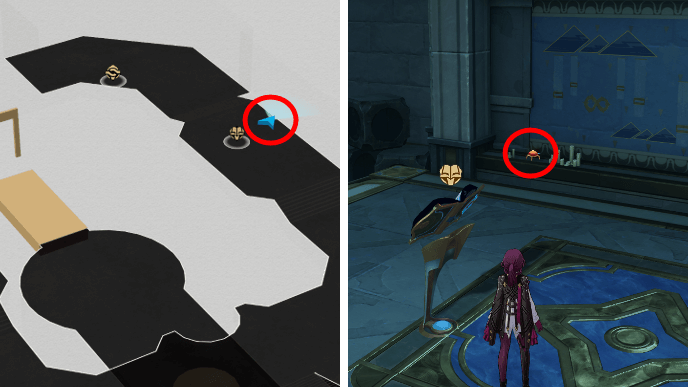 |
Use the Tranquil Tomb Gate Space Anchor and enter the 3D puzzle room. The nymph will be on the wall near the Tome of Miracles on the right. |
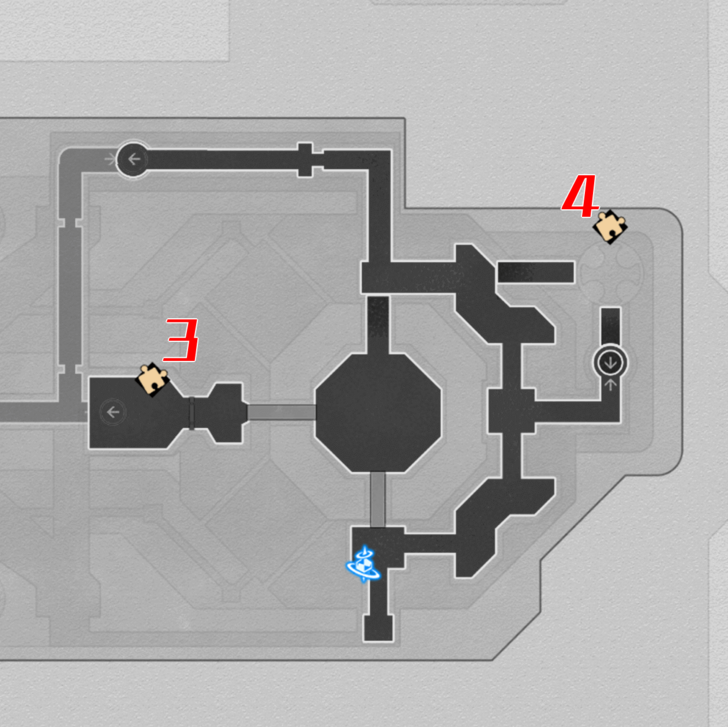
| 3 |  |
In the 3D puzzle room, change the time to Evernight. Go down to the sandy area and the nymph should be on the wall behind the three spinning shields. |
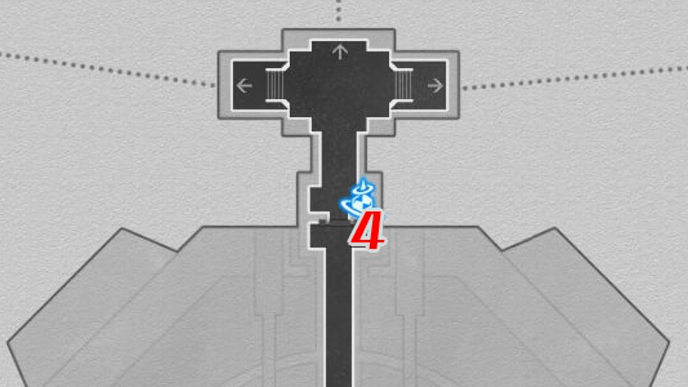
| 4 | 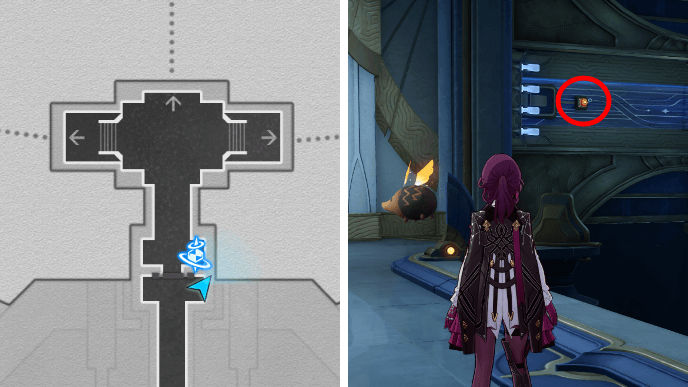 |
Use the Central Access Platform Space Anchor and return to the corridor behind. The nymph will be on the wall to the right of the door. |
| 5 | 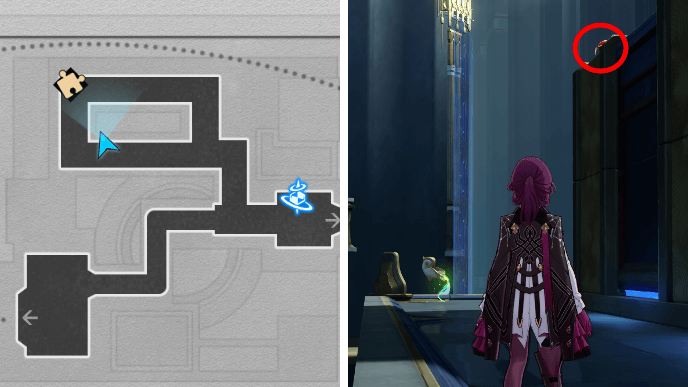 |
Use the Data Advection Sector: Entrance Space Anchor and turn right. The nymph can be found on top of a corner of the wall. |
| 6 | 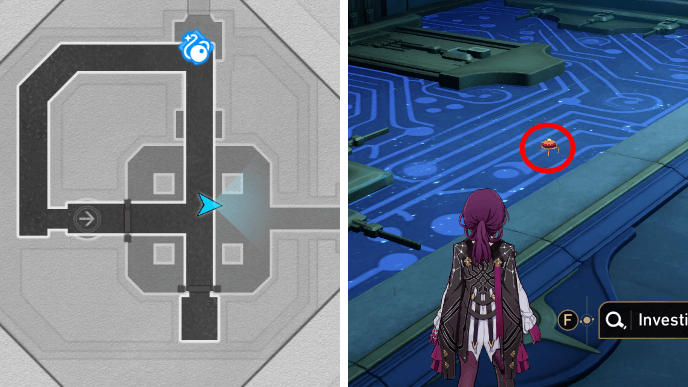 |
Teleport to the Cavern of Corrosion: Path of Hidden Salvation and go to the room with the circuits. The nymph should be on the floor with the circuits to the east. |
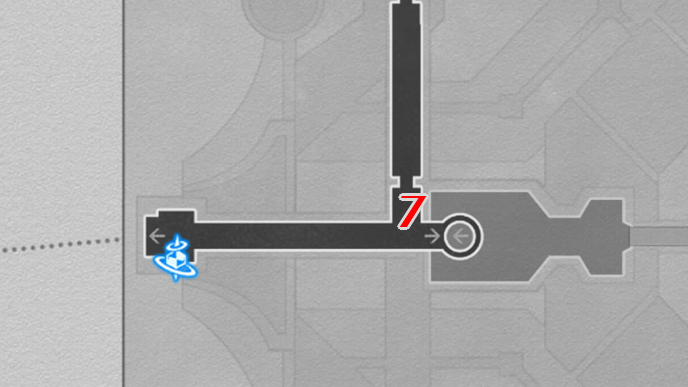
| 7 | 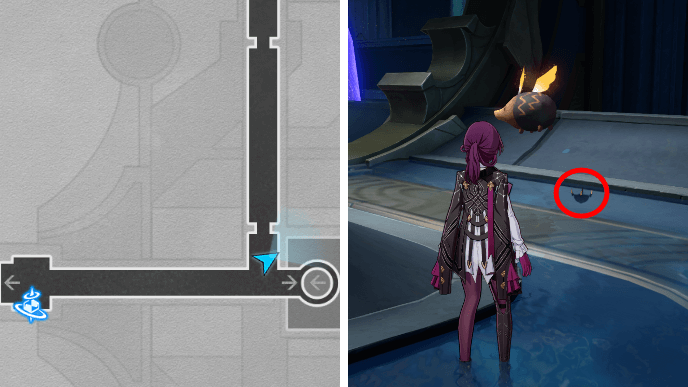 |
Found near a flying amphora a bit past the Tidal Cooling Sector: Entrance Space Anchor. |
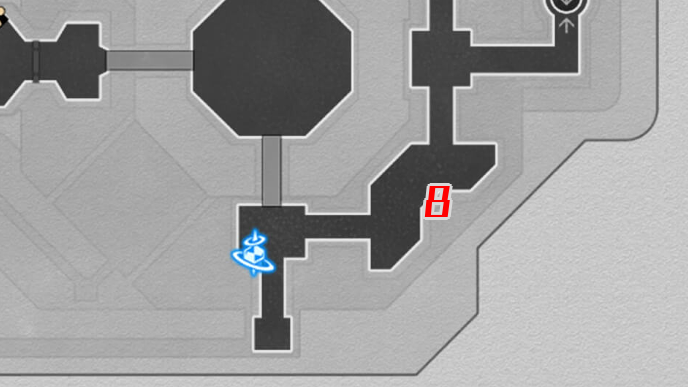
| 8 | 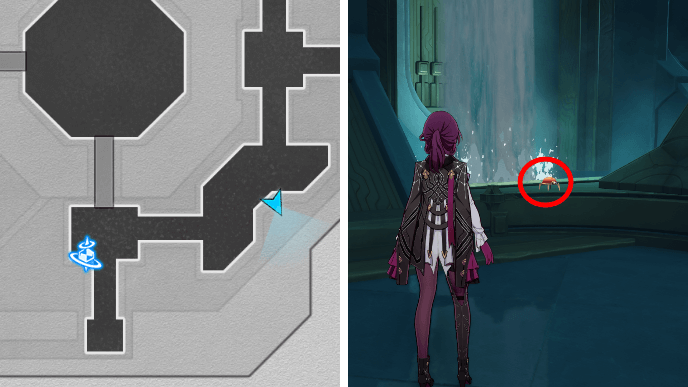 |
Use the Tidal Cooling Sector: Entrance and turn right. The nymph can be found on a ledge near the waterfall and some ichor memosprites. |
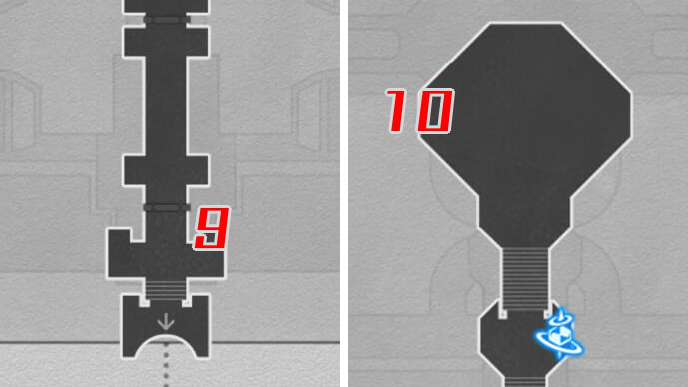
| 9 | 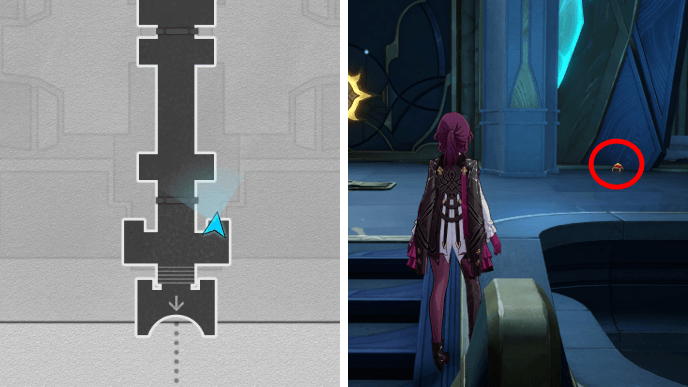 |
Found to the right of the door going to the Demiurge Matrix. |
| 10 |  |
Found on the left edge of the platform in the Demiurge Matrix. |
▲ Back to All Creation Nymphs ▲
Honkai: Star Rail Related Guides
List of All Maps
| List of Maps | |
|---|---|
| Herta Space Station | Jarilo-VI |
| The Xianzhou Luofu | Penacony |
| Amphoreus | Planarcadia |
Treasure Chest Locations
Comment
Author

All Puzzles in Universal Matrix Great Tomb of the Nameless Titan
Premium Articles

Rankings
- We could not find the message board you were looking for.
Gaming News

![Monster Hunter Stories 3 Review [First Impressions] | Simply Rejuvenating](https://img.game8.co/4438641/2a31b7702bd70e78ec8efd24661dacda.jpeg/show)
![Monster Hunter Stories 3 Review [First Impressions] | Simply Rejuvenating](https://img.game8.co/4438641/2a31b7702bd70e78ec8efd24661dacda.jpeg/thumb)
![The Seven Deadly Sins: Origin [First Impressions] | A Promising Start](https://img.game8.co/4440581/584e0bfb87908f12c4eab6e846eb1afd.png/thumb)

Popular Games

Genshin Impact Walkthrough & Guides Wiki
Umamusume: Pretty Derby Walkthrough & Guides Wiki
Pokemon Pokopia Walkthrough & Guides Wiki
Honkai: Star Rail Walkthrough & Guides Wiki
Monster Hunter Stories 3: Twisted Reflection Walkthrough & Guides Wiki
Arknights: Endfield Walkthrough & Guides Wiki
Wuthering Waves Walkthrough & Guides Wiki
Zenless Zone Zero Walkthrough & Guides Wiki
Pokemon TCG Pocket (PTCGP) Strategies & Guides Wiki
Monster Hunter Wilds Walkthrough & Guides Wiki


Recommended Games
Diablo 4: Vessel of Hatred Walkthrough & Guides Wiki
Cyberpunk 2077: Ultimate Edition Walkthrough & Guides Wiki
Fire Emblem Heroes (FEH) Walkthrough & Guides Wiki
Yu-Gi-Oh! Master Duel Walkthrough & Guides Wiki
Super Smash Bros. Ultimate Walkthrough & Guides Wiki
Pokemon Brilliant Diamond and Shining Pearl (BDSP) Walkthrough & Guides Wiki
Elden Ring Shadow of the Erdtree Walkthrough & Guides Wiki
Monster Hunter World Walkthrough & Guides Wiki
The Legend of Zelda: Tears of the Kingdom Walkthrough & Guides Wiki
Persona 3 Reload Walkthrough & Guides Wiki


All rights reserved
Copyright © 2024 HoYoverse, COGNOSPHERE. All Rights Reserved.
The copyrights of videos of games used in our content and other intellectual property rights belong to the provider of the game.
The contents we provide on this site were created personally by members of the Game8 editorial department.
We refuse the right to reuse or repost content taken without our permission such as data or images to other sites.