All Aedes Elysiae Puzzles
★ Exclusive: Check out the State of Meta in 4.0!
♦ Latest: 4.1 Livestream Redeem Codes
♦ Phase 2: Sparxie, Sparkle, Cerydra, Rappa
♦ Upcoming: Ashveil, Silver Wolf Lv.999, Evanescia
♦ Events: Cosmicon, Roll On!, Ding! Arcadia Fun-Time Clock-In Essentials

Here are all the Aedes Elysiae puzzles in Honkai: Star Rail. Check out solutions for Aedes Elysiae Golden Scapegoats and Prophecy Tablet, along with Aedes Elysiae Creation Nymph locations!
| Amphoreus Map Guide | |
|---|---|
| Aedes Elysiae Chests | Aedes Elysiae Puzzles |
List of Contents
All Aedes Elysiae Puzzles
Puzzles in Aedes Elysiae
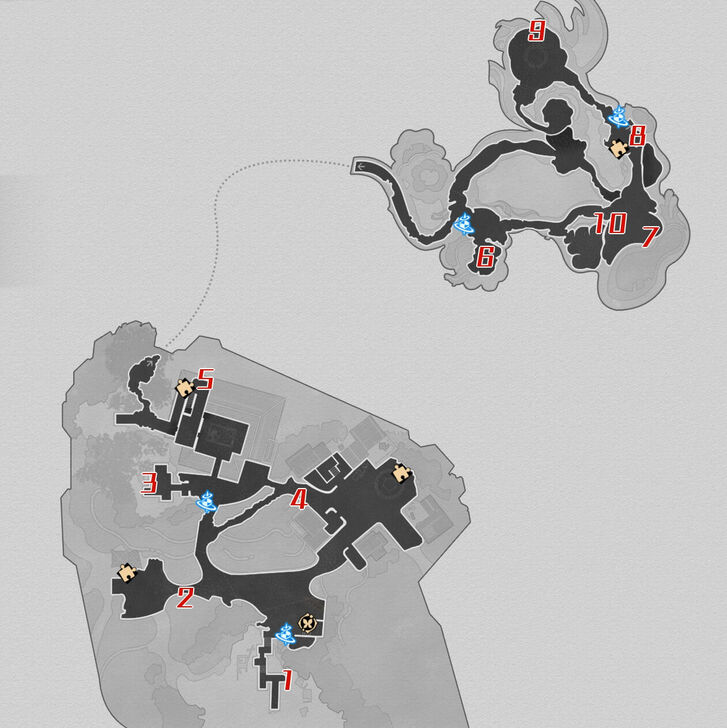
Shown above are the puzzles and collectibles found in Aedes Elysiae! Click on the puzzles in the list to jump to a section and see guides on how to solve them!
Aedes Elysiae Chests Locations
Aedes Elysiae Creation Nymphs
All Aedes Elysiae Nymphs
| Aedes Elysiae Creation Nymphs Map |
|---|
 See Full Image |
There are a total of 10 Creation Nymphs that can be found in Aedes Elysiae.
Aedes Elysiae Creation Nymph Locations
| No. | Image | How to Find |
|---|---|---|
| 1 | 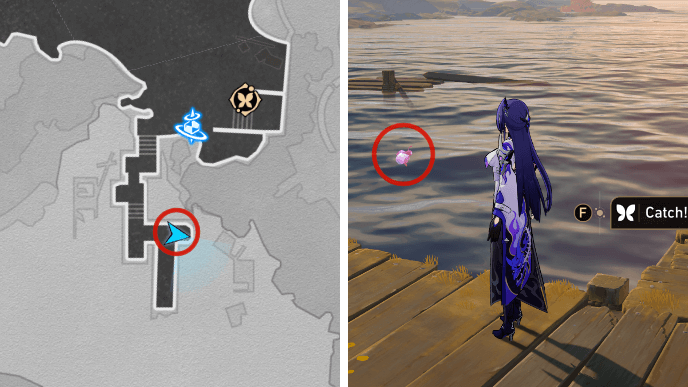 |
From the Voyager's Wharf Space Anchor, head down the pier to the south and you'll see the nymph near the edge to the left. |
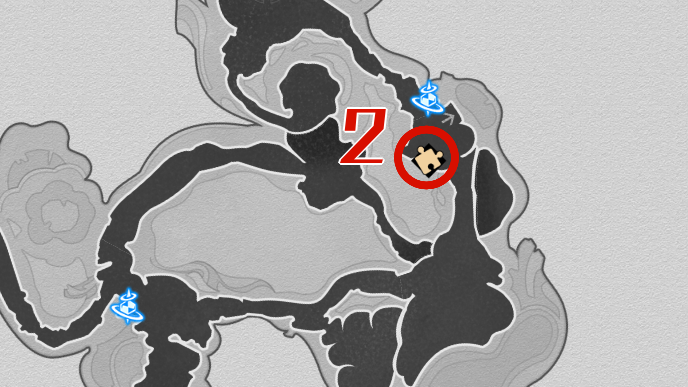
| 2 | 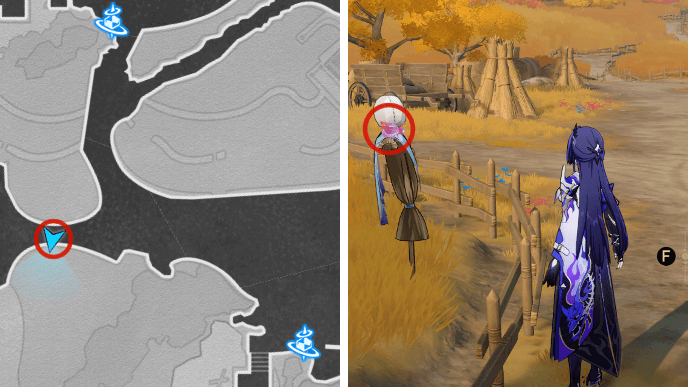 |
From the Voyager's Wharf Space Anchor, follow the path to the west until you come across a scarecrow. The nymph should be on its shoulder. |
| 3 | 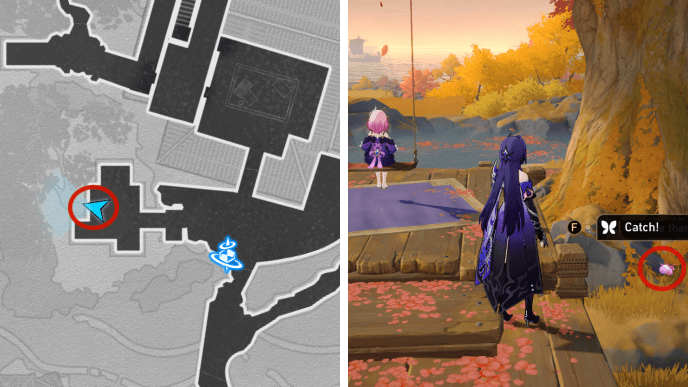 |
From the Sacrament Courtyard Space Anchor, head towards the left and head past where Cyrene is on the swing. The nymph should be on the base of the tree. |
| 4 | 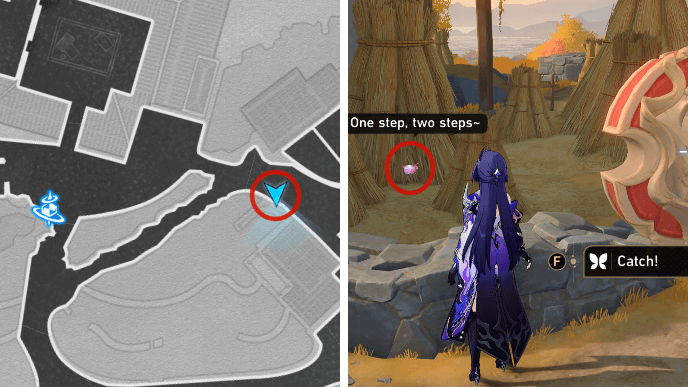 |
From the Sacrament Courtyard Space Anchor, follow the path to the right until you come across a shield. The nymph should be behind it near some bales of hay. |
| 5 |  |
From the Sacrament Courtyard Space Anchor, enter the building in front of you and head to the second floor. The nymph can be found floating on a Flying Amphora near the balcony. You must hit it to catch the nymph. |
| 6 | 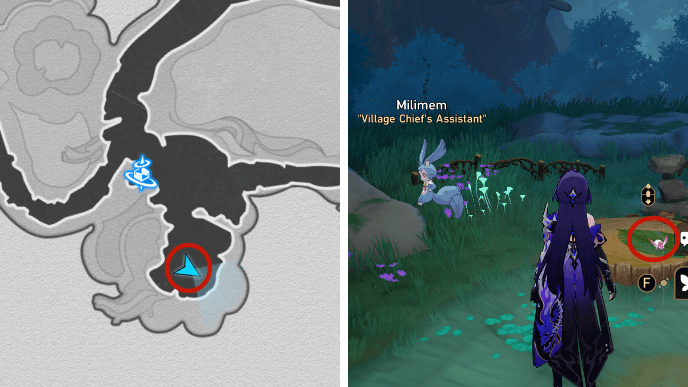 |
From the Membrance Maze Space Anchor, follow the rightmost path until you reach the small area where Dolimem and Milimem are. The nymph should be on the table behind Milimem. |
| 7 | 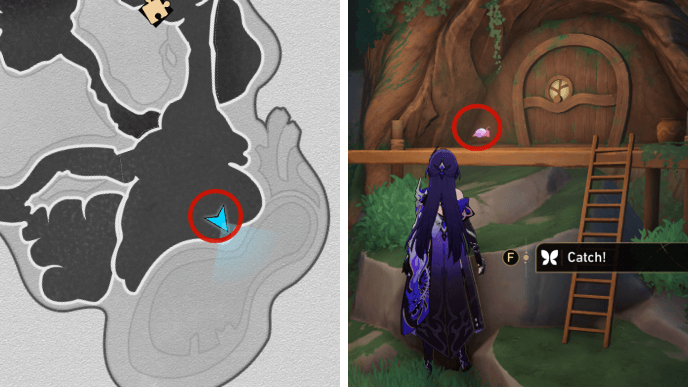 |
From the Membrance Maze Space Anchor, take the path to the right that leads to the upper level. The nymph should be near a door and a ladder at the highest level. |
| 8 | 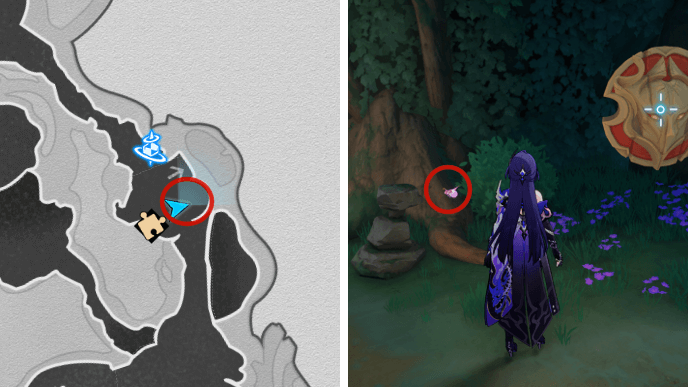 |
The nymph should be by a cairn and a shield near the Wondrous Woods Space Anchor. |
| 9 | 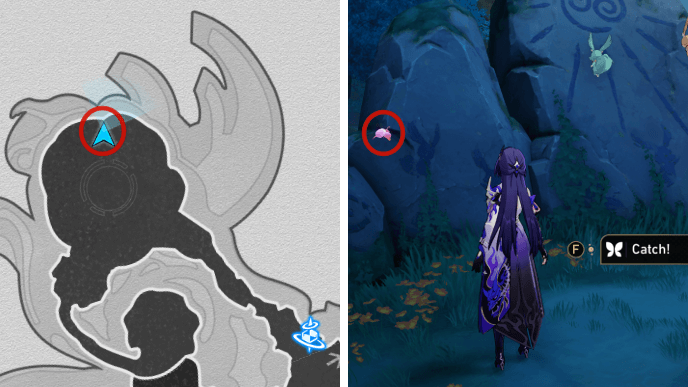 |
From the Wondrous Woods Space Anchor, follow the path to the right until you reach the area with the giant table. The nymph should be near some rocks on the edge of the area. |
| 10 | 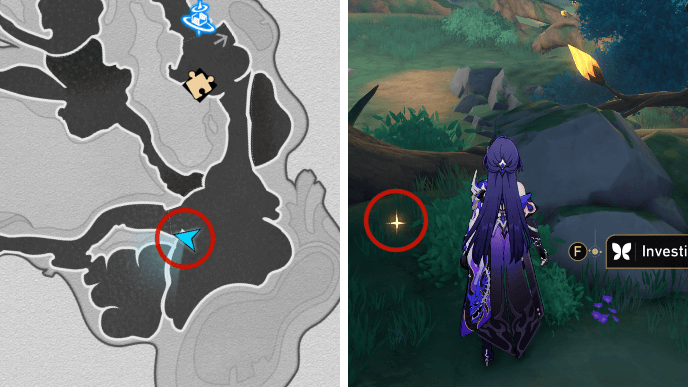 |
From the Membrance Maze Space Anchor, follow the path to the left until you reach the area past the farm. The nymph should be hidden behind some rocks. |
▲ Back to All Creation Nymphs ▲
Aedes Elysiae Golden Scapegoat
All Aedes Elysiae Golden Scapegoat Puzzles
| Aedes Elysiae Golden Scapegoat | |
|---|---|
 |
|
| Aedes Elysiae Puzzle Solutions | |
| Puzzle 1 | Puzzle 2 |
There are 2 Golden Scapegoat puzzles found in Aedes Elysiae. Click on the links in the table to jump to a puzzle solution!
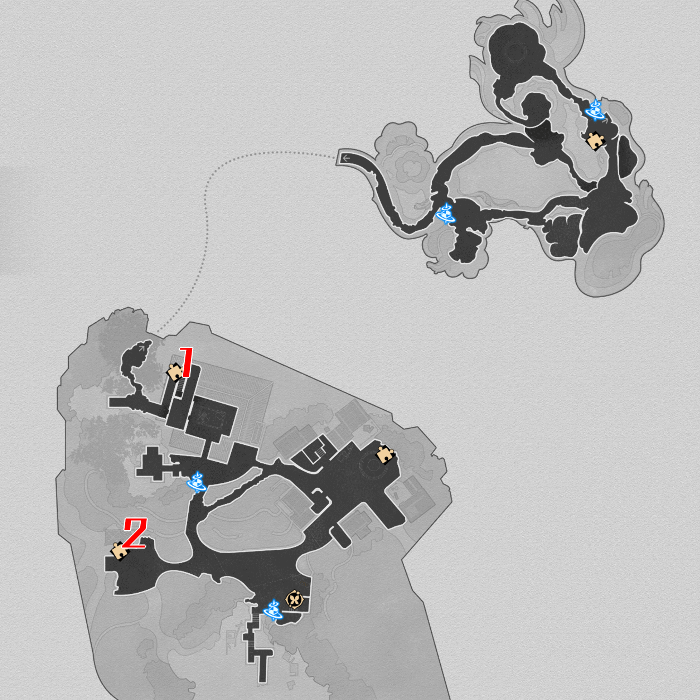
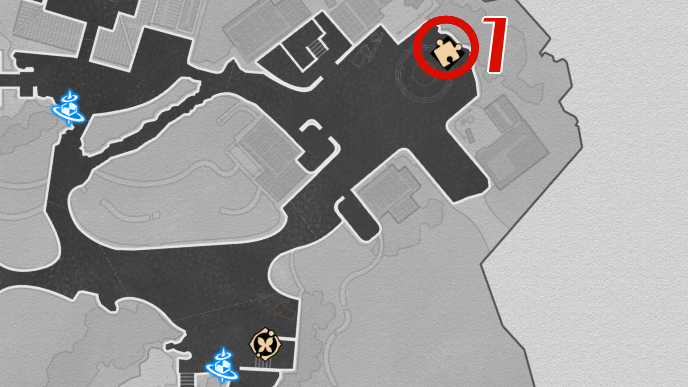
Aedes Elysiae Golden Scapegoat 1 Solution
| Aedes Elysiae Golden Scapegoat 1 Solution |
|---|
Input the commands: Left, Left, Down, Up, Down, Left, Right. When your past self shows up, head left to step on the yellow button. Next, head to the right and you'll drop to the altar. |
▲ Back to All Golden Scapegoats ▲
Aedes Elysiae Golden Scapegoat 2 Solution
| Aedes Elysiae Golden Scapegoat 2 Solution |
|---|
Input the commands: Left, Left, Left, Left, Right, Up, Left. When your past self shows up, climb the ladder then fall on the button again. Next, climb the ladder again but this time go down it after your past self stops. You can then freely fall to the altar. |
▲ Back to All Golden Scapegoats ▲
Aedes Elysiae Prophecy Tablets
All Aedes Elysiae Prophecy Tablets
| Aedes Elysiae Prophecy Tablet Locations | |
|---|---|
 |
 |
| Aedes Elysiae Puzzle Solutions | |
| Puzzle 1 | Puzzle 2 |
There are 2 Prophecy Tablets located in Aedes Elysiae. Check out how to solve it below!
Aedes Elysiae Prophecy Tablet 1 Solution
| Aedes Elysiae Prophecy Tablet 1 Solution | |
|---|---|
| 1 | 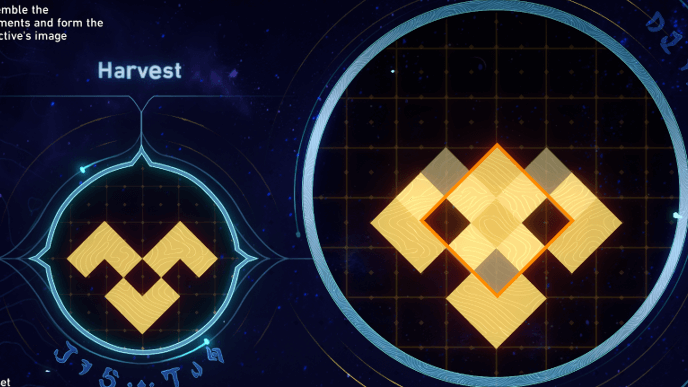 Place the large diamond at the bottom of the image. |
| 2 |  Place a small diamond on the left side of the image, with its lower right half overlapping with the large diamond. |
| 3 | 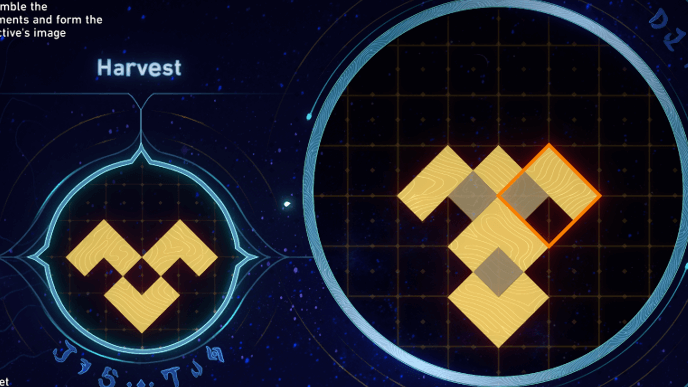 Place another small diamond on the right side of the image, with its lower left half overlapping with the large diamond. |
| 4 | 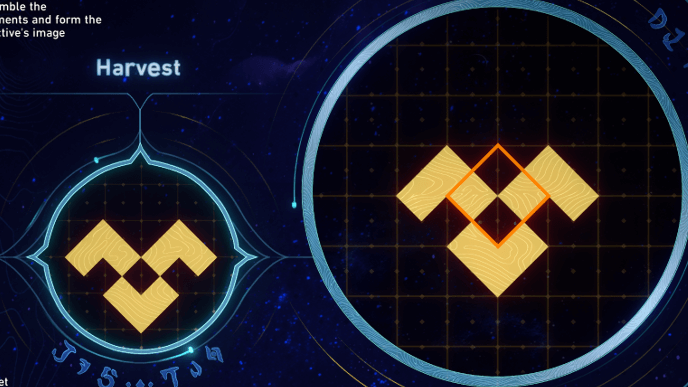 Place the last small diamond in the middle of the image to complete it. |
▲ Back to All Prophecy Tablets ▲
Aedes Elysiae Prophecy Tablet 2 Solution
| Aedes Elysiae Prophecy Tablet 2 Solution | |
|---|---|
| 1 | 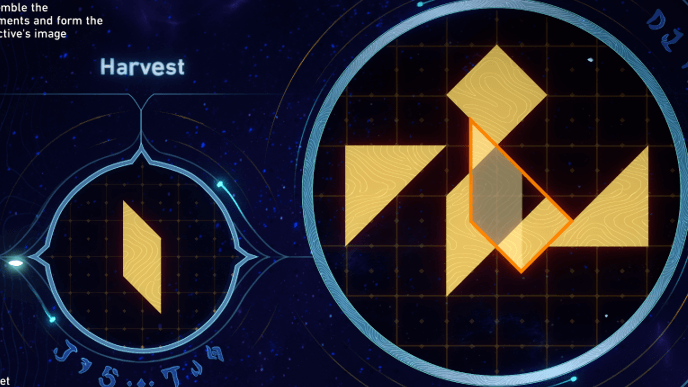 Align the trapezoid facing northwest with the top of the image. |
| 2 | 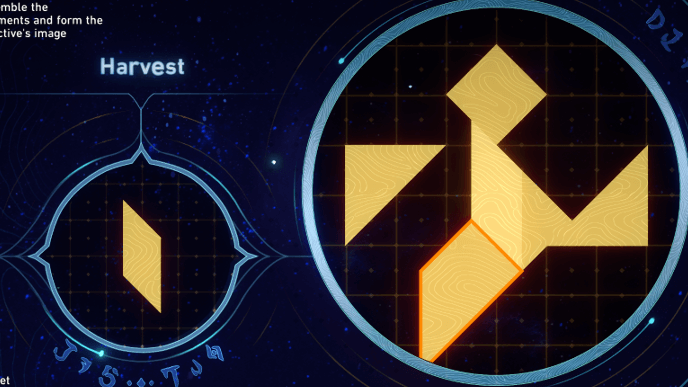 Place the trapezoid facing southwest below the trapezoid from Step 1. |
| 3 | 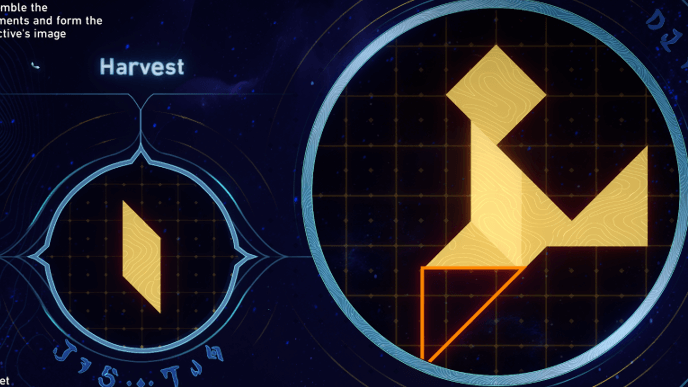 Cover the bottom half of the trapezoid from Step 2 with a right triangle. |
| 4 | 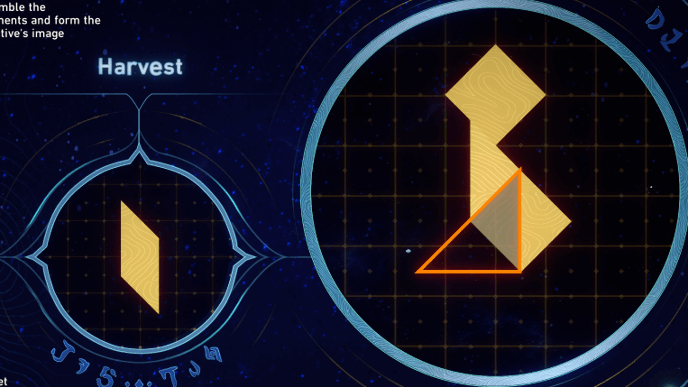 Place the other right triangle on top of the remaining visible part of the trapezoid from Step 2 as well as the bottom half of the projected image. |
| 5 | 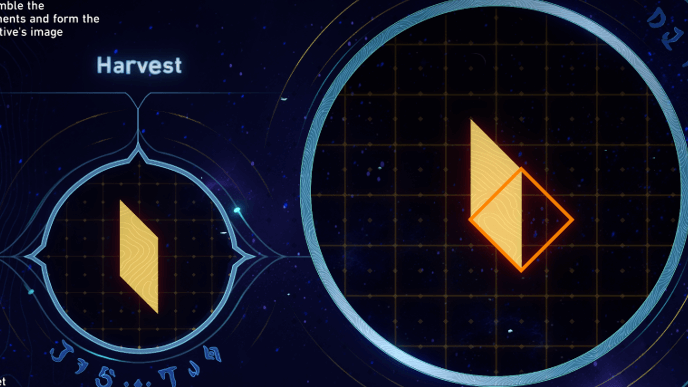 Make the diamond overlap with the bottom half of the trapezoid from Step 1 to complete the image. |
▲ Back to All Prophecy Tablets ▲
Honkai: Star Rail Related Guides
List of All Maps
| List of Maps | |
|---|---|
| Herta Space Station | Jarilo-VI |
| The Xianzhou Luofu | Penacony |
| Amphoreus | Planarcadia |
Treasure Chest Locations
Comment
Author

All Aedes Elysiae Puzzles
Premium Articles

Rankings
- We could not find the message board you were looking for.
Gaming News

![Star Savior Review [First Impressions] | Engaging, Entertaining, and Expensive](https://img.game8.co/4447603/8f500e9bf666bdb8adb1af478e9dfdbd.png/show)


Popular Games

Genshin Impact Walkthrough & Guides Wiki
Umamusume: Pretty Derby Walkthrough & Guides Wiki
Crimson Desert Walkthrough & Guides Wiki
Monster Hunter Stories 3: Twisted Reflection Walkthrough & Guides Wiki
Honkai: Star Rail Walkthrough & Guides Wiki
Pokemon Pokopia Walkthrough & Guides Wiki
The Seven Deadly Sins: Origin Walkthrough & Guides Wiki
Wuthering Waves Walkthrough & Guides Wiki
Zenless Zone Zero Walkthrough & Guides Wiki
Arknights: Endfield Walkthrough & Guides Wiki


Recommended Games
Fire Emblem Heroes (FEH) Walkthrough & Guides Wiki
Diablo 4: Vessel of Hatred Walkthrough & Guides Wiki
Cyberpunk 2077: Ultimate Edition Walkthrough & Guides Wiki
Yu-Gi-Oh! Master Duel Walkthrough & Guides Wiki
Super Smash Bros. Ultimate Walkthrough & Guides Wiki
Pokemon Brilliant Diamond and Shining Pearl (BDSP) Walkthrough & Guides Wiki
Elden Ring Shadow of the Erdtree Walkthrough & Guides Wiki
Monster Hunter World Walkthrough & Guides Wiki
The Legend of Zelda: Tears of the Kingdom Walkthrough & Guides Wiki
Persona 3 Reload Walkthrough & Guides Wiki


All rights reserved
Copyright © 2024 HoYoverse, COGNOSPHERE. All Rights Reserved.
The copyrights of videos of games used in our content and other intellectual property rights belong to the provider of the game.
The contents we provide on this site were created personally by members of the Game8 editorial department.
We refuse the right to reuse or repost content taken without our permission such as data or images to other sites.