Dewlight Pavilion Treasure Chest Locations
★ Exclusive: Check out the State of Meta in 4.0!
♦ Latest: 4.1 Livestream Redeem Codes
♦ Phase 2: Sparkxie, Sparkle, Cerydra, Rappa
♦ Upcoming: Ashveil, Silver Wolf Lv.999, Evanescia
♦ Events: Cosmicon, Roll On!, Ding! Arcadia Fun-Time Clock-In Essentials

There are 46 Dewlight Pavilion Chests to collect in Honkai: Star Rail's Penacony. See all Dewlight Pavilion chests, the Dewlight Pavilion Warp Trotter, and Lordly Trashcans here!
List of Contents
Dewlight Pavilion Chest Locations
Dewlight Pavilion Interactive Map
Select icons to toggle them on/off
| Space Anchor | Treasure Chest | ||
| Origami Bird | Warp Trotter | ||
| Lordly Trashcan | Bookshelf Readable | ||
| Great Tree | Stagnant Shadow |
All Dewlight Pavilion Chests
| Dewlight Pavilion Maps | |||||||||||
|---|---|---|---|---|---|---|---|---|---|---|---|
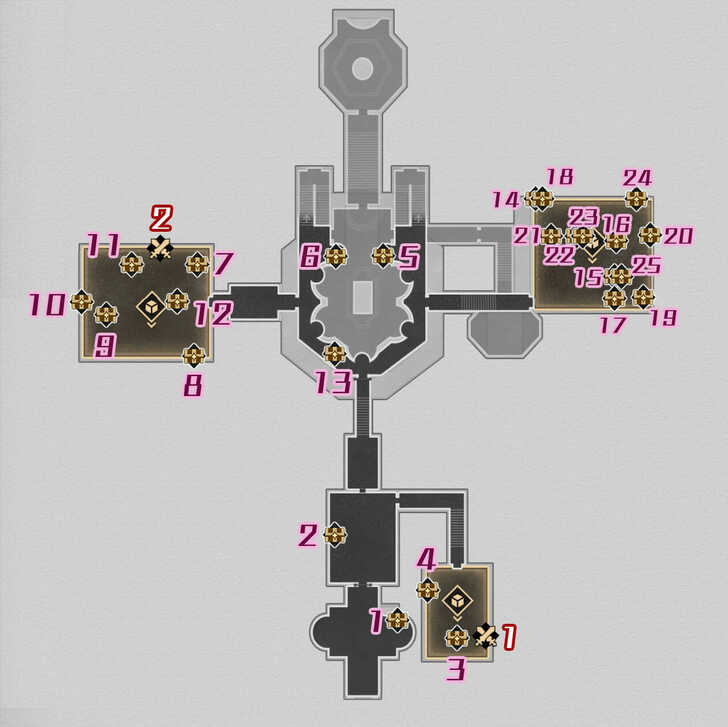 See Full Image |
|||||||||||
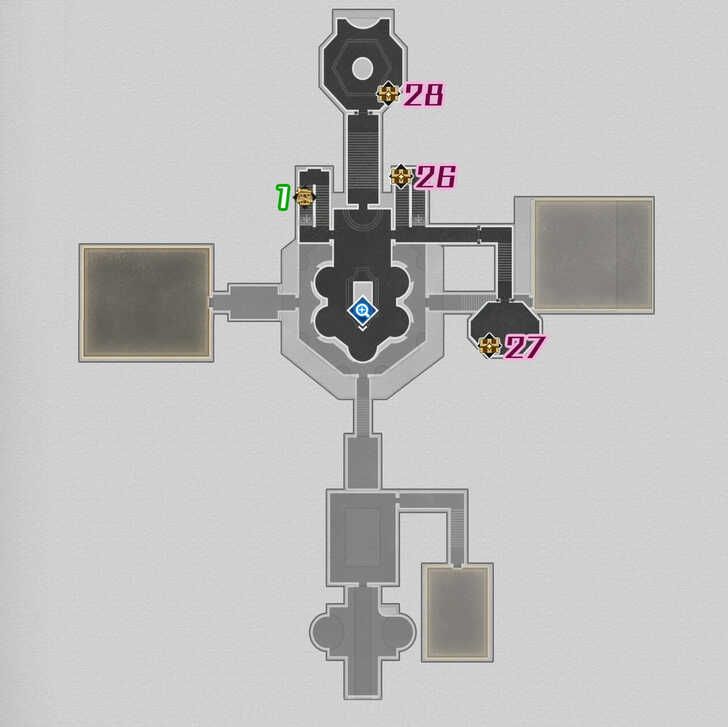 See Full Image |
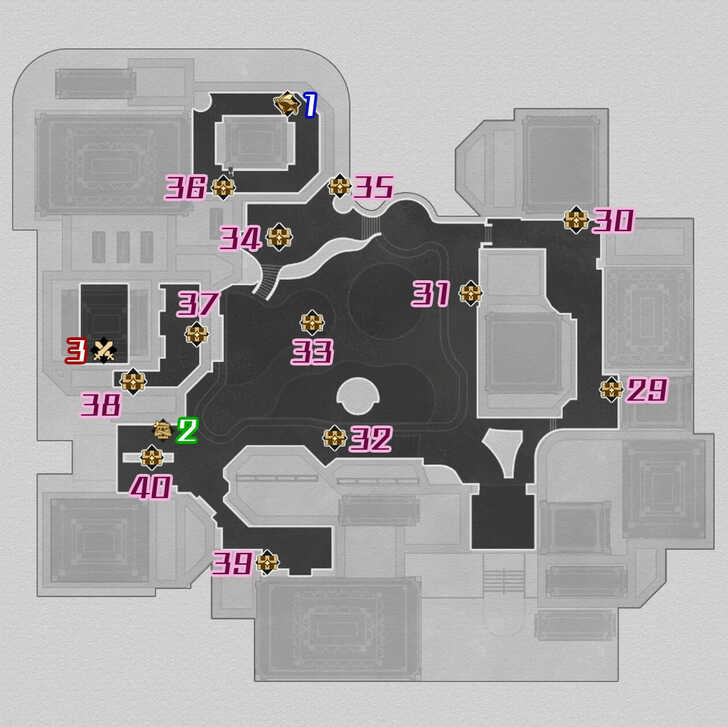 See Full Image |
||||||||||
| Dewlight Pavilion Chests | |||||||||||
| Chest 1 | Chest 2 | Chest 3 | Chest 4 | ||||||||
| Chest 5 | Chest 6 | Chest 7 | Chest 8 | ||||||||
| Chest 9 | Chest 10 | Chest 11 | Chest 12 | ||||||||
| Chest 13 | Chest 14 | Chest 15 | Chest 16 | ||||||||
| Chest 17 | Chest 18 | Chest 19 | Chest 20 | ||||||||
| Chest 21 | Chest 22 | Chest 23 | Chest 24 | ||||||||
| Chest 25 | Chest 26 | Chest 27 | Chest 28 | ||||||||
| Chest 29 | Chest 30 | Chest 31 | Chest 32 | ||||||||
| Chest 33 | Chest 34 | Chest 35 | Chest 36 | ||||||||
| Chest 37 | Chest 38 | Chest 39 | Chest 40 | ||||||||
| Dewlight Pavilion Lordly Trashcans | |||||||||||
| Trashcan 1 | Trashcan 2 | ||||||||||
| Dewlight Pavilion Trotter and Formidable Foes | |||||||||||
| Trotter | Foe 1 | Foe 2 | Foe 3 | ||||||||
How to Get Dewlight Pavilion Chests
Dewlight Pavilion Chest 1
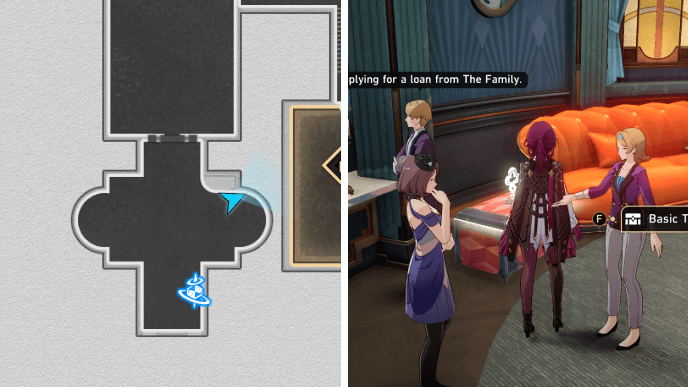
Chest 1 is located northeast of the Reception Counter Space Anchor at the second floor. It will be in between the reception counter and a couch.
Dewlight Pavilion Chest 2
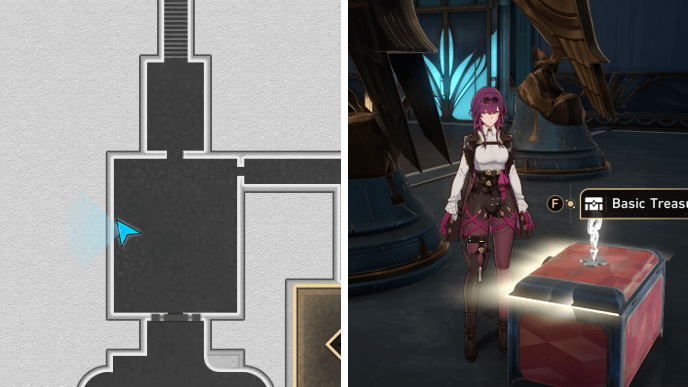
After getting Chest 1, go through the doors past Hendrick and enter the next room. Chest 2 will be behind the central bird statue on the left side of the room.
Dewlight Pavilion Chest 3
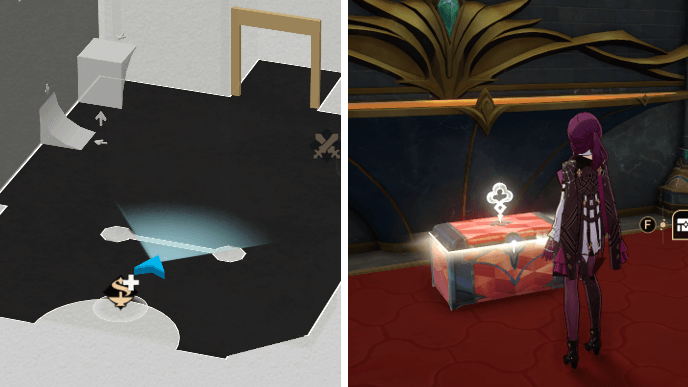
Make your way to the southeastern Dreamwalker puzzle room to find Chest 3. You can find it by a wall partition in front of a Bubble Tower.
Dewlight Pavilion Chest 4
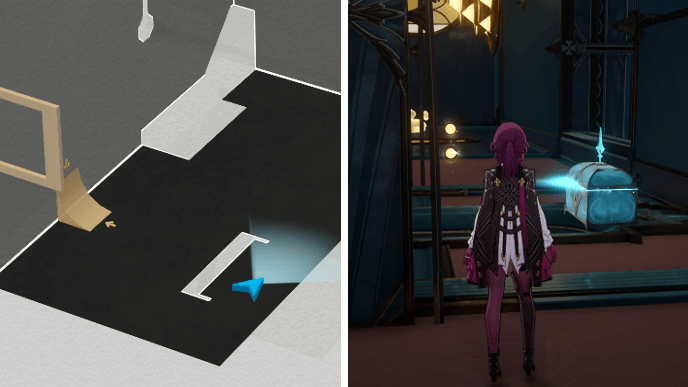
Once you get Chest 3, get bubble charges from the Bubble Tower and go up the bubble bridge on the left side from where you're standing. Chest 4 will be behind a balcony partition, but you'll need to defeat the Memory Zone Meme enemies first.
Dewlight Pavilion Chest 5
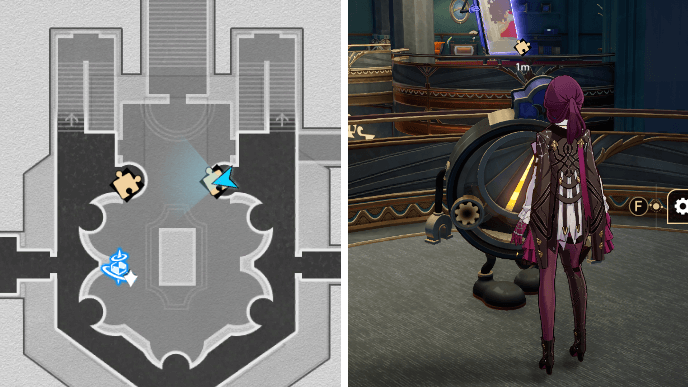
Chest 5 is on the eastern side of the central walkway on F2. You'll need to solve a Dream Ticker puzzle to get the chest.
How to Solve Chest 5 Dream Ticker
You can repair the Dream Ticker that gives Chest 5 by following the steps shown in the video above.
Dewlight Pavilion Chest 6
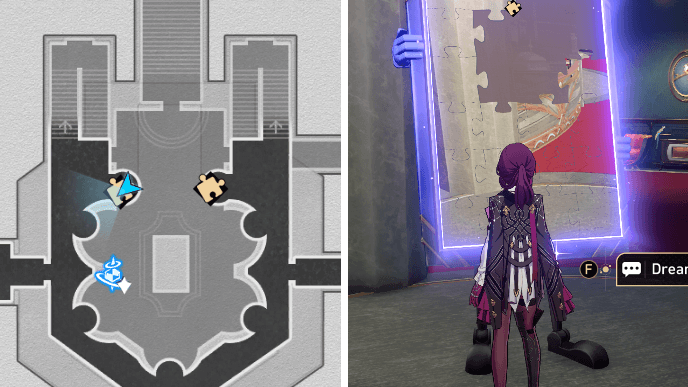
Chest 6 is also along the central walkway of F2, but it'll be on the western side directly opposite of Chest 5. Solve the Dream Jigsaw puzzle to get the chest.
How to Solve Chest 6 Dream Jigsaw
You can solve the Dream Jigsaw puzzle that gives Chest 6 by following the steps shown in the video above.
Dewlight Pavilion Chest 7
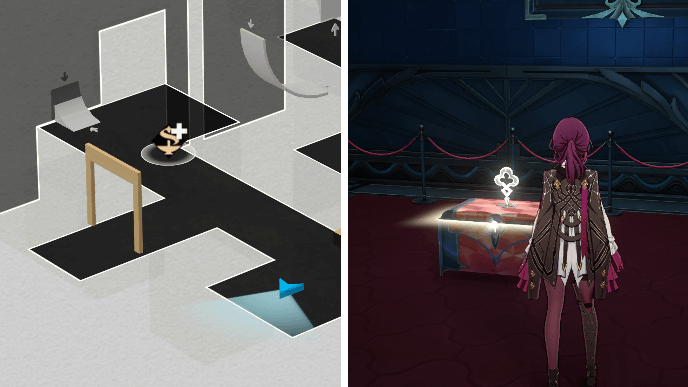
After getting Chest 6, make your way to the western Dreamwalker puzzle room and turn right. Chest 7 will be in the corner near a velvet rope barricade.
Dewlight Pavilion Chest 8
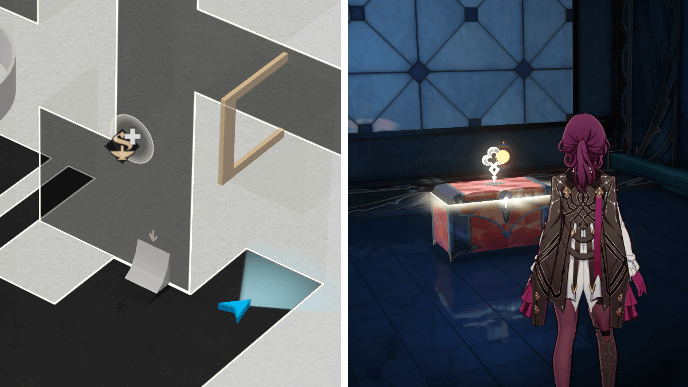
From Chest 7, get bubble charges from the nearby Bubble Tower and head up the bubble bridge. Then, turn left and go into the small corner space to find Chest 8.
Dewlight Pavilion Chest 9
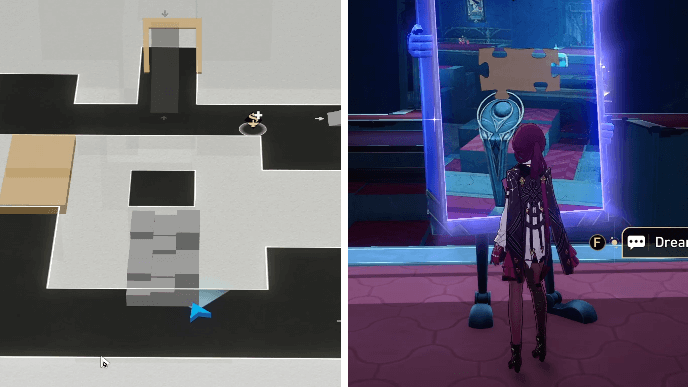
To get Chest 9, continue onwards from Chest 8 and take the next bubble bridge. You'll eventually reach a Dream Jigsaw puzzle.
You'll need to retrieve the scattered puzzle piece to solve the Dream Jigsaw. Activate the nearby control panel to form a bridge and get the piece. After solving the puzzle, you'll get the chest.
How to Solve Chest 9 Dream Jigsaw
You can solve the Dream Jigsaw puzzle that gives Chest 8 by following the steps shown in the video above.
Dewlight Pavilion Chest 10
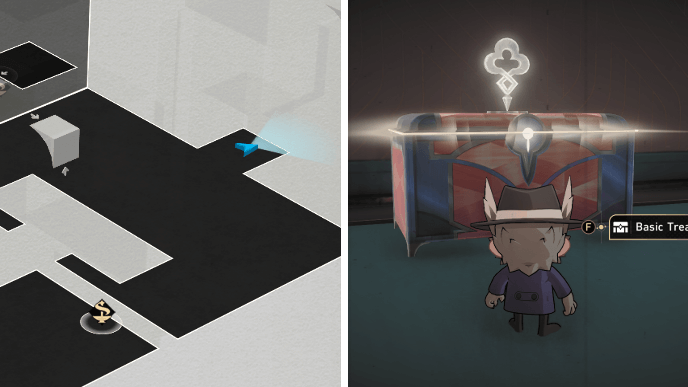
After getting Chest 9, use the bridge you just formed to get charges from the Bubble Tower again and go up the bridge on the right side of the room. Keep going forward until you reach the wall with a Hanu's Adventure TV.
Transform into Hanu and make your way to the Teleport Point. After getting the Rocket Launcher, try to take out most of the surrounding enemies and use the additional ammo to shoot the nearby fireworks. Chest 9 will be behind the wall that's destroyed.
Dewlight Pavilion Chest 11
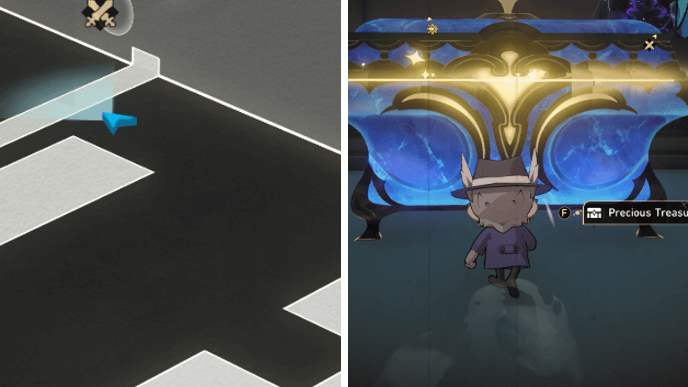
From Chest 10, head further into the area while avoiding any remaining enemies. Chest 11 will be at the end of the room past the chandelier.
Dewlight Pavilion Chest 12
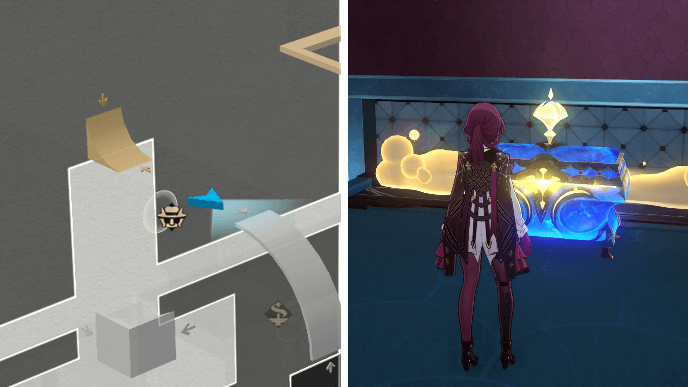
After getting Chest 11, return to the TV to transform back and get more bubble charges. Head up the nearby bridge and you'll find Chest 12 right in front of you.
Dewlight Pavilion Chest 13
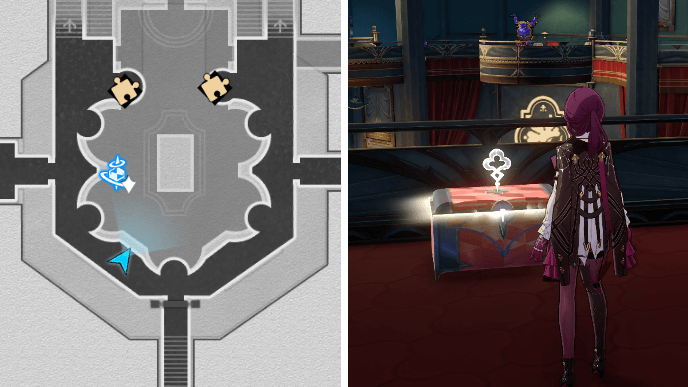
Exit the western Dreamwalker puzzle room and go back into the central walkway. Head all the way to your right and you'll find Chest 13 in front of two seats near a fallen bird statue.
Dewlight Pavilion Chest 14

Go into the eastern Dreamwalker puzzle room on F2. Take note that you can only access this area once you start the Outsourcer Adventure Mission.
Upon entering the room, get bubble charges and take the bridge nearest to the Bubble Tower. Keep going forward until you reach Chest 14 which will be by another Bubble Tower and a control panel.
Dewlight Pavilion Chest 15
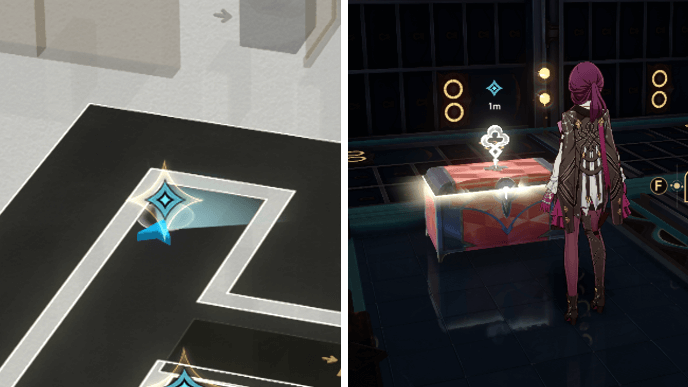
After getting Chest 14, obtain bubble charges again and activate the control panel to return to the room's central area. Retrieve more bubble charges there and take the bridge in front of the staircase. Turn right and you'll find Chest 15 near some drawers.
Dewlight Pavilion Chest 16
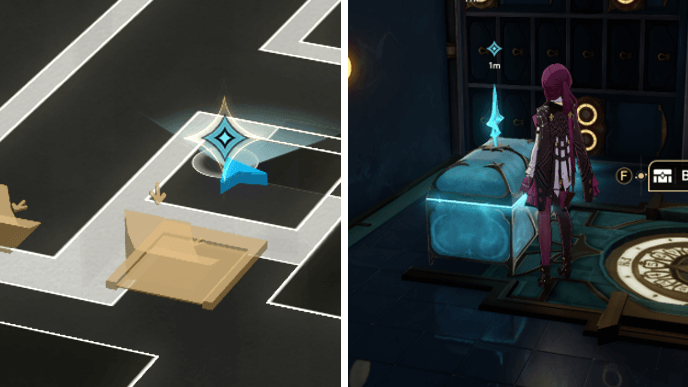
Take the bubble bridge directly opposite where you found Chest 15 and continue onwards. You'll eventually reach Chest 16 near another set of drawers at the far end of the path.
Dewlight Pavilion Chest 17
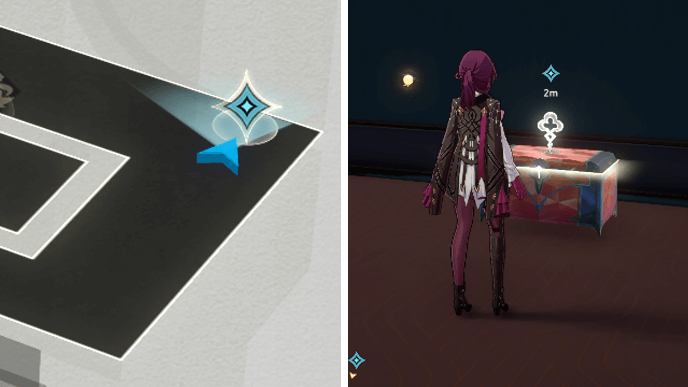
After getting Chest 16, you'll need to spawn the next set of chests by talking to Burton during the Outsourcer mission again. Go back into the eastern puzzle room andhead up the bridge nearest to the Bubble Tower.
Follow the path and you'll shortly come across Chest 17. An enemy will be nearby, however, so you must defeat it first to get the chest.
Dewlight Pavilion Chest 18
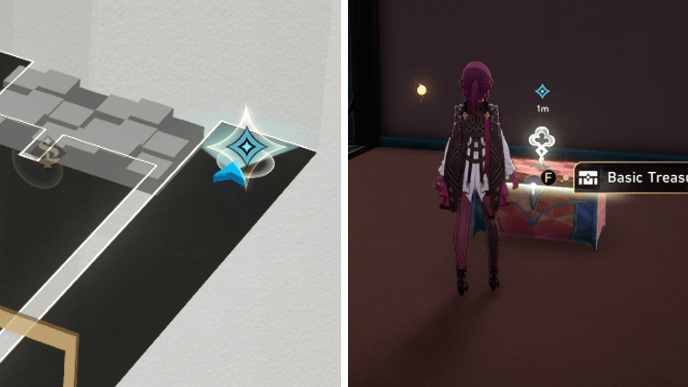
From Chest 17, get more charges from the nearby Bubble Tower and return to the central area of the room. Retrieve your bubble charges once more and go up the bridge opposite of the staircase.
Turn left and keep going forward so that you reach a new room. Before heading up the bridge, turn left and follow the path. You'll find Chest 18 at the end.
Dewlight Pavilion Chest 19
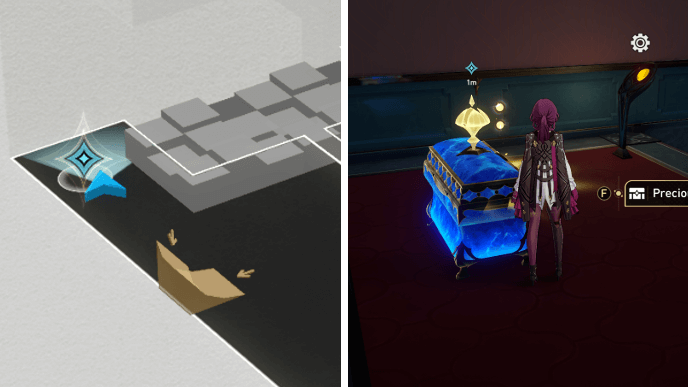
After getting Chest 18, go up the nearby bubble bridge and defeat the enemies guarding the Bubble Tower. Obtain more charges then continue onwards to reach Chest 19 by another control panel.
Dewlight Pavilion Chest 20
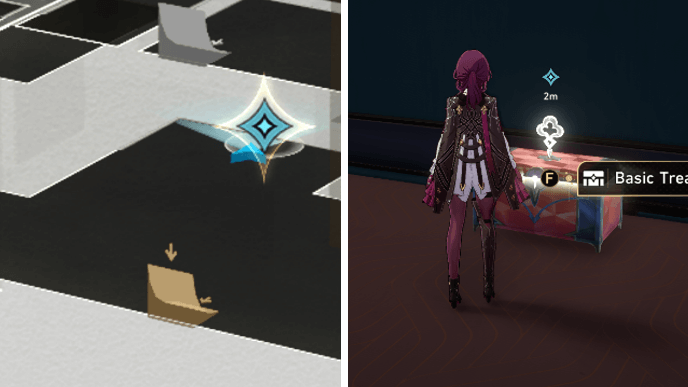
After progressing the Outsourcer mission again, you'll spawn another set of chests in the eastern puzzle room. Get Bubble Tower charges and activate the nearby control panel. Cross the platform then take the bubble bridge to find Chest 20 being guarded by some enemies.
Dewlight Pavilion Chest 21
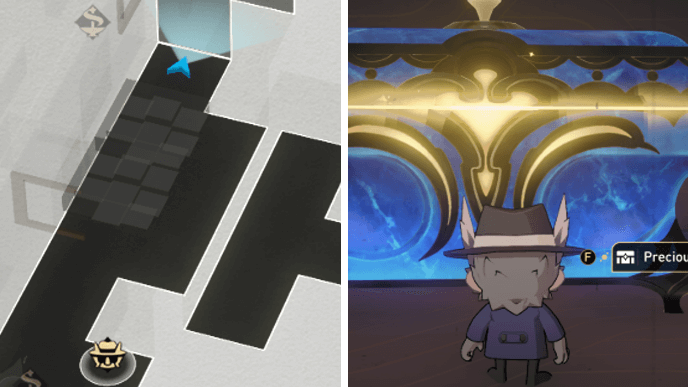
From Chest 20, go further into the area and you'll find another Bubble Tower. Take the nearby bridge after getting more charges and transform at the Hanu's Adventure TV.
Get the Rocket Launcher and shoot at the fireworks pile when enough enemies are close by. Use the extra ammo that's dropped to get rid of the other enemies guarding Chest 21.
Dewlight Pavilion Chest 22

After getting Chest 21, go into the other room through the small holes in the wall by the piles of books. Use the launcher to shoot at the fireworks and reveal Chest 22 behind the destroyed wall.
Dewlight Pavilion Chest 23
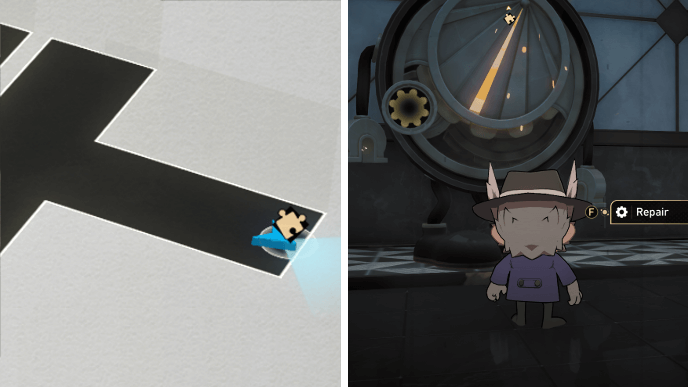
There will be another pile of fireworks near Chest 22. Shoot it, but be ready to shoot again as there'll be enemies behind the wall. After clearing the area, you'll find a Dream Ticker puzzle that gives Chest 23.
How to Solve Chest 23 Dream Ticker
You can repair the Dream Ticker that gives Chest 23 by following the steps shown in the video above.
Dewlight Pavilion Chest 24
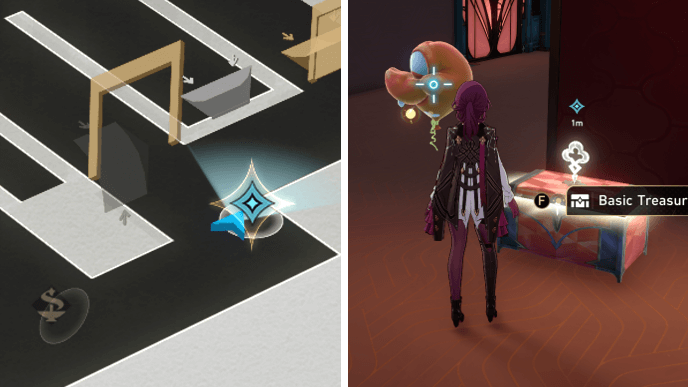
Return to the central area of the room and retrieve your bubble charges to take the bridge nearest to the staircase. Keep going forward until you find Chest 24 by a corner near a door.
Dewlight Pavilion Chest 25
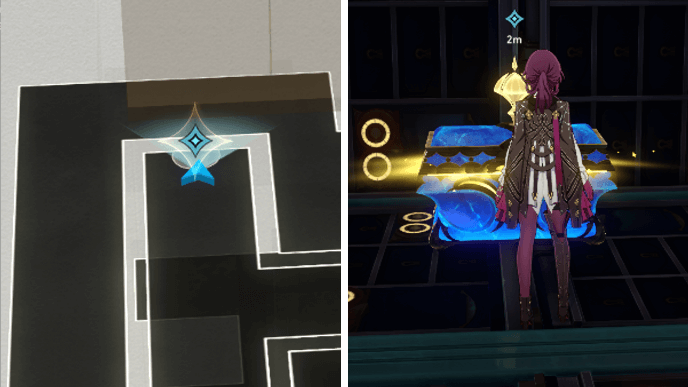
After picking up Chest 24, go through the nearby door and continue onwards. You'll find Chest 25 at the far end of the path.
Dewlight Pavilion Chest 26
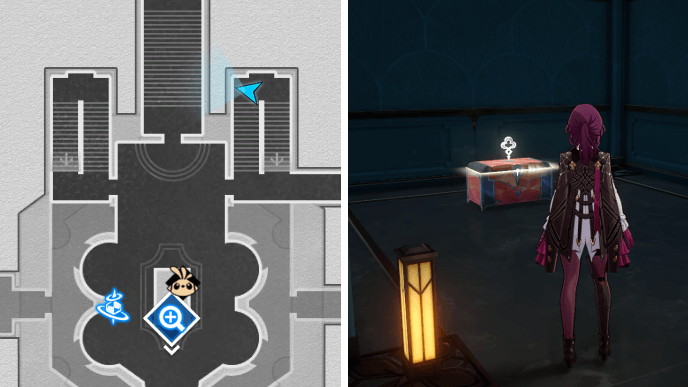
Teleport to the Dreammaster Hall Space Anchor on F1 and head into the area under the northeastern staircase. You'll find Chest 26 in the corner.
Dewlight Pavilion Chest 27
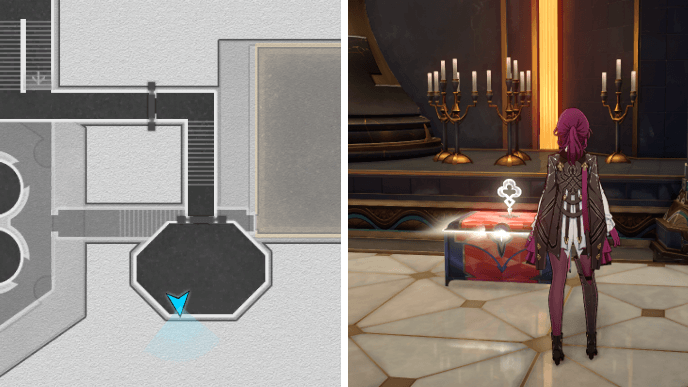
After getting Chest 26, make your way to the easternmost room of F1. Chest 27 will be on the right side of the Concentric Circle Statue, but you'll need to defeat the enemies in the room to get to it.
Dewlight Pavilion Chest 28
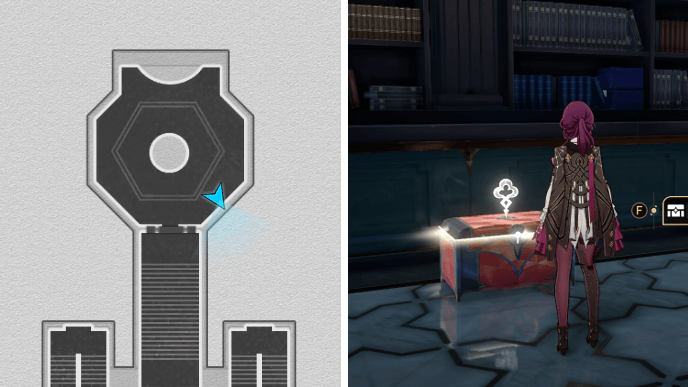
Teleport back to the Dreammaster Hall Space Anchor and go into the northernmost room of F1 this time. You'll find Chest 28 under the bookshelf on the southeastern side of the room.
Dewlight Pavilion Chest 29
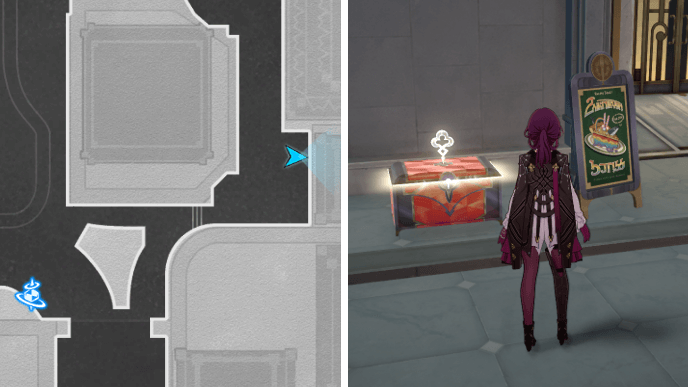
Enter the City Sandpit and head northeast from the City Sandpit Space Anchor. Chest 29 will be next to a signboard with a rainbow pie on it.
Dewlight Pavilion Chest 30
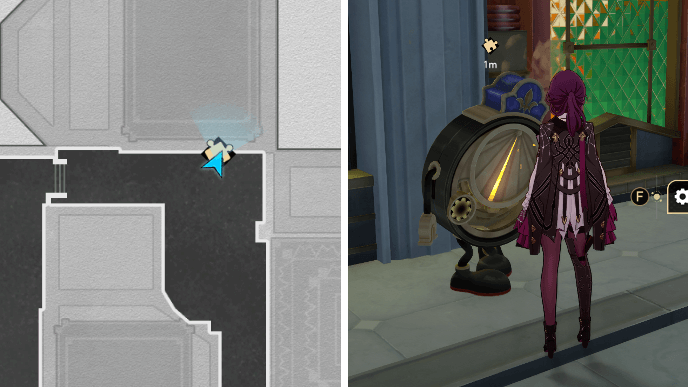
From Chest 29, head north and you'll find a Dream Ticker puzzle to the left of a lamp post. Solve the puzzle to get Chest 30.
How to Solve Chest 30 Dream Ticker
You can repair the Dream Ticker that gives Chest 30 by following the steps shown in the video above.
Dewlight Pavilion Chest 31
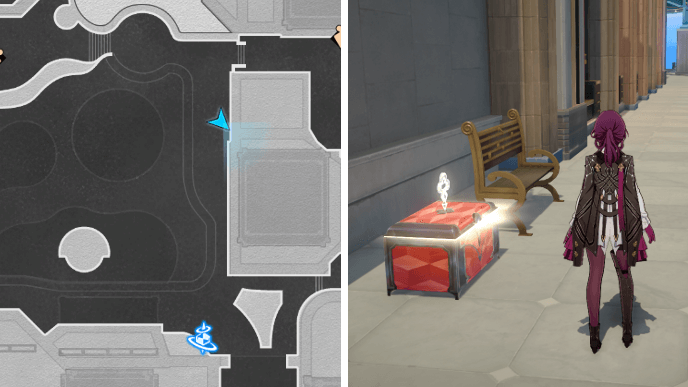
After getting Chest 30, follow the path forward and turn left at nearby the food truck. Chest 31 will be next to a bench.
Dewlight Pavilion Chest 32
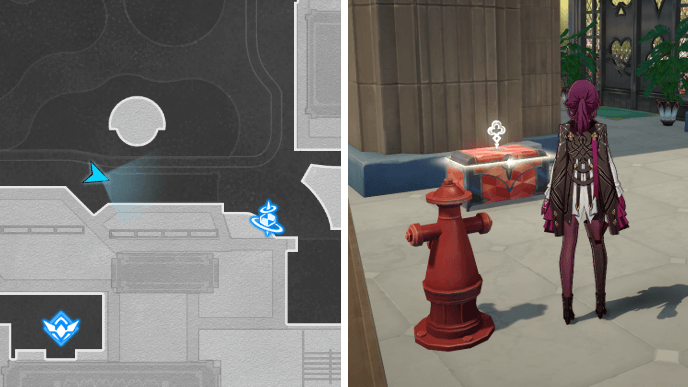
Chest 32 is located near the bar northwest of the City Sandpit Space Anchor. A fire hydrant will also be near the chest.
Dewlight Pavilion Chest 33
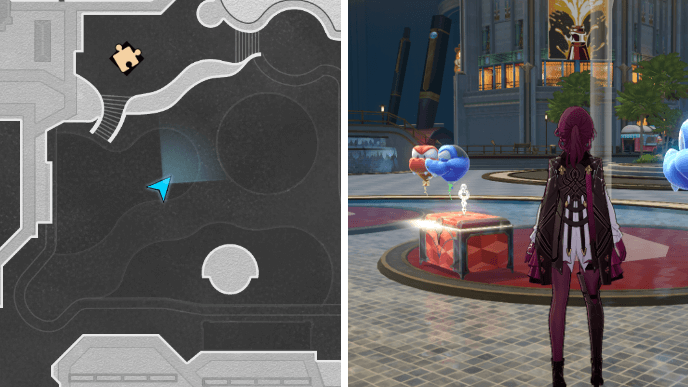
After getting Chest 32, head north towards three gigantic drink glasses. You'll find Chest 33 underneath them along with an Oak Soldier model lying down near it.
Dewlight Pavilion Chest 34
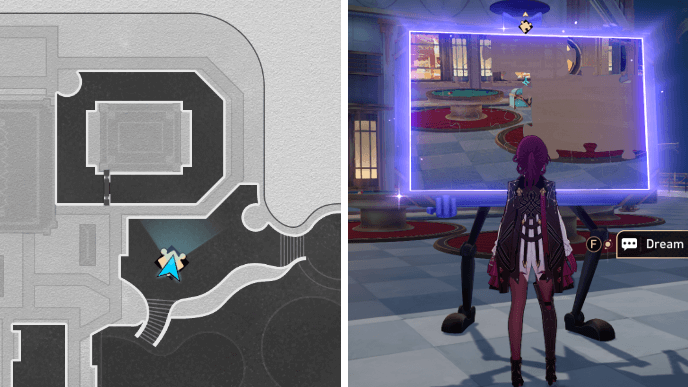
Go up the stairs near the spot you found Chest 33 and you'll find a Dream Jigsaw puzzle. Solve the puzzle to get Chest 34.
How to Solve Chest 34 Dream Jigsaw
You can solve the Dream Jigsaw puzzle that gives Chest 34 by following the steps shown in the video above.
Dewlight Pavilion Chest 35
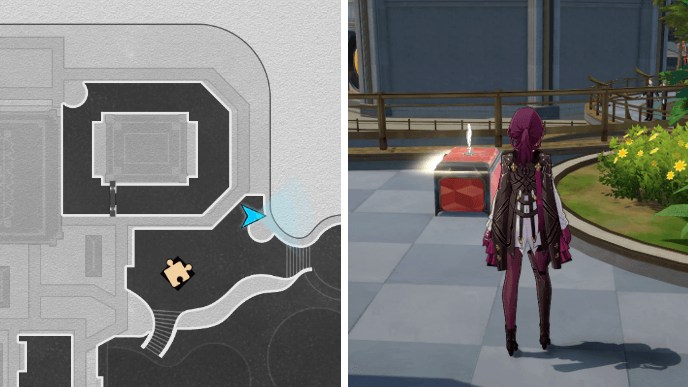
From Chest 34, take a few steps northeast and you'll find Chest 35. It will be near a couple of plants and a tree.
Dewlight Pavilion Chest 36
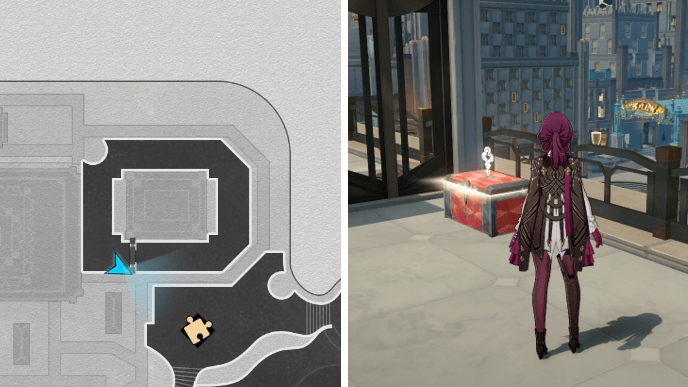
Use the Bubble Pinball machine in the central area of the Sandpit to reach the northeastern area. Follow the path onward until you reach another Bubble Pinball machine. Chest 36 will be next to a locked gate nearby.
Dewlight Pavilion Chest 37
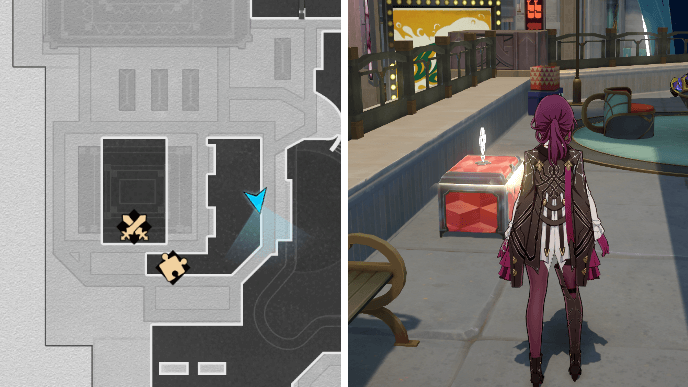
From Chest 36, use the Bubble Pinball machine to reach the next area. Chest 37 will be near a table and some benches.
Bubble Pinball Solution to Reach Chest 37
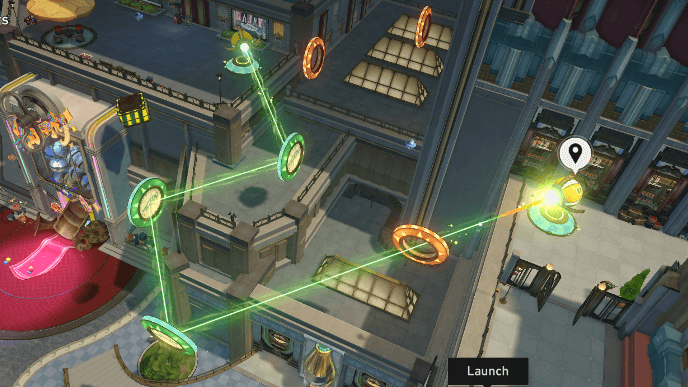
Follow the trajectory shown above to make sure the Bubble Pinball takes you to the area where Chest 37 is.
Dewlight Pavilion Chest 38
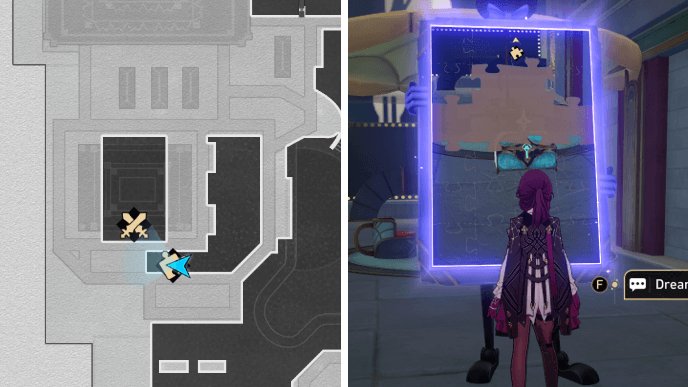
After picking up Chest 37, head further into the area and you'll find a Dream Jigsaw puzzle. Defeat the enemy guarding it and get Chest 38 after solving the puzzle.
How to Solve Chest 38 Dream Jigsaw
You can solve the Dream Jigsaw puzzle that gives Chest 38 by following the steps shown in the video above.
Dewlight Pavilion Chest 39

Chest 39 is located a few steps southwest of the Shape of Ire Stagnant Shadow. The chest will be near a large planter box.
Dewlight Pavilion Chest 40
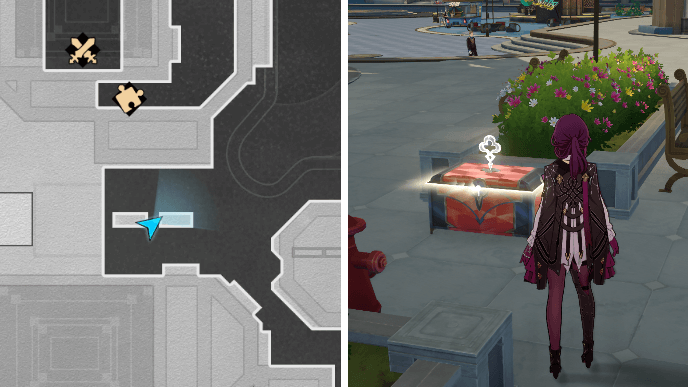
From Chest 39, head northwest and you'll find Chest 40 next to another large planter box. The chest will also be near one of the exits of the City Sandpit.
Dewlight Pavilion Lordly Trashchans
Dewlight Pavilion Lordly Trashcan 1
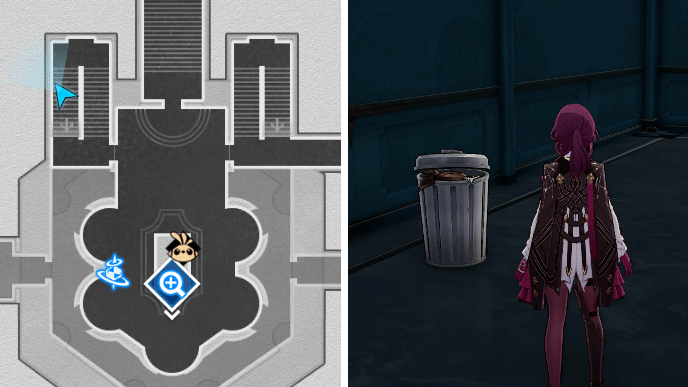
The first Lordly Trashcan in Dewlight Pavilion can be found underneath the western staircase on F1. It will be near a bookshelf. Select Option 2 both times during the conversation to get its rewards without fighting!
Dewlight Pavilion Lordly Trashcan 2
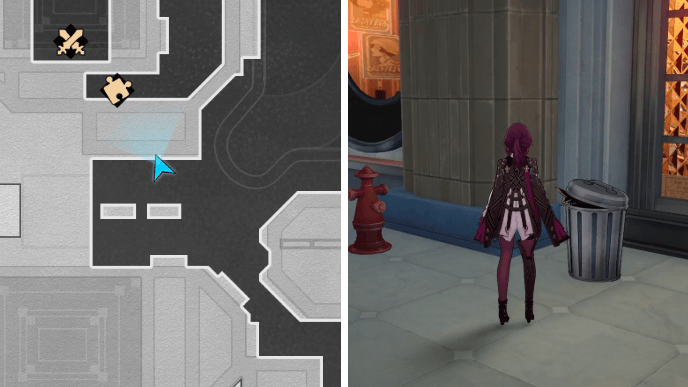
The second Lordly Trashcan in Dewlight Pavilion can be found in the southwestern area of the City Sandpit. It will be near a fire hydrant. Choose Option 2 both times during the conversation to avoid fighting it!
Dewlight Pavilion Warp Trotter Location
Dewlight Pavilion Warp Trotter
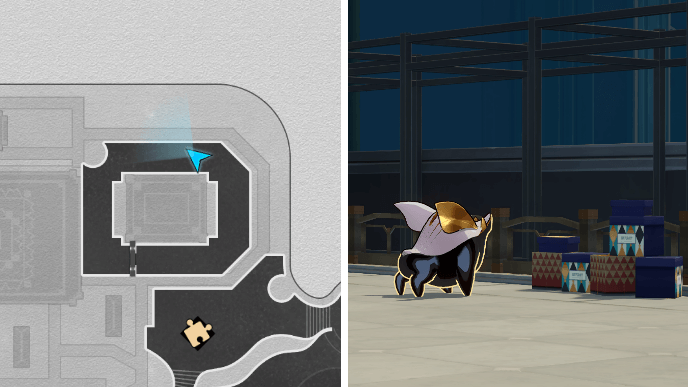
The Dewlight Pavilion Warp Trotter is located in the northwestern area of the City Sandpit. You'll need to use the Bubble Pinball machine to get to the area. Take note that the Trotter will only appear after you've completed the Double Indemnity mission.
Formidable Foe Challenge Chests
Dewlight Pavilion Challenge Chest 1
| Enemies | Weaknesses |
|---|---|
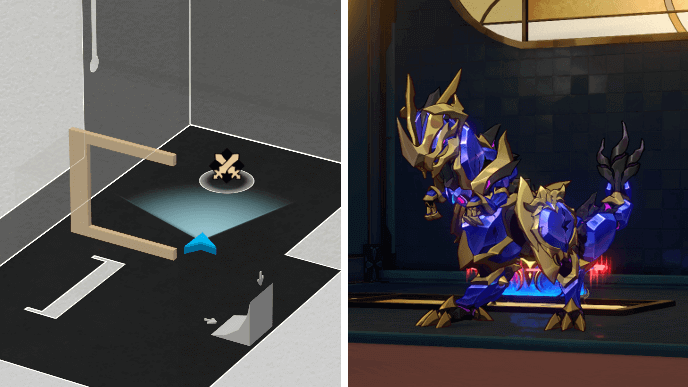
The first Formidable Foe challenge of Dewlight Pavilion can be found in the southeastern Dreamwalker puzzle room on F2. Upon entering the puzzle room, it will be on the left wall.
All enemies in this challenge are weak to Imaginary, so you can bring characters like Dr. Ratio, Imbibitor Lunae, or Welt.
Dewlight Pavilion Challenge Chest 2
| Enemies | Weaknesses | |
|---|---|---|
| Wave 1 | ||
| Wave 2 | ||
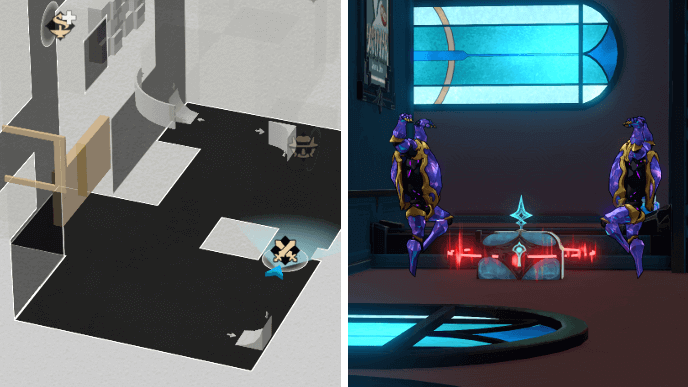
The second challenge of Dewlight Pavilion can be found in the western Dreamwalker puzzle room of F2. Upon entering the room, the challenge will be located on the right wall.
Enemies in this challenge are weak to Lightning, Ice, and Imaginary. Bringing AoE characters of these elements is recommended for this fight!
Dewlight Pavilion Challenge Chest 3
| Enemies | Weaknesses |
|---|---|
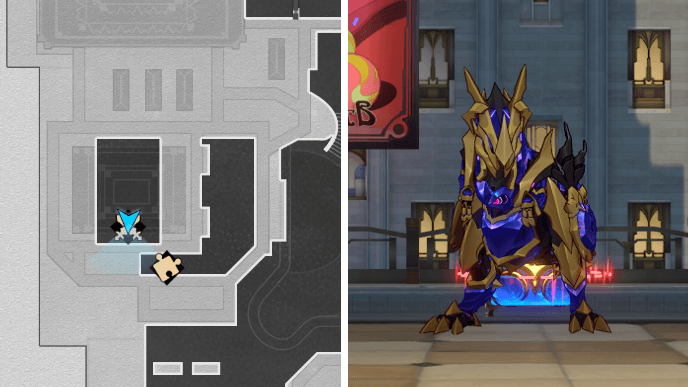
The third challenge of Dewlight Pavilion can be found in the City Sandpit. Use the Bubble Pinball near Chest 36 and readjust the trajectory so that it takes you to the westernmost area instead.
The Formidable Foes guarding the chest are all weak to Imaginary, so characters like Dr. Ratio, Imbibitor Lunae, or Welt are recommended for this fight.
Bubble Pinball Solution to Reach Foe Chest 3
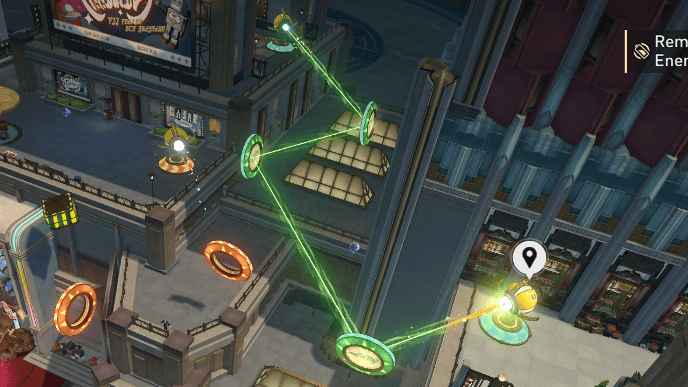
Make sure that the Bubble Pinball is aimed the same way shown above so that you're taken to the area where Formidable Foe 3 is.
How to Unlock Dewlight Pavilion
Progress Double Indemnity
You can unlock Dewlight Pavilion by progressing through the Double Indemnity Trailblaze Mission. This is part of the Cat Among Pigeons mission series.
Double Indemnity Mission Guide
Unlock the Eastern Puzzle Room in Outsourcer
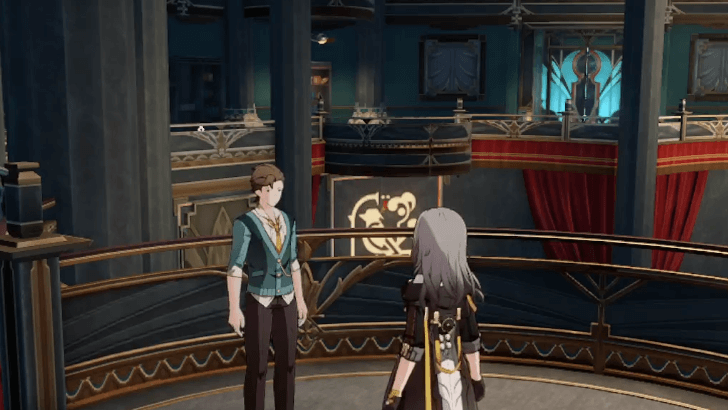
The easternmost Dreamwalker puzzle room is locked behind the Outsourcer Adventure Mission. You can start it after finishing the Cat Among Pigeons series and talking to Burton in the central walkway of Dewlight Pavilion F2.
Honkai: Star Rail Related Guides
List of All Maps
| List of Maps | |
|---|---|
| Herta Space Station | Jarilo-VI |
| The Xianzhou Luofu | Penacony |
| Amphoreus | Planarcadia |
Treasure Chest Locations
Comment
Maybe it's for a later quest/ side quest but.... what's this?????????????? It confuse me a lot cause it feel like a gathering item but you can't take it 😭😭😭
Author
Dewlight Pavilion Treasure Chest Locations
improvement survey
03/2026
improving Game8's site?

Your answers will help us to improve our website.
Note: Please be sure not to enter any kind of personal information into your response.

We hope you continue to make use of Game8.
Premium Articles
Rankings
- We could not find the message board you were looking for.
Gaming News
Popular Games

Genshin Impact Walkthrough & Guides Wiki

Honkai: Star Rail Walkthrough & Guides Wiki

Umamusume: Pretty Derby Walkthrough & Guides Wiki

Pokemon Pokopia Walkthrough & Guides Wiki

Resident Evil Requiem (RE9) Walkthrough & Guides Wiki

Monster Hunter Wilds Walkthrough & Guides Wiki

Wuthering Waves Walkthrough & Guides Wiki

Arknights: Endfield Walkthrough & Guides Wiki

Pokemon FireRed and LeafGreen (FRLG) Walkthrough & Guides Wiki

Pokemon TCG Pocket (PTCGP) Strategies & Guides Wiki
Recommended Games

Diablo 4: Vessel of Hatred Walkthrough & Guides Wiki

Fire Emblem Heroes (FEH) Walkthrough & Guides Wiki

Yu-Gi-Oh! Master Duel Walkthrough & Guides Wiki

Super Smash Bros. Ultimate Walkthrough & Guides Wiki

Pokemon Brilliant Diamond and Shining Pearl (BDSP) Walkthrough & Guides Wiki

Elden Ring Shadow of the Erdtree Walkthrough & Guides Wiki

Monster Hunter World Walkthrough & Guides Wiki

The Legend of Zelda: Tears of the Kingdom Walkthrough & Guides Wiki

Persona 3 Reload Walkthrough & Guides Wiki

Cyberpunk 2077: Ultimate Edition Walkthrough & Guides Wiki
All rights reserved
Copyright © 2024 HoYoverse, COGNOSPHERE. All Rights Reserved.
The copyrights of videos of games used in our content and other intellectual property rights belong to the provider of the game.
The contents we provide on this site were created personally by members of the Game8 editorial department.
We refuse the right to reuse or repost content taken without our permission such as data or images to other sites.


![Everwind Review [Early Access] | The Shaky First Step to A Very Long Journey](https://img.game8.co/4440226/ab079b1153298a042633dd1ef51e878e.png/thumb)

![Monster Hunter Stories 3 Review [First Impressions] | Simply Rejuvenating](https://img.game8.co/4438641/2a31b7702bd70e78ec8efd24661dacda.jpeg/thumb)


also (i totally forgot to put it in the 1rst comment) if you have Acheron you can kill most of the fow (even the strong one who keep the chest number 10 if i remember well) with her skill