This survey will take about 1 minute.
Your answers will help us to improve our website.
Dungeons & Dragons: Dark Alliance
All Tablet Locations | Lore Objects
This is a guide to all Tablet Locations in the game D&D: Dark Alliance. To know more about which quest you can find a particular Tablet, read on!
| All Lore Objects | |
|---|---|
| Paintings | Tablets |
| Tomes | Reliefs |
List of Contents
All Tablet Locations
Companions of Icewind Dale
Act I
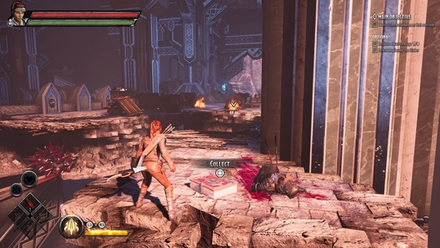
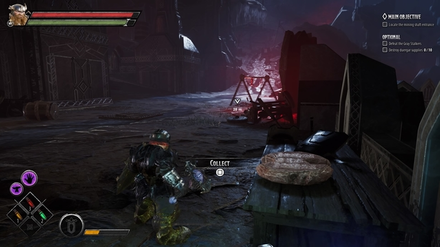
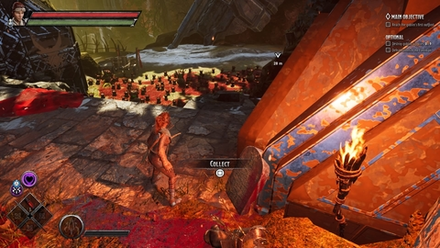
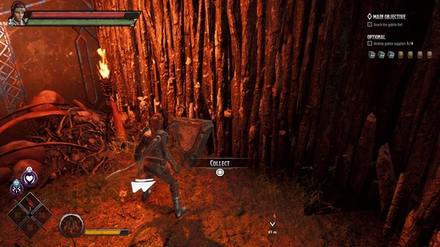
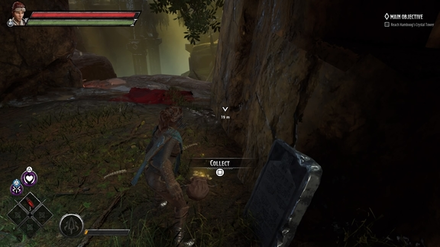
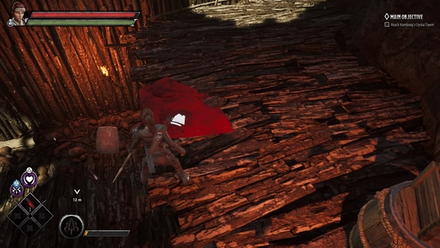
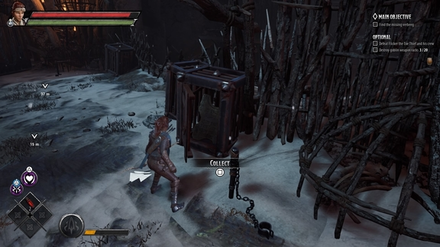
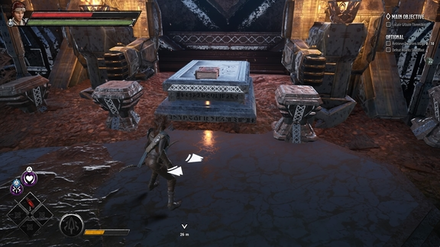
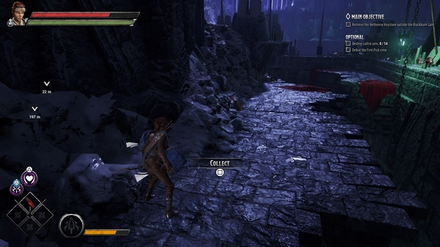
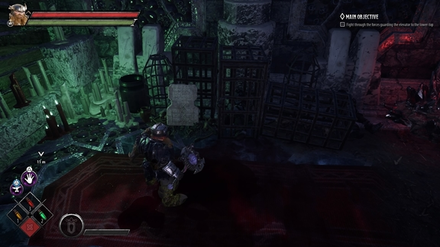
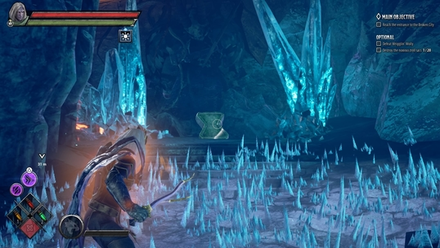
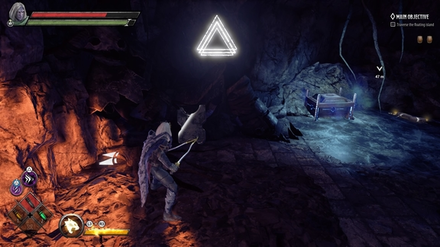
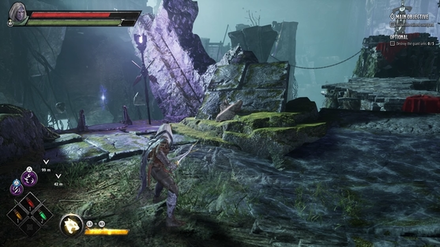
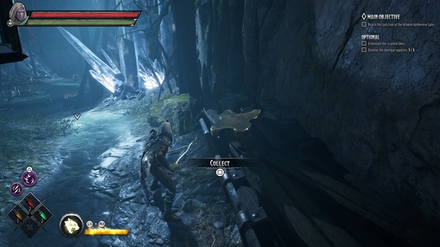
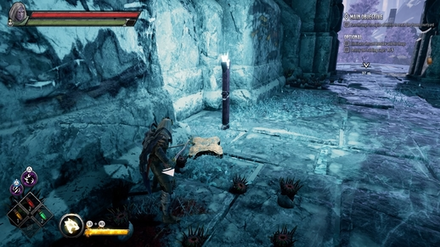
| The Long Winter | |
|---|---|
 Enlarge Enlarge |
|
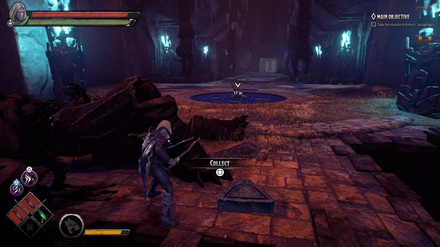
| How to Get: | |
| Take a right after crossing the bridge from the first goblin area. | |
| Group |  History of the Smallfolk of Icewind Dale History of the Smallfolk of Icewind Dale |
| Quest | Companions of Icewind Dale |
| Act | Goblins at the Gates |
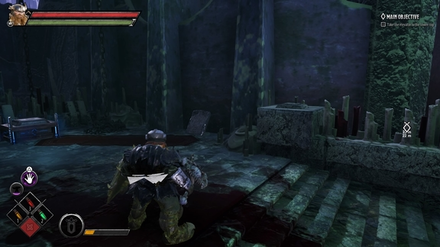
| Allegiance with Utaar | |
|---|---|
 Enlarge Enlarge |
|
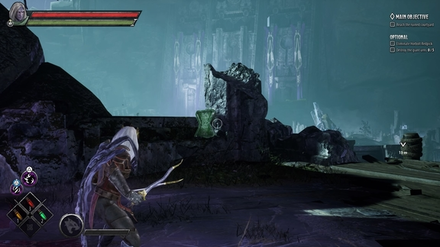
| How to Get: | |
| On a table in the area where you destroy the second ballista. | |
| Group | 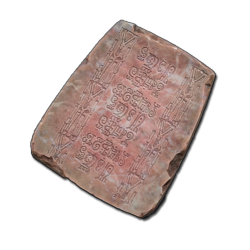 The Life of Verbeeg The Life of Verbeeg |
| Quest | Companions of Icewind Dale |
| Act | Goblins at the Gates |
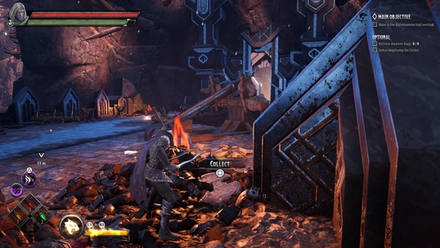
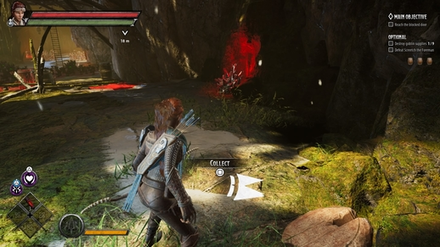
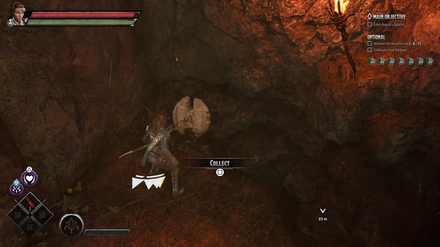
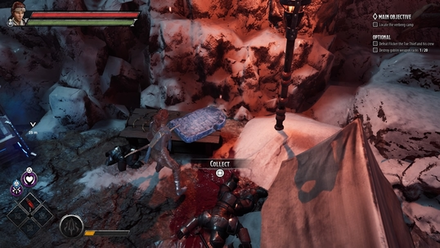
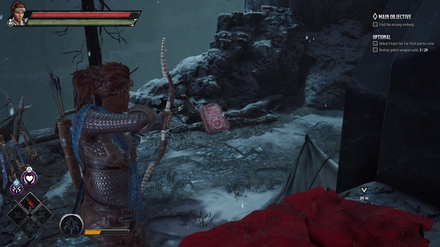
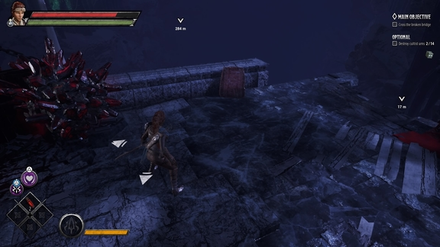
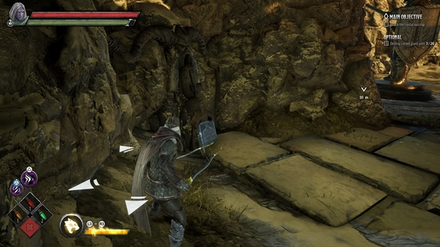
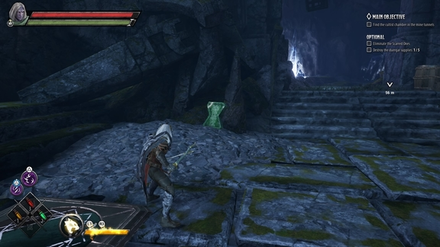
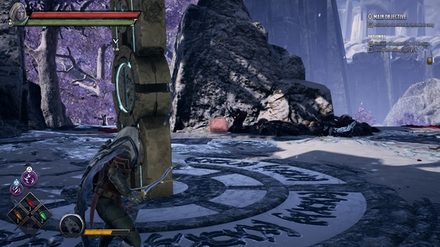
| The Reghed Glacier | |
|---|---|
 Enlarge Enlarge |
|
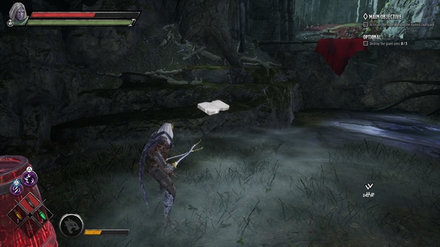
| How to Get: | |
| On the platform of a broken bridge across an area where you fight Goblins and a Verbeeg. | |
| Group | 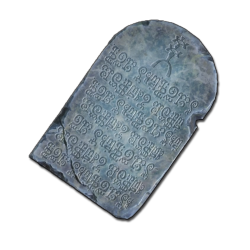 The Geography of Icewind Dale The Geography of Icewind Dale |
| Quest | Companions of Icewind Dale |
| Act | Goblins at the Gates |
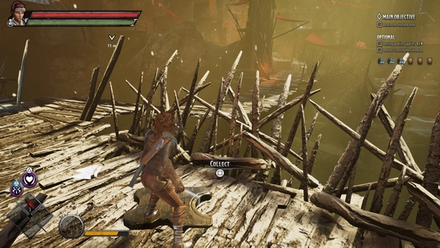
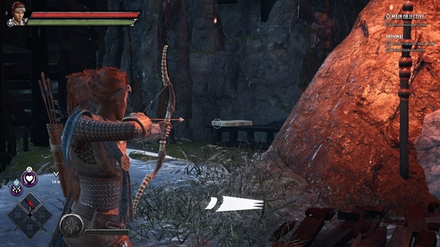
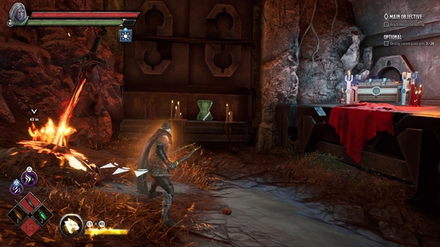
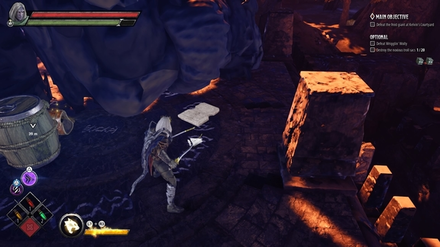
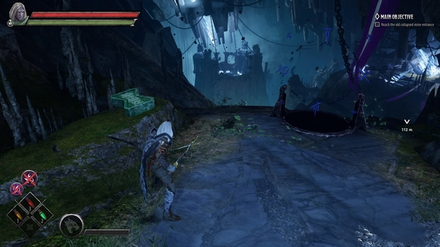
| Conflict With The Frost Giants | |
|---|---|
 Enlarge Enlarge |
|
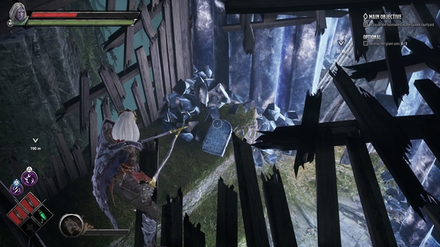
| How to Get: | |
| In a pile of corpses near the third ballista objective. | |
| Group | 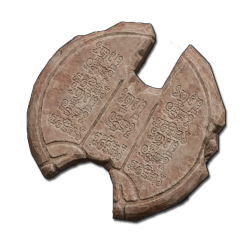 The Rise of Clan Battlehammer The Rise of Clan Battlehammer |
| Quest | Companions of Icewind Dale |
| Act | Goblins at the Gates |
Act II
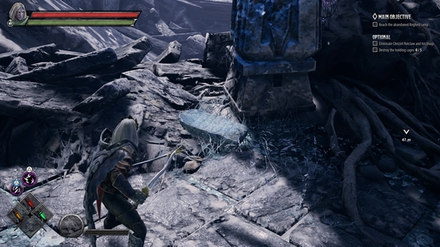
| Construction of Bangor's Span | |
|---|---|
 Enlarge Enlarge |
|
| How to Get: | |
| On a table to your right after using the first elevator. | |
| Group | The Rise of Clan Battlehammer |
| Quest | Companions of Icewind Dale |
| Act | Halls of Duergar |
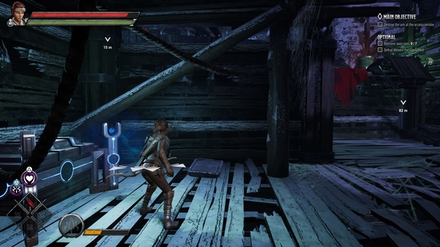
| Birth of the Verbeeg | |
|---|---|
 Enlarge Enlarge |
|
| How to Get: | |
| Go straight after taking the elevator down. Upon reaching the Gray Stalkers area, jump to the platform to your right. | |
| Group | The Life of Verbeeg |
| Quest | Companions of Icewind Dale |
| Act | Halls of Duergar |
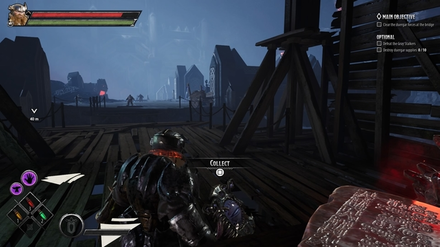
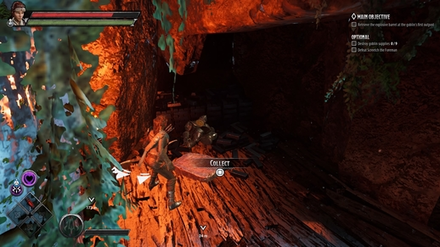
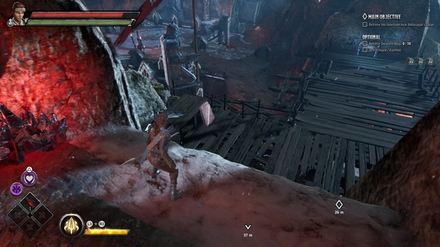
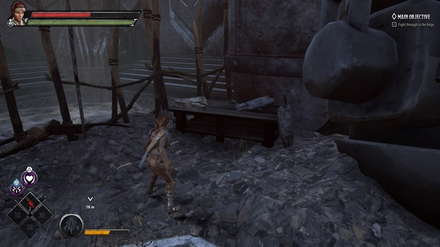
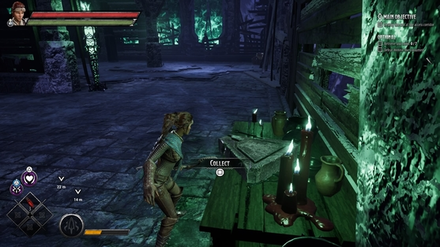
| Raiders and Caravans | |
|---|---|
 Enlarge Enlarge |
|
| How to Get: | |
| Upon entering the room filled with lava, stick to the right side until you see a wooden beam. Cross to the other side where you'll find the tablet behind some barrels. | |
| Group | History of the Smallfolk of Icewind Dale |
| Quest | Companions of Icewind Dale |
| Act | Halls of Duergar |
Act III
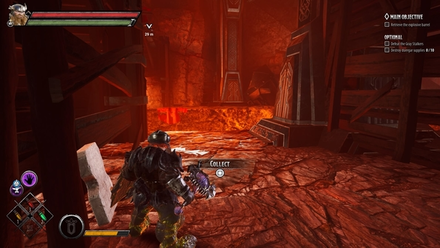
| The Mining of Kelvin's Cairn | |
|---|---|
 Enlarge Enlarge |
|
| How to Get: | |
| Turn left after jumping a lava gap, you'll see it in a corner. | |
| Group | The Rise of Clan Battlehammer |
| Quest | Companions of Icewind Dale |
| Act | Bangor's Span |
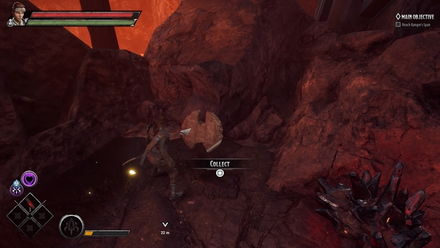
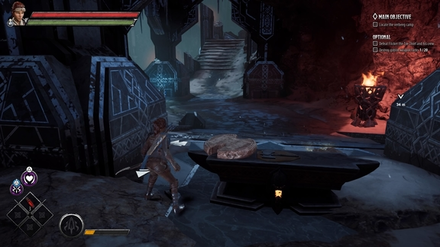
| Othea's Offspring | |
|---|---|
 Enlarge Enlarge |
|
| How to Get: | |
| The tablet is on a platform that is lowered by using a lever. Pick up an explosive barrel to open the gate where the lever is located. | |
| Group |  Ostoria, Kingdom of the Jotun Ostoria, Kingdom of the Jotun |
| Quest | Companions of Icewind Dale |
| Act | Bangor's Span |
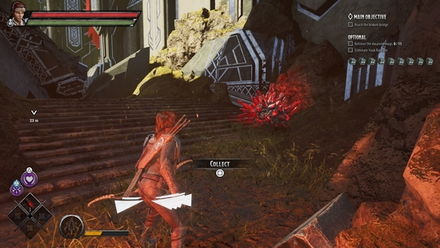
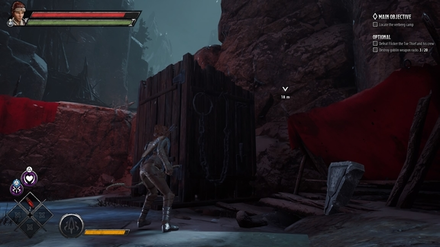
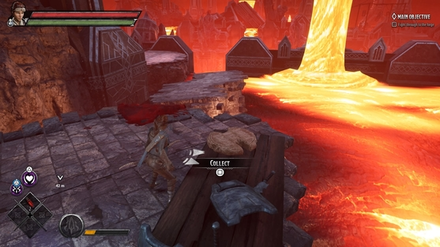
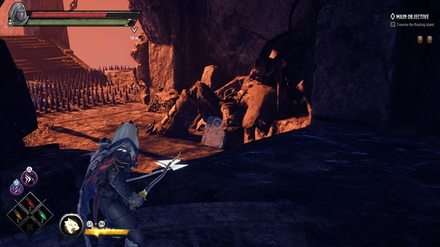
| A Sudden Turnaround | |
|---|---|
 Enlarge Enlarge |
|
| How to Get: | |
| In a gate that is opened with an explosive barrel. You can pick one up by killing the enemy that is straight ahead from the tablet's location. | |
| Group |  The Fate of the Netherese The Fate of the Netherese |
| Quest | Companions of Icewind Dale |
| Act | Bangor's Span |
Companions of Icewind Dale Walkthrough
The Goblin's Shard
Act I
| The Hazards of Icewind Dale | |
|---|---|
 Enlarge Enlarge |
|
| How to Get: | |
| Take a left near the entrance and go past the poison spores. | |
| Group | The Geography of Icewind Dale |
| Quest | The Goblin's Shard |
| Act | The Goblin Valley |
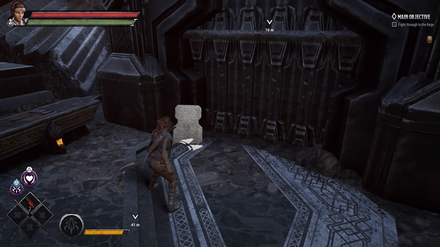
| The Arrival of Dwarves | |
|---|---|
 Enlarge Enlarge |
|
| How to Get: | |
| Follow the quest objectives until you see poison spores after climbing up a ladder. Turn right and jump over a gap. A Verbeeg will spawn here. | |
| Group | The Rise of Clan Battlehammer |
| Quest | The Goblin's Shard |
| Act | The Goblin Valley |
| Settlement of Netherhall | |
|---|---|
 Enlarge Enlarge |
|
| How to Get: | |
| Turn left after crossing a bridge. This can be seen before going up the ladder that leads to the previous tablet. | |
| Group | The Fate of the Netherese |
| Quest | The Goblin's Shard |
| Act | The Goblin Valley |
| Degenerations and Obsessions | |
|---|---|
 Enlarge Enlarge |
|
| How to Get: | |
| Follow the quest objectives until you reach the area with Captain Krelch. Go up a ladder and follow the path until you see a body. | |
| Group | The Life of Verbeeg |
| Quest | The Goblin's Shard |
| Act | The Goblin Valley |
| A Rain of Stars | |
|---|---|
 Enlarge Enlarge |
|
| How to Get: | |
| Follow the quest objective until you go down a staircase to a hall. Take a left and follow the path until you reach a portal. The tablet is up against a wooden wall to the right. There is also an Attribute Shrine here. | |
| Group | Ostoria, Kingdom of the Jotun |
| Quest | The Goblin's Shard |
| Act | The Goblin Valley |
Act II
| Settlement of Cindryc's Rift | |
|---|---|
 Enlarge Enlarge |
|
| How to Get: | |
| At the first combat area, enter the opening on the left side. | |
| Group | The Rise of Clan Battlehammer |
| Quest | The Goblin's Shard |
| Act | Goffin's Door |
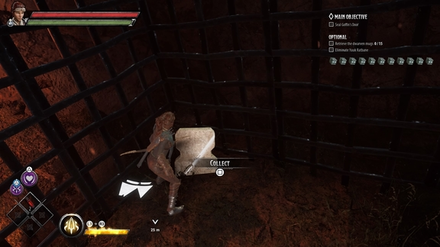
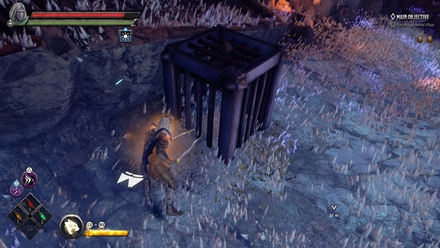
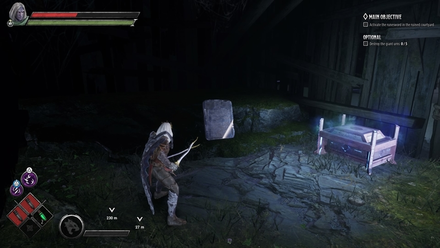
| Good Mead | |
|---|---|
 Enlarge Enlarge |
|
| How to Get: | |
| Inside a cage in the fort before entering Goffin's Door. | |
| Group | History of the Smallfolk of Icewind Dale |
| Quest | The Goblin's Shard |
| Act | Goffin's Door |
| The Thousand Years War | |
|---|---|
 Enlarge Enlarge |
|
| How to Get: | |
| Upon reaching the Cracked Halls, take the path on the left before continuing to follow the quest objective. | |
| Group | Ostoria, Kingdom of the Jotun |
| Quest | The Goblin's Shard |
| Act | Goffin's Door |
Act III
| The Shard's Voice | |
|---|---|
 Enlarge Enlarge |
|
| How to Get: | |
| In the first combat area, climb up the platform past the poison spores. | |
| Group | 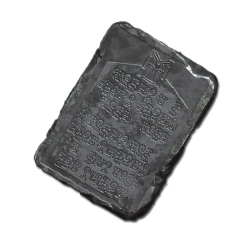 The Tale of the Crystal Shard The Tale of the Crystal Shard |
| Quest | The Goblin's Shard |
| Act | The Goblin Tower |
| The Netherese Testaments | |
|---|---|
 Enlarge Enlarge |
|
| How to Get: | |
| After jumping a gap past the second combat area, keep going straight until you see a body. | |
| Group | The Fate of the Netherese |
| Quest | The Goblin's Shard |
| Act | The Goblin Tower |
| Knucklehead Trout | |
|---|---|
 Enlarge Enlarge |
|
| How to Get: | |
| Follow the quest objective until you see poison spores to your left. Go past them. | |
| Group | History of the Smallfolk of Icewind Dale |
| Quest | The Goblin's Shard |
| Act | The Goblin Tower |
| Their Hill Giant Differentiators | |
|---|---|
 Enlarge Enlarge |
|
| How to Get: | |
| Follow the quest objective until you have to drop down a platform. It'll be to your right. | |
| Group | The Life of Verbeeg |
| Quest | The Goblin's Shard |
| Act | The Goblin Tower |
The Goblin's Shard Walkthrough
Verbeeg Jamboree
Act I
| The Sea of Moving Ice | |
|---|---|
 Enlarge Enlarge |
|
| How to Get: | |
| On a table in the first combat area. | |
| Group | The Geography of Icewind Dale |
| Quest | Verbeeg Jamboree |
| Act | The Verbeeg Jamboree |
| The Dwarven Forge | |
|---|---|
 Enlarge Enlarge |
|
| How to Get: | |
| Pick up a Netherese Keystone from a ledge in the area of the first tablet. Take a left upon entering the second combat area. Enter a blocked temple using the keystone. Tablet is on a table. | |
| Group | The Rise of Clan Battlehammer |
| Quest | Verbeeg Jamboree |
| Act | The Verbeeg Jamboree |
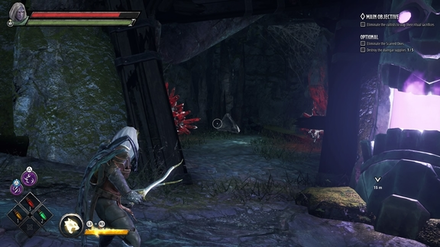
| Vonindod | |
|---|---|
 Enlarge Enlarge |
|
| How to Get: | |
| On the platform before entering a Verbeeg camp, you will see a path with poison spores to the right. Follow that path until you have to drop down to an area with a chest. | |
| Group | Ostoria, Kingdom of the Jotun |
| Quest | Verbeeg Jamboree |
| Act | The Verbeeg Jamboree |
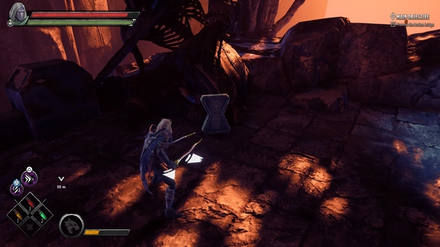
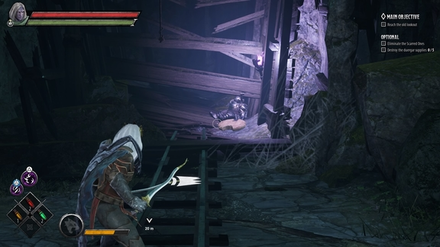
| Death Netherese | |
|---|---|
 Enlarge Enlarge |
|
| How to Get: | |
| In a small cage at the Verbeeg camp. | |
| Group | The Fate of the Netherese |
| Quest | Verbeeg Jamboree |
| Act | The Verbeeg Jamboree |
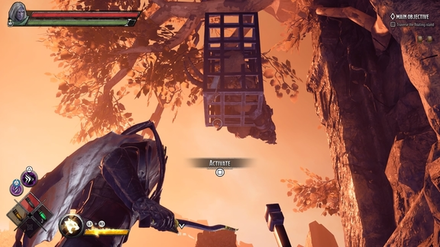
| Tactics of the Verbeeg | |
|---|---|
 Enlarge Enlarge |
|
| How to Get: | |
| Follow the quest objectives until you reach an area with some stairs (the Boss area). Instead of going up, take the path to the left of the stairs until you drop down. | |
| Group | The Life of Verbeeg |
| Quest | Verbeeg Jamboree |
| Act | The Verbeeg Jamboree |
Act II
| Termalaine Mine | |
|---|---|
 Enlarge Enlarge |
|
| How to Get: | |
| Cross the bridge after the first combat area. There will be rubble to your right. Break it and the tablet will be on a table. | |
| Group | History of the Smallfolk of Icewind Dale |
| Quest | Verbeeg Jamboree |
| Act | Designs of the Duergar |
| Dominated By Kessell | |
|---|---|
 Enlarge Enlarge |
|
| How to Get: | |
| Before climbing up to the Statue of Annuragon, you'll see a drop to the left. The tablet will be on a table here. | |
| Group | The Life of Verbeeg |
| Quest | Verbeeg Jamboree |
| Act | Designs of the Duergar |
| Discovery By Kessell | |
|---|---|
 Enlarge Enlarge |
|
| How to Get: | |
| From the Statue of Annuragon, go straight to the opposite side of the area. There will be some Duergar and a Verbeeg. The tablet will be on a table to the left side of the area. | |
| Group | The Tale of the Crystal Shard |
| Quest | Verbeeg Jamboree |
| Act | Designs of the Duergar |
| Expulsion Of The Verbeeg | |
|---|---|
 Enlarge Enlarge |
|
| How to Get: | |
| Follow the quest objectives until you reach Annuragon's tomb. The tablet will be on a table at the end of the room. | |
| Group | The Rise of Clan Battlehammer |
| Quest | Verbeeg Jamboree |
| Act | Designs of the Duergar |
Act III
| The Deeds and Death of Hjurnur Dragonslayer | |
|---|---|
 Enlarge Enlarge |
|
| How to Get: | |
| Follow the quest objectives until you reach a hall where you'll have to combat a Verbeeg and some other minions. The tablet is on a table to the right of the hall's entrance. | |
| Group | Ostoria, Kingdom of the Jotun |
| Quest | Verbeeg Jamboree |
| Act | A Feast for All Cretins |
| Coronation Of The King | |
|---|---|
 Enlarge Enlarge |
|
| How to Get: | |
| After jumping a lava gap, there will be a diverging path. Follow the one on the left. After jumping a wooden beam you'll see spike traps to your left. Get past it and get across another lava gap. The tablet is on a table at the end of this path. | |
| Group | The Rise of Clan Battlehammer |
| Quest | Verbeeg Jamboree |
| Act | A Feast for All Cretins |
| Rendaril's Emporium | |
|---|---|
 Enlarge Enlarge |
|
| How to Get: | |
| Follow the quest objectives until you reach a combat area with two Verbeegs. The tablet will be in a corner on the left side of the area. | |
| Group | History of the Smallfolk of Icewind Dale |
| Quest | Verbeeg Jamboree |
| Act | A Feast for All Cretins |
The Order of the One Light
Act I
| The Rivers | |
|---|---|
 Enlarge Enlarge |
|
| How to Get: | |
| Follow the quest objectives until you reach a staircase to your right that leads to the Blackburn Gate. Instead of going up the stairs, keep going straight. You will jump a few gaps and see the tablet up against rubble. | |
| Group | The Geography of Icewind Dale |
| Quest | The Order Of The Light |
| Act | An Infernal Dispute |
| Their Association with Goblins | |
|---|---|
 Enlarge Enlarge |
|
| How to Get: | |
| You'll see this to your left as you cross the broken bridge. It's right beside some red crystals. | |
| Group | The Life of Verbeeg |
| Quest | The Order Of The Light |
| Act | An Infernal Dispute |
Act II
| The Wonders of Ostoria | |
|---|---|
 Enlarge Enlarge |
|
| How to Get: | |
| On a table near the first combat area. | |
| Group | Ostoria, Kingdom of the Jotun |
| Quest | The Order Of The Light |
| Act | Order of the One Light |
| Kelvin's Defeat and the Loss of the Shard | |
|---|---|
 Enlarge Enlarge |
|
| How to Get: | |
| After the first combat area, take the path to your right. You'll see a wooden beam to jump across on your left. After this, keep going right until you see an ice-filled path. Traverse this until you see a platform below. Jump down and the tablet will be near a chest. | |
| Group | The Tale of the Crystal Shard |
| Quest | The Order Of The Light |
| Act | Order of the One Light |
Act III
| Resettlement of Caer Konig by Reghead Tribes | |
|---|---|
 Enlarge Enlarge |
|
| How to Get: | |
| From the start of the Act, head straight to the end of the hall. | |
| Group | History of the Smallfolk of Icewind Dale |
| Quest | The Order Of The Light |
| Act | Return of the Tyrant |
| Theories of Orc Raids Driven by the Shard | |
|---|---|
 Enlarge Enlarge |
|
| How to Get: | |
| Facing the elevator, head to the left side where you'll see some steps to a balcony. Tablet is here. | |
| Group | The Tale of the Crystal Shard |
| Quest | The Order Of The Light |
| Act | Return of the Tyrant |
| Mysteries of the Netherese | |
|---|---|
 Enlarge Enlarge |
|
| How to Get: | |
| Facing the elevator, head to the right side where you'll see some steps to a balcony. Tablet is here. | |
| Group | The Fate of the Netherese |
| Quest | The Order Of The Light |
| Act | Return of the Tyrant |
The Order of the One Light Walkthrough
The Mask of Kelvin
Act I
| Crystal Remnant | |
|---|---|
 Enlarge Enlarge |
|
| How to Get: | |
| Follow the quest objectives until you reach the third Tempus shrine to purge. Facing the statue, you will see a small opening to the right. Tablet is in here. | |
| Group | The Tale of the Crystal Shard |
| Quest | The Mask Of Kelvin |
| Act | Ghosts of the Past |
| The Hall of Judgment | |
|---|---|
 Enlarge Enlarge |
|
| How to Get: | |
| Follow the quest objectives until you cross a bridge and reach an open area with a giant and some goblins. Upon entering, there's a drop to the left that leads to an ice-filled area with a nearby explosive barrel. Pick up the barrel and blow up the wall across you. This leads to a cave where you will find the tablet. | |
| Group |  The Rise and Fall of Kelvin the Great The Rise and Fall of Kelvin the Great |
| Quest | The Mask Of Kelvin |
| Act | Ghosts of the Past |
| The Lakes | |
|---|---|
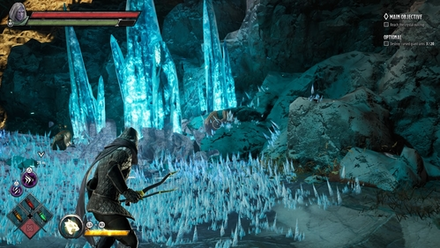 Enlarge Enlarge |
|
| How to Get: | |
| After using a portal and reaching an area with a troll and some wraiths, you'll see an ice-filled area to your right. The tablet is here stuck in some shards. | |
| Group | The Geography of Icewind Dale |
| Quest | The Mask Of Kelvin |
| Act | Ghosts of the Past |
| The Goblin Raid of Termalaine | |
|---|---|
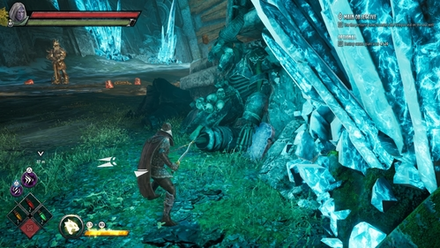 Enlarge Enlarge |
|
| How to Get: | |
| Upon reaching the Boss area, stick to the right side. The tablet is in between a giant skeleton and some blue crystals. | |
| Group | The Rise of Clan Battlehammer |
| Quest | The Mask Of Kelvin |
| Act | Ghosts of the Past |
Act II
| A Life in the Cold | |
|---|---|
 Enlarge Enlarge |
|
| How to Get: | |
| After defeating some trolls and then using a portal, you will see a path with trees. There are wooden walls to your left. Break them and enter a small area where the tablet will be. | |
| Group | The Life of Verbeeg |
| Quest | The Mask Of Kelvin |
| Act | The Broken City |
| The Statue of Annam | |
|---|---|
 Enlarge Enlarge |
|
| How to Get: | |
| Near the start of the quest, take a right through an ice-filled path. Tablet is in a cave at the end of the path. | |
| Group | The Rise and Fall of Kelvin the Great |
| Quest | The Mask Of Kelvin |
| Act | The Broken City |
| Goal of the Shard | |
|---|---|
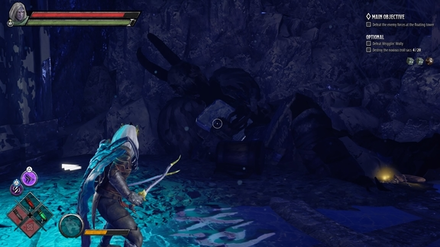 Enlarge Enlarge |
|
| How to Get: | |
| Upon reaching the floating tower, take a left and follow this path. Pick up a lever on a table as you pass here. You will see a gap to jump but drop down instead and continue from here. Insert the lever to enter a small room where the tablet will be. | |
| Group | The Tale of the Crystal Shard |
| Quest | The Mask Of Kelvin |
| Act | The Broken City |
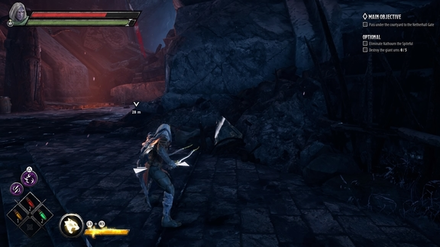
| Unnamed Tablet | |
|---|---|
 Enlarge Enlarge |
|
| How to Get: | |
| After going up stairs to reach Kelvin's Courtyard, look to your right. The tablet will be under a statue. | |
| Group | History of the Smallfolk of Icewind Dale |
| Quest | The Mask Of Kelvin |
| Act | The Broken City |
Act III
| Mysterious Origin | |
|---|---|
 Enlarge Enlarge |
|
| How to Get: | |
| Follow the quest objective until you're to climb a ladder. Before doing so, take a path to the right that leads to a spike puzzle. Right before the puzzle is the tablet laying on the ground. | |
| Group | The Tale of the Crystal Shard |
| Quest | The Mask Of Kelvin |
| Act | The Face of Kelvin |
| Scattered Ruins | |
|---|---|
 Enlarge Enlarge |
|
| How to Get: | |
| In a combat area with goblins, right before entering a portal, turn to the right and there will be a drop to a floating platform with a puzzle. Solve it to open a purple forcefield that leads to the tablet. | |
| Group | The Fate of the Netherese |
| Quest | The Mask Of Kelvin |
| Act | The Face of Kelvin |
| Allies of Kelvin | |
|---|---|
 Enlarge Enlarge |
|
| How to Get: | |
| Upon reaching the combat area with a giant and some cultists, take a left into an ice-filled path. The tablet is in the middle of the path inside a small cage. | |
| Group | The Life of Verbeeg |
| Quest | The Mask Of Kelvin |
| Act | The Face of Kelvin |
| Kelvin's Marriage and Seat of Power | |
|---|---|
 Enlarge Enlarge |
|
| How to Get: | |
| Follow the quest objective until you reach an area with a purple forcefield. Solve the puzzle to get the tablet that is inside. | |
| Group | The Rise and Fall of Kelvin the Great |
| Quest | The Mask Of Kelvin |
| Act | The Face of Kelvin |
| Wounded Mountain | |
|---|---|
 Enlarge Enlarge |
|
| How to Get: | |
| This tablet is in the combat area with goblins, right after the one with the giant and cultists. It is inside a cage hanging above. Defeat the enemies here to be able to pull the lever that lowers the cage. | |
| Group | The Geography of Icewind Dale |
| Quest | The Mask Of Kelvin |
| Act | The Face of Kelvin |
| Unnamed Tablet | |
|---|---|
 Enlarge Enlarge |
|
| How to Get: | |
| Before using the elevator in the sarcophagus, go behind the giant corpse. The tablet is here. | |
| Group | Ostoria, Kingdom of the Jotun |
| Quest | The Mask Of Kelvin |
| Act | The Face of Kelvin |
The Mask of Kelvin Walkthrough
Crystalline Dreams
Act I
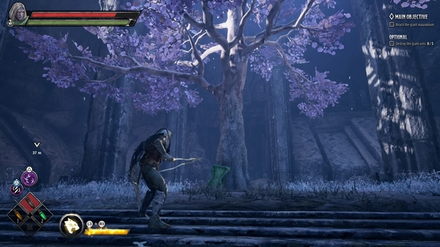
| Temple of the Everspring Tree | |
|---|---|
 Enlarge Enlarge |
|
| How to Get: | |
| Look to your left before going down the ladder near the start of the quest. | |
| Group | The Rise and Fall of Kelvin the Great |
| Quest | Crystalline Dreams |
| Act | The Floating City |
| The Rise of Kessell | |
|---|---|
 Enlarge Enlarge |
|
| How to Get: | |
| Follow the quest objectives until you reach the combat area with several trolls. The tablet is here. | |
| Group | History of the Smallfolk of Icewind Dale |
| Quest | Crystalline Dreams |
| Act | The Floating City |
| The Spine of the World | |
|---|---|
 Enlarge Enlarge |
|
| How to Get: | |
| Facing the gate at the boss area, take a path to the right where you'll climb up a stone platform. Follow this path through a portal until you climb up a ladder. Upon climbing it, look behind you where there will be a wooden beam to jump on. There will be a drop down to the area with the tablet. | |
| Group | The Geography of Icewind Dale |
| Quest | Crystalline Dreams |
| Act | The Floating City |
| The Sudden Disappearance | |
|---|---|
 Enlarge Enlarge |
|
| How to Get: | |
| Follow the quest objectives until you reach the ruined temple. The tablet will be on the first floating platform you jump to before activating the runesword. | |
| Group | The Fate of the Netherese |
| Quest | Crystalline Dreams |
| Act | The Floating City |
| Destruction of the Towers | |
|---|---|
 Enlarge Enlarge |
|
| How to Get: | |
| Facing the gate at the boss area, look to the left. There will be a room with a wooden wall. The tablet is inside. | |
| Group | The Tale of the Crystal Shard |
| Quest | Crystalline Dreams |
| Act | The Floating City |
Act II
| The Long Winter (Crystal Harvest) | |
|---|---|
 Enlarge Enlarge |
|
| How to Get: | |
| Follow quest objectives until you reach the old mining shaft. The tablet will be in this area behind a wooden wall. | |
| Group | The Rise of Clan Battlehammer |
| Quest | Crystalline Dreams |
| Act | Crystal Harvest |
| The Mask of Kelvin | |
|---|---|
 Enlarge Enlarge |
|
| How to Get: | |
| On the path right before the old lookout, there will be a room with a wooden wall to the left. Tablet is inside. | |
| Group | Ostoria, Kingdom of the Jotun |
| Quest | Crystalline Dreams |
| Act | Crystal Harvest |
| The Sea of Moving Ice (Crystal Harvest) | |
|---|---|
 Enlarge Enlarge |
|
| How to Get: | |
| After the old lookout, follow the quest objectives until you use a portal to enter a tunnel. The tablet will be along the path of the tunnel to your right. | |
| Group | The Fate of the Netherese |
| Quest | Crystalline Dreams |
| Act | Crystal Harvest |
| Kelvin's Alliance | |
|---|---|
 Enlarge Enlarge |
|
| How to Get: | |
| Follow the quest objectives until you enter the mine tunnels. Upon entering, take the first right turn. Follow this path until you jump a gap. After the gap, there will be a small opening to your right with poison floors. Enter this area and you will be led into a puzzle room with an attribute shrine. Facing the shrine, the tablet will be to your right. | |
| Group | The Rise and Fall of Kelvin the Great |
| Quest | Crystalline Dreams |
| Act | Crystal Harvest |
Act III
| Kelvin and the Crystal Shard | |
|---|---|
 Enlarge Enlarge |
|
| How to Get: | |
| Right beside the portal at the start of the quest. | |
| Group | The Rise and Fall of Kelvin the Great |
| Quest | Crystalline Dreams |
| Act | A Crystal Crown |
Crystalline Dreams Walkthrough
The Fury of Icewind
There are no tablets in Act III.
Act I
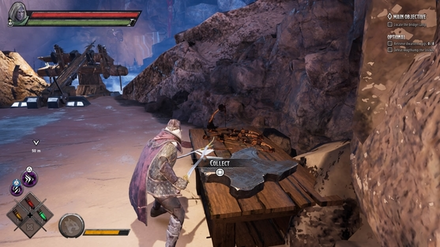
| Kelvin's Cairn | |
|---|---|
 Enlarge Enlarge |
|
| How to Get: | |
| This tablet is on the left side of the starting area, right beside the structure with a blue light. | |
| Group | The Geography of Icewind Dale |
| Quest | The Fury Of Icewind |
| Act | The Hunting Grounds |
| Betrayal In Netherhall | |
|---|---|
 Enlarge Enlarge |
|
| How to Get: | |
| When first passing through the giant gate, the Spire of Kelvin, you will see the tablet to your left. | |
| Group | The Fate of the Netherese |
| Quest | The Fury Of Icewind |
| Act | The Hunting Grounds |
| A Simple Life, A Cunning Mind | |
|---|---|
 Enlarge Enlarge |
|
| How to Get: | |
| Follow quest objectives and reach the lookout camp area. Tablet is here. | |
| Group | The Life of Verbeeg |
| Quest | The Fury Of Icewind |
| Act | The Hunting Grounds |
Act II
| The Fall of Ostoria and the Dark Age of Jotun | |
|---|---|
 Enlarge Enlarge |
|
| How to Get: | |
| Tablet is in the combat area with a verbeeg and silencing stones. It is in the far right corner of the area. | |
| Group | Ostoria, Kingdom of the Jotun |
| Quest | The Fury Of Icewind |
| Act | The Hall of Judgement |
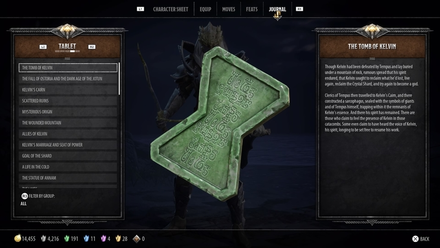
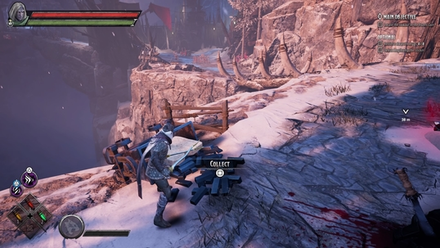
| The Tomb of Kelvin | |
|---|---|
 Enlarge Enlarge |
|
| How to Get: | |
| Follow quest objectives until you reach a room with a giant tree where wraiths will spawn. The tablet is up against the tree. | |
| Group | The Rise and Fall of Kelvin the Great |
| Quest | The Fury Of Icewind |
| Act | The Hall of Judgement |
The Fury of Icewind Walkthrough
D&D: Dark Alliance Related Links
Beginner's Guide: Tips and Tricks
Comment
3  Anonymous over 4 years
Yup, you have that messed up. The shape isone in the Battlehammer clan, and the shape of the one in the boss are, between the crystals and the corpse is the shape of geography of Icewind Dale. It was The Lakes. Just got it with a fresh character, to confirm.
Author
All Tablet Locations | Lore Objects
Please participate in our site
improvement survey
03/2026
improvement survey
03/2026
Would you assist in
improving Game8's site?
improving Game8's site?

×
We are listening to our users' valuable opinions and discussing how to act on them.
The information collected through this survey will be used for the purpose of improving our services. In addition, the information will only be disclosed a part of a statistic in a format that will not allow identification of personal information.
Begin Survey
Not Now
×
Please rate each item regarding Game8.co's Advertisements.
Amount of Ads
Very Dissatisfied
Somewhat Dissatisfied
Fine
Somewhat Satisfied
Highly Satisfied
Placement of Ads
Timing of Ad Display
Ad Loading Speed
Safeness of Ads
Content of Ads
×
Please rate each item regarding Game8.co's Quality of Articles.
Amount of information
Very Dissatisfied
Somewhat Dissatisfied
Fine
Somewhat Satisfied
Highly Satisfied
Frequency of updates
Speed of new information
Accuracy of articles
Understandibility of articles
Readability of sentences
×
Please rate each item regarding Game8.co's Usability of the Site.
Ease of finding information
Very Dissatisfied
Somewhat Dissatisfied
Fine
Somewhat Satisfied
Highly Satisfied
Loading Speed
Use of Color
Font Size
Visibility of Images
Easy to Understand Layout
×
Please rate each item regarding Game8.co's Message Boards, Comments.
Ease of Writing
Very Dissatisfied
Somewhat Dissatisfied
Fine
Somewhat Satisfied
Highly Satisfied
Readability
Ease in Finding Information
Comment Quality
Comment Quantity
Admin Response
×
Please rate each item regarding Game8.co's Site's new design.
Please rate our site's new design
Very Dissatisfied
Somewhat Dissatisfied
Fine
Somewhat Satisfied
Highly Satisfied
Do you think that the website's design change makes the site easier to use?
Has the new design made it easier for you to find information on the site?
Has the new design improved the overall visual appeal of the site?
How would you rate your overall satisfaction with the new design of the site?
×
How likely are you to recommend Game8 to someone you know?
Very Unlikely
0
1
2
3
4
5
6
7
8
9
10
Very Likely
If you have other opinions regarding potential improvement to the website, please share them with us. We would appreciate your honest opinion.
Note: This is a free response section, so you can proceed without entering anything.
Note: Please be sure not to enter any kind of personal information into your response.
Note: Please be sure not to enter any kind of personal information into your response.
×
Thank You
×
Thank you for participating in our survey! Your answers will help us to improve the quality of our website and services.
We hope you continue to make use of Game8.
We hope you continue to make use of Game8.
Close
Rankings
- We could not find the article you were looking for.
- We could not find the message board you were looking for.
Gaming News


![Monster Hunter Stories 3 Review [First Impressions] | Simply Rejuvenating](https://img.game8.co/4438641/2a31b7702bd70e78ec8efd24661dacda.jpeg/thumb)
Popular Games

Genshin Impact Walkthrough & Guides Wiki
Honkai: Star Rail Walkthrough & Guides Wiki
Umamusume: Pretty Derby Walkthrough & Guides Wiki
Pokemon Pokopia Walkthrough & Guides Wiki
Resident Evil Requiem (RE9) Walkthrough & Guides Wiki
Monster Hunter Wilds Walkthrough & Guides Wiki
Wuthering Waves Walkthrough & Guides Wiki
Arknights: Endfield Walkthrough & Guides Wiki
Pokemon FireRed and LeafGreen (FRLG) Walkthrough & Guides Wiki
Pokemon TCG Pocket (PTCGP) Strategies & Guides Wiki


Recommended Games
Diablo 4: Vessel of Hatred Walkthrough & Guides Wiki
Cyberpunk 2077: Ultimate Edition Walkthrough & Guides Wiki
Fire Emblem Heroes (FEH) Walkthrough & Guides Wiki
Yu-Gi-Oh! Master Duel Walkthrough & Guides Wiki
Super Smash Bros. Ultimate Walkthrough & Guides Wiki
Pokemon Brilliant Diamond and Shining Pearl (BDSP) Walkthrough & Guides Wiki
Elden Ring Shadow of the Erdtree Walkthrough & Guides Wiki
Monster Hunter World Walkthrough & Guides Wiki
The Legend of Zelda: Tears of the Kingdom Walkthrough & Guides Wiki
Persona 3 Reload Walkthrough & Guides Wiki


All rights reserved
© 1993-2021 Wizards of the Coast LLC, a subsidiary of Hasbro, Inc. All Rights Reserved.
The copyrights of videos of games used in our content and other intellectual property rights belong to the provider of the game.
The contents we provide on this site were created personally by members of the Game8 editorial department.
We refuse the right to reuse or repost content taken without our permission such as data or images to other sites.
Confirmed - The Lakes is definitely located in the Boss area on the right, where this guide states The Goblin Raid of Termalaine is located. Almost certainly the previous poster is correct and the guide has the 2 locations the wrong way around, though I haven't personally confirmed the Goblin Raid is at the Crystal Outcrop (Troll & Wraiths).