This survey will take about 1 minute.
Your answers will help us to improve our website.
Demon's Souls PS5
1-1: Boletarian Palace Story Walkthrough and Map
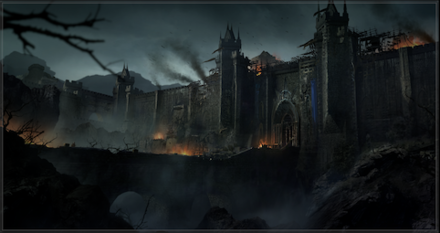
This is the story walkthrough for 1-1: Boletarian Palace in the Demon's Souls Remake (DS) for PS5. Keep reading for maps, tips on how to complete this stage, a list of NPCs, and items that can be found!
| Archstone of the Small King | |
|---|---|
| 1-1: Boletarian Palace | 1-2: Phalanx Archstone |
| 1-3: Tower Knight Archstone | 1-4: Penetrator Archstone |
List of Contents
1-1: Boletarian Palace Story Walkthrough
Map

Walkthrough Chart (1st Part)
| ① | You will spawn at the entrance of Boletarian. There will be several Dreglings hiding on the barricades so approach them with caution. |
|---|---|
| ② | After clearing the initial area, head left to find a gaping hole and an undead with a crossbow. Use your shield to block the arrow then make your way to the archer. Falling into the pit will result in instant death! |
| ③ | Proceed to the barracks and be prepared for ambushes. The area will be dark so putting your shield up and trekking slowly will be the key if you want to get through unscathed. You'll also want to use piercing moves as the area is cramped and will cause your attacks to bounce off the walls. |
| ④ | After clearing the barracks area, you will reach the first fog door guarded by two undead that use fire bombs. Move sideways to avoid the bombs while chipping away at their health with attacks to take them out. |
| ⑤ | Head through the fog then slowly make your way up. Similar to the barracks, this area is dark with occasional enemies using firebombs from above. Move slowly and use your shield to survive. Before reaching the topmost area, there will be an undead that will roll a boulder when you approach, immediately retreat when the boulder rolls down to avoid damage. |
| ⑥ | At the top, head right first (the path opposite to the area with the second fog door) and clear the enemies to avoid a potential pincer attack (do not head further and provoke the Red Eyes Knight). Head to the front of the fog then eliminate your first Blue Eyes Knight. The knight can easily be dispatched by using ranged magic attacks or by using a Riposte. |
| ⑦ | Before entering the fog, head to the opposite area from where you climbed then descend down the dark area. You will encounter Dreglings with flaming attacks and ignitable barrerls. Trek slowly and let them detonate the bomb themselves. |
| ⑧ | After reaching the most bottom part, use the lever to reveal a shortcut for your next run then loot the nearby corpse to claim a Cling Ring. The Cling Ring reduces the amount of health lost while in Soul Form. Extremely valuable if you don't want to shift the world's tendency to black by dying while in human form. |
| ⑨ | Return to the fog area that was guarded by the Knight then infront of it lies an area you can drop. Do so and claim the crossbow. Return to the fog area to proceed to second half of this area. |
② Gaping Hole

Upon this area lies a large hole that if you fall into, resulsts in an instant death! Instead, put up your shield and approach the enemies in the area slowly to avoid an accidental death.
③ Barracks
Entering open doors like this will often result in death if approached carelessly. More often than not, enemies will lie in ambush in places like this. Use your shield then approach slowly to observe the area before making your move.
⑤ Flaming Boulder
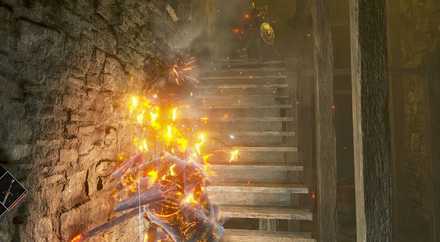
Before reaching the topmost area, the enemy will roll a boulder at you (potentially killing you if hit).
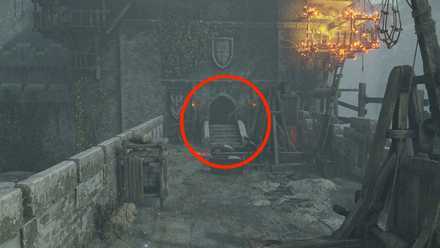
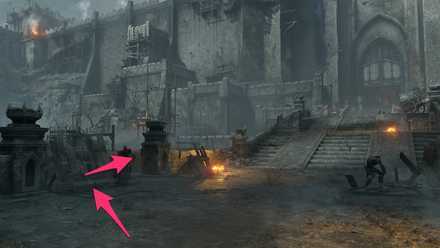
⑦ Opening the Shortcut
The path leading to a lever that unlocks a shortcut.
Opening the shortcut is a great way to save time if you wish to easily navigate the area. You can also destroy two chains on the way to the depths of the second area to make 2 corpses fall. They can be looted for some nice items. The Cling Ring is also a great to increase your character's survivability.
Walkthrough Chart (Second Half)
| ① | After entering the second fog door, you can jump down on the ledge to aid Ostrava. After doing so, he will roam the area and will slay demons one by one. If he falls, he will be permanently gone so after aiding him, it is wise to stay with him until you clear the area. |
|---|---|
| ② | Once you're done clearing the area, make your way back to the second fog then follow the path until you see a Dregling with a cross bow. Make your way there and defeat it then climb higher to encounter your third (second if you didn't help Ostrava) Blue Eyes Knight. Defeat it then enter the third fog. |
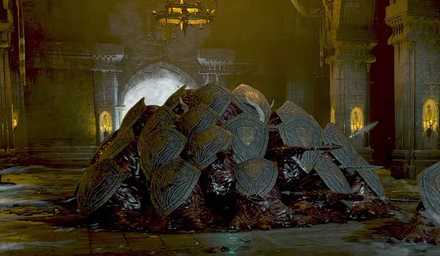
| ③ | After entering the third fog door, hit the wooden cage at the end of your path to unleash several boulders. They will roll sideways and will eliminate all the threats along the path. Make sure to not position your self infront of the boulders unless you want to experience an immediate death! |
| ④ | You will also notice the dragon's roost with several charred bodies that can be looted. It will be hard to approach it now due to the dragon that's guarding it but achieving Pure White World Tendency in Boletaria will cause the dragons to disappear! |
| ⑤ | Head further until you find a bridge with several enemies. Do not dive in immediately! The dragon will appear and will use a breath attack against all the units in the bridge. Head slightly inside until you see the dragon leaving before you move on. |
| ⑥ | After getting through the bridge, head inside then activate the lever you'll find. This will cause the massive gate at the entrance to open up. This is also the area where you'll fight your first major demon (aside from the Vanguard which is a tutorial boss) |
| ⑦ | Delve in further. Look for the stacks of barrel and destory it to reveal a corpse where you can loot a Pine Resin. This will be really valuable against the area's boss. |
| ⑧ | Continue further in. The area will be dark so you'll want to use your shield a lot. You'll also encounter Hoplites that use spears to stab at you. They have a shield on their face so you should roll past them and attack from behind to kill them quickly |
| ⑨ | Reach the deepest area and use the Lever to unlock the second shortcut. This will also be an exit that leads straight to Boletaria's entrance. Before passing through the fog, prepare some firebombs and the Pine Resin as well as some grasses for an easier fight. |
④ Dragon's Roost
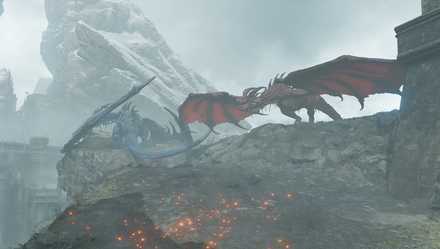
The Dragon's Roost is home to several charred bodies. The dragons will use their breath at anyone that approaches and you're no exception. The dragon will disappear if you change the world's tendency to pure white. The roost is also home to the Ring of Great Strength and the Purple Flame Shield.
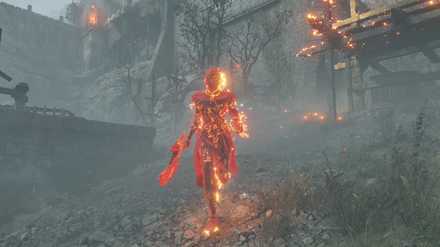
⑧ Hoplites

Beware when approaching these creatures. They have a shield in their head(?) and a spear that can easily poke you if you try to fight it upfront. It's weak to fire so use firebombs or roll past it and attack it from behind.
Boss: Phalanx
 | |
| HP | Drop |
|---|---|
| 1150 | Lead Demon Soul Effects and How to Get |
| Tips | |
| Use Firebombs and/or Pine Resin. | |
1-1: Boletarian Palace Tips and Tricks
| ★Tips Summary★ |
|---|
Be Careful When Entering Closed Areas
After clearing the starting area and entering the barracks, a Dregling will ambush you from the side. Always be careful when entering areas like this. You can approach slowly and slide the camera sideways to spot enemies hiding on the sides.
Roll Through Barrels to Destroy Them Quickly
Instead of attacking barrels, you can roll through them to quickly get through the minor obstacle instead of wasting time attacking them.
Always Ready Your Shield
Already mentioned on our Tutorial guide. Always raise your shield to avoid potential surprise attacks from enemies. Specially useful in dark areas.
Make Sure to Get the Pine Resin and Some Firebombs
Phalanx (the boss of the area) is extremely weak to fire attacks. Having some firebombs, a Pine Resin, and maybe even some fire spells will greatly aid you in the fight.
Path to Executioner's Grounds
The Executioner's Grounds can only be accessible by having a pure world tendency (either black or white would work). Executioner Miralda in her human or black phantom form can be found here depending on the world tendency and several items can also be looted in the area.
The Mausoleum Key
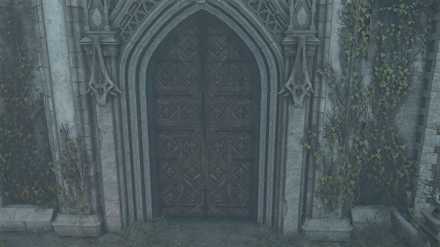
The Mausoleum Key is used to open the door thas is behind the Red Eye Knight on the path near the 2nd Fog Gate. Old King Doran makes his home in this area and his challenge can be completed to gain Demonbrandt which doubles it's damage when you have pure white character tendency. He can also be slain to get the Ancient King's Set and the Eternal Warrior's Ring.
1-1: Boletarian Palace NPCs
Ostrava of Boletaria
| HP | Acquired Soul |
|---|---|
| 900 | 550 |
| Dropped Items | |
| Mausoleum key | |
Ostrava can be encountered after entering the second fog. Instead of following the path, jump from the ledge to see him surrounded by a lot of Dreglings. Defeat them to save Ostrava. He can also potentially fall from the enemies so aiding him by clearing the enemies in the area guarantees his survival (for now).
Where to Find Ostrava of Boletaria
Executioner Miralda
| HP | Acquired Soul |
|---|---|
| 950 | 4550 |
| Dropped Items | |
| Binded Armor Set, Master's Ring | |
Only Appears in Pure White World Tendency
To make Executioner Miralda appear, the World tendency needs to be pure white.
Where to Find Executioner Miralda
Black Phantom Miralda
 |
|
| HP | Acquired Soul |
|---|---|
| 1900 | 7550 |
| Dropped Items | |
| Guillotine Axe | |
Only Appears in Pure Black World Tendency
Similar to the pure white world tendency, making Boletarian Palace reach pureblack world tendency will cause a black phantom version of Miralda appear.
Dregling
Items For Sale
| Item | Soul | Item | Soul |
|---|---|---|---|
| Crescent Moon Grass | 100 | Half Moon Grass | 400 |
| Fire Bomb | 500 | Soldier's Lotus | 200 |
| Long Sword | 1500 | Club | 500 |
| Short Spear | 1500 | Light Crossbow | 2000 |
| Wooden Shield | 500 | Soldier's Shield | 1000 |
| Slave's Shield | 100 | Wooden Bolt | 10 |
| Plate Helmet | 1000 | Coat of Plate | 1500 |
| Plate Gauntlet | 1200 | Plate Leggings | 1200 |
The Dregling is your friendly merchant in the entirety of Boletarian Palce. His wares will also prove useful if you still haven't cleared the Phalanx since his items are the only things you can get with souls at this point in time.
1-1: Boletarian Palace Items
Demon's Souls Remake Related Links
All Story Levels
Author
1-1: Boletarian Palace Story Walkthrough and Map
Please participate in our site
improvement survey
03/2026
improvement survey
03/2026
Would you assist in
improving Game8's site?
improving Game8's site?

×
We are listening to our users' valuable opinions and discussing how to act on them.
The information collected through this survey will be used for the purpose of improving our services. In addition, the information will only be disclosed a part of a statistic in a format that will not allow identification of personal information.
Begin Survey
Not Now
×
Please rate each item regarding Game8.co's Advertisements.
Amount of Ads
Very Dissatisfied
Somewhat Dissatisfied
Fine
Somewhat Satisfied
Highly Satisfied
Placement of Ads
Timing of Ad Display
Ad Loading Speed
Safeness of Ads
Content of Ads
×
Please rate each item regarding Game8.co's Quality of Articles.
Amount of information
Very Dissatisfied
Somewhat Dissatisfied
Fine
Somewhat Satisfied
Highly Satisfied
Frequency of updates
Speed of new information
Accuracy of articles
Understandibility of articles
Readability of sentences
×
Please rate each item regarding Game8.co's Usability of the Site.
Ease of finding information
Very Dissatisfied
Somewhat Dissatisfied
Fine
Somewhat Satisfied
Highly Satisfied
Loading Speed
Use of Color
Font Size
Visibility of Images
Easy to Understand Layout
×
Please rate each item regarding Game8.co's Message Boards, Comments.
Ease of Writing
Very Dissatisfied
Somewhat Dissatisfied
Fine
Somewhat Satisfied
Highly Satisfied
Readability
Ease in Finding Information
Comment Quality
Comment Quantity
Admin Response
×
Please rate each item regarding Game8.co's Site's new design.
Please rate our site's new design
Very Dissatisfied
Somewhat Dissatisfied
Fine
Somewhat Satisfied
Highly Satisfied
Do you think that the website's design change makes the site easier to use?
Has the new design made it easier for you to find information on the site?
Has the new design improved the overall visual appeal of the site?
How would you rate your overall satisfaction with the new design of the site?
×
How likely are you to recommend Game8 to someone you know?
Very Unlikely
0
1
2
3
4
5
6
7
8
9
10
Very Likely
If you have other opinions regarding potential improvement to the website, please share them with us. We would appreciate your honest opinion.
Note: This is a free response section, so you can proceed without entering anything.
Note: Please be sure not to enter any kind of personal information into your response.
Note: Please be sure not to enter any kind of personal information into your response.
×
Thank You
×
Thank you for participating in our survey! Your answers will help us to improve the quality of our website and services.
We hope you continue to make use of Game8.
We hope you continue to make use of Game8.
Close
Rankings
- We could not find the message board you were looking for.
Gaming News


Popular Games

Genshin Impact Walkthrough & Guides Wiki
Honkai: Star Rail Walkthrough & Guides Wiki
Umamusume: Pretty Derby Walkthrough & Guides Wiki
Pokemon Pokopia Walkthrough & Guides Wiki
Resident Evil Requiem (RE9) Walkthrough & Guides Wiki
Monster Hunter Wilds Walkthrough & Guides Wiki
Wuthering Waves Walkthrough & Guides Wiki
Arknights: Endfield Walkthrough & Guides Wiki
Pokemon FireRed and LeafGreen (FRLG) Walkthrough & Guides Wiki
Pokemon TCG Pocket (PTCGP) Strategies & Guides Wiki


Recommended Games
Diablo 4: Vessel of Hatred Walkthrough & Guides Wiki
Fire Emblem Heroes (FEH) Walkthrough & Guides Wiki
Yu-Gi-Oh! Master Duel Walkthrough & Guides Wiki
Super Smash Bros. Ultimate Walkthrough & Guides Wiki
Pokemon Brilliant Diamond and Shining Pearl (BDSP) Walkthrough & Guides Wiki
Elden Ring Shadow of the Erdtree Walkthrough & Guides Wiki
Monster Hunter World Walkthrough & Guides Wiki
The Legend of Zelda: Tears of the Kingdom Walkthrough & Guides Wiki
Persona 3 Reload Walkthrough & Guides Wiki
Cyberpunk 2077: Ultimate Edition Walkthrough & Guides Wiki


All rights reserved
©2009, 2020 Sony Interactive Entertainment Inc. Demon’s Souls is a trademark of Sony Interactive Entertainment Inc.
The copyrights of videos of games used in our content and other intellectual property rights belong to the provider of the game.
The contents we provide on this site were created personally by members of the Game8 editorial department.
We refuse the right to reuse or repost content taken without our permission such as data or images to other sites.