This survey will take about 1 minute.
Your answers will help us to improve our website.
Demon's Souls PS5
3-1: Tower of Latria Story Walkthrough and Map
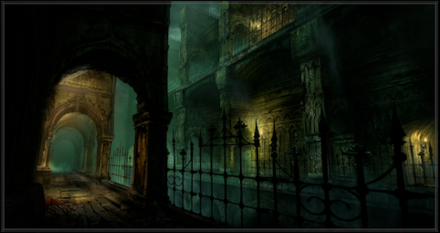
This is the story walkthrough for 3-1: Tower of Latria in the Demon's Souls Remake (DS) for PS5. Keep reading for maps, tips on how to complete this stage, a list of NPCs, and items that can be found!
| Archstone of the Tower Queen | ||
|---|---|---|
| 3-1: Tower of Latria Archstone | 3-2: Fool's Idol Archstone | 3-3: Maneater Archstone |
List of Contents
3-1: Tower of Latria Story Walkthrough
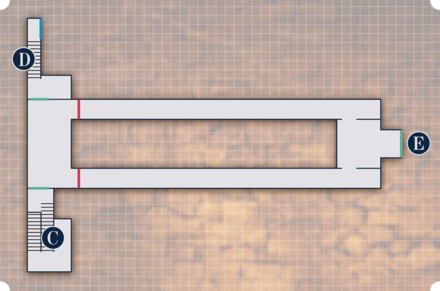
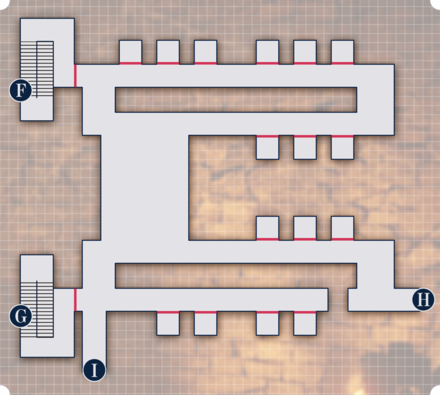
Map
| Floor 3 | Floor 4 |
|---|---|
 |
 |
| Warden's Hall | Floor 2 |
 |
 |
| Floor 1 | Path to Cathedral |
 |
 |
| Map 7 | |
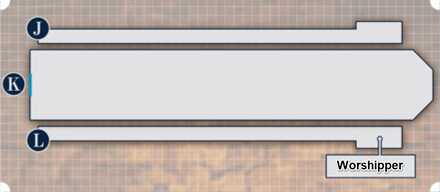 |
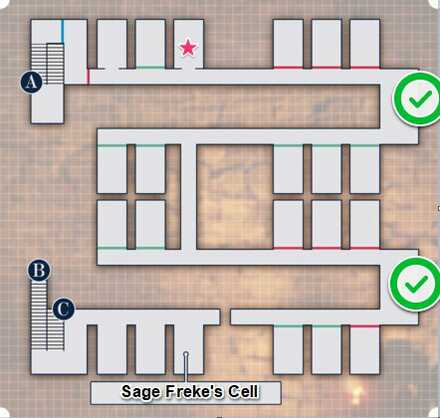
The ★ indicates the Archstone (aka, your starting spot). The Blue lines represents fog, the red lines are unlockable doors via keys and the greenlines are doors that don't require a key.
Walkthrough Chart
| ① | You'll begin in one of the cells in the Tower of Latria, your first goal is to get the Prison of Hope 3F Key and Cell Key. (Keys Locations) Beware of the Mind Flayers in the area, they can deal damage from long range and has access to an AOE attack when you're near it. |
|---|---|
| ② | After getting through the fog, your next goal is to get the Prison of Hope 4F Keys. You'll need to get through a room with some Iron Maidens to reach it. There are several traps on floor 2. Refer to our floor 2 traps and keys section for a detailed guide about floor 2. |
| ③ | After clearing floor 2, open the locked door on the last section of the area to head back to floor 3 but this time, on the opposite side. On this area, you can find Sage Freke and another stairs leading to the 2nd floor. Not much to do here right now since you still don't have the key to his cell. |
| ④ | Head downstairs and take the key to Prison of Hope 1F Key and Cell Key. The two games leading deeper into floor 2 is locked so proceed to floor 2 (this is not the 2nd floor of the tower) |
| ⑤ | This floor is a short one. You can encounter one Mind Flayer and Rydell. Aside from that, nothing else noteworth (Rydell's cell cannot be opened yet) so proceed to the 1st floor. |
| ⑥ | On the first floor, you can find a Prisoner Horde. It's a huge mass of prisoner and can attack in a 360 angle and launch magic from a far. It's the only threat on floor 1 but it can be difficult to beat recklessly. Prisoner Horde is also highly resistant to magic so go for a bow if you can. |
| ⑦ | After defeating the Prisoner Horde, head to Marker I on the Floor 1 map. Head outside for a short cutscene. Head to the path where the Ironmaiden is shooting it's arrows then take the loot from the corpse just barely outside it's firing range. It is possible to go through here by timing the invisibility frames of your dodges through the Iron Maiden's arrows. Reaching the end lies a lever you can use to disable the Iron Maiden. |
| ⑧ | Backtrack your way back to the Warden's Hall (the place where you took the 1F keys) and open the previously locked gates with the Warden's key. The end's path leads to the upperfloor just outside the tower (same area where the iron maiden ballista is located) |
| ⑨ | Make your way through the fog and disable the Ballista. On the 2nd spiral tower lies the path that leads towards the Worshipper and a special Key. Take the key and kill the Worshipper. The worshipper will revive the area's boss so make sure to kill him before tackling the boss fight. |
| Optional | With the Special Key, return to Sage Freke's cell to free him. |
| ⑩ | Return to the area where the Ballista is located then make your way towards the cathedral (the wide path) Beware of a Black Phantom in the area. She uses a dagger so beware of a parry and a backstab. |
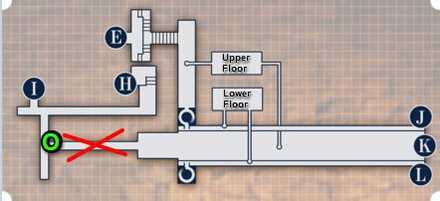
① Key Locations
To find the 2 keys, refer to the image above, The orange markers mark the Prison of Hope 3F Cell Key and Prison of Hope 3F Key (the Cell Key is the one that's closer to the Archstone).
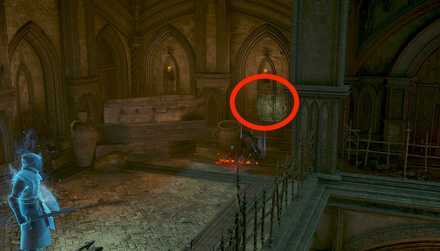
The Keys can easily be spotted on the walls of floor 1.
② Floor 4 Traps
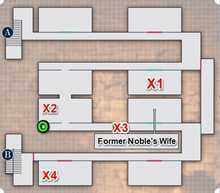
- X1 - An area that has a lootable corpse. The corpse is surrounded by Dreglings.
- X2- An Ironmaiden with a live Dregling.
- X3-A broken platform that can make you fall to your death or to Floor 1.
- X4- Another living Dregling inside an Iron maiden. The Ironmaiden can easily be identified since it's the one separated from the 3 Ironmaidens.
The Green circle refers to the Prison of Hope 4F Key and Cell Key.
④ Floor 1 Keys
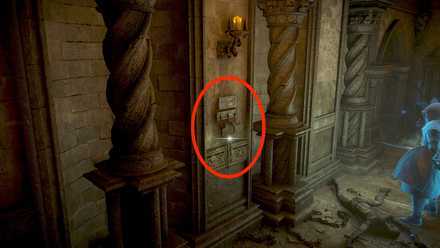
The key for Floor 1 are found just outside the Warden's Hall. Make sure to grab these keys.
Warden's Hall Key
The Warden's Key is necessary to proceed to the Boss area (the normal way). The key can be obtained just at the end of the Iron Maiden Ballista's firing range. Loot the corpse just outside the ballista's range to get it.
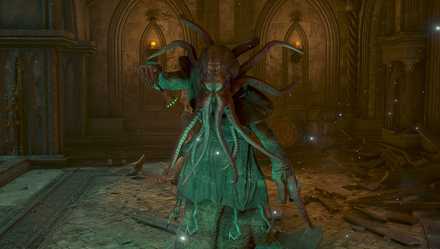
Boss: Fool's Idol
 |
|
| HP (NG) | Dropped Items |
|---|---|
| 1365 | Doll Demon Souls |
| Walkthrough | |
| Make sure to defeat the Worshipper before this boss fight! | |
3-1: Tower of Latria Tips and Tricks
| ★Tips Summary★ |
|---|
Beware of the Mind Flayers
Mind Flayers are your main enemies in the Tower of Latria 3-1. They act as a prison keeper of sorts and can use a ranged attack that will paralyze you. While paralyzed, they can grab you for lethal damage. They can also use a wide 360-degree attack that damages and knock backs targets.
Tread Lightly To Avoid Pitfalls
There are several broken ledges that can make you fall to lower floors or cause your death with the latter happening more frequently. Caution is the game when exploring the Tower of Latria. Refer to our map section to avoid these dangerous falls.
The Ballista's Arrows Can Be Dodged
The Ballista's arrows can be dodged using the invincibility frames from your roll. You need to do this to obtain the Time for Rolling Trophy.
Obtain a Mercury Rapier +1
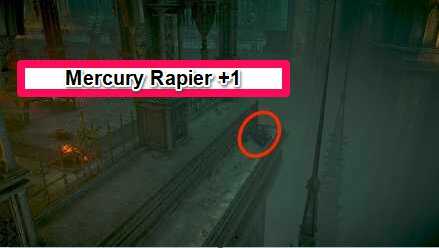
At the area with the Iron Maiden Ballista, you can tread the sides of the path by entering the broken fence. At the end of the path, you can loot a corpse that contains a Mercury Rapier +1. It's a rapier that has poison attribute and it can be used greatly against enemies with huge HP pools like the Bearbugs in 2-1.
3-1: Tower of Latria NPCs
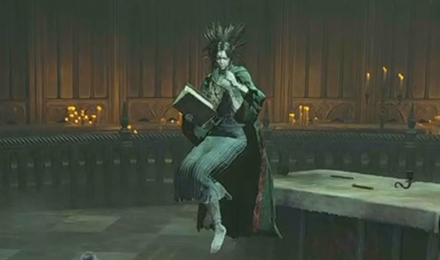
Sage Freke, the Visionary
 |
|
| HP | Souls |
|---|---|
| 430 | 770 |
| Dropped Items | |
| Ring of Magical Sharpness, Venerable Sage Set, and Baby's Nail. | |
Sir Rydell
| HP | Souls |
|---|---|
| 810 | 820 |
| Dropped Items | |
| Clever Rat's Ring | |
Rydell's Black Phantom
| HP | Souls |
|---|---|
| 2200 | 3570 |
| Dropped Items | |
| Phosphorescent Pole | |
Unnamed Black Phantom
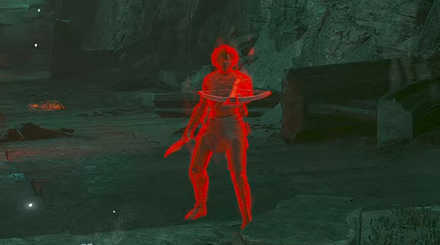
The Unnamed Black Phantom uses a Crossbow and a Dagger. You can attempt for a quick backstab after it uses it's crossbow for a cheesy fight. You should also be careful about it's dagger, it can go for a Riposte or a Backstab if you're not careful.
Royal's Wife
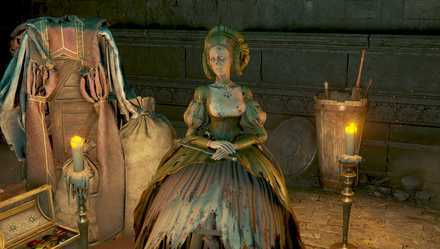 |
|
| HP | Souls |
|---|---|
| 2200 | 3570 |
| Dropped Items | |
| Phosphorescent Pole | |
| Item | Price | Item | Price |
|---|---|---|---|
| Full Moon Grass | 1300 | Fresh Spice | 200 |
| Old Spice | 1000 | Royal's Lotus | 400 |
| Widow's Lotus | 1000 | Augite of Guidance | 50 |
| Shard of Moonlight | 3000 | Rapier | 1500 |
| Wooden Catalyst | 1000 | Buckler | 1500 |
| Black Bolt | 100 | Ring of Avarice | 50000 |
3-1: Tower of Latria Items
Demon's Souls Remake Related Links

All Story Levels
Author
3-1: Tower of Latria Story Walkthrough and Map
Please participate in our site
improvement survey
03/2026
improvement survey
03/2026
Would you assist in
improving Game8's site?
improving Game8's site?

×
We are listening to our users' valuable opinions and discussing how to act on them.
The information collected through this survey will be used for the purpose of improving our services. In addition, the information will only be disclosed a part of a statistic in a format that will not allow identification of personal information.
Begin Survey
Not Now
×
Please rate each item regarding Game8.co's Advertisements.
Amount of Ads
Very Dissatisfied
Somewhat Dissatisfied
Fine
Somewhat Satisfied
Highly Satisfied
Placement of Ads
Timing of Ad Display
Ad Loading Speed
Safeness of Ads
Content of Ads
×
Please rate each item regarding Game8.co's Quality of Articles.
Amount of information
Very Dissatisfied
Somewhat Dissatisfied
Fine
Somewhat Satisfied
Highly Satisfied
Frequency of updates
Speed of new information
Accuracy of articles
Understandibility of articles
Readability of sentences
×
Please rate each item regarding Game8.co's Usability of the Site.
Ease of finding information
Very Dissatisfied
Somewhat Dissatisfied
Fine
Somewhat Satisfied
Highly Satisfied
Loading Speed
Use of Color
Font Size
Visibility of Images
Easy to Understand Layout
×
Please rate each item regarding Game8.co's Message Boards, Comments.
Ease of Writing
Very Dissatisfied
Somewhat Dissatisfied
Fine
Somewhat Satisfied
Highly Satisfied
Readability
Ease in Finding Information
Comment Quality
Comment Quantity
Admin Response
×
Please rate each item regarding Game8.co's Site's new design.
Please rate our site's new design
Very Dissatisfied
Somewhat Dissatisfied
Fine
Somewhat Satisfied
Highly Satisfied
Do you think that the website's design change makes the site easier to use?
Has the new design made it easier for you to find information on the site?
Has the new design improved the overall visual appeal of the site?
How would you rate your overall satisfaction with the new design of the site?
×
How likely are you to recommend Game8 to someone you know?
Very Unlikely
0
1
2
3
4
5
6
7
8
9
10
Very Likely
If you have other opinions regarding potential improvement to the website, please share them with us. We would appreciate your honest opinion.
Note: This is a free response section, so you can proceed without entering anything.
Note: Please be sure not to enter any kind of personal information into your response.
Note: Please be sure not to enter any kind of personal information into your response.
×
Thank You
×
Thank you for participating in our survey! Your answers will help us to improve the quality of our website and services.
We hope you continue to make use of Game8.
We hope you continue to make use of Game8.
Close
Rankings
- We could not find the message board you were looking for.
Gaming News


![Everwind Review [Early Access] | The Shaky First Step to A Very Long Journey](https://img.game8.co/4440226/ab079b1153298a042633dd1ef51e878e.png/thumb)

![Monster Hunter Stories 3 Review [First Impressions] | Simply Rejuvenating](https://img.game8.co/4438641/2a31b7702bd70e78ec8efd24661dacda.jpeg/thumb)
Popular Games

Genshin Impact Walkthrough & Guides Wiki
Honkai: Star Rail Walkthrough & Guides Wiki
Umamusume: Pretty Derby Walkthrough & Guides Wiki
Pokemon Pokopia Walkthrough & Guides Wiki
Resident Evil Requiem (RE9) Walkthrough & Guides Wiki
Monster Hunter Wilds Walkthrough & Guides Wiki
Wuthering Waves Walkthrough & Guides Wiki
Arknights: Endfield Walkthrough & Guides Wiki
Pokemon FireRed and LeafGreen (FRLG) Walkthrough & Guides Wiki
Pokemon TCG Pocket (PTCGP) Strategies & Guides Wiki


Recommended Games
Diablo 4: Vessel of Hatred Walkthrough & Guides Wiki
Fire Emblem Heroes (FEH) Walkthrough & Guides Wiki
Yu-Gi-Oh! Master Duel Walkthrough & Guides Wiki
Super Smash Bros. Ultimate Walkthrough & Guides Wiki
Pokemon Brilliant Diamond and Shining Pearl (BDSP) Walkthrough & Guides Wiki
Elden Ring Shadow of the Erdtree Walkthrough & Guides Wiki
Monster Hunter World Walkthrough & Guides Wiki
The Legend of Zelda: Tears of the Kingdom Walkthrough & Guides Wiki
Persona 3 Reload Walkthrough & Guides Wiki
Cyberpunk 2077: Ultimate Edition Walkthrough & Guides Wiki


All rights reserved
©2009, 2020 Sony Interactive Entertainment Inc. Demon’s Souls is a trademark of Sony Interactive Entertainment Inc.
The copyrights of videos of games used in our content and other intellectual property rights belong to the provider of the game.
The contents we provide on this site were created personally by members of the Game8 editorial department.
We refuse the right to reuse or repost content taken without our permission such as data or images to other sites.