This survey will take about 1 minute.
Your answers will help us to improve our website.
Demon's Souls PS5
5-1: Valley of Defilement Story Walkthrough and Map
This is the story walkthrough for 5-1: Valley of Defilement in the Demon's Souls Remake (DS) for PS5. Keep reading for maps, tips on how to complete this stage, a list of NPCs, and items that can be found!
| Archstone of the Chieftain | ||||||||||||||||||||||
|---|---|---|---|---|---|---|---|---|---|---|---|---|---|---|---|---|---|---|---|---|---|---|
| 5-1: Valley of Defilement | 5-2: Leechmonger Archstone | 5-3: Dirty Colossus Archstone | ||||||||||||||||||||
List of Contents
5-1: Valley of Defilement Story Walkthrough
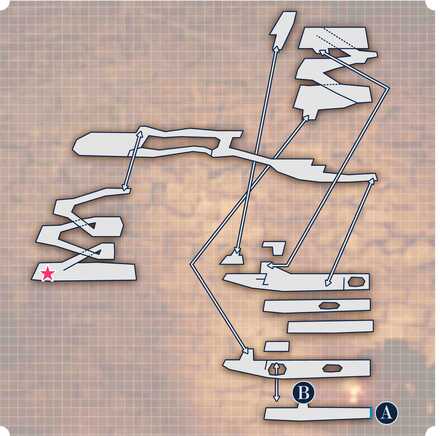
Map
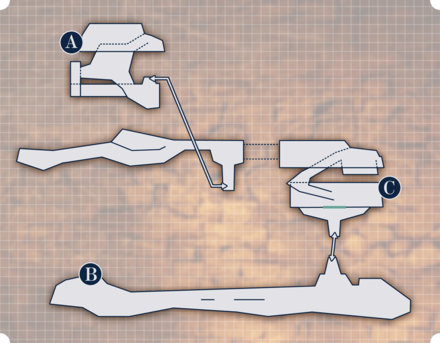
| Starting Area | Second Area (After 1st Fog Gate) |
|---|---|
 |
 |
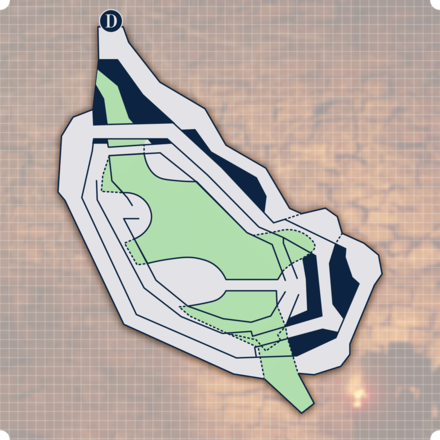
| Bottom Area | Leechmonger |
 |
 |
Walkthrough Chart
| Note | Prepare some Lotuses (Royal and Widow) as well as several firebombs for dealing with enemies (most enemies in the Valley of Defilement are weak to fire). Focus on surviving and clearing enemies one by one and reach the boss as the Leechmonger is fairly easy to beat. |
|---|---|
| ① | At the starting area, you'll first have to make your way up. But your main focus on this stage is to head deeper. Head upward and eliminate the depraved one at your path. This will be the most common variant of enemy you'll fight. Some will wield a flaming pike and some will be larger and more durable and wields a club. |
| ② | After making it up, cross the bridge to your left. From there, you can start making your way downward. Here, you'll fight your first depraved one with a flaming pike. You can repel their attacks with a shield by blocking it. This will make them vulnerable and easy to kill. |
| ③ | After crossing the bridge, you can either use the ladder to go down or jump to the platform infront to get an item |
| ④ | Jump down the platform (or the ladder depending on which route you chose) then clear the Depraved Ones. After that, you can either push the platform to make open a new pathand take some loots or jump down the hole to continue traversing the Valley. |
| ⑤ | Whichever path you chose, when proceeding to the area before the 1st fog, check the platforms below before jumping. The last platform is infested with several Depraved Ones. Dispatching them with bows or firebombs is recommended.Using manual aim is not recommended when attacking them above due to the way Demon's Souls' aim mechanics works so use auto-lock instead. |
| ⑥ | Once on the most bottom part, you can either traverse the fog to proceed as normal or jump through the extended platform. We recommend jumping since you get the Blessed Mace on that area which can give a passive health regen when equipped.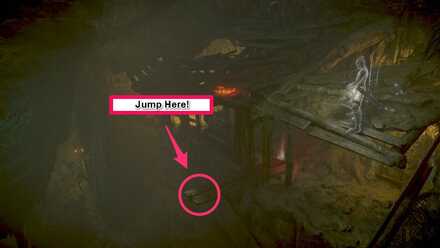 when jumping through the platform, jump forward and do not sprint! |
| If you went through the fog, refer to the steps marked as A and refer to B if you did use the platform to jump | |
| ⑦A | Keep heading down while dispatching enemies. When you reach the area with a bridge conencting to the opposite platforms, head the opposite path. At the end lies a corpse with the Saint's armor set This is the only notable item in this area. If you took path B, this is the only item worth backtracking to get. |
| ⑧A | Use the bridge then dispatch the Depraved Ones and the ticks. You'll also encounter your first giant Depraved One. Lure it on a wide area so you can dodge it's attacks and slowly chip away at it's life. |
| ⑦B | You are now at the second area, your main goal is to head to point C as shown on the 2nd map. The path is faily straight forward from point B (jumping) so make your way forward while dispatching enemies. Beware of the giant red ticks, they deal damage when attacked in close proximity while in expanded form. |
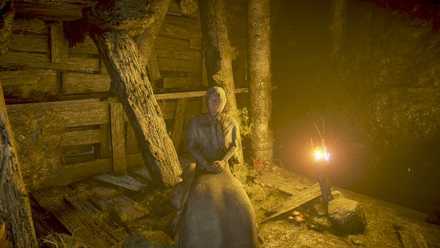
| ⑧B | Once done, push the platform to get to the next area. Prepare some firebombs or other AOE attack to dispatch the plague rats on the opposite end Heading above, you'll find the Filthy Woman. Her wares are expensive but she's the only one who sells Rotten Arrows. |
| The separated path unites here. | |
| ⑨ | You're now at the 3rd map. You'll immediately see a Giant on the distance and several other Depraved Ones. Lure them one by one on the area beneath the Filthy Woman so you can have some space to dodge attacks. |
| ⑩ | Head further, from here, head above then eliminate the ticks. At the opposite side of the bridge rests a Giant and several other Depraved Ones. Again, lure them on your current area then dispatch them one by one. |
| ⑪ | Head to the opposite side then descend to meet the Leechmonger. |
⑦ A & B
Two small differing steps depending on if you jumped through the shortcut near the first fog gate or when through it. Refer to Guide A if you didn't jump and B if you did.
⑧ B Platform
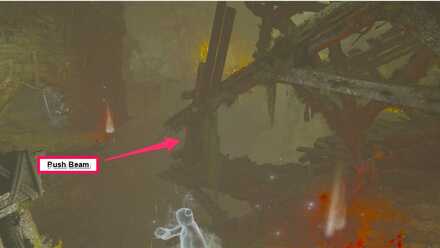
After getting the mace, push the beam to head to the area beneath the Filthy Lady. Beware of the rats though, you can use firebombs to dispatch their group.
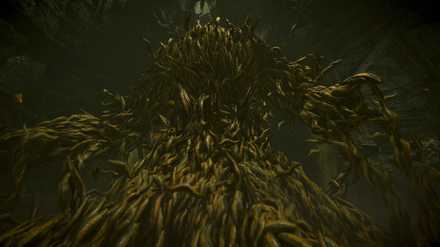
Boss: Leechmonger
 |
|
| HP (NG) | Dropped Items |
|---|---|
| 2047 | Writhing Demon Soul |
| Walkthrough | |
| Use Fire Attacks to exploit it's weakness. | |
5-1: Valley of Defilement Tips and Tricks
| ★Tips Summary★ |
|---|
Play It Slowly And Survive!
The stage will be difficulty, thankfully, the boss of the area, Leechmonger, isn't. Focus on surviving and taking it slowly to reach the boss. Once you encounter the fog to the boss room, you can consider 5-1 to be completed.
Bring Firebombs and Other Means of Ranged Damage
Enemies in the Valley are weak to fire, to further that, there are also several platforms. You can abuse the elevation advantage to snipe enemies from higher platforms. It might be hard to use manual aim at close range though so use auto-lock feature if it allows it.
Leechmonger Is A Simple Damage Check
The Leechmonger offers little ways to defeat you. It can use some annoying ranged attacks and an extremely slow but high damaging melee attacks. If your damage is high enough, just focus on survivability to get to the boss area.
5-1: Valley of Defilement NPCs
Filthy Woman
 |
|
| HP | Soul |
|---|---|
| 350 | 22 |
| Drops | |
| None | |
5-1: Valley of Defilement Items
| Talisman of God | Saint's Armor Set | Morning Star |
| Blessed Mace | Istarelle (Pure White World Tendency) |
Demon's Souls Remake Related Links
All Story Levels
Author
5-1: Valley of Defilement Story Walkthrough and Map
Please participate in our site
improvement survey
03/2026
improvement survey
03/2026
Would you assist in
improving Game8's site?
improving Game8's site?

×
We are listening to our users' valuable opinions and discussing how to act on them.
The information collected through this survey will be used for the purpose of improving our services. In addition, the information will only be disclosed a part of a statistic in a format that will not allow identification of personal information.
Begin Survey
Not Now
×
Please rate each item regarding Game8.co's Advertisements.
Amount of Ads
Very Dissatisfied
Somewhat Dissatisfied
Fine
Somewhat Satisfied
Highly Satisfied
Placement of Ads
Timing of Ad Display
Ad Loading Speed
Safeness of Ads
Content of Ads
×
Please rate each item regarding Game8.co's Quality of Articles.
Amount of information
Very Dissatisfied
Somewhat Dissatisfied
Fine
Somewhat Satisfied
Highly Satisfied
Frequency of updates
Speed of new information
Accuracy of articles
Understandibility of articles
Readability of sentences
×
Please rate each item regarding Game8.co's Usability of the Site.
Ease of finding information
Very Dissatisfied
Somewhat Dissatisfied
Fine
Somewhat Satisfied
Highly Satisfied
Loading Speed
Use of Color
Font Size
Visibility of Images
Easy to Understand Layout
×
Please rate each item regarding Game8.co's Message Boards, Comments.
Ease of Writing
Very Dissatisfied
Somewhat Dissatisfied
Fine
Somewhat Satisfied
Highly Satisfied
Readability
Ease in Finding Information
Comment Quality
Comment Quantity
Admin Response
×
Please rate each item regarding Game8.co's Site's new design.
Please rate our site's new design
Very Dissatisfied
Somewhat Dissatisfied
Fine
Somewhat Satisfied
Highly Satisfied
Do you think that the website's design change makes the site easier to use?
Has the new design made it easier for you to find information on the site?
Has the new design improved the overall visual appeal of the site?
How would you rate your overall satisfaction with the new design of the site?
×
How likely are you to recommend Game8 to someone you know?
Very Unlikely
0
1
2
3
4
5
6
7
8
9
10
Very Likely
If you have other opinions regarding potential improvement to the website, please share them with us. We would appreciate your honest opinion.
Note: This is a free response section, so you can proceed without entering anything.
Note: Please be sure not to enter any kind of personal information into your response.
Note: Please be sure not to enter any kind of personal information into your response.
×
Thank You
×
Thank you for participating in our survey! Your answers will help us to improve the quality of our website and services.
We hope you continue to make use of Game8.
We hope you continue to make use of Game8.
Close
Rankings
- We could not find the message board you were looking for.
Gaming News


![Monster Hunter Stories 3 Review [First Impressions] | Simply Rejuvenating](https://img.game8.co/4438641/2a31b7702bd70e78ec8efd24661dacda.jpeg/thumb)

Popular Games

Genshin Impact Walkthrough & Guides Wiki
Honkai: Star Rail Walkthrough & Guides Wiki
Umamusume: Pretty Derby Walkthrough & Guides Wiki
Pokemon Pokopia Walkthrough & Guides Wiki
Resident Evil Requiem (RE9) Walkthrough & Guides Wiki
Monster Hunter Wilds Walkthrough & Guides Wiki
Wuthering Waves Walkthrough & Guides Wiki
Arknights: Endfield Walkthrough & Guides Wiki
Pokemon FireRed and LeafGreen (FRLG) Walkthrough & Guides Wiki
Pokemon TCG Pocket (PTCGP) Strategies & Guides Wiki


Recommended Games
Diablo 4: Vessel of Hatred Walkthrough & Guides Wiki
Fire Emblem Heroes (FEH) Walkthrough & Guides Wiki
Yu-Gi-Oh! Master Duel Walkthrough & Guides Wiki
Super Smash Bros. Ultimate Walkthrough & Guides Wiki
Pokemon Brilliant Diamond and Shining Pearl (BDSP) Walkthrough & Guides Wiki
Elden Ring Shadow of the Erdtree Walkthrough & Guides Wiki
Monster Hunter World Walkthrough & Guides Wiki
The Legend of Zelda: Tears of the Kingdom Walkthrough & Guides Wiki
Persona 3 Reload Walkthrough & Guides Wiki
Cyberpunk 2077: Ultimate Edition Walkthrough & Guides Wiki


All rights reserved
©2009, 2020 Sony Interactive Entertainment Inc. Demon’s Souls is a trademark of Sony Interactive Entertainment Inc.
The copyrights of videos of games used in our content and other intellectual property rights belong to the provider of the game.
The contents we provide on this site were created personally by members of the Game8 editorial department.
We refuse the right to reuse or repost content taken without our permission such as data or images to other sites.