How to Solve All Speed Booster and Shinespark Puzzles
Check out our Metroid Prime 4: Beyond Walkthrough!
☆ Dread Rush | Boss Rush | Survival Rush | Practice
★ Speedrun and Sequence Breaks Guide
☆ Locations: Missile Tanks / Energy Tanks / Power Bomb Tanks
Using the Speed Booster ability to Shinespark is required to get many items locked behind Speed Booster Blocks. This guide will cover how to solve all Speed Booster and Shinespark puzzles found in each area of Metroid Dread!
List of Contents
All Speed Booster and Shinespark Puzzles
Artaria Speed Booster Puzzles
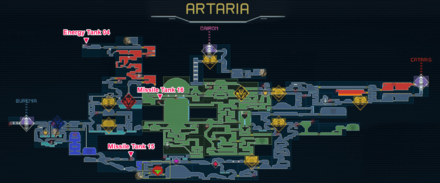
Missile Tank 15 (Missile+ Tank)
| How to Solve |
|---|
 |
| Map Location |
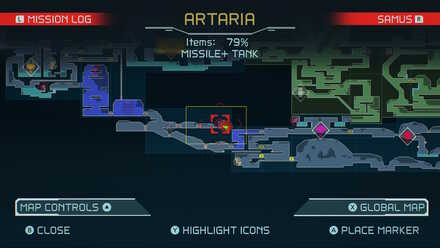 |
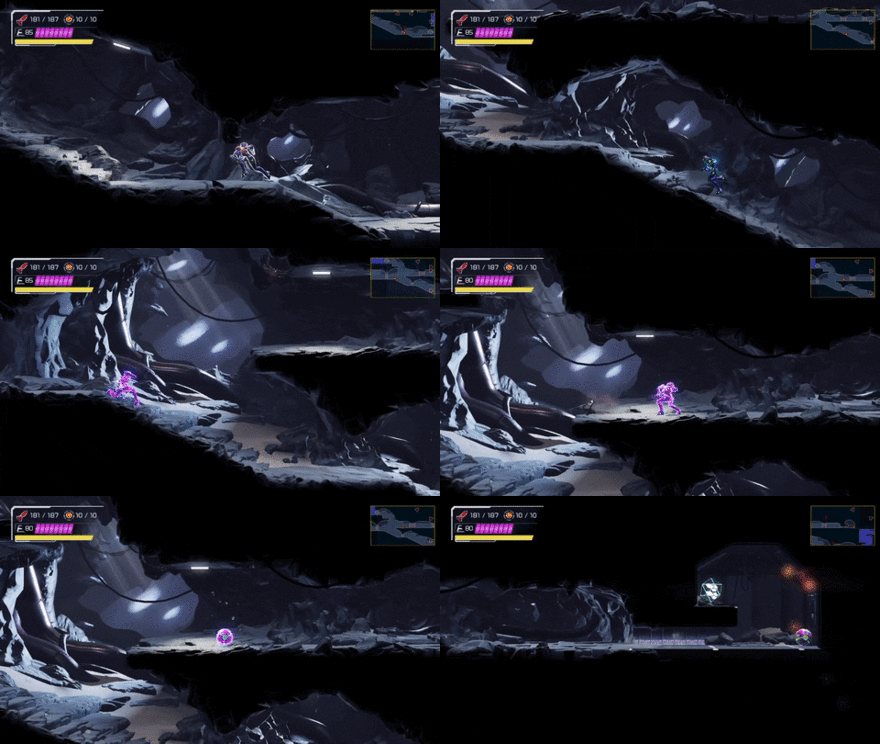
Use the Speed Booster below to charge up and store your Shinespark. Once stored, jump up onto the ledge above and then use the Shinespark while in the Morph Ball mode. This will break the Speed Booster Block and bring you right underneath the Missile+ Tank.
Energy Tank 04
| How to Solve |
|---|
 |
| Map Location |
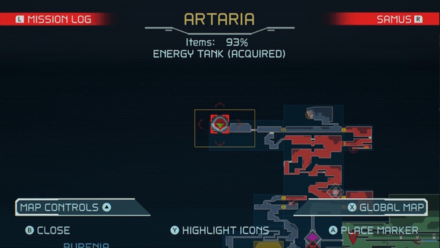 |
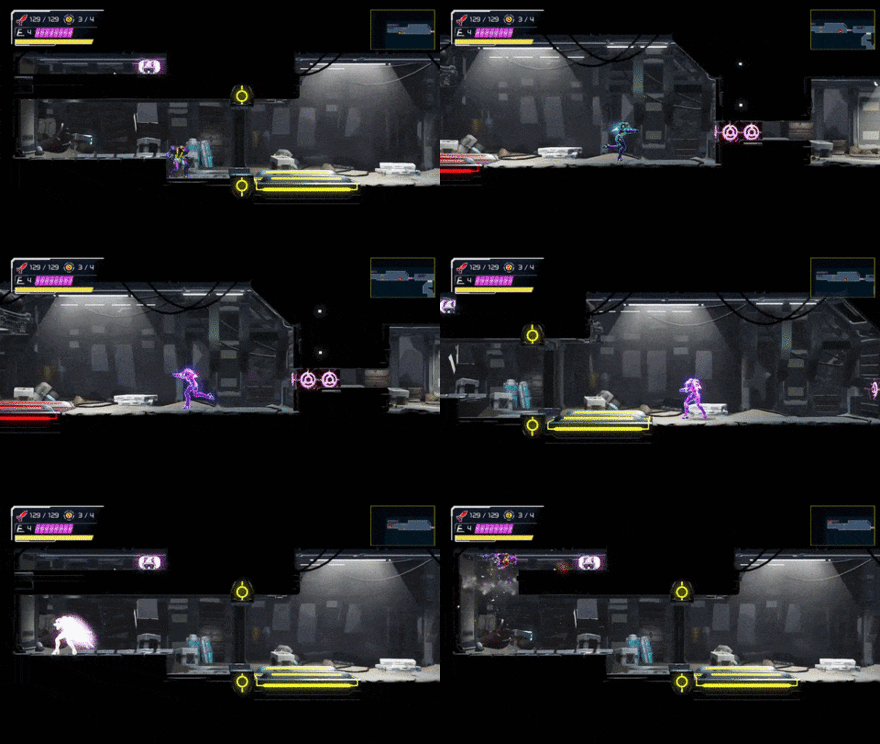
Inside the room, you will want to use your Speed Booster just past the upper ledge. Before you hit the wall with the Bomb Blocks, store your Shinespark. Once stored, use Flash Shift to get past the Shutter Platform and to get inside.
Missile Tank 16
| How to Solve |
|---|
 |
| Map Location |
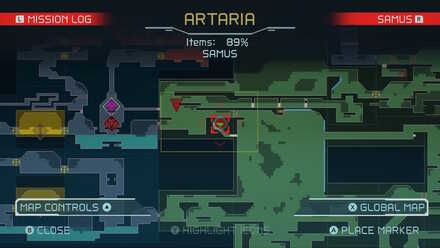 |
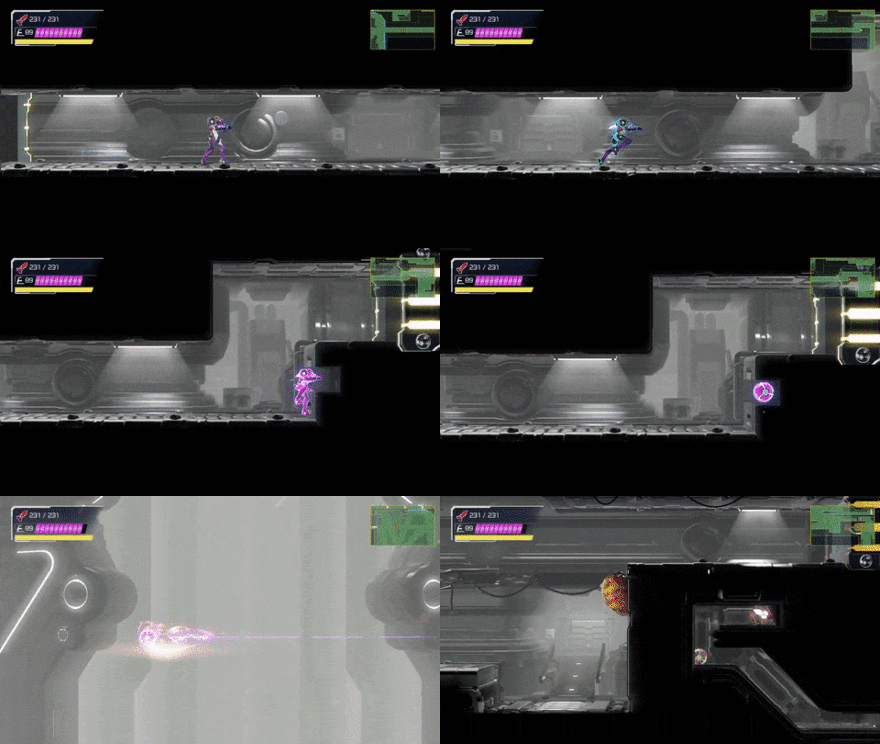
Use the Speed Booster and store your Shinespark just before you hit the wall. Climb in the small gap and use Shinespark while in Morph Ball mode and travel to the left. As you're flying, make sure to hold the left analog stick to the left. You will need to do this to keep your momentum going to the left and break the remaining blocks leading to the Missile Tank.
Cataris Speed Booster Puzzles
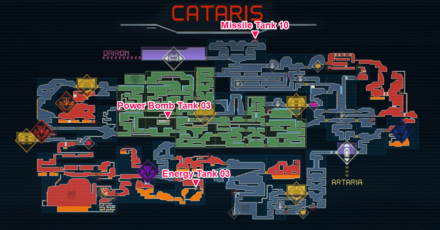
Missile Tank 10
| How to Solve |
|---|
 |
| Map Location |
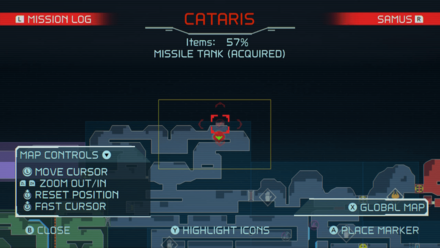 |
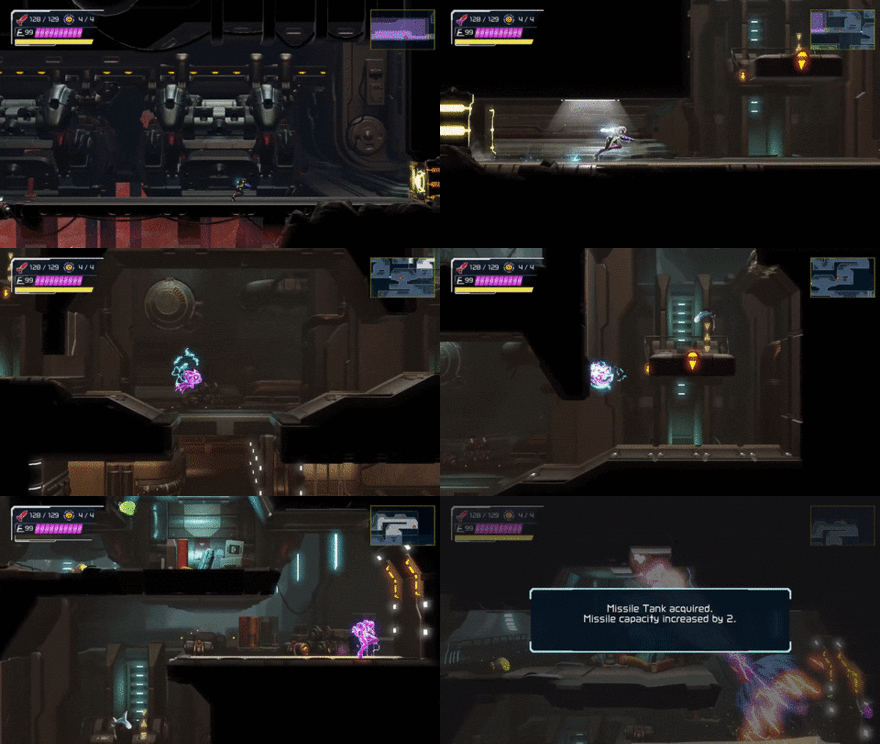
Starting from the shuttle going to Dairon from Cataris, use your Speed Booster to charge your Shinespark. As you enter the next room, you will need to slide to break the Beam Block and then store your Shinespark as you get past it. Next, you will need to make your way across the platform and reach the other end of the room. As shown in the gif, you will need to use the Flash Shift mid-air to save time. As you land, activate your Shinespark and tilt your analog stick to the top left to hit the Speed Boost Blocks and nab the Tank.
Energy Tank 03
| How to Solve: Step 1 |
|---|
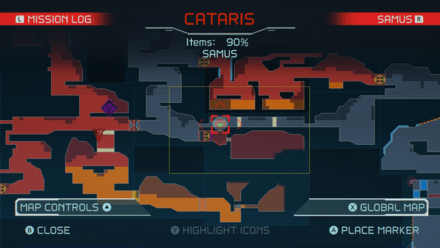
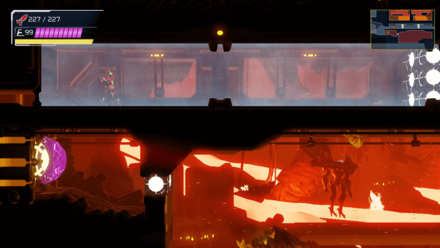 Go to this room on the map once you have the Wave Beam and shoot the Wave Beam Door through the floor. Go through the door from the other side to access the next lava area. |
| Step 1: Map Location |
 |
| How to Solve: Step 2 |
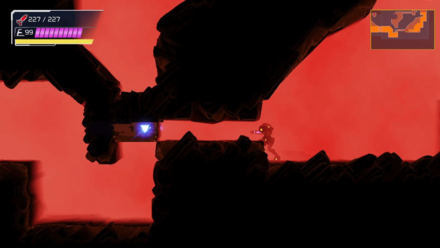 Proceed through the lava area and use the Grapple Beam to clear the Grapple Beam Block. |
| How to Solve: Step 3 |
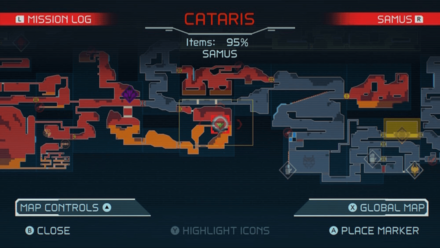
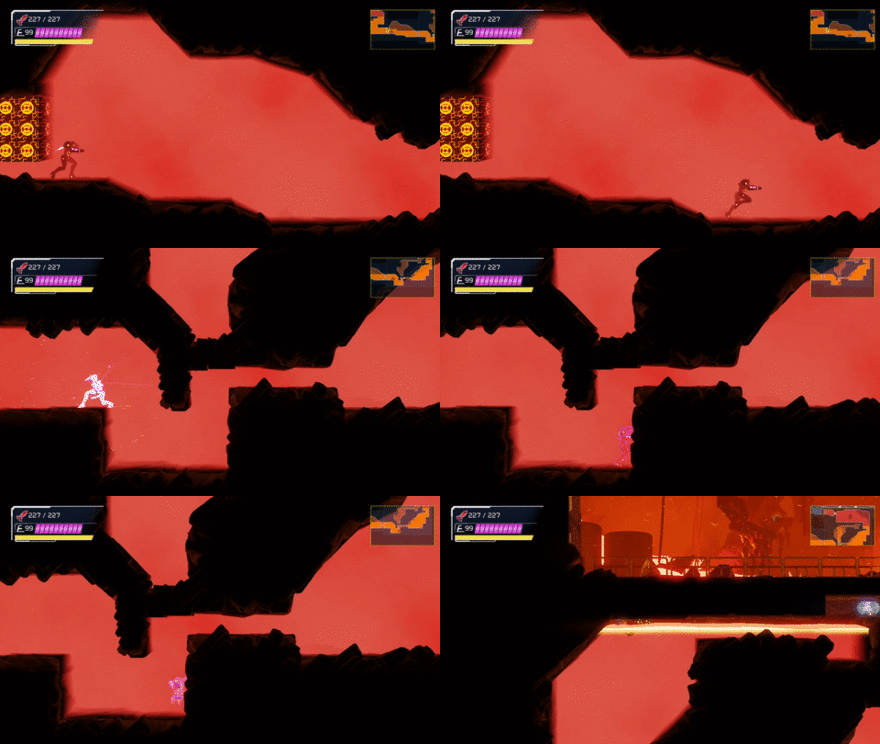 Go back to the other lava room on the left side. Destroying the Power Bomb Blocks is not required, but it gives you extra time to charge your Shinespark. Store a Shinespark just before you drop down the ledge. Once charged, drop down and aim your Shinespark upwards to destroy the blocks! |
| Step 3: Map Location |
 |
Power Bomb Tank 03
| How to Solve |
|---|
 |
| Map Location |
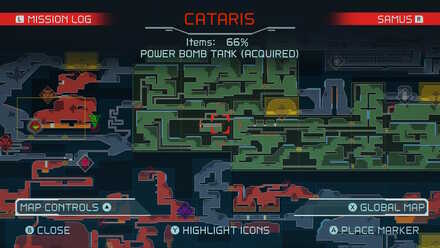 |
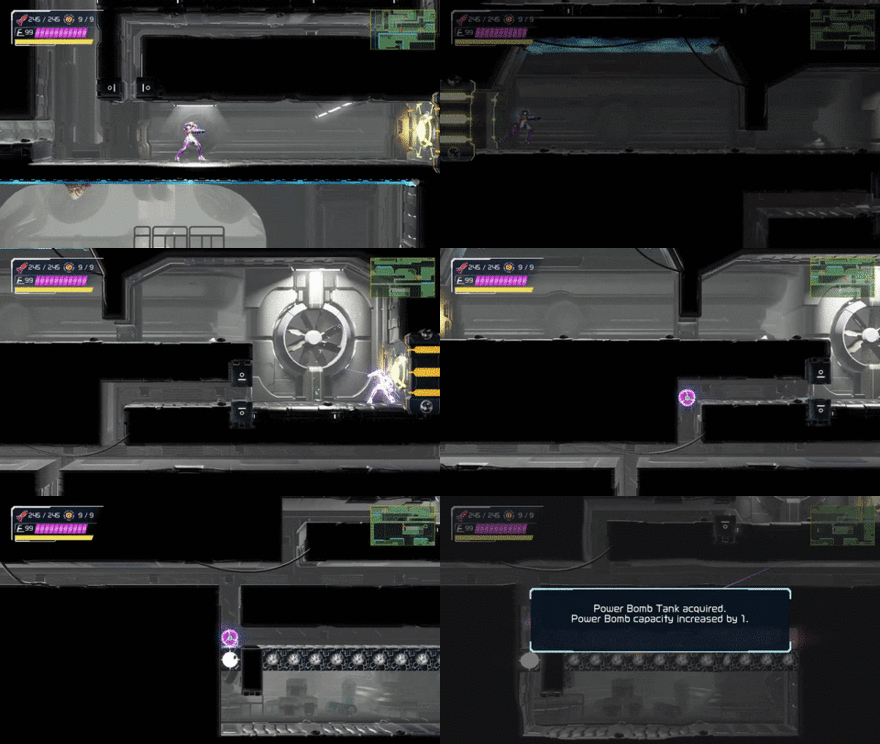
You will need to first destroy the Power Bomb Block with the Power Bomb while inside the vents. Once removed, go to the room above and give yourself enough distance to use the Speed Booster and store a Shinespark. Once stored, quickly go back inside the vents and then use the Shinespark while in Morph Ball mode to go grab the Power Bomb Tank.
Dairon Speed Booster Puzzles

Energy Tank 05 (Energy Part)
| How to Solve |
|---|
 |
| Map Location |
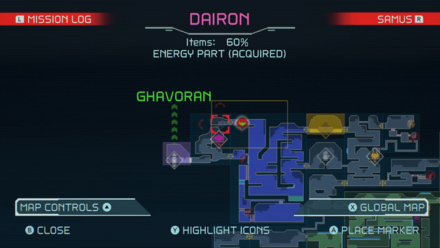 |
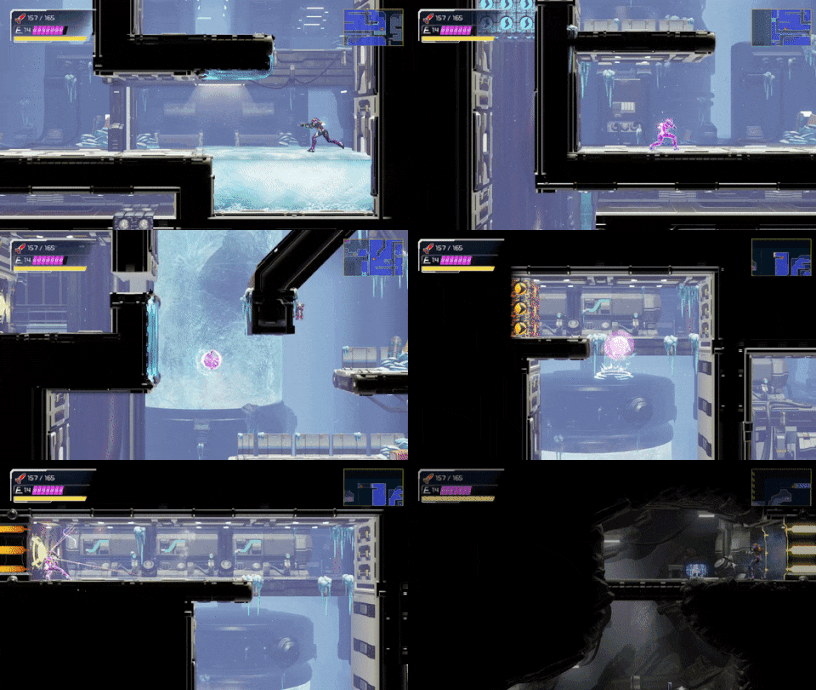
The timing for activating your Shinespark is strict for this puzzle. The moment you hear the sound queue for the Speed Booster, activate your Shinespark and start using Space Jump to climb up. Be careful not to hit any of the walls on your way up or you will not have enough time to pull off the Shinespark. Once you reach the top, be careful not to immediately attempt your Shinespark. The game requires a slight delay after landing for Shinespark to activate. If you press it too fast, you will end up jumping instead.
Missile Tank 06 (Missile+ Tank)
| How to Solve |
|---|
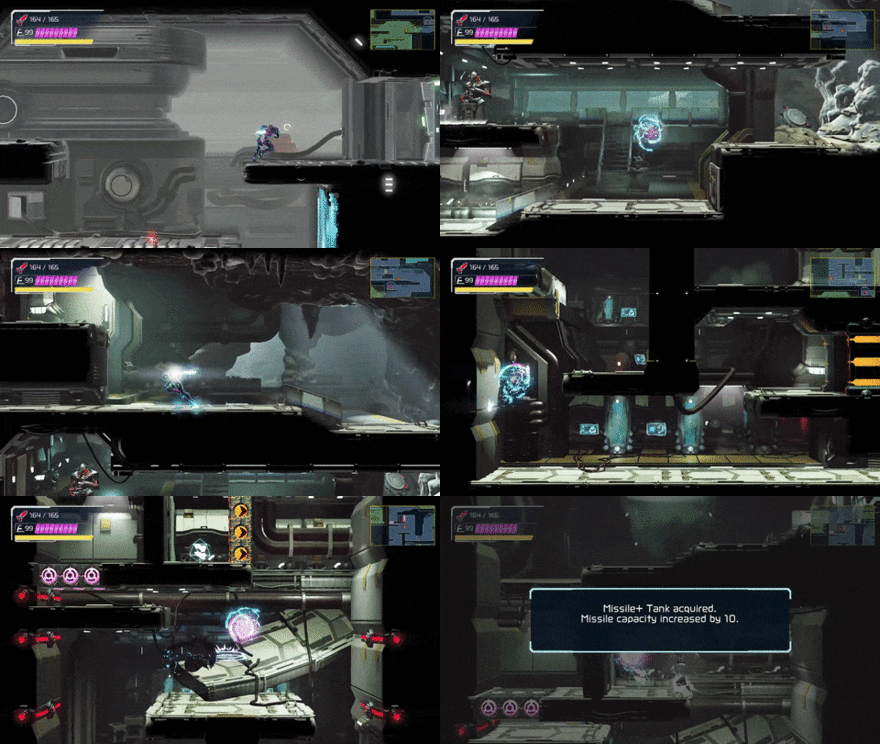 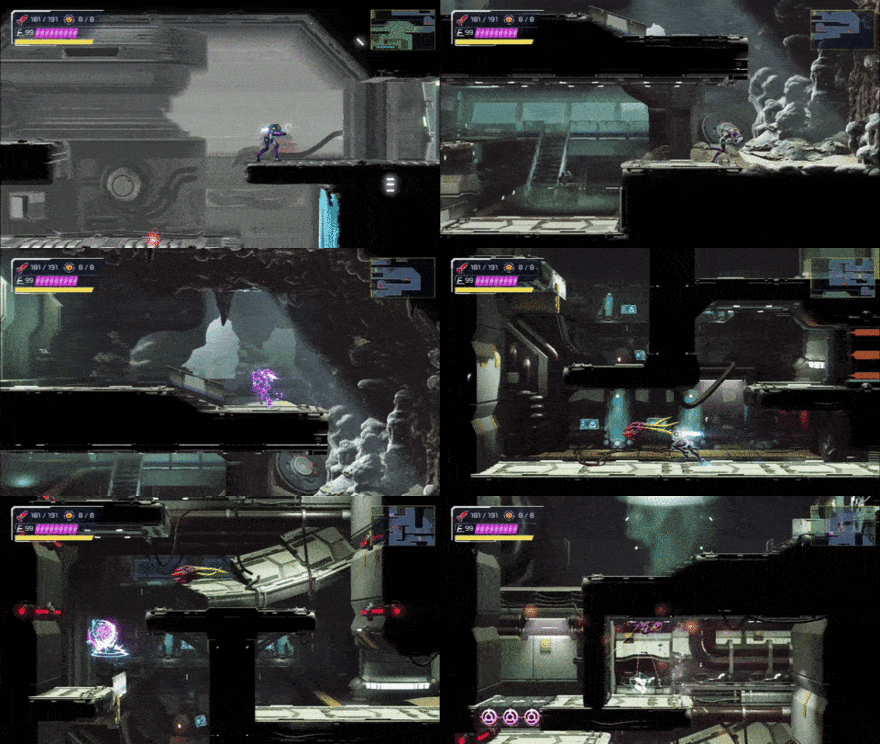 (Shinespark Chaining) |
| Map Location |
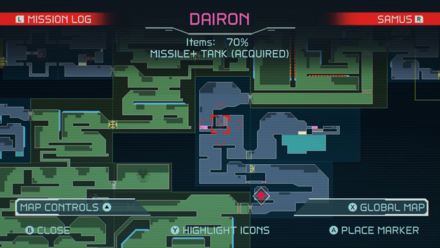 |
Start inside the EMMI Zone to build up speed into the next room. As you run, you will need to do a wall jump without holding a direction on the left analog stick (this will let you keep your momentum). Before you land on your feet, tilt the Left-Analog stick to the left to keep your momentum forward and then press ZL to slide into the hole. Keep running and then start wall jumping to reach the Missile+ Tank! Remember, you will keep your Speed Booster momentum as long as you don't hold any directional input after a wall jump.
Alternatively, you can also do Shinespark Chaining. Build up your Shinespark and use it against the stairs. As you run and slide through the hole, charge your Shinespark again before you hit the wall. Hitting a Shinespark on a slope will allow you to store another. Next, jump and land on a small piece of the floor right next to the Speed Booster Blocks and activate your Shinespark!
Burenia Speed Booster Puzzles
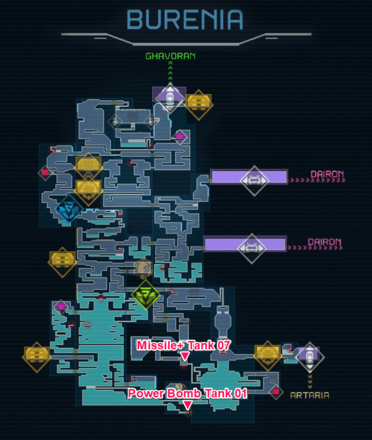
Missile Tank 07 (Missile+ Tank)
| How to Solve |
|---|
 |
| Map Location |
 |
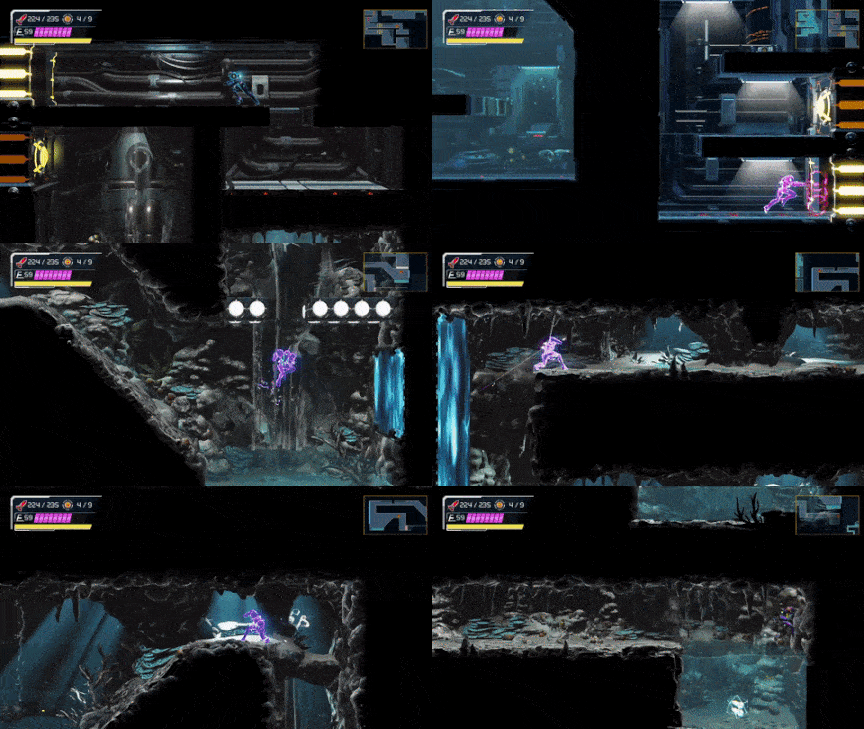
Run through the door in the upper room and store a Shinespark. Head down to the next room and shoot the Beam Blocks as you are falling. Activate the Shinespark midair to hit the slope and continue running. Charge your Shinespark again before you fall, and then activate it and hit the ramp. Store your Shinespark when you get over the ramp and activate it again against the Speed Booster Blocks.
Power Bomb Tank 01
| How to Solve |
|---|
 |
| Map Location |
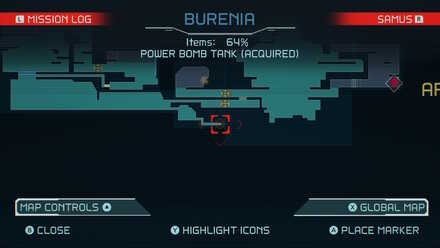 |
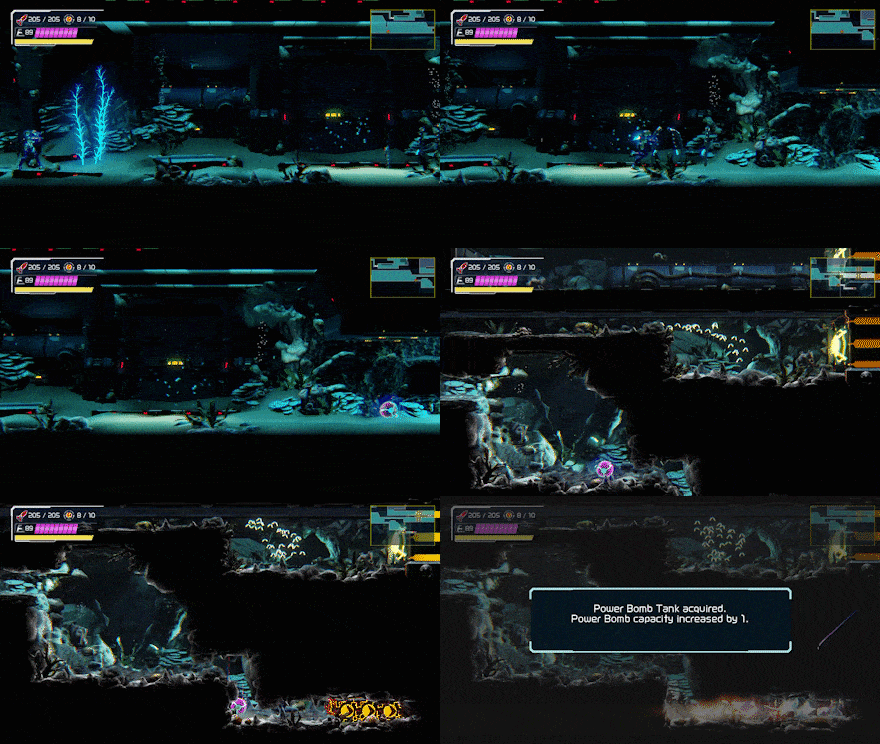
Slide into the small cave at the south of the map and use your Pulse Radar to find the hidden block. Place a Power Bomb on the hidden block to destroy it. Head back to the previous room to get a running start and ready your Shinespark before entering the small cave. Use your Morph Ball to enter the small crevice and activate your Shinespark to break the blocks and obtain the Power Bomb.
Ferenia Speed Booster Puzzles
Missile Tank 03 (Missile+ Tank)
| How to Solve |
|---|
 |
| Map Location |
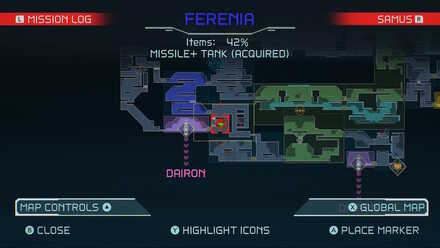 |
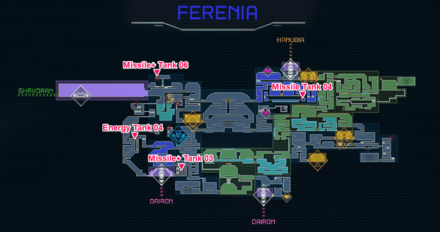
Activate your Speed Booster and store your Shinespark just before you hit the wall, then use Space Jump to climb to the top. Next, destroy the Beam Blocks by either shooting them as you slide or using a Morph Ball Bomb. Lastly, activate your Shinespark as you're falling (making sure that you're not holding a directional button) and break the blocks!
Alternatively, if you already have the Gravity Suit, you can use the cold room right above this Missile Tank to charge your Shinespark!
Missile Tank 04
| How to Solve |
|---|

|
| Map Location |
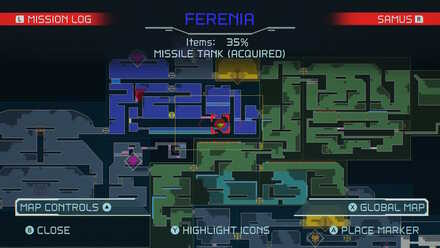 |
To access the room below, you first need to use Speed Booster through the door and slide to break the first Speed Booster Block. Break through the Beam Blocks to access the bottom area, and find another Speed Booster Block to your right.
Use Speed Booster once again in the room above and store your Shinespark. Make your way down into the bottom room, use your Morph Ball and Shinespark to break the Speed Booster Block. The Missile Tank is found in the upper left corner of the next room.
Missile Tank 06 (Missile+ Tank)
| How to Solve |
|---|
 |
| Map Location |
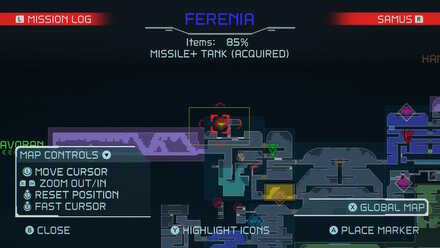 |
Use your Speed Booster and then store your Shinespark right under the ledge. After storing it, jump up and then break the Beam Blocks to Morph Ball inside. You will need to use a Cross Bomb to get across the Pitfall blocks. Lastly, when you're underneath the Bomb Blocks, you will want to use a Bomb and then use the Shinespark while in Morph Ball mode immediately after. With the correct timing, you will launch upwards just after the Bomb Blocks get destroyed!
Energy Tank 04
| How to Solve |
|---|
 |
| Map Location |
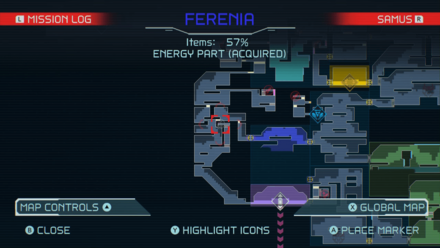 |
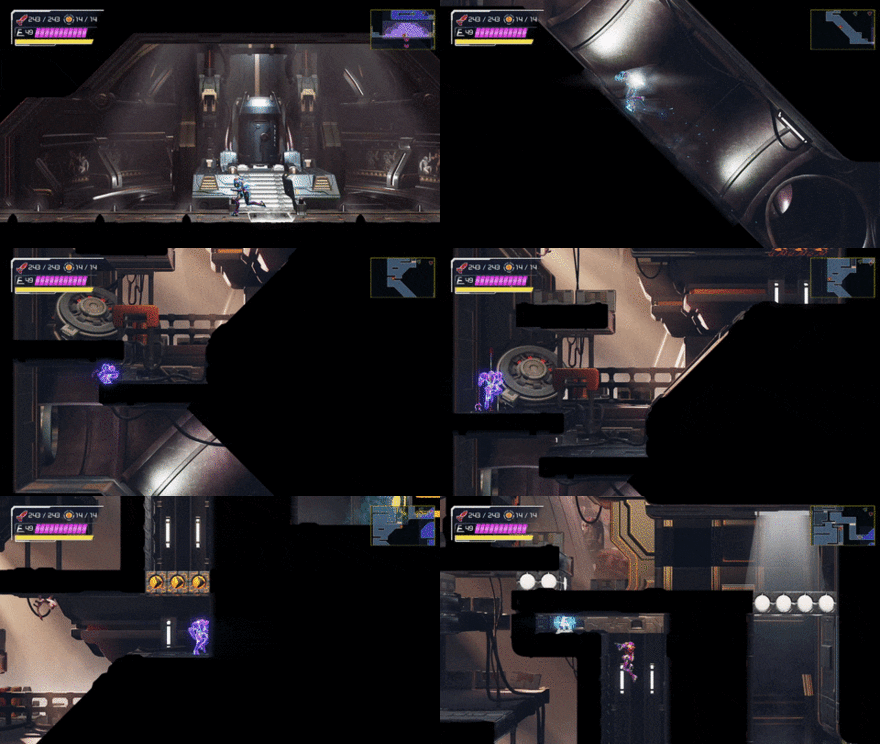
To prepare for this puzzle, you will first need to remove the wall leading to the elevator. This will give you enough room to charge your Shinespark.
 Remove the wall by destroying the Alien Block above. |
After you've destroyed it, activate your Speed Booster and charge your Shinespark. When you reach the end of the first slope, store your Shinespark and proceed to the second ledge right above you. Activate your Shinespark and direct it towards the second slope. Your Speed Booster will activate once again when you hit the slope. You won't need as much distance this time to charge your Shinespark. Store your Shinespark a second time just as you get over the slope and then use it on the Speed Booster Blocks right above you! Shinesparks can be chained when moving on a sloped surface.
Ghavoran Speed Booster Puzzles
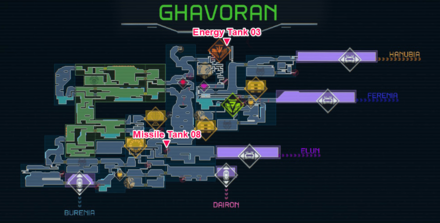
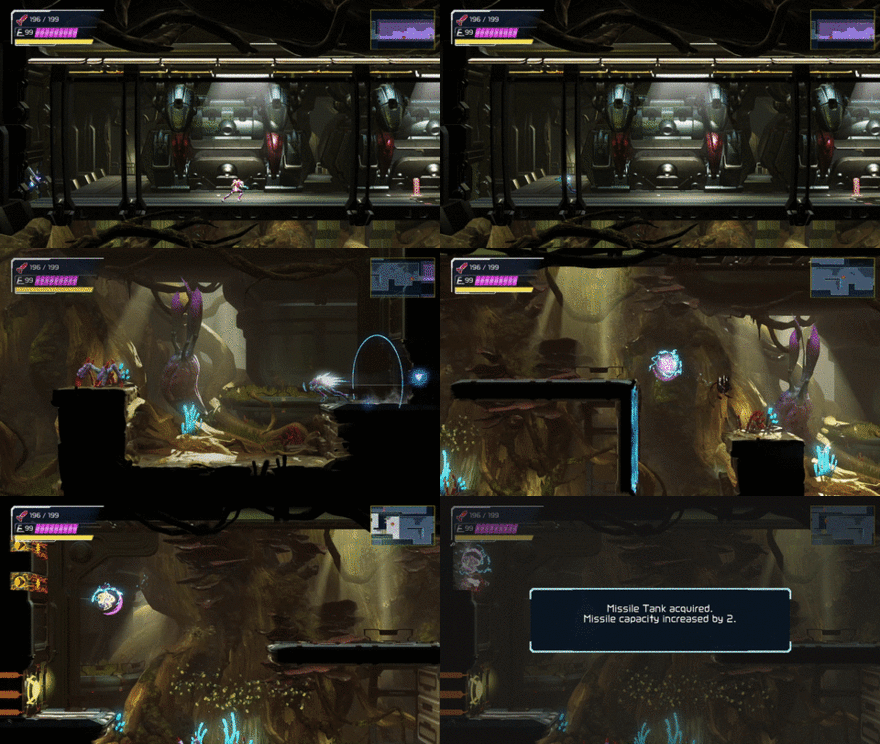
Missile Tank 08
| How to Solve |
|---|
 |
| Map Location |
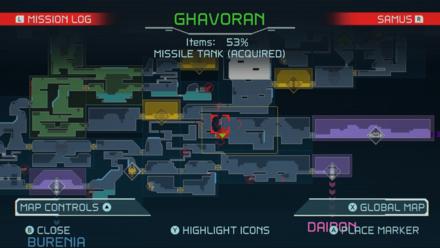 |
Open the Grapple Beam Door from a distance, and then activate your Speed Booster. The moment you load into the next room, jump onto the next platform and then again to the next. After, you will need to use Space Jump to destroy the Speed Booster Blocks.
Energy Tank 03
| How to Solve |
|---|
 |
| Map Location |
 |
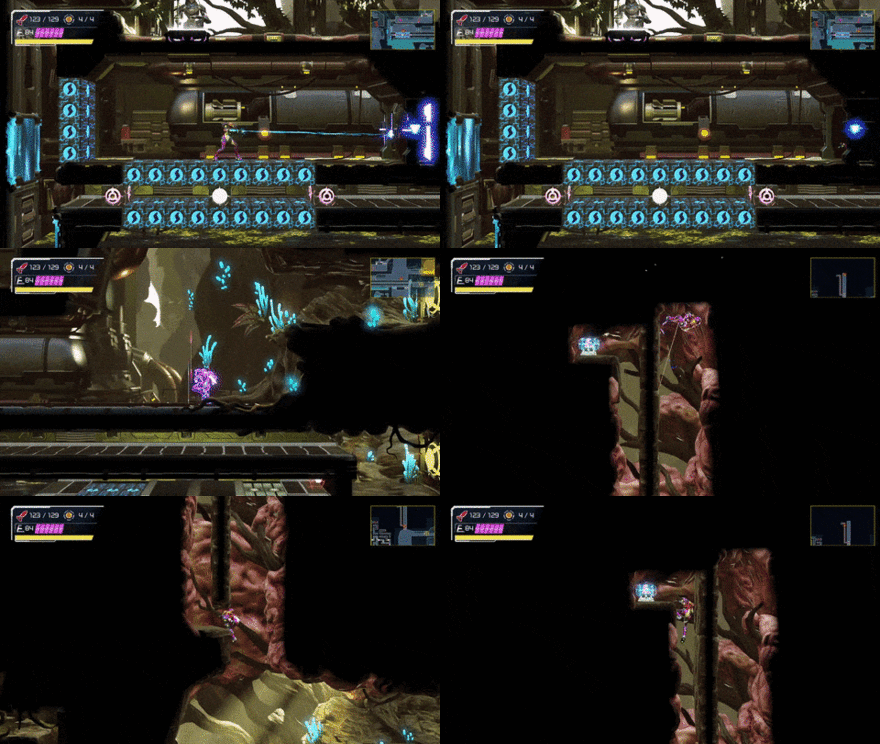
For this puzzle, you will need to charge your Shinespark starting from the room full of Screw Attack Blocks. Open the Beam Block Door before you run. Once your Shinespark is charged, use it to travel straight up and destroy multiple Speed Booster Blocks. You will then need to drop down to the edge, Morph Ball inside, and use Space Jumps to go all the way up.
Elun Speed Booster Puzzles

Missile Tank 01
| How to Solve |
|---|
 |
| Map Location |
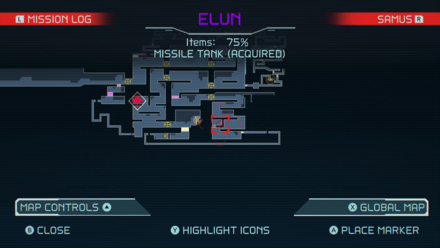 |
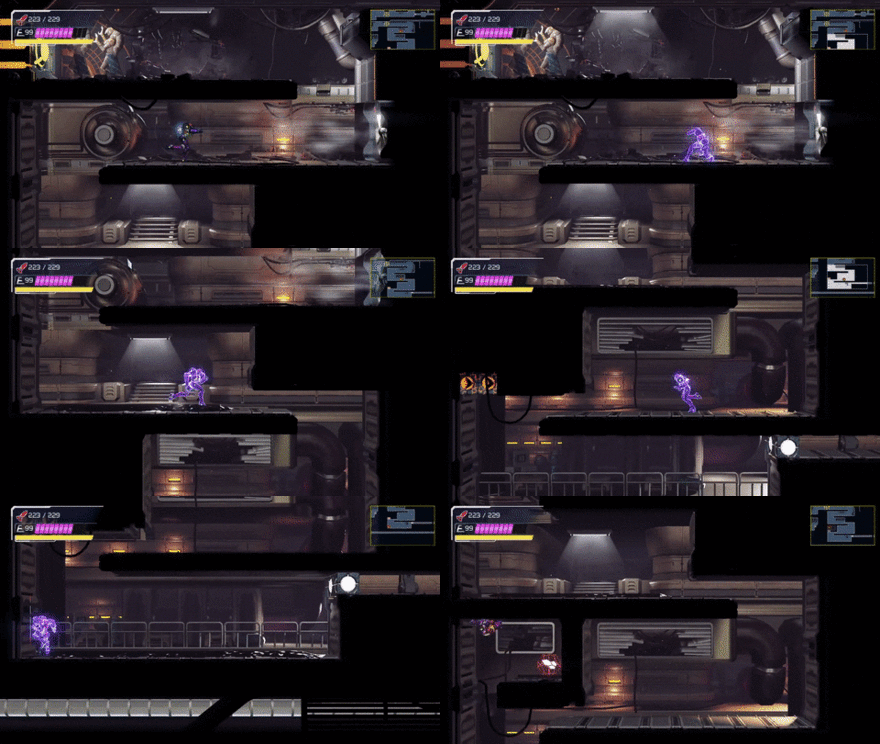
Since there are no long hallways in Elun, you will need to charge your Shinespark by using the Speed Booster on the fan. Once you've stored your Shinespark, travel down and activate it to break the ceiling above.
Hanubia Speed Booster Puzzles
Power Bomb Tank 01
| How to Solve |
|---|
  Solution 2 Solution 2 |
| Map Location |
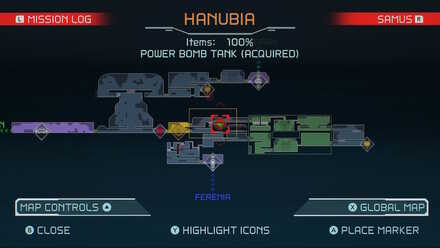 |
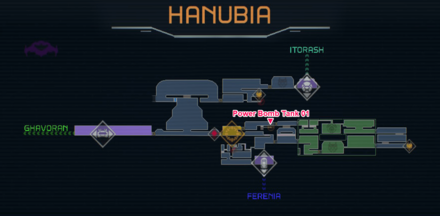
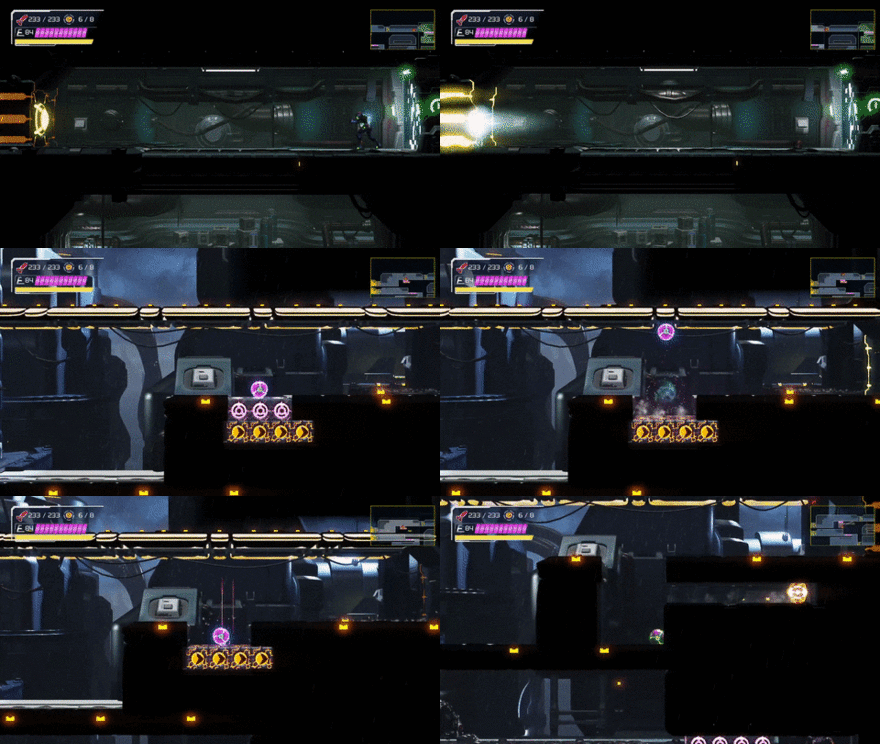
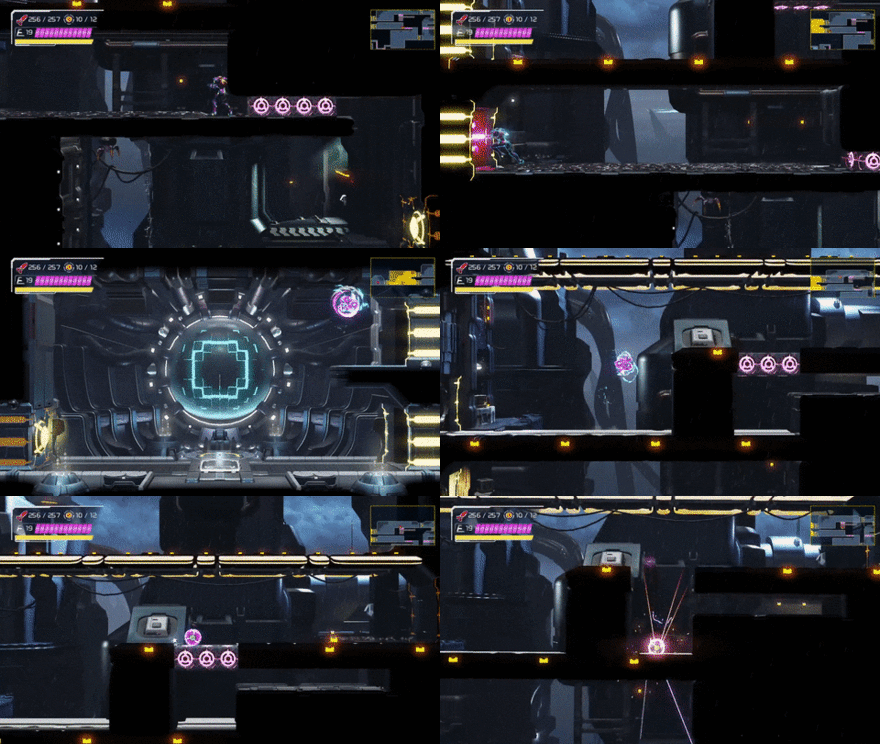
Use the Speed Booster on the hallway above the Power Bomb Tank and then store your Shinespark just as you reach the Bomb Blocks. Next, use Morph Ball Bombs to break the blocks and then use the Shinespark while aiming downwards with the left analog stick. This will break all the remaining blocks and will open the path to the Power Bomb Tank.
Alternatively, if you can't do it from the hallway above, you can try from the hallway below. Start near the Bomb Blocks and use your Speed Booster while shooting both the upper and lower door open. When you get inside the room, charge your Shinespark and make your way towards the Power Bomb Tank location. Once on top of the Bomb Blocks, use a Bomb and then activate the Shinespark immediately after. With the right timing, the Bomb Blocks will get destroyed just before your Shinespark Activates!
How to Use the Shinespark
How to Shinespark in the Air

You will notice that you can activate your Shinespark while free falling in the air. However, thi is usually impossible if you manually jump since you will be doing a Spin Boost motion.
Shinespark Chaining

When you use your Shinespark against a ramp or slope, your Speed Booster will immediately activate at its max speed. This will let you store another Shinespark almost immediately.
With this in mind, you will be able to access hard-to-reach areas and even make some of the Shinespark Puzzles easier!
Shinespark Controls

Morph Ball Shinespark (Ball Spark) Controls
Metroid Dread Related Guides

Comment
FFS! I've been trying to run in from the other room and make it through the bomb blocks for two f'in hours. THANK YOU.
Author
How to Solve All Speed Booster and Shinespark Puzzles
improvement survey
03/2026
improving Game8's site?

Your answers will help us to improve our website.
Note: Please be sure not to enter any kind of personal information into your response.

We hope you continue to make use of Game8.
Rankings
- We could not find the message board you were looking for.
Gaming News
Popular Games

Genshin Impact Walkthrough & Guides Wiki

Honkai: Star Rail Walkthrough & Guides Wiki

Umamusume: Pretty Derby Walkthrough & Guides Wiki

Pokemon Pokopia Walkthrough & Guides Wiki

Resident Evil Requiem (RE9) Walkthrough & Guides Wiki

Monster Hunter Wilds Walkthrough & Guides Wiki

Wuthering Waves Walkthrough & Guides Wiki

Arknights: Endfield Walkthrough & Guides Wiki

Pokemon FireRed and LeafGreen (FRLG) Walkthrough & Guides Wiki

Pokemon TCG Pocket (PTCGP) Strategies & Guides Wiki
Recommended Games

Diablo 4: Vessel of Hatred Walkthrough & Guides Wiki

Fire Emblem Heroes (FEH) Walkthrough & Guides Wiki

Yu-Gi-Oh! Master Duel Walkthrough & Guides Wiki

Super Smash Bros. Ultimate Walkthrough & Guides Wiki

Pokemon Brilliant Diamond and Shining Pearl (BDSP) Walkthrough & Guides Wiki

Elden Ring Shadow of the Erdtree Walkthrough & Guides Wiki

Monster Hunter World Walkthrough & Guides Wiki

The Legend of Zelda: Tears of the Kingdom Walkthrough & Guides Wiki

Persona 3 Reload Walkthrough & Guides Wiki

Cyberpunk 2077: Ultimate Edition Walkthrough & Guides Wiki
All rights reserved
© Nintendo. Metroid and Nintendo Switch are trademarks of Nintendo. © 2021 Nintendo.
The copyrights of videos of games used in our content and other intellectual property rights belong to the provider of the game.
The contents we provide on this site were created personally by members of the Game8 editorial department.
We refuse the right to reuse or repost content taken without our permission such as data or images to other sites.


![Everwind Review [Early Access] | The Shaky First Step to A Very Long Journey](https://img.game8.co/4440226/ab079b1153298a042633dd1ef51e878e.png/thumb)

![Monster Hunter Stories 3 Review [First Impressions] | Simply Rejuvenating](https://img.game8.co/4438641/2a31b7702bd70e78ec8efd24661dacda.jpeg/thumb)


It is possible that way. Run left then Spark at end of ledge, drop and use bomb, roll through, then wall jump, shoot Y and then hit B while tilting L towards Left or upper left