Burenia Walkthrough
Check out our Metroid Prime 4: Beyond Walkthrough!
☆ Dread Rush | Boss Rush | Survival Rush | Practice
★ Speedrun and Sequence Breaks Guide
☆ Locations: Missile Tanks / Energy Tanks / Power Bomb Tanks
This is the Burenia walkthrough and guide for Metroid Dread for the Nintendo Switch. Read on to learn more about how to progress through the story, how to solve puzzles, and tips on area bosses.
| Previous Part | Next Part |
|---|---|
| Cataris | Ferenia |
List of Contents
Burenia Walkthrough Maps
Burenia Map Guide
| Complete Burenia Map |
|---|
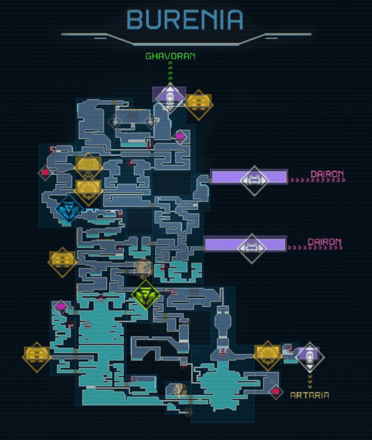 View Full Map Image |
Burenia Area Map and 100% Items Guide
Burenia Walkthrough All Map Guides
| All Map Guides | |
|---|---|
 |
 |
 |
- |
Burenia Walkthrough Objectives
| Objectives | |
|---|---|
| 1 | ✔ Learn about Dairon from Adam |
| 2 | ✔ Activate the Second Generator in Dairon |
| 3 | ✔ Obtain the Bomb Upgrade |
| 4 | ✔ Head to Burenia and Talk to Adam |
| 5 | ✔ Obtain Flash Shift |
| 6 | ✔ Defeat the Yellow EMMI and Obtain the Speed Booster |
| 7 | ✔ Return to Artaria to Obtain the Grapple Beam |
| 8 | ✔ Head to Ferenia |
| 9 | ✔ Encounter the Purple EMMI |
| 10 | ✔ Meet Quiet Robe (Chozo Scientist) |
| 11 | ✔ Defeat the Robot Chozo Soldier |
| 12 | ✔ Defeat Drogyga in Burenia |
Learn About Dairon from Adam

After beating Kraid and obtaining the Diffusion Beam, use the Purple Teleportal to travel to Dairon. Once in Dairon, head to the Network Station to the south and talk to Adam where he will instruct you to reactivate another generator in Dairon.
Activate the Second Generator in Dairon

Continue exploring Dairon until you reach the second generator room to the northwest. Activate the generator to restore power to this sector of Dairon and unlock more areas.
Obtain the Bomb Upgrade

Once you have restored the power, the door leading to the Bomb upgrade room should now be active. Open that door and obtain the Bomb upgrade.
Head to Burenia and Talk to Adam

After obtaining the Bomb upgrade, head to the western area of the map and take the first shuttle to Burenia. Once at Burenia, head to the first Network Station where Adam will explain more about area.
Obtain Flash Shift

Continue exploring Burenia and head further south until you reach a hidden room containing the Flash Shift upgrade.
Defeat the Yellow EMMI to Obtain the Speed Booster

With Flash Shift, you can head further west and take the shuttle back to Dairon. Head to the EMMI Zone in Dairon and find the Central Unit. Destroy it to obtain the Omega Cannon and use it to defeat the Yellow EMMI and obtain the Speed Booster upgrade.
Return to Artaria to Obtain the Grapple Beam

The Speed Booster Upgrade will now allow you access to the Yellow Teleportal. Use the Yellow Teleportal in Dairon to travel back to Artaria. Head north and obtain the Grapple Beam from a hidden room.
Head to Ferenia

After obtaining the Grapple Beam, you can head north and take the Elevator to Dairon. Once in Dairon, continue travelling North until you reach the Elevator that leads to Ferenia.
Encounter the Purple EMMI

Traverse through Ferenia until you reach the EMMI Zone. After sliding into the path to the next room, Samus will encounter the the Purple EMMI, but it will be quickly deactivated by an unknown Chozo.
Meet Quiet Robe (Chozo Scientist)

The Chozo who deactivated the EMMI introduces himself as Quiet Robe, a scientist from the Thoha tribe. He goes into detail about the backstory of Metroid Dread and opens up a path for Samus in Burenia.
Defeat the Robot Chozo Soldier

At the end of the cutscene, a Robot Chozo Soldier appears from behind Quiet Robe and kills him. Defeat the Robot Chozo Soldier to leave the area and avenge Quiet Robe.
Return to Dairon

With the Robot Chozo Soldier defeated, you'll need to leave the area and find your way back to Burenia, but to get there, you'll have go through Darion. Enter the tall hallway and use your Grapple Beam to enter a passage with a fan. From there you can Speed Boost, then Shinespark to fly upwards into the corridor where you can get into an elevator leading to Dairon.
Defeat Drogyga in Burenia

Once back in Burenia from Dairon, find the path opened up by Quiet Robe and head up. As you travel further North of Burenia, you will encounter another boss fight with Drogyga. Defeating Drogyga advances the story and opens up access to an elevator leading to Ghavoran.
What to Do if Stuck in Burenia
How to Escape the Bottom Area of Burenia

After getting the Space Jump upgrade, you will need to return to Burenia to obtain the Gravity Suit. The bottom areas of Burenia are vast and cavernous, making it difficult to navigate. Follow the instructions in the table to escape the bottom areas of Burenia and obtain the Gravity Suit.
| Step-By-Step Walkthrough | |
|---|---|
| 1 | 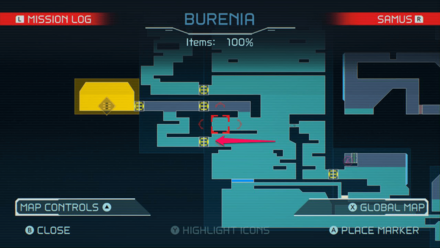 After first descending into the bottom areas of Burenia, you will first need to locate the Save Station. You can reach the Save Station by using your Space Jump upgrade to cross the short water section. |
| 2 |  Destroy the Alien Block and Grapple Block Destroy the Alien Block and Grapple BlockTo the right of the Save Station, you will run into an Alien Block. Destroy it with your Power Beam to open up the wall. Across the water, you can spot a Grapple Block. Pull on it with the Grapple Beam to destroy it. |
| 3 |  Travel through the Narrow Path Travel through the Narrow PathOnce the Grapple Block is destroyed, use your Space Jump to travel to the other side and go through the narrow passage. |
| 3 |  Open Up the Narrow Path Above the Cave Open Up the Narrow Path Above the CaveAs you continue through the path, it will eventually lead to a small cave at the very bottom of Burenia. At the top left corner, you can spot another alien block. Use your Diffusion Beam to destroy it and open up the path above. |
| 3 |  Get on the Bridge and Go Up Get on the Bridge and Go UpThrough the path, you will encounter a trench. Cross the trench and use Space Jump to get on the bridge. Once you're on the bridge, head upwards passing through the two Sensor-Lock Doors. |
| 3 |  Space Jump to the Other Side Space Jump to the Other SideAfter passing through the second Sensor-Lock Door, you will encounter a large gap. Use Space Jump to cross the large gap and make your way to the other side. If you accidentally fall, you can climb back up on the right side. |
| 3 |  Destroy the Alien Blocks to Expose the Grapple Block Destroy the Alien Blocks to Expose the Grapple BlockGo up the narrow passage and destroy the alien block to open up the wall and expose more alien blocks. Continue destroying the alien blocks until the wall is completely destroyed and the Grapple Block is exposed. |
| 3 |  Pull on the Grapple Block to Destroy the Bridge Below Pull on the Grapple Block to Destroy the Bridge BelowThe Grapple Block will be holding up a large underwater structure. Pull on the Grapple Block to cause the large structure to fall onto the bridge below and destroy it. |
| 3 |  Once the bridge is destroyed, you can enter the room containing the Gravity Suit to the left. With the Gravity Suit, you can freely travel through the water and escape the bottom area of Burenia. |
EMMI Encountered
Yellow EMMI
| Yellow EMMI | ||
|---|---|---|
 |
||
| Rewards | Speed Booster | |
| Abilities | • Able to climb walls • Can dash at high speeds • Instant kill attack |
|
Yellow EMMI Map Location
| EMMI Zone Map |
|---|
 |
Purple EMMI
| Purple EMMI | ||
|---|---|---|
 |
||
| Rewards | Wave Beam | |
| Abilities | • Able to climb walls Instant kill attack • Paralyzing Beam that can pierce walls |
|
Purple EMMI Map Location
| EMMI Zone Map |
|---|
 |
Bosses
Robot Chozo Soldier
| Robot Chozo Soldier | |
|---|---|
 |
|
| 1st Encounter | Ferenia |
| 2nd Encounter | Ghavoran |
| Robot Chozo Soldier Boss Tips |
|---|
|
✔ Keep distance with Flash Shift ✔ Deal damage with Missiles ✔ Alternate between the top and bottom levels ✔ Use Shinespark to deal massive damage |
How to Beat Robot Chozo Soldier
Drogyga
| Drogyga | ||
|---|---|---|
 |
||
| Rewards | No Rewards | |
| Location | Burenia | |
| Drogyga Boss Tips |
|---|
| ✔ Shoot at Grogyga's top tentacle until it retracts. ✔ Shoot Charge Beams at the buttons on either side of the room to drain water out. ✔ Attack the core of the dehydrated Grogyga until it shrivels up. |
Metroid Dread Related Guides

| Walkthrough by Area | |
|---|---|
 Artaria Artaria |
 Cataris Cataris |
 Dairon Dairon |
 Burenia Burenia |
 Ferenia Ferenia |
 Artaria Part 2 Artaria Part 2 |
 Ghavoran Ghavoran |
 Hanubia Hanubia |
Author

Burenia Walkthrough
Rankings
- We could not find the message board you were looking for.
Gaming News


Popular Games

Genshin Impact Walkthrough & Guides Wiki
Honkai: Star Rail Walkthrough & Guides Wiki
Arknights: Endfield Walkthrough & Guides Wiki
Umamusume: Pretty Derby Walkthrough & Guides Wiki
Wuthering Waves Walkthrough & Guides Wiki
Pokemon TCG Pocket (PTCGP) Strategies & Guides Wiki
Abyss Walkthrough & Guides Wiki
Zenless Zone Zero Walkthrough & Guides Wiki
Digimon Story: Time Stranger Walkthrough & Guides Wiki
Clair Obscur: Expedition 33 Walkthrough & Guides Wiki


Recommended Games
Fire Emblem Heroes (FEH) Walkthrough & Guides Wiki
Pokemon Brilliant Diamond and Shining Pearl (BDSP) Walkthrough & Guides Wiki
Diablo 4: Vessel of Hatred Walkthrough & Guides Wiki
Super Smash Bros. Ultimate Walkthrough & Guides Wiki
Yu-Gi-Oh! Master Duel Walkthrough & Guides Wiki
Elden Ring Shadow of the Erdtree Walkthrough & Guides Wiki
Monster Hunter World Walkthrough & Guides Wiki
The Legend of Zelda: Tears of the Kingdom Walkthrough & Guides Wiki
Persona 3 Reload Walkthrough & Guides Wiki
Cyberpunk 2077: Ultimate Edition Walkthrough & Guides Wiki


All rights reserved
© Nintendo. Metroid and Nintendo Switch are trademarks of Nintendo. © 2021 Nintendo.
The copyrights of videos of games used in our content and other intellectual property rights belong to the provider of the game.
The contents we provide on this site were created personally by members of the Game8 editorial department.
We refuse the right to reuse or repost content taken without our permission such as data or images to other sites.