
This survey will take about 1 minute.
Your answers will help us to improve our website.
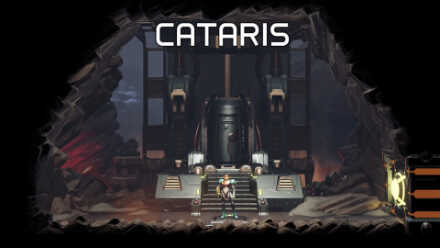
Metroid Dread (Switch)
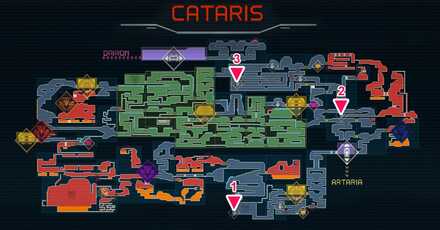
Cataris Area Map and 100% Items Guide
Check out our Metroid Prime 4: Beyond Walkthrough!
☆ Dread Rush | Boss Rush | Survival Rush | Practice
★ Speedrun and Sequence Breaks Guide
☆ Locations: Missile Tanks / Energy Tanks / Power Bomb Tanks
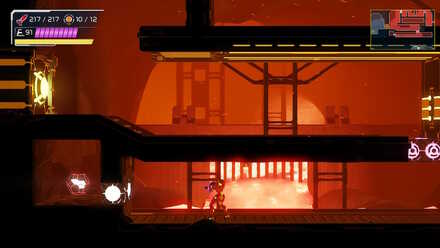
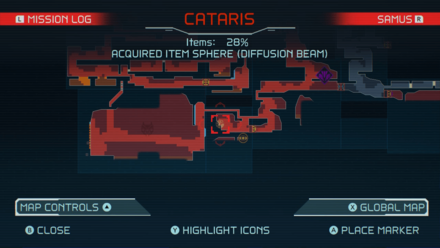
This is a 100% items guide to Cataris, one of the areas found in planet ZDR in Metroid Dread for the Nintendo Switch. Read on to learn about all the enemies, bosses, and upgrades found in Cataris and find out how to navigate the Cataris map in order to locate all the stations, teleportals, elevators, missile tanks, and energy tanks!
List of Contents
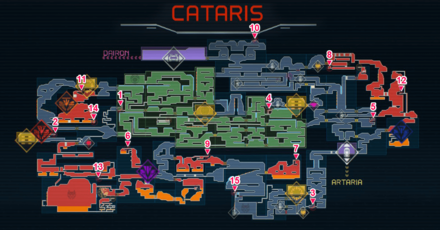
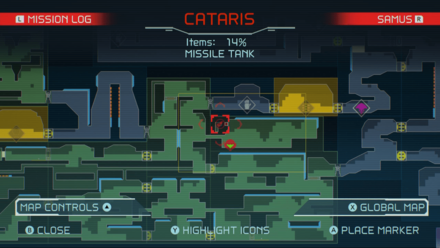
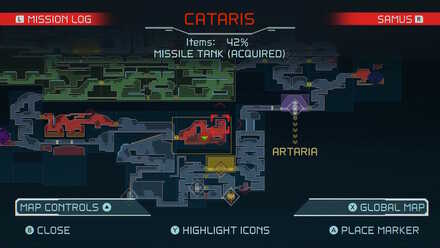
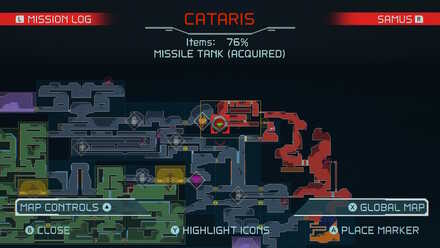
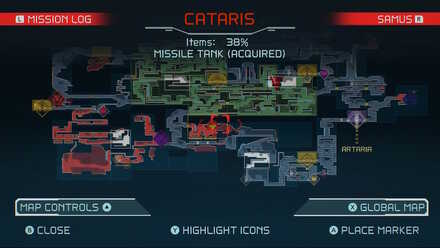
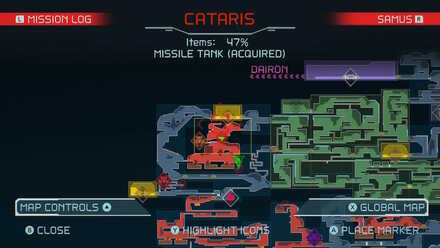
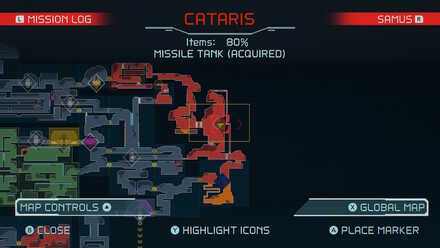
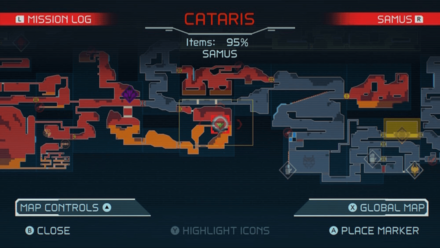
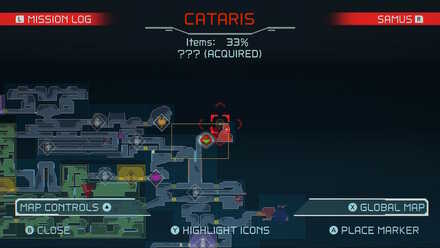
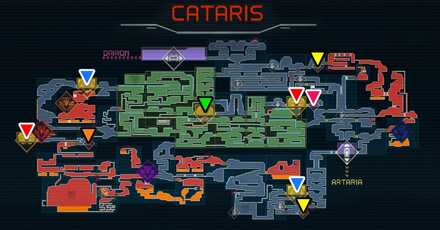
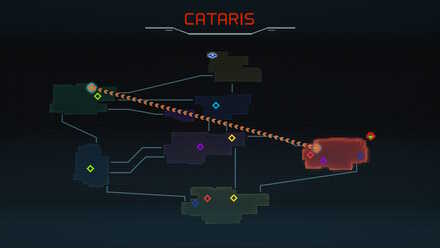
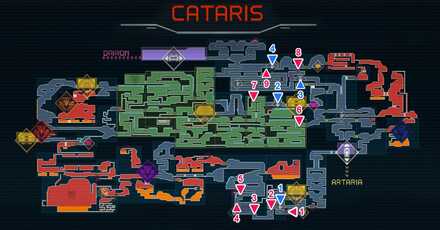
Cataris Map
| Complete Cataris Map |
|---|
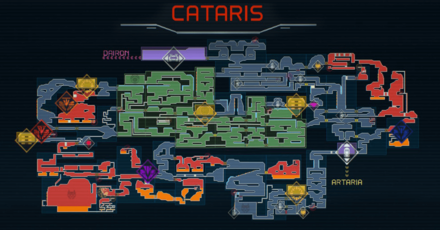 View Full Map Image |
| Icon | Description |
|---|---|
 | Samus The Samus icon on the map shows Samus' current location. |
 | Save Station Save stations allow you to save the current progress of your game and are found in yellow zones. |
 | Network Station You can use Network Stations found in yellow zones to contact your ship and save your progress. |
 | Network Station You can visit a Map Station to download the map data of certain area and save your progress. |
   | Recharge Station Recharge Stations can replenish Samus' energy and missiles. There are three types of Recharge Stations: Ammo (Red), Energy (Pink) and Total Recharge Stations (Yellow). |
 | Teleportal Teleportals are found in specific sections of the map and can be used to warp to a different area. There are different colors of teleportals that link to each other. |
 | Missile Tank Missile Tanks are found in hidden areas around the map and can increase your missile capacity. |
 | Energy Tank Energy Tanks are found in hidden areas around the map and can increase Samus' maximum health. |
 | Elevator Elevators can bring Samus to another area in planet ZDR. |
 | Interactables Interactables are buttons, switches, or other devices that Samus can interact with to manipulate the environment. |
Cataris Objectives
| Cataris Objectives |
|---|
| ✔ Learn about Cataris from Adam ✔ Encounter the Green EMMI ✔ Obtain the Wide Beam ✔ Head to Dairon ✔ Encounter the Yellow EMMI in Dairon ✔ Defeat the Green EMMI in Cataris ✔ Return to Artaria to Obtain the Varia Suit ✔ Defeat Kraid in Cataris ✔ Obtain the Diffusion Beam |
All Items in Cataris
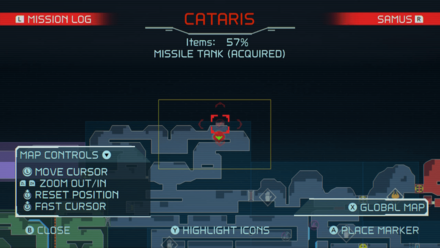
Missile Tanks
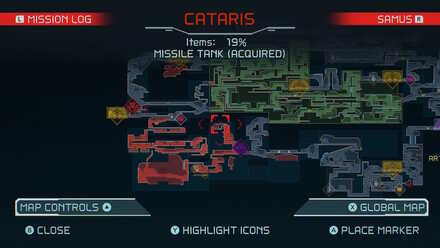
| All Cataris Missile Tank Locations |
|---|
 View Full Map Image |
| Item / Details | Map | Screen |
|---|---|---|
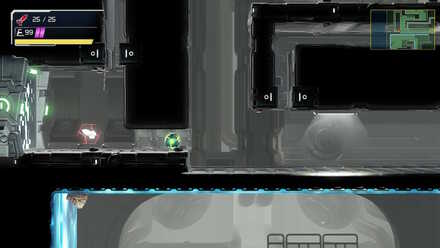
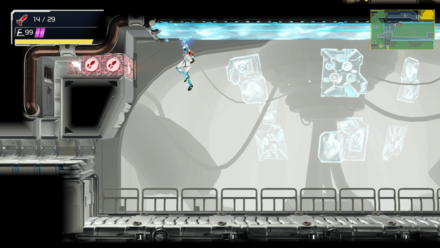
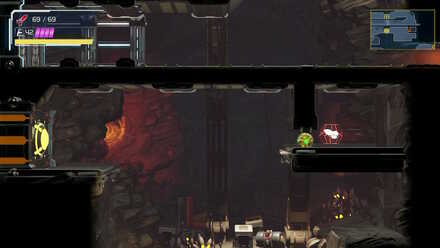
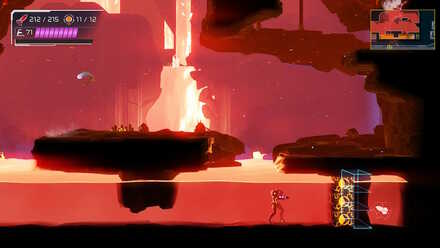
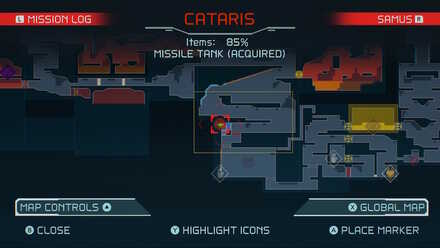
| Missile Tank 01
How to Get: Use the Morph Ball to go through the opening. Required Ability: • Morph Ball |
 |
 |
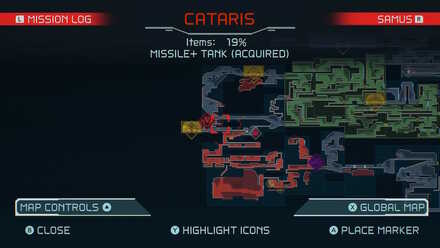
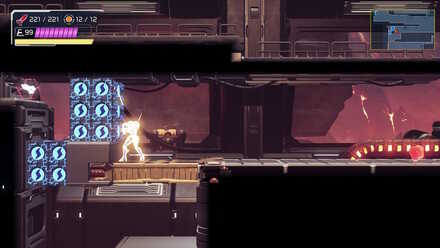
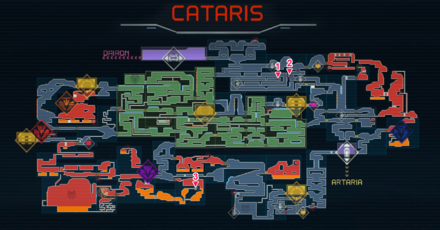
| Missile Tank 02
(Missile+ Tank)
How to Get: Use the Morph Ball to go through the narrow passageway to get the item. Required Ability: • Morph Ball |
 |
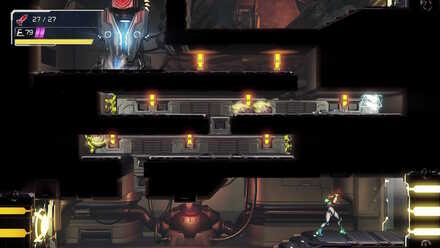 |
| Missile Tank 03
How to Get: Use the Morph Ball to go through the opening in the wall. Required Ability: • Morph Ball |
 |
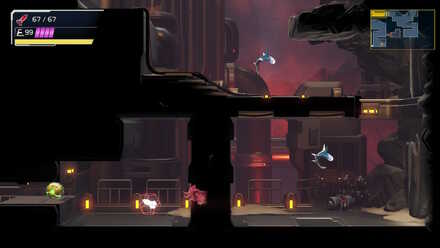 |
| Missile Tank 04
How to Get: Climb onto the Magnetic ceiling and then shoot a Missile at the wall. Required Ability: • Spider Magnet • Morph Ball |
 |
 |
| Missile Tank 05
How to Get: Open the Charge Beam Door and hop up through the gap using the Morph Ball. Required Ability: • Charge Beam • Morph Ball |
 |
 |
| Missile Tank 06
How to Get: Jump up the side of the wall and cling to the sides of the divets. Shoot the blocks from the magnetic strip and use the Morph Ball to get the item. Don't go through the lava. Required Ability: • Spider Magnet • Morph Ball • Varia Suit |
 |
 |
| Missile Tank 07
How to Get: Open the Charge Beam Door and continue to the right. Do a wall jump to reach this item. Required Ability: • Charge Beam • Varia Suit |
 |
 |
| Missile Tank 08
How to Get: Hit the Wide Beam Block out of the way, then use Bombs to break the Bomb Blocks in the floor. Shoot the Beam Block out of the way to get this Missile Tank. Required Ability: • Wide Beam • Morph Ball • Varia Suit • Bomb |
 |
 |
| Missile Tank 09
How to Get: Break the blocks in the room before with the Diffusion Beam, then roll through with the Morph Ball. Required Ability: • Morph Ball • Varia Suit • Diffusion Beam |
 |
 |
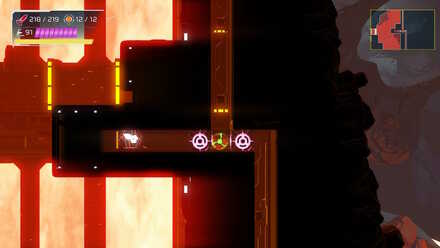
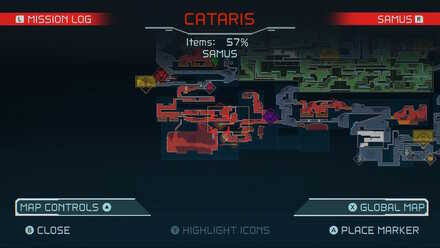
| Missile Tank 10
How to Get: This is a Shinespark Puzzle. You will need to store your Shinespark as you make your way near under the Speed Boost Blocks to launch yourself diagonally. Remember to use Flash Shift to cut down time. Required Ability: • Flash Shift • Speed Booster • Space Jump |
 |
 |
| Missile Tank 11
How to Get: Use Space Jump to clear reach the ledge, then use Morph Ball to crawl through the opening. Required Ability: • Morph Ball • Space Jump |
 |
 |
| Missile Tank 12
How to Get: Use Space Jump to reach the top of the room and bomb the wall. Drop down and use another bomb to grab this Missile Tank. Required Ability: • Morph Ball • Varia Suit • Bomb • Space Jump |
 |
 |
| Missile Tank 13
How to Get: Turn into a Morph Ball and roll through the lava. Required Ability: • Morph Ball • Gravity Suit |
 |
 |
| Missile Tank 14
How to Get: Start at the left wall, shoot the Beam Blocks out of the way, and use the Speed Booster to start running. Slide under the platform and break the wall to get this Missile Tank. Required Ability: • Speed Booster • Gravity Suit |
 |
 |
| Missile Tank 15
How to Get: Use the Screw Attack to break the blocks. Required Ability: • Screw Attack |
 |
 |
Speed Booster and Shinespark Puzzle Solutions
Missile Tank 10
| How to Solve |
|---|
|
| Map Location |
|
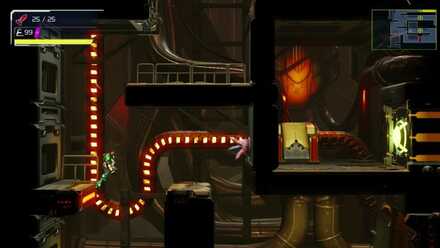
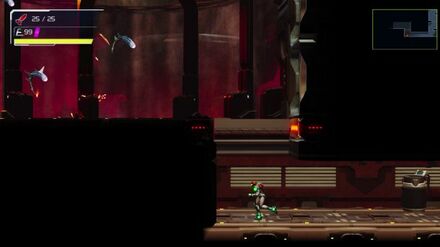
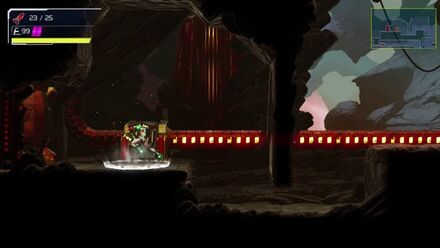
This Missile Tank can be found at the very top of the map. Starting from the shuttle going to Dairon from Cataris, use your Speed Booster to charge your Shinespark. As you enter the next room, you will need to slide to break the Beam Block and then store your Shinespark as you get past it. Next, you will need to make your way across the platform and reach the other end of the room. As shown in the gif, you will need to use the Flash Shift mid-air to save time. As you land, activate your Shinespark and tilt your analog stick to the top left to hit the Speed Boost Blocks.
Energy Tanks
| All Cataris Energy Tank Locations |
|---|
 View Full Map Image |
| Item / Details | Map | Screen |
|---|---|---|
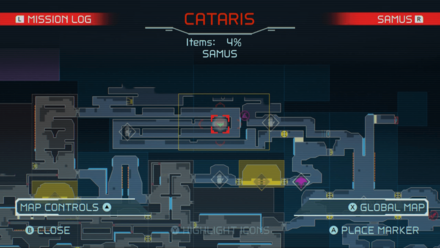
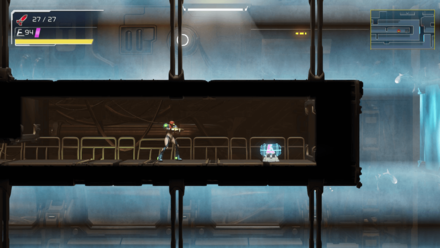
| Energy Tank 01
(Energy Part)
How to Get: After lowering the lava, backtrack through the hallways to reach this Energy Part. You can alternate wall-jumping off both walls to reach the top of the room. |
 |
 |
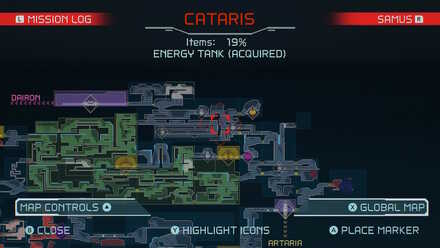
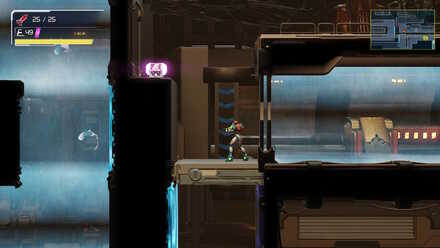
| Energy Tank 02
How to Get: Lower the magnetic platform in the room directly below. To access this room you will need to shoot open some blocks above a magnetic strip in the room with an Energy Recharge Station at the bottom. Once the platform is lowered go back up to get the item. Required Ability: • Spider Magnet |
 |
 |
| Energy Tank 03
(Energy Part)
How to Get: This is a Shinespark Puzzle. With your back against the Power Bomb Block wall, activate your Speed Booster and store your Shinespark just before you hit the ledge. After, drop down and activate your Shinespark upwards. Required Ability: • Speed Booster • Grapple Beam • Gravity Suit • Power Bomb • Wave Beam |
 |
 |
Speed Booster and Shinespark Puzzle Solutions
Energy Tank 03
This Energy Tank can be found around the Purple Teleporter. This puzzle will have multiple parts. You will also need the Gravity Suit as well as the Wave Beam to access this room.
| How to Solve: Step 1 |
|---|
 Once you have the Wave Beam, shoot the Wave Beam Door through the floor. Go through the door from the other side to access the next lava area. |
| Step 1: Map Location |
 |
| How to Solve: Step 2 |
 Proceed through the lava area and use the Grapple Beam to clear the Grapple Beam Block. |
| How to Solve: Step 3 |
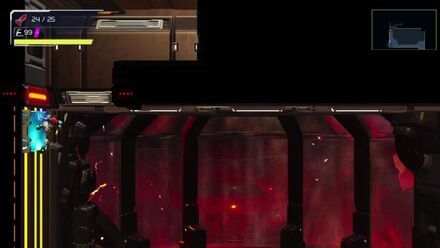
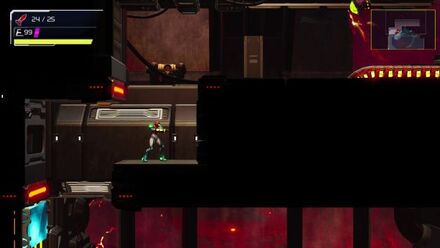
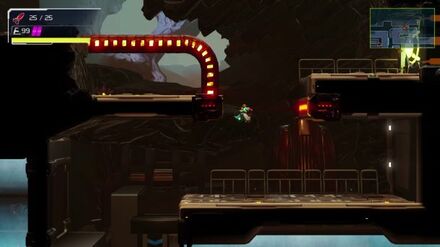
Go back to the other lava room on the left side. Destroying the Power Bomb Blocks is not required, but it gives you extra time to charge your Shinespark. Store a Shinespark just before you drop down the ledge. Once charged, drop down and aim your Shinespark upwards to destroy the blocks! |
| Step 3: Map Location |
|
Power Bombs
| All Cataris Power Bomb Tank Locations |
|---|
 View Full Map Image |
| Item / Details | Map | Screen |
|---|---|---|
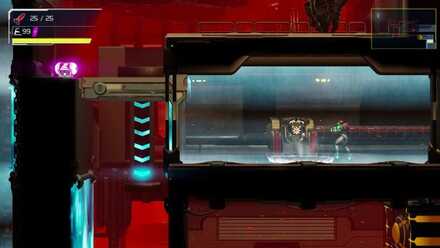
| Power Bomb Tank 01
How to Get: Head up to this area using the Grapple Beam. Break the Power Beam, Bomb, and Missile Blocks quick enough to bring the platform down. Required Ability: • Spider Magnet • Morph Ball • Varia Suit • Grapple Beam |
 |
 |
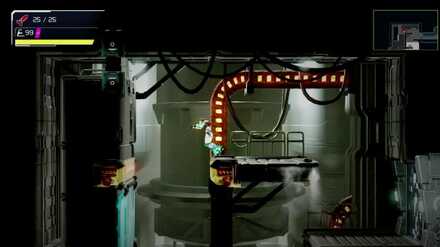
| Power Bomb Tank 02
How to Get: Once you have the Gravity Suit, go back to Kraid's boss room and slide under the right side. Go through the Morph Ball maze using Bombs to clear the way. Use the Grapple Beam to gain access to the Power Bomb Tank. Required Ability: • Morph Ball • Bomb • Grapple Beam • Gravity Suit |
 |
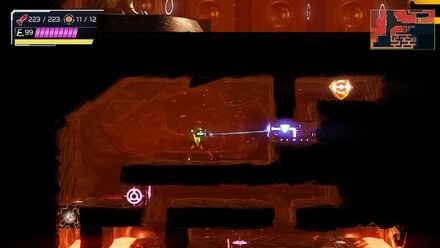 |
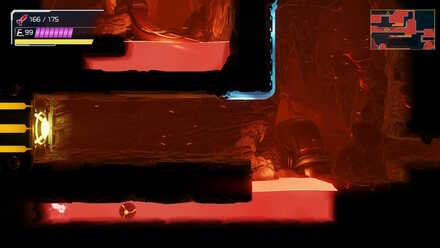
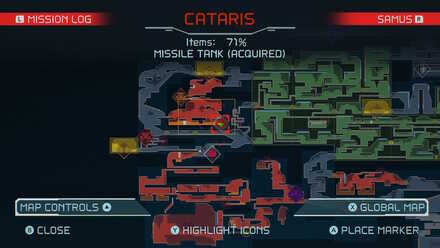
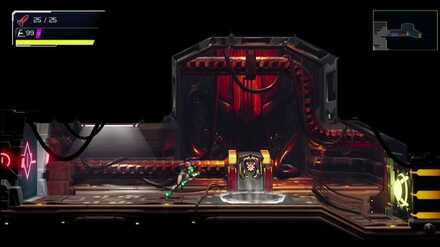
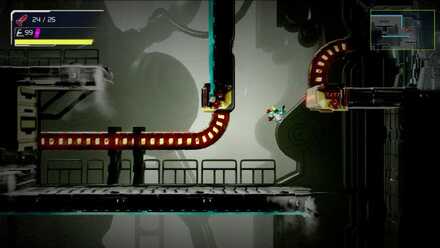
| Power Bomb Tank 03
How to Get: First destroy the Power Bomb Block. Go to the room to the upper left and use the Speed Booster. Store a Shinespark and slide under the wall in the next room. Drop down and turn into a Morph Ball, follow the path until you can drop down and unleash the Shinespark to get this Power Bomb Tank. Required Ability: • Morph Ball • Speed Booster • Power Bomb |
 |
 |
Speed Booster and Shinespark Puzzle Solutions
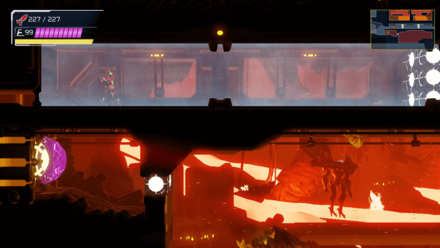
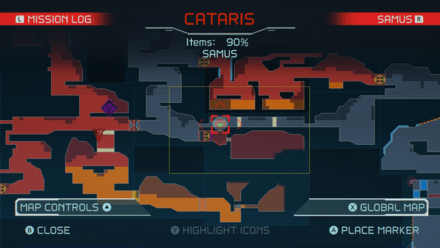
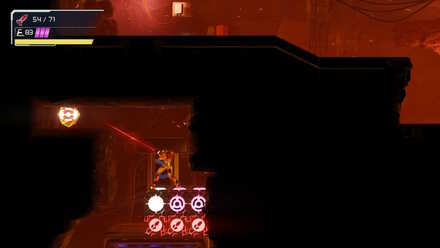
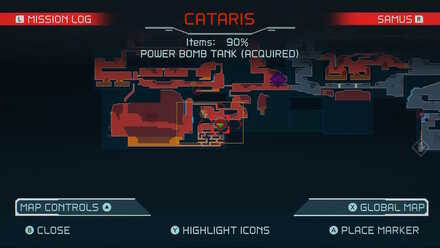
Power Bomb Tank 03
| How to Solve |
|---|
|
| Map Location |
|
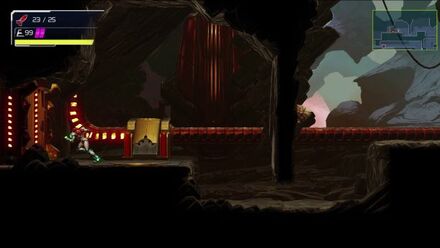
You can find this Power Bomb Tank around the middle of the map, inside a Morph Ball hallway in the EMMI zone. You will need to first destroy the Power Bomb Block with the Power Bomb while inside the vents. Once removed, go to the room above and give yourself enough distance to use the Speed Booster and store a Shinespark. Once stored, quickly go back inside the vents and then use the Shinespark while in Morph Ball mode to go grab the Power Bomb Tank.
Cataris Bosses
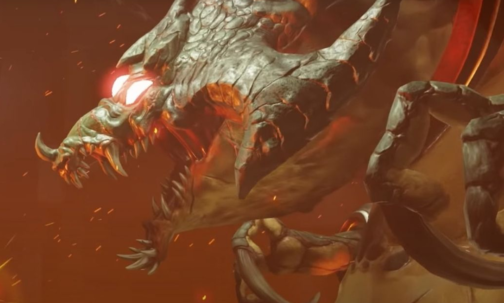
Kraid
| Kraid | ||
|---|---|---|
 |
||
| Rewards | No Rewards | |
| Kraid Boss Tips |
|---|
|
✔ Shoot missiles or fully charged beams at Kraid's mouth to deal damage. ✔ Avoid Kraid's projectiles or shoot them to recover Missiles and Energy. ✔ After dropping down to the lower area, shoot at Kraid's stomach wound. ✔ Cling to the Spider Magnet Strip on the left wall and Shoot at Kraid's mouth. ✔ Pro Tip: Defeat Kraid with Bombs if you unlock the Bombs early. |
How to Beat Kraid: Boss Fight Guide
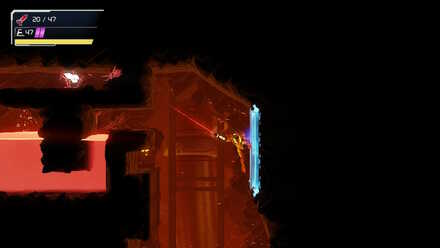
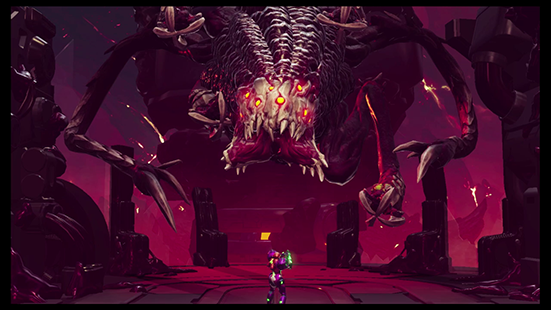
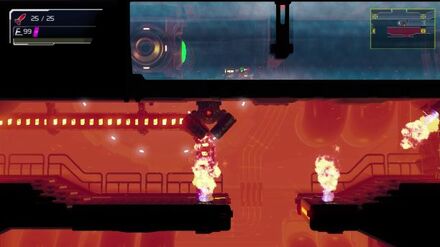
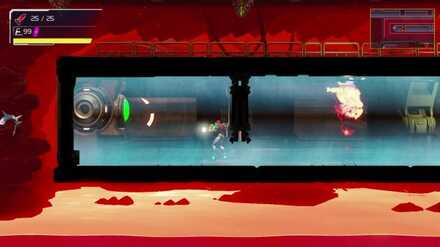
Experiment No. Z-57
| Experiment No. Z-57 | ||
|---|---|---|
 |
||
| Rewards | No Rewards | |
| Experiment No. Z-57 Boss Tips |
|---|
|
✔ Use Storm Missile attacks on its head ✔ Space Jump to avoid the slashes ✔ Use Flash Shift to jump to the safe area when Z-57 shoots its laser ✔ Counter Z-57 when it goes in for the bite and then spam missiles during the cutscene ✔ Run against the wind and time your Space Jumps to avoid the laser shockwaves ✔ Pro Tip: Use Shinespark to deal fatal damage. |
How to Beat Experiment No. Z-57
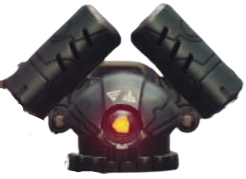
Cataris EMMI
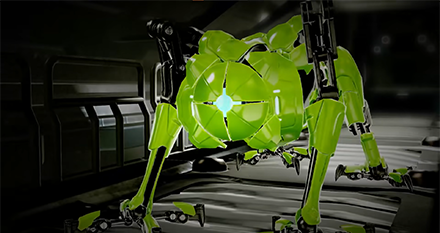
Green EMMI
| Green EMMI | ||
|---|---|---|
 |
||
| Rewards | Morph Ball | |
| Abilities | • Able to climb walls • Can fit through small spaces • Instant kill attack |
|
Green EMMI Map Location
| EMMI Zone Map |
|---|
 |
Upgrades and Power-Ups in Cataris
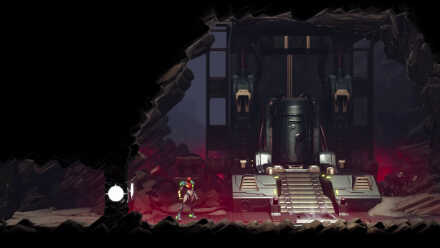
Diffusion Beam
| Diffusion Beam Location | |
|---|---|
 |
|
| Description | This beam causes Charge Beam to explode on impact and can penetrate through terrain. Diffusion Beam emits a purple ignition upon impact. |
| Upgrade Type | Beam |
How to Obtain the Diffusion Beam
Cataris Stations
Station Locations
| Map Icon Legends | ||
|---|---|---|
 Save Station Save Station |
 Network Station Network Station |
 Map Station Map Station |
 Ammo Recharge Station Ammo Recharge Station |
 Energy Recharge Station Energy Recharge Station |
 Total Recharge Station Total Recharge Station |
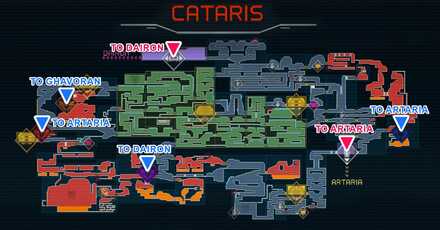
Cataris Transportation
Elevator, Tram, and Teleportal Locations
| Map Icon Legends | |
|---|---|
 Elevator or Shuttle Elevator or Shuttle |
Teleportal |
Elevator to Artaria
The Elevetor the Southeast of Cataris leads back to Artaria. Samus uses this elevator on her first visit to Cataris.
Shuttle to Dairon
The Shuttle to Dairon is located North of the map. Samus will first travel to this shuttle to obtain the Wide Beam from a secret room in Dairon.
Red Teleportal
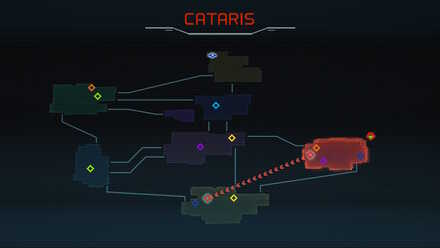
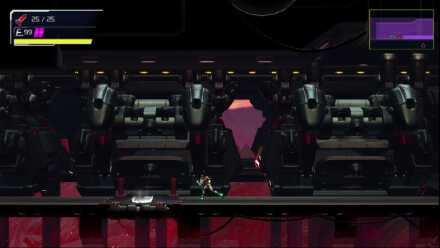
The Red Teleportal found to the West of the map leads back to Artaria. Samus first uses this Teleportal when she returns to Artaria to obtain the Varia Suit.
Purple Teleportal
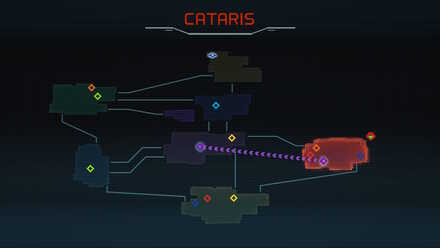
The Purple Teleporal found near the south side of the map leads to Dairon. After defeating Kraid, Samus can use this teleportal to travel to directly to Dairon
Blue Teleportal
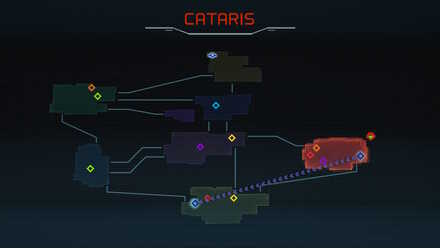
The Blue Teleportal is located on the east side of the map and leads back to Artaria, to reach the Blue Teleportal, you first need to obtain the Gravity Suit to swim through the lava.
Orange Teleportal
The Orange Teleportal is located on the northwest side of the map and leads to Ghavaron. It is one of the few Teleportals that is not required to complete the game.
Cataris Interactables
Thermal Fuel Switches
| Map Icon Legends | |
|---|---|
| Thermal Door |
Thermal Fuel Switch |
| Switch No. | Doors Controlled |
|---|---|
 |
     |
 |
 |
 |
 |
 |
  |
Buttons
| Button No. | Effect |
|---|---|
 |
Activates the moving Blue Magnetic Strips above. |
 |
Activates the moving Blue Magnetic Strips in the room above. |
 |
Drains the lava from the room below and removes the heat. |
Enemies in Cataris
| List of Enemies | ||
|---|---|---|
|
|
 Vulkran Vulkran
|
 Autclast Autclast
|
|
|
 Unknown Unknown
|
 Unknown Unknown
|
 Unknown Unknown
|
 Unknown Unknown
|
 Unknown Unknown
|
 Unknown Unknown
|
 Unknown Unknown
|
|
Metroid Dread Related Guides
 Artaria Artaria |
 Cataris Cataris |
 Dairon Dairon |
 Burenia Burenia |
 Ghavoran Ghavoran |
 Ferenia Ferenia |
 Elun Elun |
 Hanubia Hanubia |
 Itorash Itorash |
- |
Author

Cataris Area Map and 100% Items Guide
Please participate in our site
improvement survey
03/2026
improvement survey
03/2026
Would you assist in
improving Game8's site?
improving Game8's site?

×
We are listening to our users' valuable opinions and discussing how to act on them.
The information collected through this survey will be used for the purpose of improving our services. In addition, the information will only be disclosed a part of a statistic in a format that will not allow identification of personal information.
Begin Survey
Not Now
×
Please rate each item regarding Game8.co's Advertisements.
Amount of Ads
Very Dissatisfied
Somewhat Dissatisfied
Fine
Somewhat Satisfied
Highly Satisfied
Placement of Ads
Timing of Ad Display
Ad Loading Speed
Safeness of Ads
Content of Ads
×
Please rate each item regarding Game8.co's Quality of Articles.
Amount of information
Very Dissatisfied
Somewhat Dissatisfied
Fine
Somewhat Satisfied
Highly Satisfied
Frequency of updates
Speed of new information
Accuracy of articles
Understandibility of articles
Readability of sentences
×
Please rate each item regarding Game8.co's Usability of the Site.
Ease of finding information
Very Dissatisfied
Somewhat Dissatisfied
Fine
Somewhat Satisfied
Highly Satisfied
Loading Speed
Use of Color
Font Size
Visibility of Images
Easy to Understand Layout
×
Please rate each item regarding Game8.co's Message Boards, Comments.
Ease of Writing
Very Dissatisfied
Somewhat Dissatisfied
Fine
Somewhat Satisfied
Highly Satisfied
Readability
Ease in Finding Information
Comment Quality
Comment Quantity
Admin Response
×
Please rate each item regarding Game8.co's Site's new design.
Please rate our site's new design
Very Dissatisfied
Somewhat Dissatisfied
Fine
Somewhat Satisfied
Highly Satisfied
Do you think that the website's design change makes the site easier to use?
Has the new design made it easier for you to find information on the site?
Has the new design improved the overall visual appeal of the site?
How would you rate your overall satisfaction with the new design of the site?
×
How likely are you to recommend Game8 to someone you know?
Very Unlikely
0
1
2
3
4
5
6
7
8
9
10
Very Likely
If you have other opinions regarding potential improvement to the website, please share them with us. We would appreciate your honest opinion.
Note: This is a free response section, so you can proceed without entering anything.
Note: Please be sure not to enter any kind of personal information into your response.
Note: Please be sure not to enter any kind of personal information into your response.
×
Thank You
×
Thank you for participating in our survey! Your answers will help us to improve the quality of our website and services.
We hope you continue to make use of Game8.
We hope you continue to make use of Game8.
Close
Rankings
- We could not find the message board you were looking for.
Gaming News


![Everwind Review [Early Access] | The Shaky First Step to A Very Long Journey](https://img.game8.co/4440226/ab079b1153298a042633dd1ef51e878e.png/thumb)

![Monster Hunter Stories 3 Review [First Impressions] | Simply Rejuvenating](https://img.game8.co/4438641/2a31b7702bd70e78ec8efd24661dacda.jpeg/thumb)
Popular Games

Genshin Impact Walkthrough & Guides Wiki
Honkai: Star Rail Walkthrough & Guides Wiki
Umamusume: Pretty Derby Walkthrough & Guides Wiki
Pokemon Pokopia Walkthrough & Guides Wiki
Resident Evil Requiem (RE9) Walkthrough & Guides Wiki
Monster Hunter Wilds Walkthrough & Guides Wiki
Wuthering Waves Walkthrough & Guides Wiki
Arknights: Endfield Walkthrough & Guides Wiki
Pokemon FireRed and LeafGreen (FRLG) Walkthrough & Guides Wiki
Pokemon TCG Pocket (PTCGP) Strategies & Guides Wiki


Recommended Games
Diablo 4: Vessel of Hatred Walkthrough & Guides Wiki
Fire Emblem Heroes (FEH) Walkthrough & Guides Wiki
Yu-Gi-Oh! Master Duel Walkthrough & Guides Wiki
Super Smash Bros. Ultimate Walkthrough & Guides Wiki
Pokemon Brilliant Diamond and Shining Pearl (BDSP) Walkthrough & Guides Wiki
Elden Ring Shadow of the Erdtree Walkthrough & Guides Wiki
Monster Hunter World Walkthrough & Guides Wiki
The Legend of Zelda: Tears of the Kingdom Walkthrough & Guides Wiki
Persona 3 Reload Walkthrough & Guides Wiki
Cyberpunk 2077: Ultimate Edition Walkthrough & Guides Wiki


All rights reserved
© Nintendo. Metroid and Nintendo Switch are trademarks of Nintendo. © 2021 Nintendo.
The copyrights of videos of games used in our content and other intellectual property rights belong to the provider of the game.
The contents we provide on this site were created personally by members of the Game8 editorial department.
We refuse the right to reuse or repost content taken without our permission such as data or images to other sites.
Y'all are missing a Power Bomb Tank in the SW section of the EMMI zone. Its in the middle of long section of morph ball tube.