Baramos' Lair Map and Strategy Guide
★ Best Personality | Best Equipment | Best Party
☆ Class Tier List | Vamp Guide | Monster Wrangler
★ Friendly Monsters | Sparkly Spots | Keys Guide
☆ EXP Farming | Money Farming | Seed Farming
★ Post Game (Spoilers!) | Missables | Trophy Guide
This is a map and strategy guide for the Baramos' Lair dungeon in Dragon Quest 3 (DQ3). It includes the recommended level for Baramos' Lair, the route to take, the location of treasure chests, obtainable items, and monsters that appear.
List of Contents
Baramos' Lair Location
Fly Around the Gondo Shrin Area
Baramos' Lair can be seen while flying with the Lamia around the vicinity of Gondo Shrine.
Olivia's Cape to Baramos' Lair Walkthrough
Baramos' Lair Map Overview (Recommended Level 33 - 34)
| Jump to a Baramos' Lair Floor! | ||
|---|---|---|
| Exterior | Floor 1-1 | Floor 1-2 |
| Basement Floor 1-1 | Basement Floor 1-2 | Basement Floor 1-3 |
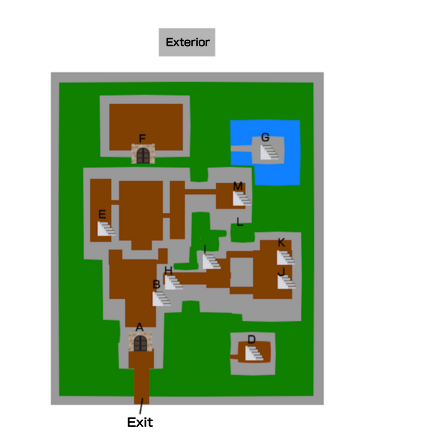
Baramos' Lair Exterior
| Baramos' Lair Exterior | ||
|---|---|---|
 |
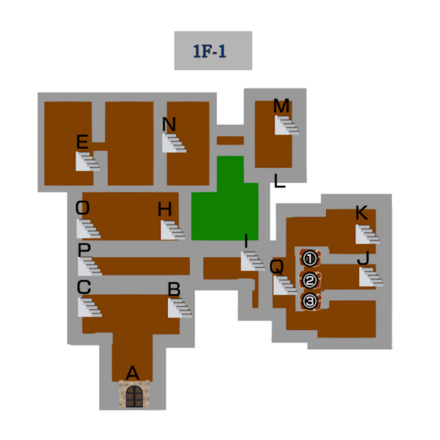
Baramos' Lair Floor 1-1
| Baramos' Lair 1F-1 | ||
|---|---|---|
 |
||
| Acquired Items | ||
| SNES Version | NES Version | |
| 1 | Headsman's Axe | Headsman's Axe |
| 2 | Wizard Ring | Wizard Ring |
| 3 | Misery Helm | Misery Helm |
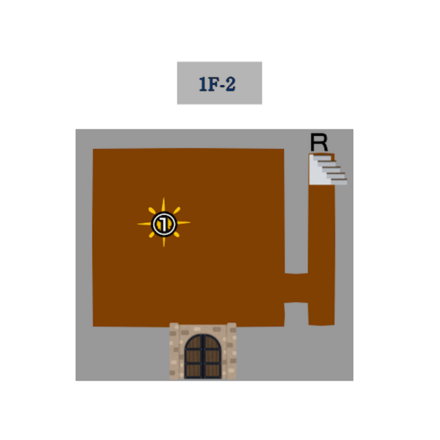
Baramos' Lair Floor 1-2
| Baramos' Lair 1F-2 | ||
|---|---|---|
 |
||
| Acquired Items | ||
| SNES Version | NES Version | |
| 1 | Mini Medal | - |
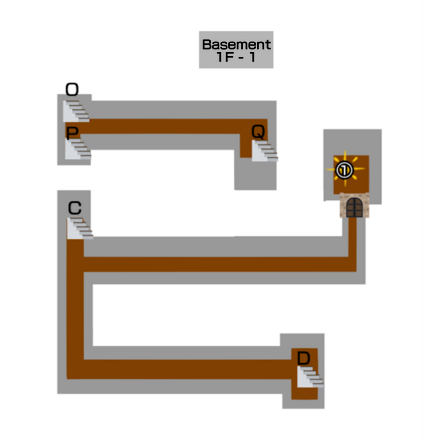
Baramos' Basement Floor 1-1
| Baramos' Lair Basement 1F-1 | ||
|---|---|---|
 |
||
| Acquired Items | ||
| SNES Version | NES Version | |
| 1 | Mini Medal | - |
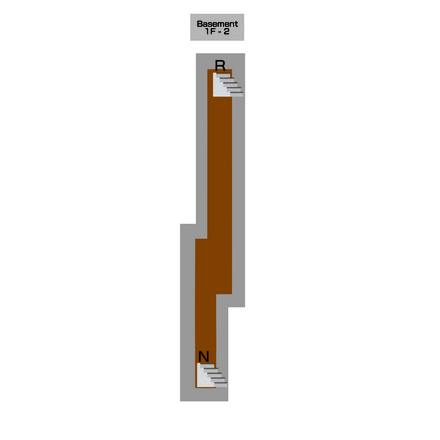
Baramos' Lair Basement Floor 1-2
| Baramos' Lair Basement 1F-2 | ||
|---|---|---|
 |
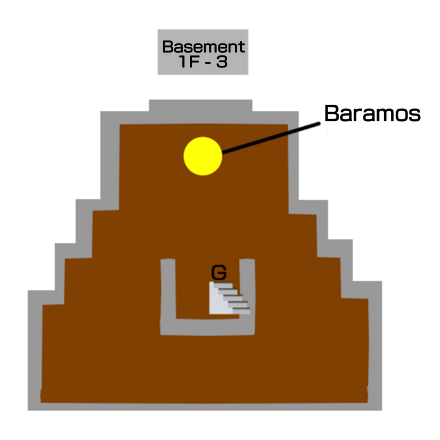
Baramos' Lair Basement Floor 1-3
| Baramos' Lair Basement 1F-3 | ||
|---|---|---|
 |
Baramos' Lair Strategy Guide
Defeat Baramos
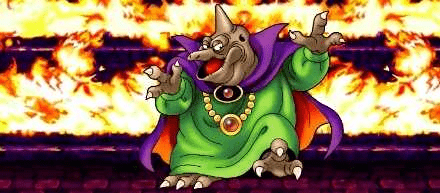
As the name suggests, Baramos awaits you at Baramos' Lair. Your goal is to defeat him, so make sure you are well equipped and prepared with items.
Level Up at Baramos' Lair
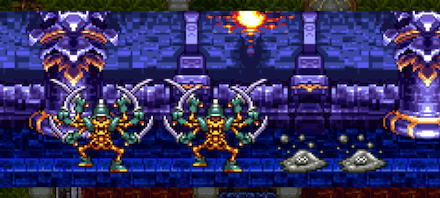
Mettables also appear in Baramos' Lair. You get a lot of EXP by defeating it, so it is also recommended to use this location to level up your characters.
Defeat Baramos Alone to Get the Bastard Sword
If you defeat Baramos with only one character in your party, you will receive a Bastard Sword from the King of Aliahan. This equipment will be available in other weapon shops in the future, but it may be a good idea to try obtaining it as a solo challenge.
Baramos' Lair Enemies
| List of Enemies |
|
|
|---|---|
|
|
|
|
|
|
Dragon Quest 3 HD-2D Remake Related Guides

List of All Towns
List of All Dungeons
Comment
Author
Baramos' Lair Map and Strategy Guide
improvement survey
03/2026
improving Game8's site?

Your answers will help us to improve our website.
Note: Please be sure not to enter any kind of personal information into your response.

We hope you continue to make use of Game8.
Rankings
- We could not find the message board you were looking for.
Gaming News
Popular Games

Genshin Impact Walkthrough & Guides Wiki

Honkai: Star Rail Walkthrough & Guides Wiki

Umamusume: Pretty Derby Walkthrough & Guides Wiki

Pokemon Pokopia Walkthrough & Guides Wiki

Resident Evil Requiem (RE9) Walkthrough & Guides Wiki

Monster Hunter Wilds Walkthrough & Guides Wiki

Wuthering Waves Walkthrough & Guides Wiki

Arknights: Endfield Walkthrough & Guides Wiki

Pokemon FireRed and LeafGreen (FRLG) Walkthrough & Guides Wiki

Pokemon TCG Pocket (PTCGP) Strategies & Guides Wiki
Recommended Games

Fire Emblem Heroes (FEH) Walkthrough & Guides Wiki

Diablo 4: Vessel of Hatred Walkthrough & Guides Wiki

Yu-Gi-Oh! Master Duel Walkthrough & Guides Wiki

Super Smash Bros. Ultimate Walkthrough & Guides Wiki

Pokemon Brilliant Diamond and Shining Pearl (BDSP) Walkthrough & Guides Wiki

Elden Ring Shadow of the Erdtree Walkthrough & Guides Wiki

Monster Hunter World Walkthrough & Guides Wiki

The Legend of Zelda: Tears of the Kingdom Walkthrough & Guides Wiki

Persona 3 Reload Walkthrough & Guides Wiki

Cyberpunk 2077: Ultimate Edition Walkthrough & Guides Wiki
All rights reserved
© ARMOR PROJECT/BIRD STUDIO/SPIKE CHUNSOFT/SQUARE ENIX
© SUGIYAMA KOBO ℗ SUGIYAMA KOBO
The copyrights of videos of games used in our content and other intellectual property rights belong to the provider of the game.
The contents we provide on this site were created personally by members of the Game8 editorial department.
We refuse the right to reuse or repost content taken without our permission such as data or images to other sites.





![Slay the Spire 2 Review [Early Access] | Still the Deckbuilder to Beat](https://img.game8.co/4433115/44e19e1fb0b4755466b9e516ec7ffb1e.png/thumb)

![Resident Evil Village Review [Switch 2] | Almost Flawless Port](https://img.game8.co/4432790/e1859f64830960ce4248d898f8cd38d9.jpeg/thumb)


