This survey will take about 1 minute.
Your answers will help us to improve our website.
Skull and Bones
Best Settings
Skull and Bones offers a wide variety of settings on PC and Console for you to tweak and optimize your gameplay experience. Check out the best gameplay, graphics, and controller settings for PC and Console in our guide!
List of Contents
Best Gameplay Settings
Turn Off Auto Harvester
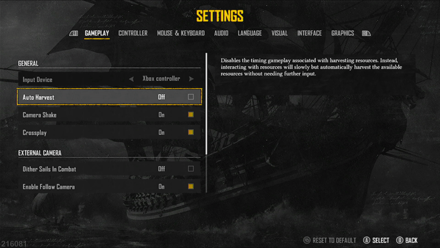
Leaving Auto Harvester on Off disables the timing mini game when harvesting resources. This means that you will slowly farm resources automatically upon interacting with them without any additional effort on your part.
Disable Crossplay to Connect to Servers Easily
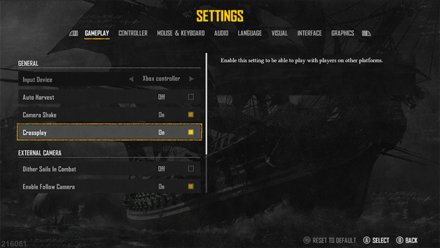
If you're having trouble connecting to the Skull and Bones online servers, a good temporary fix is to turn off Crossplay. This is a well-known solution that works in other games that also have the Crossplay feature.
What To Do When No Server Available
Best Graphics Settings
Recommended Graphics Settings
| Settings | Recommended |
|---|---|
| Graphics Mode | Performance |
| Depth of Field | Off |
| Motion Blur | Off |
For Graphics Mode, we recommend setting it to Performance to prioritize higher framerates for smoother gameplay in exchange for lower resolution and graphics detail. This also reduces the workload of your console and prevents it from overheating.
Depth of Field and Motion Blur can both be set to Off, since these two options offer no gameplay advantage and are only cinematic effects that can easily be ignored.
Best Controller Settings
Enable Aim Assist
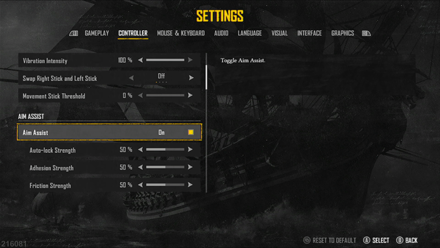
Console players are highly recommended to turn on Aim Assist as aiming with a controller is a lot more difficult compared to using a Mouse and Keyboard. Players can also adjust the sensitivity of the Auto-Lock feature to their own liking.
Toggle Auto-Orientation On
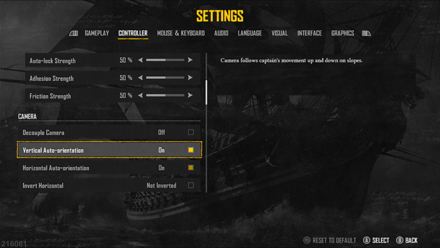
When Vertical and Horizontal Auto-Orientation is enabled, the third-person camera follows the player character's movements. This makes it easy to follow your character vision and you won't have to manually use the Right Analog Stick to adjust to your character's point-of-view.
Best PC Settings
Recommended PC Settings
| Settings | Recommended |
|---|---|
| Graphics Quality | High |
| Adaptive Quality | Off |
| TAA Quality | Very High |
| Shadows | Low / Medium |
| Environment | High |
| Clutter | Very High |
| Water | Low |
| Screen Space Reflections | On |
| Volumetric Clouds | High |
| Ambient Occlusion | On |
| Depth of Field | Off |
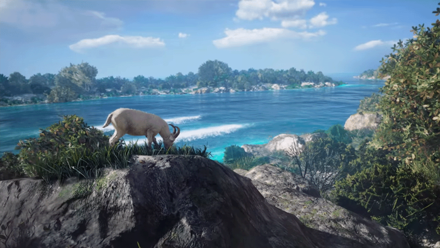
For PC graphics settings, we recommend setting most of it to High to enjoy the beautiful scenery of Skull and Bones. However, for Shadows and Water settings, you can set these to Low as these two will negatively impact your framerates and performance, as well as putting a heavy strain on your gaming rig.
Turn On Ray Tracing for Powerful GPUs
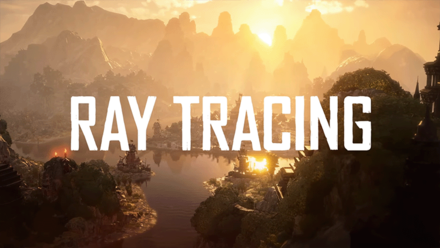
GPUs that are part of the RTX series will have access to Ray Tracing, a feature that greatly improves lighting quality when enabled. We only recommend this for RTX GPUs that are powerful enough to handle it (those that are part of the 30 and 40 series).
Best PS5 and Xbox Settings
Set Graphics Mode to Performance for Higher Framerates

Setting the Graphics Mode to Performance will lower the quality and resolution of the game, but will increase its framerate and smoothen out the overall gameplay experience.
Set Graphics Mode to Quality for Better Resolution
Setting the Graphics mode to Quality will provide a much more crispier resolution of the game, best suited for those who enjoy exploring while admiring the beautiful scenery that Skull and Bones has to offer.
Enable Aim Assist to Auto-Lock on Targets
Aim Assist allows Console players to auto-lock on their targets when aiming on the controller. This is a feature primarily helpful in combat as aiming with an Analog stick is proven to be a lot more difficult compared to a Mouse and Keyboard.
Skull and Bones Related Guides

Beginner's Guide: Tips and Tricks
All Tips and Tricks
Comment
Author

Please participate in our site
improvement survey
03/2026
improvement survey
03/2026
Would you assist in
improving Game8's site?
improving Game8's site?

×
We are listening to our users' valuable opinions and discussing how to act on them.
The information collected through this survey will be used for the purpose of improving our services. In addition, the information will only be disclosed a part of a statistic in a format that will not allow identification of personal information.
Begin Survey
Not Now
×
Please rate each item regarding Game8.co's Advertisements.
Amount of Ads
Very Dissatisfied
Somewhat Dissatisfied
Fine
Somewhat Satisfied
Highly Satisfied
Placement of Ads
Timing of Ad Display
Ad Loading Speed
Safeness of Ads
Content of Ads
×
Please rate each item regarding Game8.co's Quality of Articles.
Amount of information
Very Dissatisfied
Somewhat Dissatisfied
Fine
Somewhat Satisfied
Highly Satisfied
Frequency of updates
Speed of new information
Accuracy of articles
Understandibility of articles
Readability of sentences
×
Please rate each item regarding Game8.co's Usability of the Site.
Ease of finding information
Very Dissatisfied
Somewhat Dissatisfied
Fine
Somewhat Satisfied
Highly Satisfied
Loading Speed
Use of Color
Font Size
Visibility of Images
Easy to Understand Layout
×
Please rate each item regarding Game8.co's Message Boards, Comments.
Ease of Writing
Very Dissatisfied
Somewhat Dissatisfied
Fine
Somewhat Satisfied
Highly Satisfied
Readability
Ease in Finding Information
Comment Quality
Comment Quantity
Admin Response
×
Please rate each item regarding Game8.co's Site's new design.
Please rate our site's new design
Very Dissatisfied
Somewhat Dissatisfied
Fine
Somewhat Satisfied
Highly Satisfied
Do you think that the website's design change makes the site easier to use?
Has the new design made it easier for you to find information on the site?
Has the new design improved the overall visual appeal of the site?
How would you rate your overall satisfaction with the new design of the site?
×
How likely are you to recommend Game8 to someone you know?
Very Unlikely
0
1
2
3
4
5
6
7
8
9
10
Very Likely
If you have other opinions regarding potential improvement to the website, please share them with us. We would appreciate your honest opinion.
Note: This is a free response section, so you can proceed without entering anything.
Note: Please be sure not to enter any kind of personal information into your response.
Note: Please be sure not to enter any kind of personal information into your response.
×
Thank You
×
Thank you for participating in our survey! Your answers will help us to improve the quality of our website and services.
We hope you continue to make use of Game8.
We hope you continue to make use of Game8.
Close
Rankings
Gaming News


![Everwind Review [Early Access] | The Shaky First Step to A Very Long Journey](https://img.game8.co/4440226/ab079b1153298a042633dd1ef51e878e.png/thumb)

![Monster Hunter Stories 3 Review [First Impressions] | Simply Rejuvenating](https://img.game8.co/4438641/2a31b7702bd70e78ec8efd24661dacda.jpeg/thumb)
Popular Games

Genshin Impact Walkthrough & Guides Wiki
Honkai: Star Rail Walkthrough & Guides Wiki
Umamusume: Pretty Derby Walkthrough & Guides Wiki
Pokemon Pokopia Walkthrough & Guides Wiki
Resident Evil Requiem (RE9) Walkthrough & Guides Wiki
Monster Hunter Wilds Walkthrough & Guides Wiki
Wuthering Waves Walkthrough & Guides Wiki
Arknights: Endfield Walkthrough & Guides Wiki
Pokemon FireRed and LeafGreen (FRLG) Walkthrough & Guides Wiki
Pokemon TCG Pocket (PTCGP) Strategies & Guides Wiki


Recommended Games
Diablo 4: Vessel of Hatred Walkthrough & Guides Wiki
Fire Emblem Heroes (FEH) Walkthrough & Guides Wiki
Yu-Gi-Oh! Master Duel Walkthrough & Guides Wiki
Super Smash Bros. Ultimate Walkthrough & Guides Wiki
Pokemon Brilliant Diamond and Shining Pearl (BDSP) Walkthrough & Guides Wiki
Elden Ring Shadow of the Erdtree Walkthrough & Guides Wiki
Monster Hunter World Walkthrough & Guides Wiki
The Legend of Zelda: Tears of the Kingdom Walkthrough & Guides Wiki
Persona 3 Reload Walkthrough & Guides Wiki
Cyberpunk 2077: Ultimate Edition Walkthrough & Guides Wiki


All rights reserved
© 2022 Ubisoft Entertainment. All Rights Reserved. Skull and Bones, Ubisoft, and the Ubisoft logo are registered or unregistered trademarks of Ubisoft Entertainment in the US and/or other countries.
The copyrights of videos of games used in our content and other intellectual property rights belong to the provider of the game.
The contents we provide on this site were created personally by members of the Game8 editorial department.
We refuse the right to reuse or repost content taken without our permission such as data or images to other sites.