Pioneer Castle Dungeon Guide
☆ Get 100,000 Haze with our Haze Farming Guide!
★ Story Walkthrough | Requests
☆ Gear up with our best Weapons | Partners | Blood Codes | Jails | Formae!
★ Obtain the best outcomes with our Choices Guide!
Pioneer Castle is one of the dungeons in the Slaying the Hero Lyle quest in Code Vein 2. See this detailed guide to check out how to navigate the dungeon for lootable items and chests.
List of Contents
Pioneer Castle Walkthrough
| Pioneer Castle Mistles List | |
|---|---|
| 1 | In Front of the Castle Gate |
| 2 | Subterranean Administrative Ward |
| 3 | In Front of West Wing Elevator |
| 3 | West Wing Residential Block |
| 4 | Central Stairwell |
| 5 | East Wing |
| 7 | In Front of the Command Room |
Click on any of the links above to jump to the section!
In Front of the Castle Gate
| Step | Objectives |
|---|---|
| 1 | 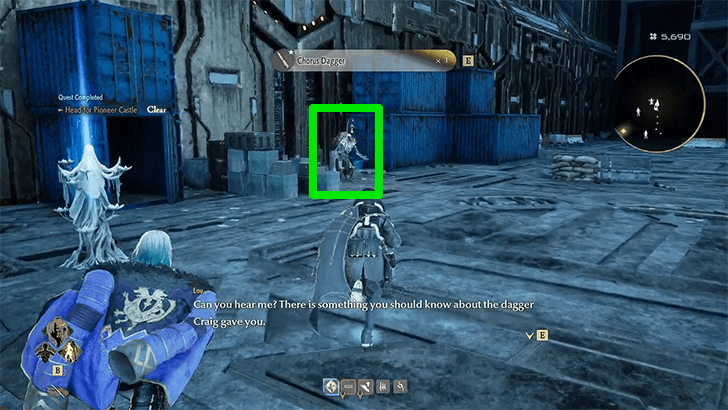 You can find a Jadwiga's Minion Shop to the right of the mistle. |
| 2 | 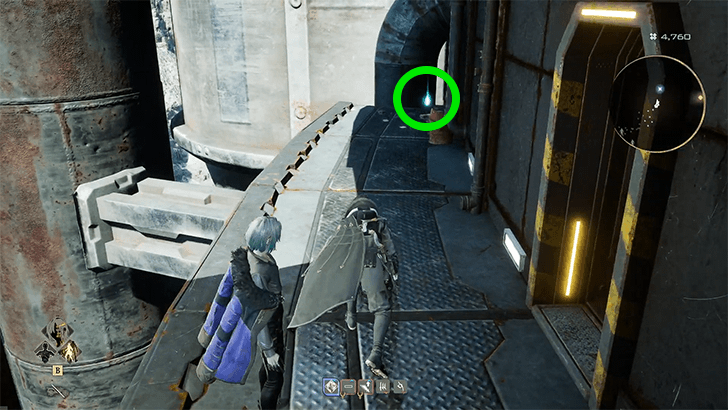 Head towards the left of the castle entrance through the Chorus camps, and go down the stairs to pick up the Anti-Fatal Leak next to the yellow and black striped door. Enter here after. |
| 3 | 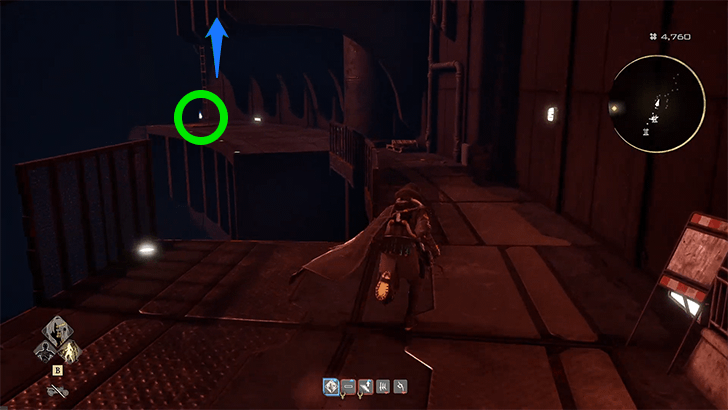 Once inside, head down to the ladder on the left, then make your way to the other end of the platform to pick up a Pure Platinum 1. Then, go up the ladder. |
| 4 | 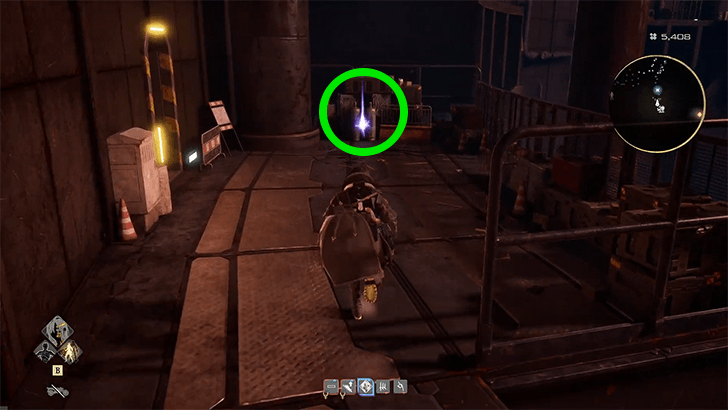 At the top of the ladder next to a door, you will find an Uncanny Stone. |
Subterranean Administrative Ward
| Step | Objectives |
|---|---|
| 1 | 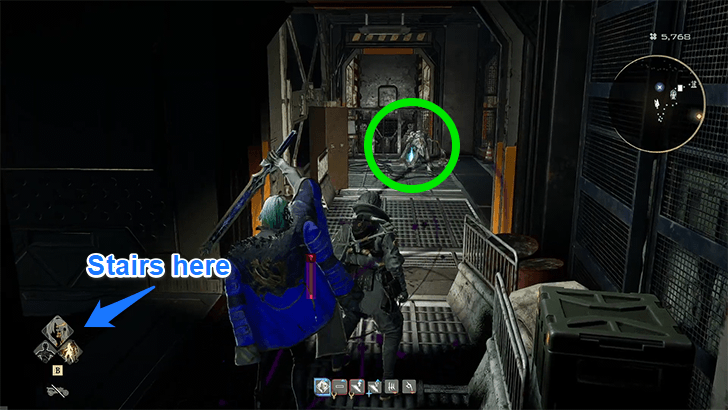 From the mistle, continue down the hallway until you come to a room where an enemy guards a blue item. Defeat the enemy to pick up Fatal Leak Vaccine. Then, turn around and go down the next few flights of stairs. |
| 2 | 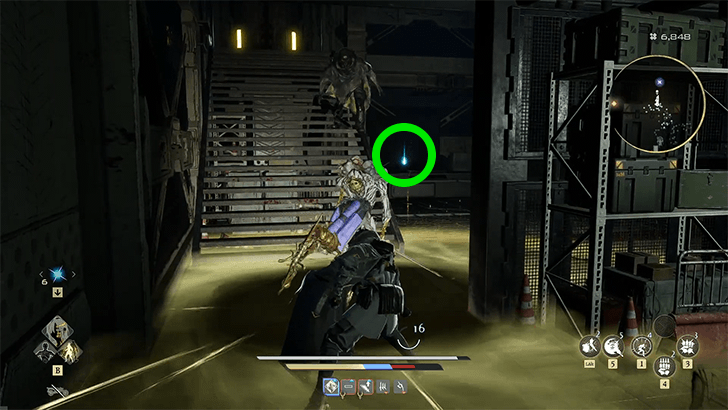 Continue the path while clearing the area of enemies until you get to a room with another blue item. Defeat the enemies to pick up Blood Injection S. |
| 3 | 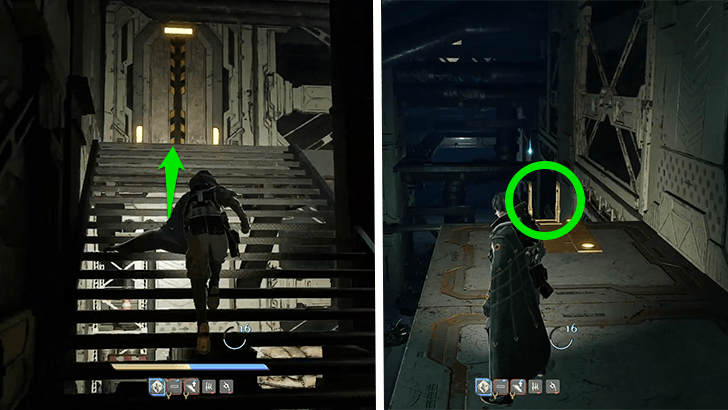 Go up the stairs and open the closed door. Then, head down to the ladder on your immediate right. |
| 4 | 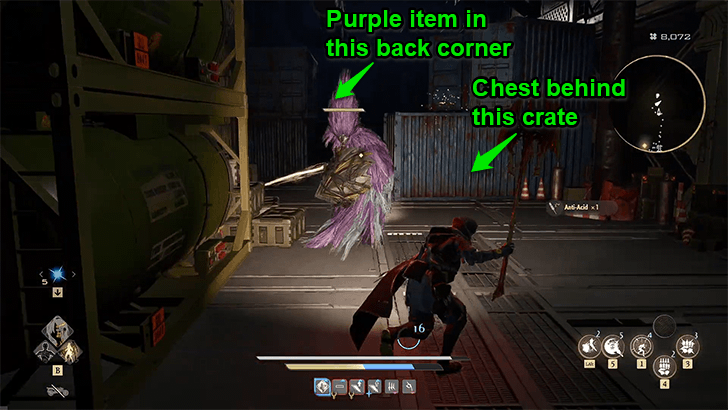 Defeat the enemies at the bottom, then head towards the blue metal crates. Eliminate the enemies there and get the chest containing the Mighty Smash Combat Formae behind the crate and the Tender Crimson Stone 2 in the far back corner. |
| 5 | 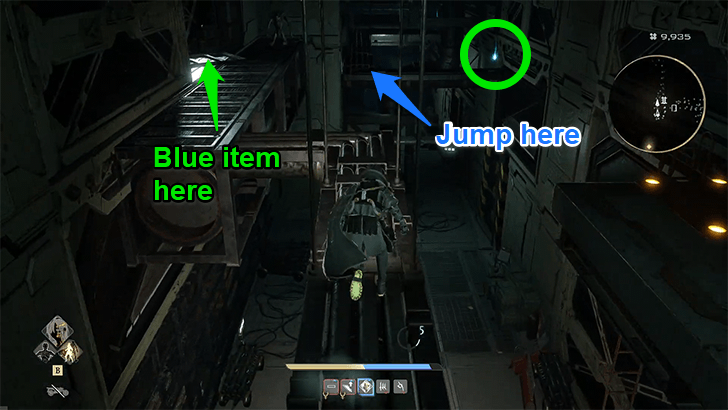 Go back up the ladder and walk on the pipe platforms. You will pass by an alcove containing a [ITEM]. Jump to the pipes after killing the enemy, then pick up the Flame Injection S before continuing. |
| 6 | 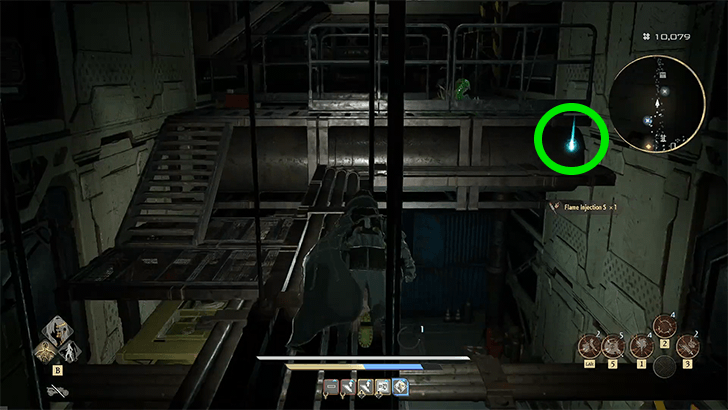 Keep following the pipe platforms to get the Citrus at the end, then ascend the next platforms. |
| 7 | 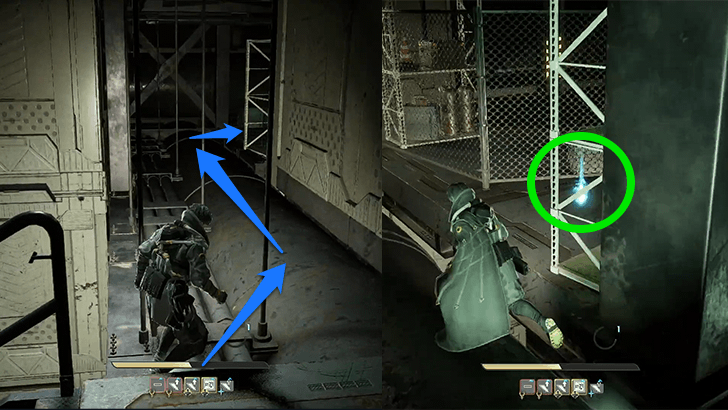 Once at the top, go left onto the big pipe and follow that path until you pass by the Icy Weapon Salve on the right. |
| 8 | 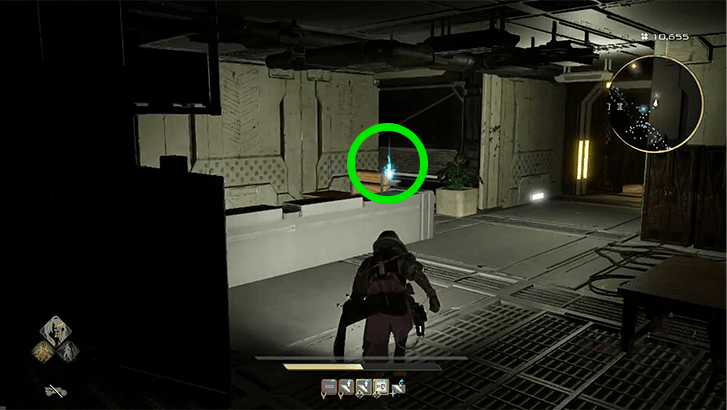 Descend through the doorway, then pick up the Chemical Light on the counter by the elevator. |
In Front of West Wing Elevator
| Step | Objectives |
|---|---|
| 1 | 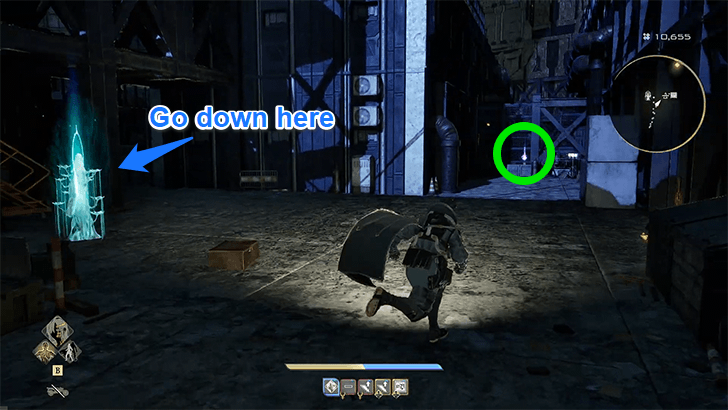 Head right of the West Wing Elevator to pick up a purple item. Then, go down the stairs to find two more purple items guarded by enemies. Pure Platinum 3: Can be found to the right of the West Wing Elevator in Pioneer Castle.
Tender Crimson Stone 4: Can be found below the In Front of West Wing Elevator mistle.
Heart Remnant 3: Can be found in a room below the In Front of West Wing Elevator mistle. |
| 2 | 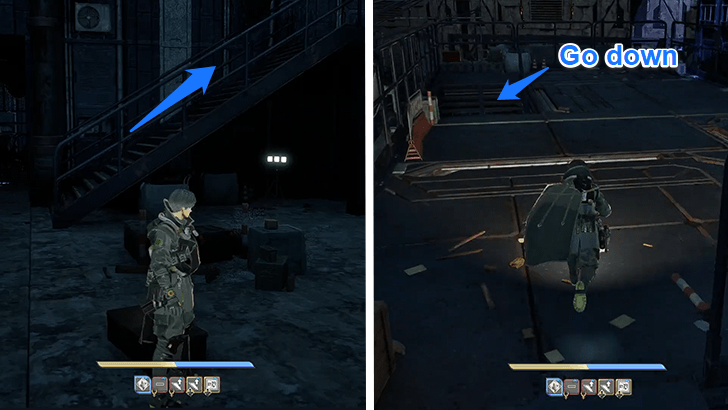 Fast travel back to the mistle, then go up the stairs to the left of the mistle towards the roof of the building. Face left and go down the stairs into the building. |
| 3 | 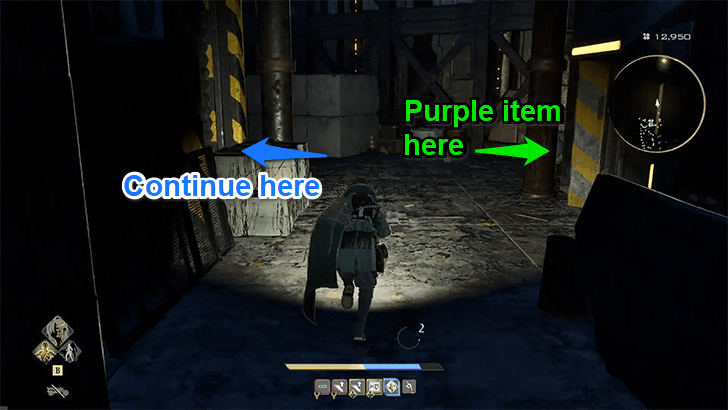 After defeating the enemies here, exit the building through the door at the bottom. When you reach the end of the alley, face right for a purple item, then go left to continue. Tender Crimson Stone 2: Can be found to the right of a small alley past the West Wing Elevator in Pioneer Castle. |
| 4 | 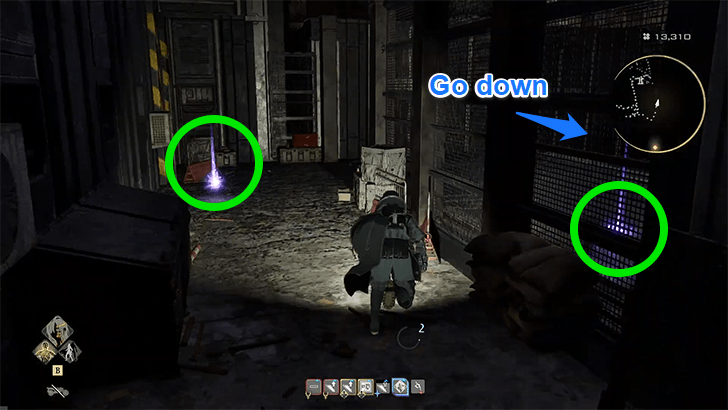 Make a U-turn to find two purple items near each other. Go down the stairs and defeat the enemies near the hotdog stand. Ichor Supplement: Can be found before the hotdog stand past the West Wing Elevator in Pioneer Castle.
Pure Platinum 4: Can be found before the hotdog stand past the West Wing Elevator in Pioneer Castle. |
| 5 | 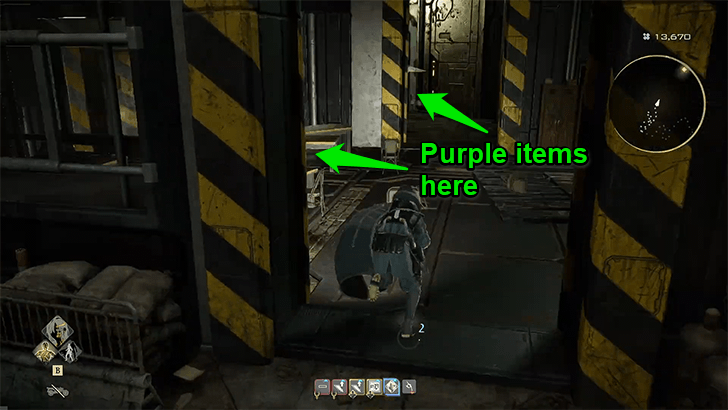 Go to the room on the left of the hotdog stand to find a purple item. Keep going towards the next room to find another purple item. Ascend the stairs and follow the path until you reach a room with a Map Jammer and the West Wing Residential Block mistle. Tender Light Stone 3: Can be found to the left of a hotdog stand past the West Wing Elevator in Pioneer Castle.
Pure Platinum 2: Can be found to the left of a hotdog stand past the West Wing Elevator in Pioneer Castle. |
West Wing Residential Block
| Step | Objectives |
|---|---|
| 1 | 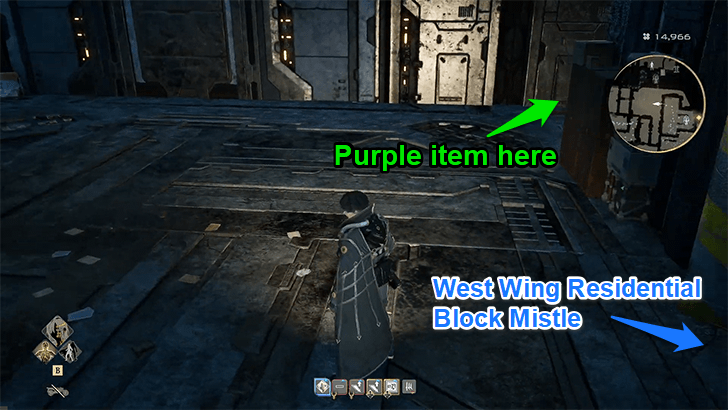 From the mistle, head to the exit on the right into an open area. Make a U-turn to the right and defeat an enemy to get a Tender Crimson Stone 2. |
| 2 | 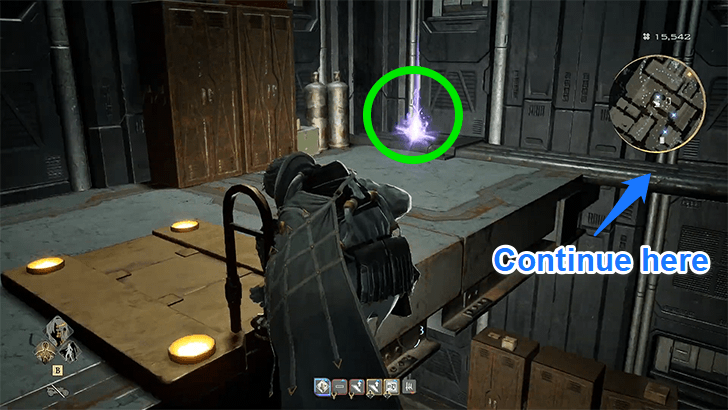 Turn back to the open area and interact with the closed door on the left side of the area. Go up the ladder to get a Pure Platinum 2. Then, go onto the pipe platforms again and jump down. After jumping down past the doorway, head right and defeat the enemies to pick up a Tender Crimson Stone 5. |
| 3 | 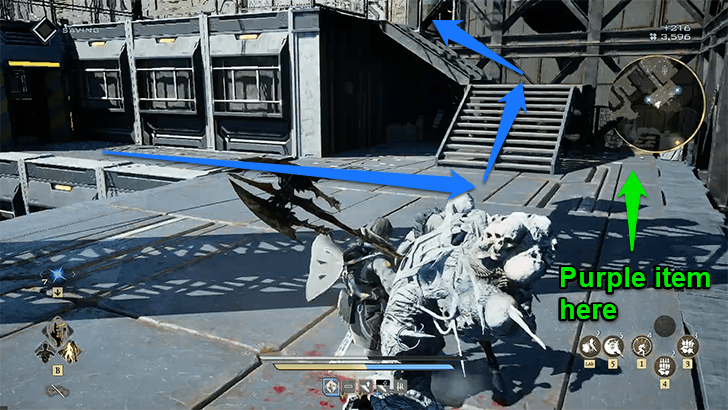 Fast travel back to the mistle to go up the right set of stairs. Ignore the doorway for now and defeat the enemy to access the roof. Get the Tender Crimson Stone 3 beside the staircase, then head up to the next floor of the roof. |
| 4 | 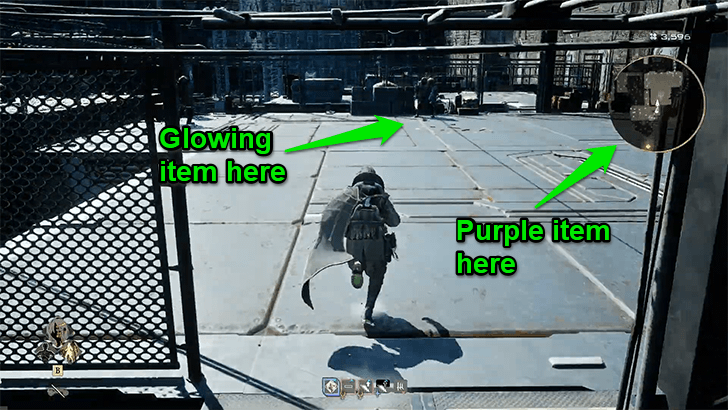 Defeat the enemies on this roof to freely get the Local Pennant and the Bunker Key items. |
| 5 |  Descend from the roof and go back to the doorway that was ignored earlier. Make your way through this section of the building until you exit towards the other side of the main castle gate. Approach the main castle gate for the Central Stairwell mistle. |
Central Stairwell
| Step | Objectives |
|---|---|
| 1 | 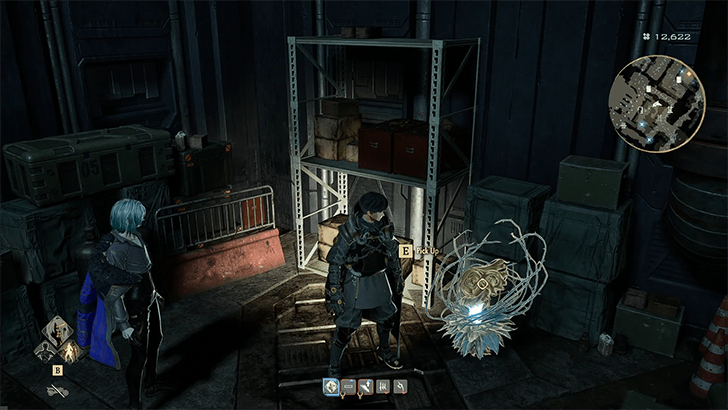 Descend the large staircase near the mistle and run towards the back of it. Interact with the closed door to open it, and you will find a Golden Nectar plant inside the room. |
| 2 | 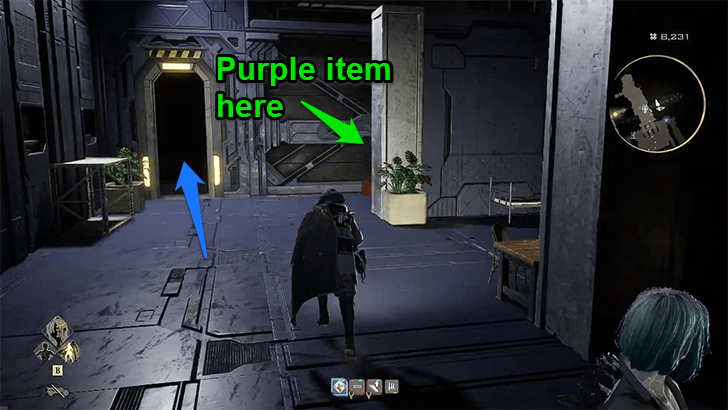 Head into the room next to the mistle. Pick up the Pure Platinum 5 before continuing towards the other side of the building. |
| 3 | 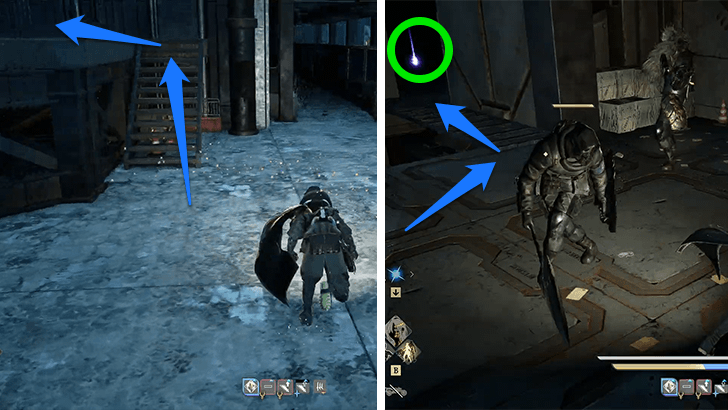 Once you exit, defeat the enemy and take the stairs on the left. Then, defeat another set of enemies to reach the Pure Platinum 5 in the corner. |
| 4 | 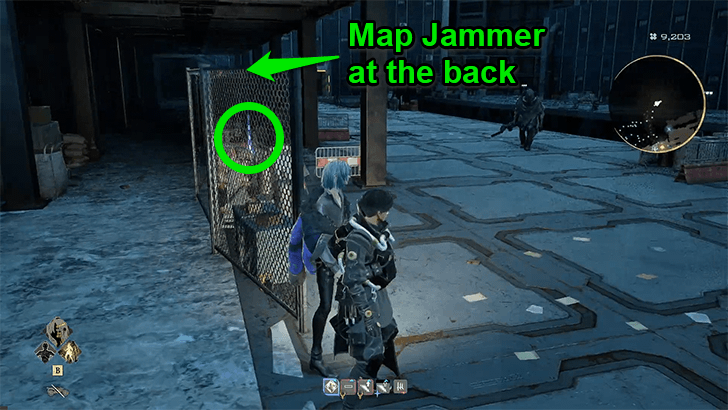 Go back down the stairs and go past the fence. Defeat enemies and pick up the Uncanny Stone and destroy the Map Jammer to reveal the map. Go up the sets of stairs next to the Map Jammer, then head inside the door. |
| 5 | 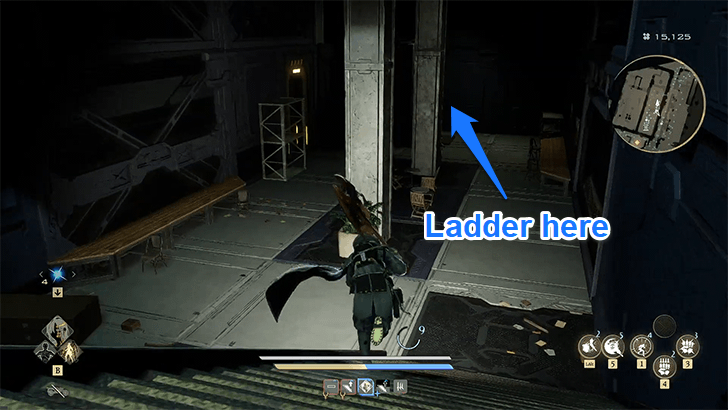 Once in the building, go down a few floors, then go up the ladder at the end of the bottom floor. Walk on the pipes to get the Tender Crimson Stone 4. |
| 6 | 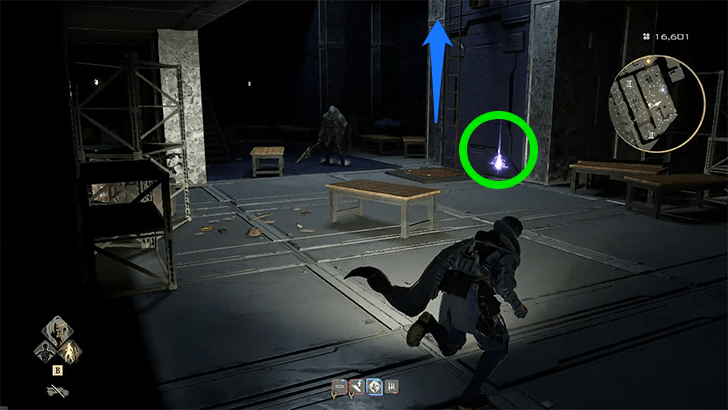 Jump down from the pipes, then proceed towards the left of the room. Defeat the enemies and go up the stairs to pick up the Pure Platinum 3. Go up the ladder, then enter the black and yellow-striped doorway to reach the East Wing mistle. |
East Wing
| Step | Objectives |
|---|---|
| 1 |  Face to the left of the East Wing mistle, then head to the farthest door to obtain the Tender Light Stone 3, then go back towards the mistle. |
| 2 | 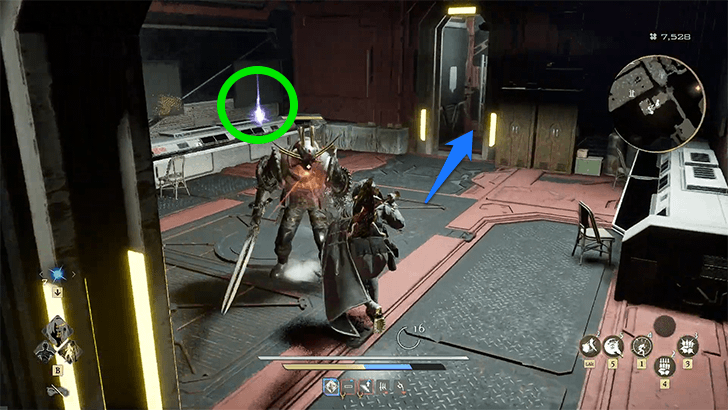 Go down the stairwell to the right of the mistle and defeat the enemies to pick up the Breath of Blood in the bottom room. Continue to the next door and go through the small hallway. |
| 3 | 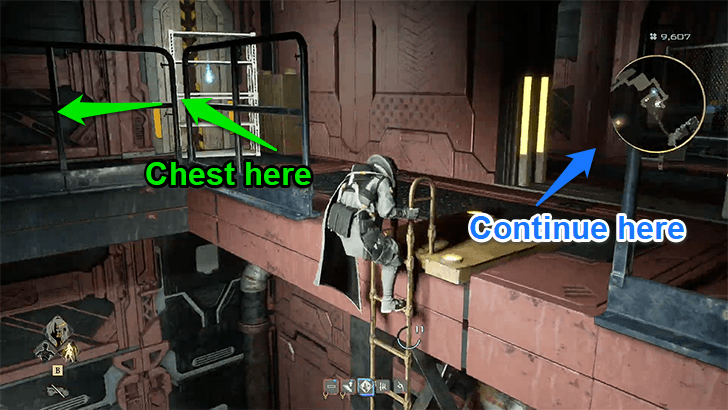 At the end of the hallway, go up the ladder. Go left to defeat the enemy to access a chest containing the Soul Stimulant, then proceed to the doorway to continue. |
| 4 | 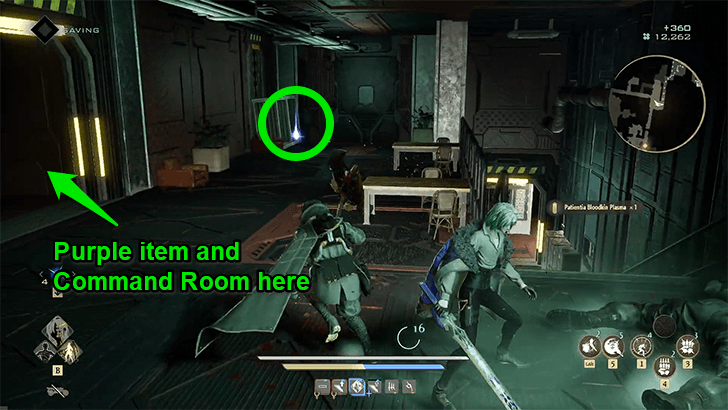 Keep following the path until you reach a sort of lounge area. Defeat the enemy here, then get the Uncanny Stone. Then, ascend the staircase in the middle. Grab the Tender Crimson Stone 3 in the small room on thr right, then keep going up the reach the Command Room and the In Front of Command Room mistle. |
In Front of Command Room
| Step | Objectives |
|---|---|
| 1 | 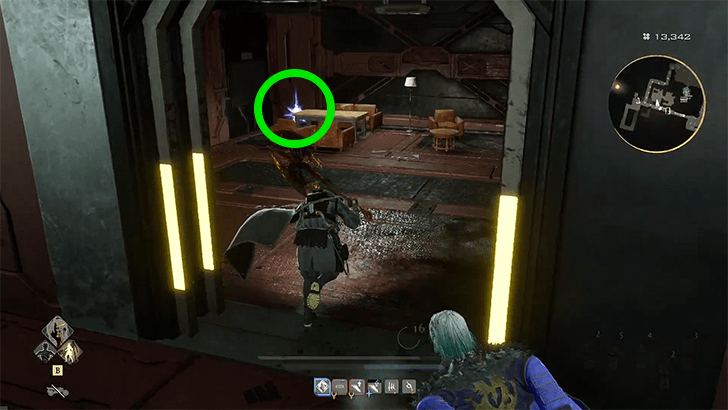 From the mistle, head left towards a staircase. Follow the path until you arrive at the narrow hallway. Go left to defeat the enemy and pick up the Tender Crimson Stone 3. Exit the room and proceed to the right, ignoring the elevator. |
| 2 | 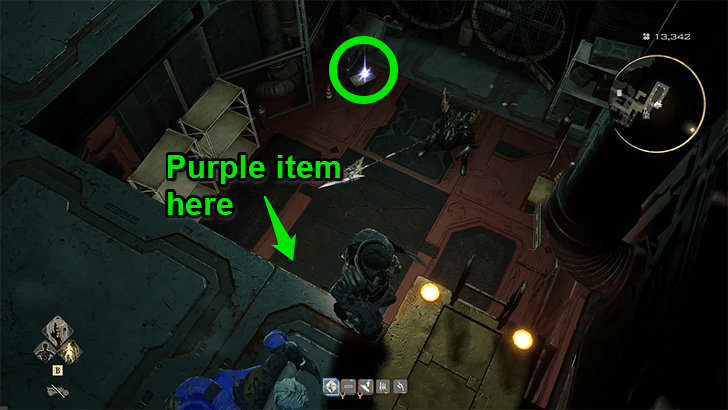 Continue down the flights of stairs until you see a ladder. Descend to the bottom to eliminate the enemies to get Pure Platinum 3, and Pure Platinum 2 in the connected small room. Go back up the ladder to proceed. |
| 3 | 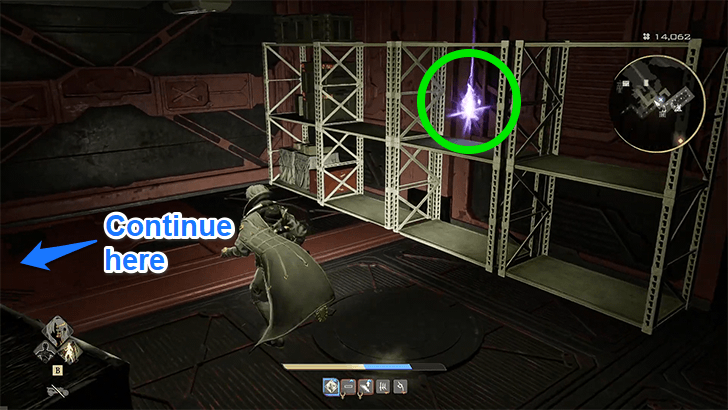 Go through the doorway and find a Tender Crimson Stone 4 on the shelves to the right. The path then leads to the room of the Tainted Scout boss fight. |
| 4 | 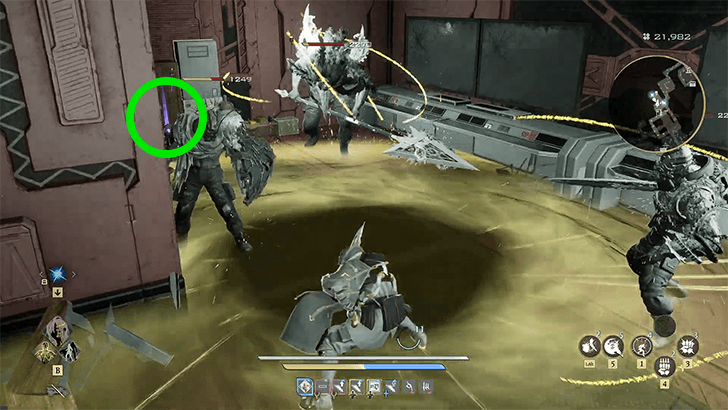 Before leaving this room, head up the other set of stairs to enter a room with three enemies. Defeat them to reach the Tender Crimson Stone 5. |
| 5 | 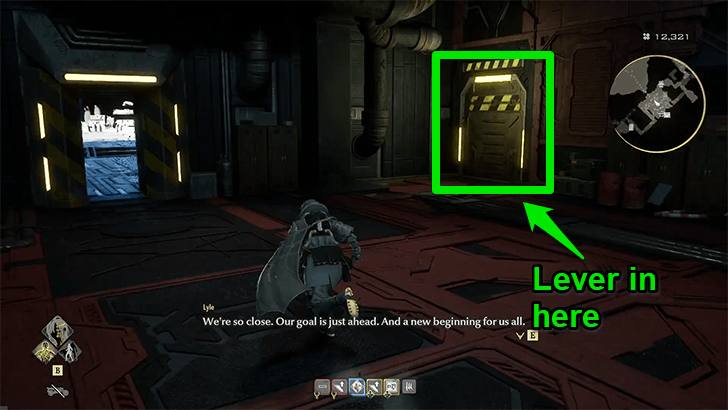 Eventually, when prompted to light the furnace during the quest, open the metal door in the Tainted Scout boss room to reach the lever to activate the furnace. |
How to Unlock Pioneer Castle
During the Slaying the Hero Lyle Quest
| Location | Corroded Scar |
|---|---|
| Unlock Requirements | ・During Slaying the Hero Lyle quest ・Obtain the Bridge Gate Key |
This dungeon is unlocked during the Slaying the Hero Lyle quest. You will need to obtain the Bridge Gate Key, which is given after slaying the two retainers.
Slaying the Hero Lyle Quest Walkthrough
Code Vein 2 Related Guides

| Code Vein 2 Contents | |
|---|---|
 Story Walkthrough Story Walkthrough |
 Weapons Weapons |
 Partners Partners |
 Bosses Bosses |
 Blood Codes Blood Codes |
 Jails Jails |
 Formae Formae |
 Boosters Boosters |
 Maps Maps |
 Items Items |
 NPCs NPCs |
 Tips and Tricks Tips and Tricks |
 Cosmetics Cosmetics |
 Builds Builds |
 Shops Shops |
 News and Game Info News and Game Info |
Recommended Guides
 Haze Farming Guide: How to Level Up Fast
 Best Early Game Build
 Best Weapons
 Best Blood Codes
 Best Jails
 Best Partners
 Best Weapon Formae
 Best Boosters
 How to Get the True Ending
 How to Access New Game Plus (NG+)
 Point of No Return
 Story and Timeline Explained
 Should You Save Noah?
 Repair Josee's Fading Bond
 Repair Lyle's Fading Bond
 Repair Holly's Fading Bond
 How to Increase Partner Affinity
 How to Unlock Partner Weapons
 How to Increase Booster Slots
 How to Increase Blood Code Proficiency
 Character Creation Guide
 Character Sharing Board
 How To Change Appearance
 How to Get All Achievements
 Revival and Return Monument Explained
 How To Check Buffs
Comment
Author

Pioneer Castle Dungeon Guide
Rankings
- We could not find the message board you were looking for.
Gaming News


![Marathon Cryo Archive Map Teased as [REDACTED] on Selection Screen](https://img.game8.co/4442236/6357203e58172f6de57f1991e7c39b22.png/thumb)


Popular Games

Genshin Impact Walkthrough & Guides Wiki
Umamusume: Pretty Derby Walkthrough & Guides Wiki
Pokemon Pokopia Walkthrough & Guides Wiki
Honkai: Star Rail Walkthrough & Guides Wiki
Monster Hunter Stories 3: Twisted Reflection Walkthrough & Guides Wiki
Arknights: Endfield Walkthrough & Guides Wiki
Wuthering Waves Walkthrough & Guides Wiki
Zenless Zone Zero Walkthrough & Guides Wiki
Pokemon TCG Pocket (PTCGP) Strategies & Guides Wiki
Monster Hunter Wilds Walkthrough & Guides Wiki


Recommended Games
Diablo 4: Vessel of Hatred Walkthrough & Guides Wiki
Cyberpunk 2077: Ultimate Edition Walkthrough & Guides Wiki
Fire Emblem Heroes (FEH) Walkthrough & Guides Wiki
Yu-Gi-Oh! Master Duel Walkthrough & Guides Wiki
Super Smash Bros. Ultimate Walkthrough & Guides Wiki
Pokemon Brilliant Diamond and Shining Pearl (BDSP) Walkthrough & Guides Wiki
Elden Ring Shadow of the Erdtree Walkthrough & Guides Wiki
Monster Hunter World Walkthrough & Guides Wiki
The Legend of Zelda: Tears of the Kingdom Walkthrough & Guides Wiki
Persona 3 Reload Walkthrough & Guides Wiki


All rights reserved
© Bandai Namco Entertainment America Inc. All third party content, brands, names, and logos are used under license and remain property of their respective owners. All rights reserved.
The copyrights of videos of games used in our content and other intellectual property rights belong to the provider of the game.
The contents we provide on this site were created personally by members of the Game8 editorial department.
We refuse the right to reuse or repost content taken without our permission such as data or images to other sites.