Attributes Guide: Status Explained
☆ Get 100,000 Haze with our Haze Farming Guide!
★ Story Walkthrough | Requests
☆ Gear up with our best Weapons | Partners | Blood Codes | Jails | Formae!
★ Obtain the best outcomes with our Choices Guide!
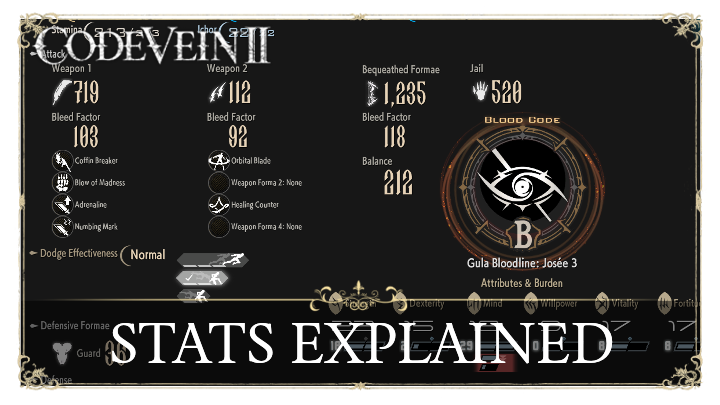
This is a guide to an explanation to all stats in Code Vein 2. Learn the description of each stat and how to increase them in this guide!
List of Contents
Stats Explained
Basic Stats
| Stats | Description |
|---|---|
| HP | This represents your character's health. Reducing your HP to 0 will cause your character to die. Your partner will perform Restorative Offering if they are not on cooldown, which will revive you. |
| LP | LP is your partner's HP. When enemies hit you with attacks, LP is depleted before your character's HP. Losing all LP removes the Link Trait granted by your partner. |
| Stamina | Attacking, dodging, and guarding all require stamina. If you run out of stamina, you'll be unable to perform these actions. |
| Ichor | Ichor is like your Mana points (MP), as they are required to cast Weapon Formae, Bequeathed Formae attacks, and some Defensive Formae. |
Both HP and LP are restored using the Regeneration item, but your HP is prioritized. There are some weapon formae, like the Healing Counter, which only restores LP when dodging or perfect guarding enemy attacks. Ichor can be replenished by using drain attacks.
Character Attributes
| Stats | Description |
|---|---|
| Strength | Mainly affects the attack power of heavy weapons such as Two-Handed Swords, Hammers and some Halberds. |
| Dexterity | Dexterity affects the attack power of light weapons such as the Twin Blades and Bayonets. |
| Mind | The Mind attribute mainly affects the effect duration of support formae. Having high Mind increases the duration of your buffs. |
| Willpower | Willpower mainly affects the attack power of magic formae. Magic formae are weapon formae under the Magic category. |
| Vitality | Having high Vitality increases maximum HP and LP. |
| Fortitude | Having high Fortitude increases maximum Stamina. |
| Burden | Burden is similar to weight, but for attributes. If the total burden from all the gear you have equipped exceeds your current attribute values, you will become overburdened, granting both benefits and penalties. |
Attributes are only affected by the Blood Code you have equipped. For example, certain Blood Codes have higher Strength, which makes them a good fit for heavy weapon users. You can also equip Boosters to increase your attribute values. Consuming certain food items provides similar effects, albeit temporarily.
Attributes have Burden, which originate from the gear you have equipped. Some Blood Codes and Boosters have traits that increase the Burden on your attributes. Depending on your build, you may want to overburden some attributes for their benefits.
Overburden Benefits and Penalty Guide
Attack Stats
| Stats | Description |
|---|---|
| Weapon Attack | Weapon Attack represents the damage you deal to enemies using your equipped weapons. Charged weapon attacks deal higher damage. This can be affected by support buffs, which can increase the damage you deal. |
| Bequeathed Formae | This represents the damage you deal to enemies by using you're equipped Bequeathed Formae. Some traits or boosters can affect this stat and increase their damage. |
| Bleed Factor | Bleed Factor determines the bleed buildup applied to enemies when attacking them. Having a high Bleed Factor restores more ichor from a successful Drain Attack, and the bleed buildup is then reset afterward. |
| Jail | The Jail stat determines the damage you deal with your equipped Jail. All Jails start with the same base attack, and upgrading them increases their attack stat. |
Attack Stat on Weapon Info is the Total of the Base and Modifier Values

The attack value shown on the weapon info screen is the total of the weapon’s Base and Modifier values. The Base refers to the weapon's base stats, which can be increased by leveling up the weapon. Modifier values are affected by your character's level as well as the attribute values the weapon scales with.
Weapon Formae Capacity
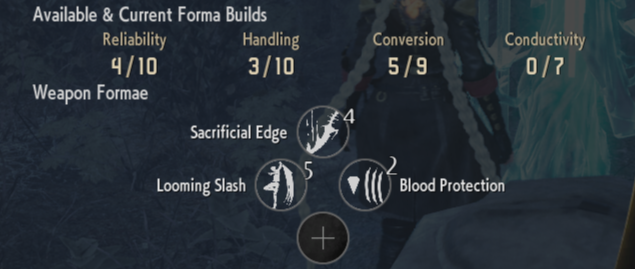
A weapon can have up to four weapon formae equipped, and each weapon forma has values in four categories: Reliability, Handling, Conversion, and Conductivity. Each weapon has a maximum value for each of these categories, and you cannot equip a weapon forma if its values exceed those limits.
These can be modified by transforming a weapon through Jadwiga. Some transformations imbue a weapon with permanent elemental attacks, while others modify its attribute scaling.
Defense Stats
| Stats | Description |
|---|---|
| Defense | The values under Defense refer to your character's damage reduction against specific attack types (Slash, Pierce, Crush) and elemental damage. |
| Guarding Defense | These values refer to your character's damage reduction while guarding, where a value of 100 will fully negate that specific damage type. |
| Guard | The Guard stat determines the stamina consumed when blocking an attack, where a higher value means less stamina is used. Executing a perfect guard by timing your block consumes about half of the stamina you would normally use while guarding. |
| Resistances | These determine your resistances to each status ailment category: Disease, Wound, Bleed, and Curse. |
| Balance | Balance determines your resistance to being disrupted by enemy attacks. Having high Balance means you'll be less likely to get staggered, which is useful when charging your attacks for high damage. |
Status Ailments and Categories List
| • Venom • Toxic Venom • Stun • Resurgence |
• Acid • Stone • Bind • Stall |
| • Leak • Fatal Leak • Inhibit • Dissonance • Eclipse |
• Slow • Luna • Rapacis • Sunblight |
Each category consists of different status ailments, and you can increase your resistance to a specific ailment by using consumables like vaccines or cure them outright. Status ailment category values are affected by the Blood Code and Defensive Forma you have equipped.
How to Increase Stats
Level Up Your Character at Mistles
Your stats are increased as you level up, however the increase are only limited to your character's HP, Stamina, Weapon attacks, Bequeathed Forma attack, and Drain attack power.
Haze Farming Guide: How to Level Up Fast
Code Vein 2 Related Guides
Beginner's Guide: Tips and Tricks to Get Started
Character Guides
| Overburden Benefits and Penalty Guide | Attributes Guide: Status Explained |
| Link Traits and Partner Trait Bonus | - |
Combat Guides
Exploration and Location Guides
| How to Get to the Sunken City | How to Get to the Undead Forest |
| How to Get to the Corroded Scar | How to Get to Insula Carcere |
| Pioneer Castle Dungeon Guide | How to Get Motorcycle |
Miscellaneous Guides
| How to Change Difficulty | List of Controls |
| How To Change Time | How To Use Items |
Comment
Author

Attributes Guide: Status Explained
Rankings
- We could not find the message board you were looking for.
Gaming News


![Monster Hunter Stories 3 Review [First Impressions] | Simply Rejuvenating](https://img.game8.co/4438641/2a31b7702bd70e78ec8efd24661dacda.jpeg/thumb)
Popular Games

Genshin Impact Walkthrough & Guides Wiki
Umamusume: Pretty Derby Walkthrough & Guides Wiki
Pokemon Pokopia Walkthrough & Guides Wiki
Honkai: Star Rail Walkthrough & Guides Wiki
Monster Hunter Stories 3: Twisted Reflection Walkthrough & Guides Wiki
Arknights: Endfield Walkthrough & Guides Wiki
Wuthering Waves Walkthrough & Guides Wiki
Zenless Zone Zero Walkthrough & Guides Wiki
Pokemon TCG Pocket (PTCGP) Strategies & Guides Wiki
Monster Hunter Wilds Walkthrough & Guides Wiki


Recommended Games
Diablo 4: Vessel of Hatred Walkthrough & Guides Wiki
Cyberpunk 2077: Ultimate Edition Walkthrough & Guides Wiki
Fire Emblem Heroes (FEH) Walkthrough & Guides Wiki
Yu-Gi-Oh! Master Duel Walkthrough & Guides Wiki
Super Smash Bros. Ultimate Walkthrough & Guides Wiki
Pokemon Brilliant Diamond and Shining Pearl (BDSP) Walkthrough & Guides Wiki
Elden Ring Shadow of the Erdtree Walkthrough & Guides Wiki
Monster Hunter World Walkthrough & Guides Wiki
The Legend of Zelda: Tears of the Kingdom Walkthrough & Guides Wiki
Persona 3 Reload Walkthrough & Guides Wiki


All rights reserved
© Bandai Namco Entertainment America Inc. All third party content, brands, names, and logos are used under license and remain property of their respective owners. All rights reserved.
The copyrights of videos of games used in our content and other intellectual property rights belong to the provider of the game.
The contents we provide on this site were created personally by members of the Game8 editorial department.
We refuse the right to reuse or repost content taken without our permission such as data or images to other sites.