Grandmaster 67: To the Master Guide
★ Latest Banners: Tiki: Everlasting Voice | Springtime Sisters
☆ New: Mythic Tiki (Adult) | Spring Thórr, Spring Dorothea, Spring Sothe, Spring Eirika
★ Free Units: Spring Bernadetta
☆ State of the Meta (February 2026)
This is a walkthrough for the Tactics Drill To the Master (Grandmaster 67), for Fire Emblem Heroes (FEH). For a step-by-step solution on how to beat this map, please read on.
| Other Tactics Drills Guides | |
|---|---|
| Previous Map | Hope and Despair |
| Next Map | Sweets in Moderation |
List of Contents
Grandmaster 67: To the Master
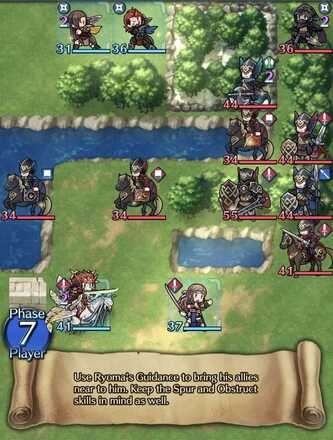
| Win Conditions | Clear Within 7 Phases |
|---|---|
| Reward for First Clear |
Party Members
|
|
|
|
|
Solution
- Move Saizo 2 spaces to the left.
- Move Kagero to the space below Saizo and take out the blue flier below.
- Move Hana to the space above Ryoma and use Rally Attack on him.
- Move Ryoma to the space above Hana and take out the blue flier.
- Ryoma will take out a foe in this enemy phase.
- Move Saizo 2 spaces to the right and attack the axe fighter. He will deal 0 damage but Poison Strike will kick-in after and deal damage. He will also debuff enemies in an area.
- Move Ryoma 1 space north.
- Because of Guidance, Kagero will be able to cross the lake. Move her to the space below Ryoma and attack the sword knight.
- Use Hana to finish of the sword knight by moving her to the space right of Kagero.
- Hana and Saizo will be attacked this phase, but they will deal lots of damage back.
- Move Hana to the space below Kagero and take out the sword cavalier.
- Move Ryoma 1 space to the right.
- Move Saizo to the space below Ryoma. He will be able to go to said space because of Guidance. Make sure to use Harsh Command on Kagero upon doing so.
- Move Kagero to the space below Saizo and take out the lance fighter.
- Saizo will take damage in this enemy phase.
- Move Kagero to the space above Ryoma and take out the thief at the top of the map.
- Move Ryoma 1 space to the right and take out the axe fighter.
- Move Saizo to the space above Ryoma and attack the sword fighter.
- Finally, use the formidable Hana to take out the sword fighter!
Tactics Drills Related Links
All Tactics Drills (Grandmaster)
Author

Grandmaster 67: To the Master Guide
Premium Articles
Rankings
- We could not find the message board you were looking for.
Gaming News


![Monster Hunter Stories 3 Review [First Impressions] | Simply Rejuvenating](https://img.game8.co/4438641/2a31b7702bd70e78ec8efd24661dacda.jpeg/thumb)
Popular Games

Genshin Impact Walkthrough & Guides Wiki
Honkai: Star Rail Walkthrough & Guides Wiki
Umamusume: Pretty Derby Walkthrough & Guides Wiki
Pokemon Pokopia Walkthrough & Guides Wiki
Resident Evil Requiem (RE9) Walkthrough & Guides Wiki
Monster Hunter Wilds Walkthrough & Guides Wiki
Wuthering Waves Walkthrough & Guides Wiki
Arknights: Endfield Walkthrough & Guides Wiki
Pokemon FireRed and LeafGreen (FRLG) Walkthrough & Guides Wiki
Pokemon TCG Pocket (PTCGP) Strategies & Guides Wiki


Recommended Games
Diablo 4: Vessel of Hatred Walkthrough & Guides Wiki
Cyberpunk 2077: Ultimate Edition Walkthrough & Guides Wiki
Fire Emblem Heroes (FEH) Walkthrough & Guides Wiki
Yu-Gi-Oh! Master Duel Walkthrough & Guides Wiki
Super Smash Bros. Ultimate Walkthrough & Guides Wiki
Pokemon Brilliant Diamond and Shining Pearl (BDSP) Walkthrough & Guides Wiki
Elden Ring Shadow of the Erdtree Walkthrough & Guides Wiki
Monster Hunter World Walkthrough & Guides Wiki
The Legend of Zelda: Tears of the Kingdom Walkthrough & Guides Wiki
Persona 3 Reload Walkthrough & Guides Wiki


All rights reserved
© 2025 Nintendo / INTELLIGENT SYSTEMS
The copyrights of videos of games used in our content and other intellectual property rights belong to the provider of the game.
The contents we provide on this site were created personally by members of the Game8 editorial department.
We refuse the right to reuse or repost content taken without our permission such as data or images to other sites.
4. red flier, not blue