This survey will take about 1 minute.
Your answers will help us to improve our website.
Mario Kart World
Best Combo Setup for Character and Kart
★ 394 P Switches | 150 ? Panels | 200 Medallions
☆ Unlockables Guide | Mirror Mode
★ How to Get Kamek Fast
☆ Best Characters | Best Karts | Best Combo
★ How to Unlock All Outfits with Food locations!
☆ Ver. 1.1.2 Patch Update released on 7/25/2025!

The best combo setups in Mario Kart World are focused on a build with high Acceleration and Handling to achieve victory in the final lap. See the best combo setup in the current meta for both Online Ranked and Time Trials in Mario Kart World.
| Related Guides | |||
|---|---|---|---|
| Best Combos | Best Character Tier List | Best Kart Tier List | Best Item Tier List |
List of Contents
Best Combo Setup for the Online Ranked Meta
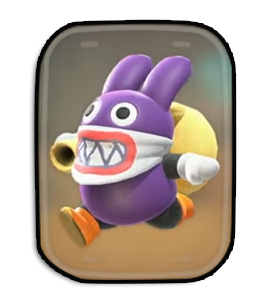
Lightweight Characters with Baby Blooper
※ S is Speed, A is Acceleration, W is Weight, and H is Handling
| Character | |
|---|---|


|
|
| Kart | Stats |
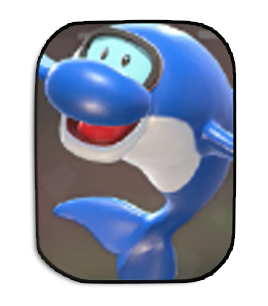
 Baby Blooper Baby Blooper
|
S 35

A 70

W 30

H 65

|
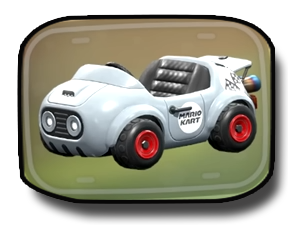
The best current combo for Online Ranked matches features a lightweight character together with the popular Baby Blooper.
In Ranked matches, the early-to-midgame is currently focused on purposefully taking a low position to get strong items, then using these items in the endgame to suddenly take the lead in a strategy commonly known as Bagging.
To pull off a Bagging strategy, it's important to have a character with high Acceleration to quickly achieve top speed again after being hit by attack items, and a high Handling to effectively maneuver through shortcuts when trying to quickly gain the lead in the final lap.
This character and kart combo effectively maintains the Speed stat to reasonable levels, while placing a strong emphasis on Acceleration and Handling. This will allow for both stability and flexibility in the current meta of Online Ranked matches.
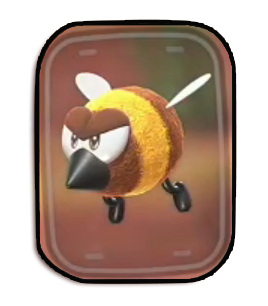
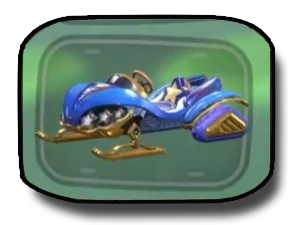
Middleweight Characters with Rally Bike
| Character | |
|---|---|


|
|
| Kart | Stats |
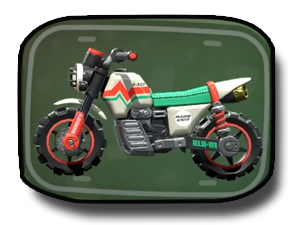 Rally Bike Rally Bike
|
S 30
A 70

W 30
H 65
|
Another solid combo option is a middleweight character together with the Rally Bike.
Compared to the Baby Blooper, the Rally Bike option slightly reduces Speed while providing extra Acceleration.
This combo's greatest strength is its increased ability to recover after getting hit while attempting to quickly reach 1st place, providing it with high stability in Online Ranked match results. This is especially important after you've already used your items and are trying to survive in the front of the pack together with other players.
A stronger option at a higher Online Ranking
As your Ranking in Online matches increases, the number of points you will gain and lose from the results changes drastically.
Specifically, at a Rank of 9000, even if you get 1st place, you'll only receive about 20 points, but if you get 24th place, you'll suffer a loss of -150 points. As such, there's less motivation to take a big risk to win, and more motivation to make sure you don't lose badly after geting hit by an item late in the game.
Best Combo Setup for Offline and Time Trials
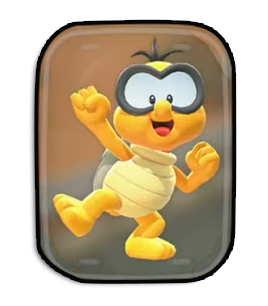
Heavyweight Characters with Baby Blooper
| Character | Kart / Stats & Explanation | |
|---|---|---|
|
Baby Blooper
|
S 60

A 45

W 55

H 40

|
| ・Mixes strong Speed with fair Acceleration and Handling ・Top class for Time Trials ・Relatively harder to control than other options |
||


|
Baby Blooper
|
S 55
A 50

W 50
H 45
|
| ・Mixes good Speed with fair Acceleration and Handling ・Slightly better Acceleration and Handling than Bowser |
||
For Offline modes including Grand Prix, Knockout Tour, and Time Trials, these combos are the best in the game. With a high speed stat, and a balanced Acceleration and Handling, you can dominate against CPUs who have limits on how many items they can use compared to human opponents.
Because their Speed stat is high, it's comparatively easy to reach 1st place and maintain it; the focus on straight paths in courses in Mario Kart World compared to previous games in the series makes it easier than ever to use a character with high Speed to barrel forward and reach the top position early on. This strategy is known as Frontrunning, in contrast to Bagging, a strategy which instead attempts to grab the lead in the final lap of the race.
Best Combo for Beginners
Beginner Combo
※ S is Speed, A is Acceleration, W is Weight, and H is Handling
| Character | Car/Stats/Explanation | ||
|---|---|---|---|
| Baby Blooper |
S:
A:
W:
H:
|
||
|
・Well-balanced customization for beginners ・High acceleration and resets easily after being knocked ・Characters and karts are available from the beginning |
|||
| Baby Blooper |
S:
A:
W:
H:
|
||
|
・Speed, acceleration, and handling ・Easily clears the top of Time Trials Mode ・If you are concerned about handling, change to your preferred character |
|||
These combos are beginner friendly due to its decent speed, and makes it easy to turn due to its high handling value. Furthermore, it is easy to reset from being knocked or falling of a track because of the very high acceleration. Lastly, the characters and karts are already available by default, making these builds accessible!
Drifting Guide: How to Drift Like a Pro
Best Combos per Stat
Speed Combo
※ S is Speed, A is Acceleration, W is Weight, and H is Handling
| Character | Car/Stats/Explanation | ||
|---|---|---|---|
 Stellar Sled Stellar Sled |
S:
A:
W:
H:
|
||
|
・Speed, acceleration, and handling ・Easily clears the top of Time Trials Mode ・If you are concerned about handling, change to your preferred character |
|||
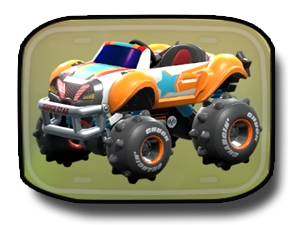 Chargin' Truck Chargin' Truck |
S:
A:
W:
H:
|
||
|
・Speed, acceleration, and handling ・Easily clears the top of Time Trials Mode ・If you are concerned about handling, change to your preferred character |
|||
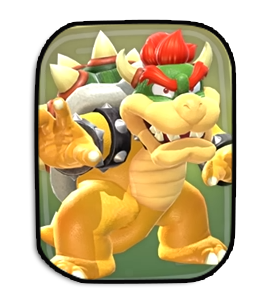
The Bowser plus Stellar Sled or Chargin' Truck combo boasts the highest speed value of 80/100 among all other combos, making this the strongest build on straight courses.
The current meta in Mario Kart World favors character and kart combo setup that heavily invest in the Speed stat. High-speed combos are ideal for maximizing performance on long straightaways, allowing players to create significant leads or keep pace with competitive rivals.
Most characters that perform well in this setup belong to the same heavyweight class, which have identical stats. Bowser, however, is an exception as he outclasses the other heavyweight characters in Speed by a tiny bit.
List of Heavyweight Characters
Acceleration Combo
※ S is Speed, A is Acceleration, W is Weight, and H is Handling
| Character | Car/Stats/Explanation | ||
|---|---|---|---|
 Mach Rocket Mach Rocket |
S:
A:
W:
H:
|
||
|
・Customized for high acceleration value ・Best used on courses with many ramps, jumps, and curves ・Underperforms on straight courses |
|||
| Baby Blooper |
S:
A:
W:
H:
|
||
|
・Best used on straight courses with few curves ・Slightly higher speed than the Mach Rocket |
|||
For maximum acceleration value, the Baby Peach plus Mach Rocket combo boasts the highest acceleration of 85/100 among all other combos. This makes it the strongest build on courses with a lot of jumps and curves, requiring better technique and expertise and underperforming on straight courses.
This Combo Dominates the Whistlestop Summit Leaderboards
This combo is best used on the Whistlestop Summit course since it contains a lot of jumps, curves, and rail slides!
Mario Kart World Related Guides
All Wiki Guides
 Characters Characters |
 Items Items |
 Courses Courses |
 Vehicles Vehicles |
 Outfits Outfits |
 News News |
 Tips and Tricks Tips and Tricks |
 Techniques Techniques |
 Interactive Map Interactive Map |
 Game Modes Game Modes |
 Stickers Stickers |
Recommended Guides
 Best Character Tier List Best Character Tier List |
 Best Kart Tier List Best Kart Tier List |
| Best Combo Setup |
 Best Item Tier List Best Item Tier List |
Leaderboard
| P Switch Mission Record Leaderboard |
Comment
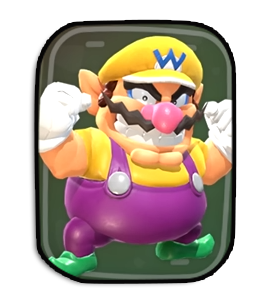
1  Anonymous 9 months
Excellent guide. I was using Wario and the blooper and this aligned with my thoughts
Author

Best Combo Setup for Character and Kart
Please participate in our site
improvement survey
03/2026
improvement survey
03/2026
Would you assist in
improving Game8's site?
improving Game8's site?

×
We are listening to our users' valuable opinions and discussing how to act on them.
The information collected through this survey will be used for the purpose of improving our services. In addition, the information will only be disclosed a part of a statistic in a format that will not allow identification of personal information.
Begin Survey
Not Now
×
Please rate each item regarding Game8.co's Advertisements.
Amount of Ads
Very Dissatisfied
Somewhat Dissatisfied
Fine
Somewhat Satisfied
Highly Satisfied
Placement of Ads
Timing of Ad Display
Ad Loading Speed
Safeness of Ads
Content of Ads
×
Please rate each item regarding Game8.co's Quality of Articles.
Amount of information
Very Dissatisfied
Somewhat Dissatisfied
Fine
Somewhat Satisfied
Highly Satisfied
Frequency of updates
Speed of new information
Accuracy of articles
Understandibility of articles
Readability of sentences
×
Please rate each item regarding Game8.co's Usability of the Site.
Ease of finding information
Very Dissatisfied
Somewhat Dissatisfied
Fine
Somewhat Satisfied
Highly Satisfied
Loading Speed
Use of Color
Font Size
Visibility of Images
Easy to Understand Layout
×
Please rate each item regarding Game8.co's Message Boards, Comments.
Ease of Writing
Very Dissatisfied
Somewhat Dissatisfied
Fine
Somewhat Satisfied
Highly Satisfied
Readability
Ease in Finding Information
Comment Quality
Comment Quantity
Admin Response
×
Please rate each item regarding Game8.co's Site's new design.
Please rate our site's new design
Very Dissatisfied
Somewhat Dissatisfied
Fine
Somewhat Satisfied
Highly Satisfied
Do you think that the website's design change makes the site easier to use?
Has the new design made it easier for you to find information on the site?
Has the new design improved the overall visual appeal of the site?
How would you rate your overall satisfaction with the new design of the site?
×
How likely are you to recommend Game8 to someone you know?
Very Unlikely
0
1
2
3
4
5
6
7
8
9
10
Very Likely
If you have other opinions regarding potential improvement to the website, please share them with us. We would appreciate your honest opinion.
Note: This is a free response section, so you can proceed without entering anything.
Note: Please be sure not to enter any kind of personal information into your response.
Note: Please be sure not to enter any kind of personal information into your response.
×
Thank You
×
Thank you for participating in our survey! Your answers will help us to improve the quality of our website and services.
We hope you continue to make use of Game8.
We hope you continue to make use of Game8.
Close
Rankings
- We could not find the message board you were looking for.
Gaming News


![Slay the Spire 2 Review [Early Access] | Still the Deckbuilder to Beat](https://img.game8.co/4433115/44e19e1fb0b4755466b9e516ec7ffb1e.png/thumb)

![Resident Evil Village Review [Switch 2] | Almost Flawless Port](https://img.game8.co/4432790/e1859f64830960ce4248d898f8cd38d9.jpeg/thumb)
Popular Games

Genshin Impact Walkthrough & Guides Wiki
Honkai: Star Rail Walkthrough & Guides Wiki
Umamusume: Pretty Derby Walkthrough & Guides Wiki
Pokemon Pokopia Walkthrough & Guides Wiki
Resident Evil Requiem (RE9) Walkthrough & Guides Wiki
Monster Hunter Wilds Walkthrough & Guides Wiki
Wuthering Waves Walkthrough & Guides Wiki
Arknights: Endfield Walkthrough & Guides Wiki
Pokemon FireRed and LeafGreen (FRLG) Walkthrough & Guides Wiki
Pokemon TCG Pocket (PTCGP) Strategies & Guides Wiki


Recommended Games
Fire Emblem Heroes (FEH) Walkthrough & Guides Wiki
Diablo 4: Vessel of Hatred Walkthrough & Guides Wiki
Yu-Gi-Oh! Master Duel Walkthrough & Guides Wiki
Super Smash Bros. Ultimate Walkthrough & Guides Wiki
Pokemon Brilliant Diamond and Shining Pearl (BDSP) Walkthrough & Guides Wiki
Elden Ring Shadow of the Erdtree Walkthrough & Guides Wiki
Monster Hunter World Walkthrough & Guides Wiki
The Legend of Zelda: Tears of the Kingdom Walkthrough & Guides Wiki
Persona 3 Reload Walkthrough & Guides Wiki
Cyberpunk 2077: Ultimate Edition Walkthrough & Guides Wiki


All rights reserved
© Nintendo
The copyrights of videos of games used in our content and other intellectual property rights belong to the provider of the game.
The contents we provide on this site were created personally by members of the Game8 editorial department.
We refuse the right to reuse or repost content taken without our permission such as data or images to other sites.
Inaccurate guide. The most important stats are not Acceleration and Handling, even outside time trials. If anything, Handling is the least important. Speed is the first thing you should prioritise. The game actually shows wrong values as there are hidden stats for Speed (and most likely Handling). On-Road Speed is the most important stat, followed by Acceleration. This is why Baby Blooper is one of the most popular vehicles. As for the characters, Wario is the one who has the best balance.