How to Beat Airbuster | Boss Fight Guide (Normal & Hard Mode)
This is a guide to beating the Boss Airbuster in the game Final Fantasy 7 Remake. This article explains Airbuster's attack patterns, weaknesses, and tips and strategies for defeating it on both Normal and Hard Mode.
List of Contents
Airbuster Stats and Information
Basic Information
| Airbuster | ||
|---|---|---|
|
Species | Movement | Type |
| Mechanical | Grounded | Boss |
Description
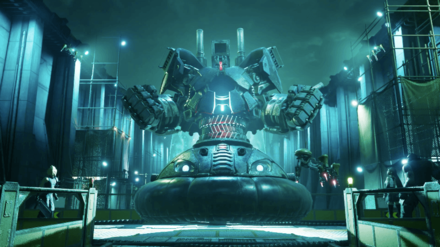
A large mobile weapons platform currently being developed by the Advanced Weaponry Division. Although still in the prototype phase, it was rushed into action to aid in the public execution of Avalanche members.
Assess (Tips)
Lightning attacks rapidly fill its stagger gauge.
Airbuster Stats
| Easy | Normal | Hard | |
|---|---|---|---|
| HP | 18066 | 32848 | 87718 |
| Attack | 119 | 328 | |
| Magic Attack | 119 | 328 | |
| Defense | 126 | 342 | |
| Magic Defense | 134 | 363 | |
Airbuster Weaknesses & Resistances
| Weakness / Status Ailments | Lightning | |
|---|---|---|
| Lesser Resistances | - | |
| Greater Resistances | Stop | |
| Immunities | Poison, Silence, Sleep, Slow, Berserk, Proportional Damage | |
| Absorbed Elements | - | |
Stagger Rates
| ×0.75 | ×0.75 | ×0.75 | ×1 |
| - | |||
| ×1 | ×1.5※ | ×1 | - |
Stagger Length
| Phase 1 | Phase 2 | Phase 3 | Phase 4 |
|---|---|---|---|
| 10 seconds | 10 seconds | 4 seconds | 10 seconds |
Changes form as it takes damage
Each time Airbuster takes a set amount of damage, it will change its form and its attack pattern. Keep these phases in mind as you fight to have a better shot at defeating it.
Summary of phases
| Remaining HP | Method of Attack |
|---|---|
| 100% | Attacks with lightning attacks |
| 75% | Will start charging and fire the Tankbuster attack |
| 50% | Will fly into the air and attack from afar |
Rewards
| Easy/Normal | Hard | |
|---|---|---|
| Gil | 550 | 2250 |
| AP | 10 | 30 |
| Exp | 550 | 4500 |
| Items Dropped | Titanium Bangle (100%) | |
| Rare Items Dropped | - | |
| Steal | AI Programming Core (12%) | |
Learnable Enemy Skills
No Enemy Skills can be learned from Airbuster.
How to Pressure Airbuster
| Phase | Situation |
|---|---|
| Phase 1 | For 5 seconds after damage equaling 8% of its max HP has been dealt. |
| Phase 2 | For 5 seconds after damage equaling 10% of its max HP has been dealt. |
| Phase 3 | For 3 seconds after damage equaling 8% of its max HP has been dealt. |
| Phase 4 | For 5 seconds after damage equaling 10% of its max HP has been dealt. |
Breakable Parts
| Name | HP | Details |
|---|---|---|
| Arms | Easy: 2428 Normal: 4415 Hard: 11790 |
Airbuster's arms can only be reduced to 1 HP. Easily staggered by physical attacks. |
Airbuster Boss Fight Guide
Airbuster Abilities and Attack Patterns
| Name | Element | Blockable? | Knockdown? | Status |
|---|---|---|---|---|
|
|
- | Yes | No |
Stun (8 sec)
|
| Shoots electric beams from its fingers. | ||||
|
|
- | Yes | Yes | - |
| Opens its lower half and releases bombs after 6 seconds. Can be prevented by hitting its lower half with two abilities or a Limit Break while open. | ||||
|
|
- | Yes | No | - |
| Aims its machine gun behind itself and fires at a target. | ||||
|
|
- | Yes | Yes | - |
| Aims its grenade launcher behind it and fires grenades. | ||||
|
|
- | Yes | Yes | - |
| Releases electricity orbs onto the battlefield. | ||||
|
|
- | Yes | No | - |
| Fires a machine gun from its front, hitting anyone in its path. | ||||
|
|
- | No | No |
Stun (8 sec)
|
| Scatters 3 depth charges (more in phase 2). After 2 seconds the depth charges will release orbs of lightning. | ||||
|
Divide and Conquer
|
- | - | - | - |
| Detaches its arms. | ||||
|
Merge
|
- | - | - | - |
| Reattaches its arms. | ||||
|
|
- | No | Yes | - |
| Charges its cannon for 3 seconds before releasing a wide wave of energy. | ||||
|
|
- | Yes | No | - |
| Sprays flames from its hands. | ||||
|
|
- | Yes | No | - |
| Fires lasers from its shoulders. The lasers can change directions and go after targets. | ||||
|
|
- | Yes | No | - |
| Fires balls of energy from the cannon on its chest in all directions. | ||||
|
|
- | Yes | No | - |
| Hurls its fist at a target. | ||||
|
|
- | Yes | Yes | - |
| Charges its fist full of electricity and slams it down on a target. Will alternate fists hitting up to 5 times in phase 4. | ||||
*Status Effects and Ailments Guide
Airbuster Arms Abilities
| Name | Element | Blockable? | Knockdown? | Status |
|---|---|---|---|---|
|
|
- | No | No | - |
| Moves close to the Airbuster and creates a wall of electricity. | ||||
|
|
- | Yes | Yes | - |
| Charges at a target. | ||||
|
|
- | Yes | Yes | - |
| Grabs a target and binds them in place during Tank Buster. Will let go if 1% of its total HP is dealt in damage or if hit by an ability. | ||||
*Status Effects and Ailments Guide
Best Characters for This Boss
Available Characters
 Cloud Cloud
|
 Barret Barret
|
 Tifa Tifa
|
The Airbuster is encountered during Chapter 7. In this chapter, Cloud, Barret, and Tifa is available.
Best Equipment for Characters
| Cloud |
Role: Attacker & Healer Weapon: Buster Sword Armor: Mesmeric Armlet Accessory: Power Wristguards |
|---|---|
| Barret |
Role: Tank Weapon: Light Machine Gun Armor: Star Bracelet Accessory: Crescent Moon Charm |
| Tifa |
Role: Attacker Weapon: Sonic Strikers Armor: Leather Bracer Accessory: Power Wristguards |
Best Materia for Cloud
| Weapon (3 Slots) | |
|---|---|
| Armor (2 Slots) | |
| Summon | |
Use spells from the Lightning Materia to deal extra damage but remember to save some MP for healing and reviving. Summon Ifrit and spam Radiant Plume as soon as possible.
Best Materia for Barret
| Weapon (3 Slots) | |
|---|---|
| Armor (2 Slots) | |
Using Barret in this batte is slightly requires more work. As soon as the battle begins, use Overcharge for the ATB charages then have him cast Barrier on himself. Once the Barrier is up, accumulate ATB charges for Lifesaver then follow it with Steelskin. This will make Barret tank most of the hits taken by other members. If Barret needs healing, use his Chakra or have Cloud cast Cure (or higher if needed) on him.
Best Materia for Tifa
| Weapon (4 Slots) | |
|---|---|
| Armor (2 Slots) | |
| Summon | |
Use Tifa as your main attacker during the first two phases and when the Airbuster comes close in Phase 3. After reaching Chi level 3 using Unbridled Strength for the damage boost, spam spells from the Lightning Materia since Tifa does not have any other spell to use. After this, use every ATB charge you accumulate on Focused Strike. Every time this ability hits fills up the ATB gauge so you can almost use it one after another.
Airbuster Attack Phases
Phase 1
| Phase Highlights | |
|---|---|
| 1 | Uses timed Lightning Mines, easily avoidable |
| 2 | Fires Machine Gun shots at you |
| 2 | Uses Big Bomber, can deal 1000+ damage |
Phase 2
| Phase Highlights | |
|---|---|
| 1 | Will start to use Tankbuster, a huge laser with a wide attack range |
| 2 | Your Summon Gauge will start to fill |
| 3 | Detaches its Arms with Divide and Conquer |
| 4 | Left and Right Arms attack independently |
| 5 | The Arms can make an electric field between them |
| 6 | The Arms also shoot Fingerbeams |
Phase 3
| Phase Highlights | |
|---|---|
| 1 | It will start flying with jet engines |
| 2 | From afar, it will attack with: ・Small homing missiles ・Lightning orbs ・Lightning Mines |
| 3 | When close, it will: ・Shoot Fingerbeams ・Use flamethrowers from its palms ・Punch several times with its Arms ・Shoot Tankbuster |
| 4 | It will use Big Bomber both when close and afar |
Tips & Strategies for Beating Airbuster
| ★ Strategy Checklist ★ (Click to jump) |
||
|---|---|---|
|
|
Use Key Cards to Dispose of Airbuster components

By using Key Cards on the 3 Consoles spread out in the Assembly facility, you can cripple the Airbuster's movements, damage output and ammunition. We strongly recommend removing the weapon components, AI Programming Cores or Big Bombers instead of getting items.
The Effects of Removing Components
| Component | Effect |
|---|---|
| AI Programming Cores | ・Will use Fingerbeams less ・You will get stunned less |
| Big Bombers | ・Will use Big Bomber less ・Will have less ammunition ・Damage will decrease a bit |
| M Unit | ・Get a random item ・No effect on the battle |
Where to Find Key Cards
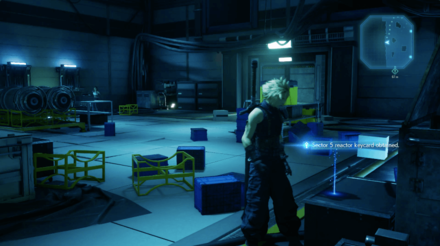
You can find Key Cards in the facility rooms with the consoles. These are all before the battle itself, so make sure you pick them up before you challenge the Airbuster.
Stagger it with Thunder

No matter the phase, Airbuster is weak to Thunder and can be Staggered by it. You only have few openings to go full power, so try to Stagger it as much as you can.
Avoid the Lightning Mines

Airbuster will spread out a couple of Lightning Mines. These will be on the ground for a little while before unleashing a lightning field that will stun you, so you have the time to avoid them and definitely should!
Once it's got you stunned, it will fire Big Bomber at you. Depending on your level and difficulty, this can deal 1000 damage, so avoid the mines and rob him of easy targets.
Avoid the Tankbuster Beam
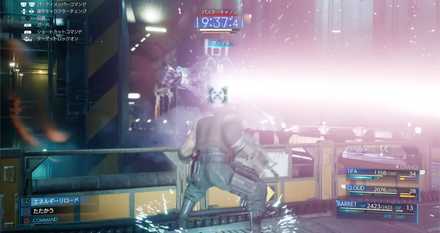
When you get it to around 75% health, Airbuster will shoot out a huge laser with its Tankbuster move.
It takes a while to charge and the Airbuster will place itself so you can take cover to the sides, so make sure to avoid it.
While it's shooting the laser, you can switch to Barret and get some good damage in.
Defeat the Arms First

Airbuster will send off both of its Arms to attack you on their own with the Divide and Conquer move.
They both have the same weakness as the boss itself, Thunder, but they also don't take a lot of damage from normal attacks, so try to Stagger them or switching to Punisher mode for more damage output.
Attack with Barret when it's Flying

At 50% health, Airbuster will bust out jet engines and fly out of reach. You won't be able to reach with Cloud or Tifa's attacks, so switch to Barret and rain bullets on it.
Use Close Ranged Attacks when it Comes Close

When it comes back to the railing you are fighting on, give it everything you got. Limit Breaks and Summons work especially well, and you can get in a lot of damage if you Stagger it while it's close.
Airbuster: Hard Mode Guide
Best Characters and Equipment
| Cloud |
Role: Mage Weapon: Mythril Saber Armor: Force Bracelet Accessory: Circlet |
|---|---|
| Tifa |
Role: Attacker Weapon: Metal Knuckles Armor: Force Bracelet Accessory: Champion Belt |
| Barret |
Role: Healer & Tank Weapon: Gatling Gun or Big Bertha Armor: Supreme Bracer Accessory: Survival Vest |
Cloud as the Mage
Cloud has the best Magic damage output and potential with his Mythril Saber combined with the Circlet. You will want to use him whenever you need to stagger with the help of Lightning magic.
TIfa as the Hitter
Once Airbuster is staggered switch to Tifa and let her rip. Make sure you have max Chi lv. when you stagger it. Use Rise and Fall and Omnistrike to increase the stagger bonus damage and use True Strike for maximum damage.
Barret as the Healer
With Barret's large health pool and ability to fight from afar, he has the best chances of living the longest, making him an effective healer. Switch to him whenevery you need to heal, revive or simply need to attack from afar, especiialy during Phase 3.
Best Materia to Use
The number of slots in your Weapon may vary depending on your Weapon Level.
Cloud
| Weapon (6 Slots) | |||
|---|---|---|---|
| Armor (3 Slots) | |||
| Summon | |||
Tifa
| Weapon (6 Slots) | ||
|---|---|---|
| Armor (4 Slots) | ||
| Summon | ||
Barret
| Weapon (6 Slots) | ||
|---|---|---|
| Armor (4 Slots) | ||
| Summon | ||
| ★How to Beat Airbuster on Hard Mode★ | ||
|---|---|---|
|
|
Link Lightning and Elemental for Increased Damage

Due to being unable to use items on hard mode, you will have no way to recover MP outside of regeneration, so it is best to link up the Elemental and Lightning materias on each character's weapon to add lightning to your physical attacks.
Remove Its AI Cores

Throughout the chapter when you receive card keys, you want to focus on removing its AI Cores to prevent it from using its Fingerbeam attack. The attack is difficult to predict and will stun your characters for 10-15 seconds, so the less Airbuster can use this attack the better.
Watch Out for its Arms!

Just like in normal, when Airbuster uses Divide and Conquer it will detach its arms and send them to each side of the arena. A new mechanic in hard is that they can now grab you and bind you, leaving you wide open to taking the full brunt of Tankbuster when it uses it. When the arms appear focus one down as quickly as possible with all of your attacks to avoid this attack.
Beware of Tankbuster in the Final Phase
When its HP gets low, it will begin to use Tankbuster twice in quick succession. When it begins to charge the attack get away from its front and stay away until both go off. Getting hit by just one of these will deal massive damage on hard mode and leave you open to get hit by the next one.
Boss Fight Related Articles
Major Story Bosses
| All Major Story Bosses | |
|---|---|
| Chapter 1 | Scorpion Sentinel |
| Chapter 4 | Roche |
| Chapter 5 | Crab Warden |
| Chapter 7 | Airbuster |
| Chapter 8 | Reno Rude |
| Chapter 9 | Hell House |
| Chapter 10 | Abzu |
| Chapter 11 | Ghoul Eligor |
| Chapter 13 | Failed Experiment |
| Chapter 14 | Abzu (2nd Fight) |
| Chapter 15 | The Valkyrie |
| Chapter 16 | Specimen H0512 |
| Chapter 17 | Jenova Dreamweaver Rufus The Arsenal |
| Chapter 18 | Motor Ball Whisper Harbinger Sephiroth |
VR Mission Bosses
| All VR Mission Bosses | |
|---|---|
| Chapter 8 | Shiva |
| Chapter 9 | Fat Chocobo |
| Chapter 13 | Leviathan |
| Secret Boss | Bahamut |
| Superboss | Pride and Joy Prototype |
Story Sub-Bosses
| All Story Sub-Bosses | |
|---|---|
| Chapter 2 | The Huntsman |
| Chapter 3 | The Hoodlums |
| Chapter 4 | Enigmatic Spectre |
| Chapter 12 | Enigmatic Spectre |
| Chapter 17 | M.O.T.H. Unit Brain Pod Swordipede |
Monster Variants & Optional Sub-Bosses
| All Monster Variants & Optional Sub-Bosses | |
|---|---|
| Chapter 3 | Doomrat Cerulean Drake Wrath Hound |
| Chapter 8 | Hedgehog Pie King Mark II Monodrive Venomantis Chromogger |
| Chapter 14 | Rust Drake Tonberry Trypapolis Type-0 Behemoth |
| Chapter 17 | Malboro |
Author

How to Beat Airbuster | Boss Fight Guide (Normal & Hard Mode)
Rankings
- We could not find the message board you were looking for.
Gaming News
![Animal Crossing: New Horizons Review [Switch 2] | Needlessly Crossing Over to a New Generation](https://img.game8.co/4391759/47d0408b0b8a892e453a0b90f54beb8a.png/show)


Popular Games

Genshin Impact Walkthrough & Guides Wiki
Honkai: Star Rail Walkthrough & Guides Wiki
Arknights: Endfield Walkthrough & Guides Wiki
Umamusume: Pretty Derby Walkthrough & Guides Wiki
Wuthering Waves Walkthrough & Guides Wiki
Pokemon TCG Pocket (PTCGP) Strategies & Guides Wiki
Abyss Walkthrough & Guides Wiki
Zenless Zone Zero Walkthrough & Guides Wiki
Digimon Story: Time Stranger Walkthrough & Guides Wiki
Clair Obscur: Expedition 33 Walkthrough & Guides Wiki


Recommended Games
Fire Emblem Heroes (FEH) Walkthrough & Guides Wiki
Pokemon Brilliant Diamond and Shining Pearl (BDSP) Walkthrough & Guides Wiki
Diablo 4: Vessel of Hatred Walkthrough & Guides Wiki
Super Smash Bros. Ultimate Walkthrough & Guides Wiki
Yu-Gi-Oh! Master Duel Walkthrough & Guides Wiki
Elden Ring Shadow of the Erdtree Walkthrough & Guides Wiki
Monster Hunter World Walkthrough & Guides Wiki
The Legend of Zelda: Tears of the Kingdom Walkthrough & Guides Wiki
Persona 3 Reload Walkthrough & Guides Wiki
Cyberpunk 2077: Ultimate Edition Walkthrough & Guides Wiki


All rights reserved
© SQUARE ENIX CO., LTD. All Rights Reserved.
CHARACTER DESIGN:TETSUYA NOMURA/ROBERTO FERRARI
The copyrights of videos of games used in our content and other intellectual property rights belong to the provider of the game.
The contents we provide on this site were created personally by members of the Game8 editorial department.
We refuse the right to reuse or repost content taken without our permission such as data or images to other sites.
No card key video guide for this guy please.