How to Beat Eligor | Boss Fight Guide (Normal & Hard Mode)

This is a guide to beating the Boss Eligor in the game Final Fantasy 7 Remake (FF7R). This article explains Eligor's attack patterns, weaknesses, and tips and strategies for defeating them on both Normal and Hard Mode.
List of Contents
Eligor Stats and Information
Basic Information
| Eligor | ||
|---|---|---|

|
Species | Movement | Type |
| Unreadable | Flying | Boss |
Description
A ghastly fiend that haunts the train graveyard and feeds on human fear to grow stronger. It is a manifestation of the memories and sorrows that linger in the train graveyard.
Assess (Tips)
When it is in the air, hit it with wind attacks to rapidly fill its stagger gauge. Unleash a leaping attack to knock it down to the ground.
Eligor Stats
| Easy | Normal | Hard | |
|---|---|---|---|
| HP | 17171 | 31220 | 66024 |
| Attack | 144 | 328 | |
| Magic Attack | 144 | 328 | |
| Defense | 169 | 363 | |
| Magic Defense | 159 | 342 | |
Eligor Weaknesses & Resistances
| Weakness / Status Ailments | Ice, Wind | |
|---|---|---|
| Lesser Resistances | Physical | |
| Greater Resistances | - | |
| Immunities | Silence, Sleep, Slow, Magic, Proportional Damage | |
| Absorbed Elements | - | |
Stagger Rates
| ×1 | ×1 | ×1 | ×1 |
| - | |||
| ×1 | ×1 | ×1 | - |
Stagger Length
| Stagger Length | 10 seconds |
|---|
Rewards
| Easy/Normal | Hard | |
|---|---|---|
| Gil | 1200 | 3375 |
| AP | 10 | 30 |
| Exp | 1040 | 5850 |
| Items Dropped | Echo Mist (100%) | |
| Rare Items Dropped | - | |
| Steal | Bladed Staff (25%) | |
Learnable Enemy Skills
No Enemy Skills can be learned from Eligor.
Eligor Boss Fight Guide
Eligor Abilities and Attack Patterns
| Name | Element | Blockable? | Knockdown? | Status |
|---|---|---|---|---|
|
|
- | Yes | Yes | - |
| Eligor's horse lifts its front legs up and stomps on a target. Eligor will also attack during the stomp. | ||||
|
|
- | Yes | No |
|
| Eligor stabs at a target with its javelin. Silences whoever it hits on Hard mode. | ||||
|
|
- | Yes | No |
|
| Eligor does a side swing at a target with its javelin. Silences whoever it hits on Hard mode. | ||||
|
|
- | Yes | Yes | - |
| A basic charge attack. | ||||
|
|
- | Yes | Yes | - |
| Eligor swings its javelin while chasing a target. | ||||
|
|
- | No | No |
|
| A red beam comes out of Eligor's eyes and rotates across the battlefield, putting to sleep and silencing whoever it hits. | ||||
|
|
- | Yes | No | - |
| Runs in circles around the arena, knocking back anyone it hits. While in the air, javelins will drop on top of party members. | ||||
|
|
- | No | No | |
| Casts Reflect on itself. On Hard mode, Eligor will cast Reflect on everyone and it will not expire. | ||||
|
|
- | No | No | - |
| Rains javelins down on the party or draws them up from the ground. | ||||
|
|
- | No | No |
|
| Shoots a red beam at one party member, putting them to sleep and silencing them. | ||||
|
|
- | Yes | No |
|
| Swings its javelin from left to right while running around the arena. Silences whoever it hits on Hard mode. | ||||
|
|
- | Yes | No |
|
| Runs in a circle around the arena swinging its javelin from left to right. Javelins will also drop onto random party members' heads. Silences whoever it hits on Hard mode. | ||||
|
|
- | Yes | Yes | - |
| Creates wind that drags the party towards it, ending in an explosion. | ||||
*Status Effects and Ailments Guide
Best Characters for This Boss
Available Characters
 Cloud Cloud
|
 Tifa Tifa
|
 Aerith Aerith
|
Recommended Characters
During the first phase the quickest way to deal damage is hitting it with Blizzard while it's stationary so pop an Arcane Ward with Aerith and hit it with your strongest Blizzard spells. Most of this fight is best handled with Aerith so until phase 3 you probably don't need to use Cloud or Tifa as much unless you want to.
Eligor Attack Phases
Phase 1
| Phase Point Summary | |
|---|---|
| 1 | Will rotate between Sweeping Gaze, Trample, and Reaper. |
| 2 | Once enough damage is dealt it will take to the skies. |
Phase 2
| Phase Point Summary | |
|---|---|
| 1 | Immediately casts Reflect to prevent magic damage. |
| 2 | Starts to rotate between Piercing Gaze and Javelin Bolts, recasting Reflect from time to time. |
| 3 | When it takes enough damage it will return to the ground. |
Phase 3
| Phase Point Summary | |
|---|---|
| 1 | Immediately casts Winds of Gehenna and gets rid of the large container in the middle of the battlefield. |
| 2 | Will continue to use Javelin Bolts, except they now come from the ground. |
| 3 | Rides in a circle around the battlefield only stopping to use Sweeping Gaze or if its wheels are crippled. |
Tips & Strategies for Beating Eligor
| ★ Strategy Checklist ★ (Click to jump) |
||
|---|---|---|
|
|
Attack it From the Front!
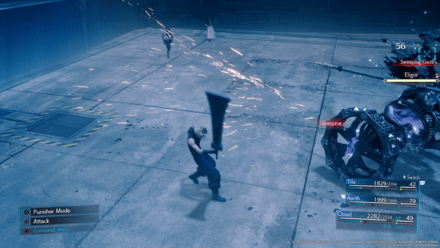
During the first phase, its backside is immune to all damage so target the front and go wild!
Equip Ice Materia and Shiva
Eligor's main weakness is Ice so you should bring your strongest Ice Materia and Shiva to maximize damage dealt. Pair this up with Aerith's Arcane Ward while Eligor is stationary and you can quickly stagger it.
Use Wind Magic While it's in the Sky

When Eligor takes off into the sky it gains a new weakness to wind magic. Wait until Reflect wears off and cast your strongest wind spell when it stops moving to deal a lot of damage. Like before, Arcane Ward is great for increasing damage output.
Hide Behind the Container During Javelin Bolts

When javelins come raining down from the sky, you should quickly take cover behind the large crate that appears in the middle of the arena during phase 2. You can also hide behind this to avoid Piercing Gaze!
Cripple its Wheels in Phase 3
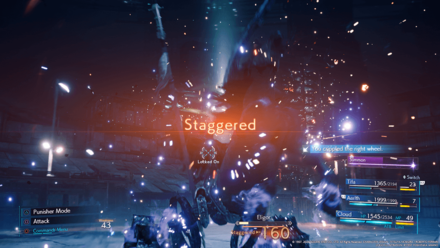
After it comes back down to the ground, you will notice its wheels have now become both targettable and vulnerable to physical damage. When Eligor stops running around the arena, quickly take out one of its wheels to cripple it in place for an opportunity to deal a hefty amount of damage. Repeat with the next wheel and Eligor will go down shortly after.
Eligor: Hard Mode Guide
Best Characters and Equipment
 Cloud Cloud |
Weapon: Mythril Saber Armor: Force Bracelet Accessory: Timeworn Talisman |
|---|---|
 Aerith Aerith |
Weapon: Mythril Rod Armor: Chain Bangle Accessory: Circlet |
 Tifa Tifa |
Weapon: Mythril Claws Armor: Force Bracelet Accessory: Timeworn Talisman |
Have Everyone Magic Focused
Eligor has a Lesser Resistance against Physical damage, making physical attacks hit for less. Have Cloud and Tifa equipped with Ice linked with Elemental and use Mytrhil Saber and Mythril Claws to increase their magic damage output.
Best Materia to Use
The number of slots in your Weapon may vary depending on your Weapon Level.
Cloud
| Weapon (6 Slots) | ||
|---|---|---|
| Armor (4 Slots) | ||
| Summon | ||
Aerith
| Weapon (6 Slots) | ||
|---|---|---|
| Armor (4 Slots) | ||
| Summon | ||
Tifa
| Weapon (6 Slots) | ||
|---|---|---|
| Armor (4 Slots) | ||
| Summon | ||
| ★ Strategy Checklist ★ (Click to jump) |
||
|---|---|---|
|
|
Keep Close or Dodge to the Side to Avoid Sweeping Gaze

Sweeping Gaze is hard to avoid and if hit, can disable your characters. When you see it about to use that attack, try to get in close during Phase 1 and 3. If you are close enough the laser will pass over your head. During Phase 2 you should dodge to the side it shoots the laser.
Make Use of Arcane Ward and Lustrous Shield

Aerith has some powerful abilities under her belt. She has both offensive and defensive abilities to help the whole party. Use Arcane Ward to increase magic damage output and Lustrous Shield to protect sleeping party members against the Javelin Bolts.
Make Use of Prayer and Chakra

When Eligor goes into the sky and casts Reflect, it will cast it on your entire party as well. This means that casting healing magic on any of your party members will reflect it onto the boss, healing it instead, so if you want to heal, use the abilities Prayer and Chakra instead.
Boss Fight Related Articles
Major Story Bosses
| All Major Story Bosses | |
|---|---|
| Chapter 1 | Scorpion Sentinel |
| Chapter 4 | Roche |
| Chapter 5 | Crab Warden |
| Chapter 7 | Airbuster |
| Chapter 8 | Reno Rude |
| Chapter 9 | Hell House |
| Chapter 10 | Abzu |
| Chapter 11 | Ghoul Eligor |
| Chapter 13 | Failed Experiment |
| Chapter 14 | Abzu (2nd Fight) |
| Chapter 15 | The Valkyrie |
| Chapter 16 | Specimen H0512 |
| Chapter 17 | Jenova Dreamweaver Rufus The Arsenal |
| Chapter 18 | Motor Ball Whisper Harbinger Sephiroth |
VR Mission Bosses
| All VR Mission Bosses | |
|---|---|
| Chapter 8 | Shiva |
| Chapter 9 | Fat Chocobo |
| Chapter 13 | Leviathan |
| Secret Boss | Bahamut |
| Superboss | Pride and Joy Prototype |
Story Sub-Bosses
| All Story Sub-Bosses | |
|---|---|
| Chapter 2 | The Huntsman |
| Chapter 3 | The Hoodlums |
| Chapter 4 | Enigmatic Spectre |
| Chapter 12 | Enigmatic Spectre |
| Chapter 17 | M.O.T.H. Unit Brain Pod Swordipede |
Monster Variants & Optional Sub-Bosses
| All Monster Variants & Optional Sub-Bosses | |
|---|---|
| Chapter 3 | Doomrat Cerulean Drake Wrath Hound |
| Chapter 8 | Hedgehog Pie King Mark II Monodrive Venomantis Chromogger |
| Chapter 14 | Rust Drake Tonberry Trypapolis Type-0 Behemoth |
| Chapter 17 | Malboro |
Author
How to Beat Eligor | Boss Fight Guide (Normal & Hard Mode)
improvement survey
03/2026
improving Game8's site?

Your answers will help us to improve our website.
Note: Please be sure not to enter any kind of personal information into your response.

We hope you continue to make use of Game8.
Rankings
- We could not find the message board you were looking for.
Gaming News
Popular Games

Genshin Impact Walkthrough & Guides Wiki

Honkai: Star Rail Walkthrough & Guides Wiki

Umamusume: Pretty Derby Walkthrough & Guides Wiki

Pokemon Pokopia Walkthrough & Guides Wiki

Resident Evil Requiem (RE9) Walkthrough & Guides Wiki

Monster Hunter Wilds Walkthrough & Guides Wiki

Wuthering Waves Walkthrough & Guides Wiki

Arknights: Endfield Walkthrough & Guides Wiki

Pokemon FireRed and LeafGreen (FRLG) Walkthrough & Guides Wiki

Pokemon TCG Pocket (PTCGP) Strategies & Guides Wiki
Recommended Games

Fire Emblem Heroes (FEH) Walkthrough & Guides Wiki

Diablo 4: Vessel of Hatred Walkthrough & Guides Wiki

Yu-Gi-Oh! Master Duel Walkthrough & Guides Wiki

Super Smash Bros. Ultimate Walkthrough & Guides Wiki

Pokemon Brilliant Diamond and Shining Pearl (BDSP) Walkthrough & Guides Wiki

Elden Ring Shadow of the Erdtree Walkthrough & Guides Wiki

Monster Hunter World Walkthrough & Guides Wiki

The Legend of Zelda: Tears of the Kingdom Walkthrough & Guides Wiki

Persona 3 Reload Walkthrough & Guides Wiki

Cyberpunk 2077: Ultimate Edition Walkthrough & Guides Wiki
All rights reserved
© SQUARE ENIX CO., LTD. All Rights Reserved.
CHARACTER DESIGN:TETSUYA NOMURA/ROBERTO FERRARI
The copyrights of videos of games used in our content and other intellectual property rights belong to the provider of the game.
The contents we provide on this site were created personally by members of the Game8 editorial department.
We refuse the right to reuse or repost content taken without our permission such as data or images to other sites.


![Slay the Spire 2 Review [Early Access] | Still the Deckbuilder to Beat](https://img.game8.co/4433115/44e19e1fb0b4755466b9e516ec7ffb1e.png/thumb)

![Resident Evil Village Review [Switch 2] | Almost Flawless Port](https://img.game8.co/4432790/e1859f64830960ce4248d898f8cd38d9.jpeg/thumb)


Soon as you start, dodge back wit Cloud then strongest ice from 2 characters. Then attack from the rear but directly in the middle to avoid the wheels. Subversion will do away with his reflect if you are on hard mode. Don't know which mode wrote the strats here but they will definitely have you using heal spells that you don't need.