How to Beat M.O.T.H. Unit | Boss Fight Guide

This is a guide to beating the Boss M.O.T.H. Unit in the game Final Fantasy 7 Remake (FF7R). This article explains M.O.T.H. Unit's attack patterns, weaknesses, and tips and strategies for defeating them.
List of Contents
M.O.T.H. Unit Stats and Information
Basic Information
| M.O.T.H. Unit | ||
|---|---|---|

|
Species | Movement | Type |
| Mechanical | Grounded | Normal |
Description
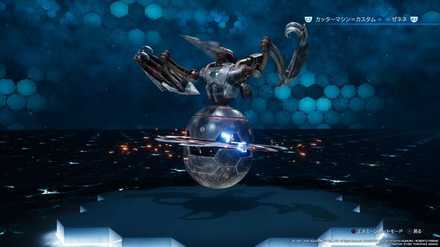
A self-piloting antipersonnel weapon manufactured by Shinra's Advanced Weaponry Division. This consummate killing machine is armed with a drill on its head, claws on its arms, and rotating blades on its torso.
Assess (Tips)
Once it charges up enough electricity, it unleashes a highly potent special attack. For a short time after this attack, the unit is susceptible to staggering. In fact, this is the only time its stagger gauge can be filled.
M.O.T.H. Unit Stats
| Easy | Normal | Hard | |
|---|---|---|---|
| HP | 6732 | 12240 | 17685 |
| Attack | 174 | 283 | |
| Magic Attack | 248 | 418 | |
| Defense | 183 | 268 | |
| Magic Defense | 183 | 268 | |
M.O.T.H. Unit Weaknesses & Resistances
| Weakness / Status Ailments | Lightning, Wind | |
|---|---|---|
| Lesser Resistances | - | |
| Greater Resistances | - | |
| Immunities | Poison, Sleep | |
| Absorbed Elements | - | |
Stagger Rates
| ×1 | ×1 | ×1 | ×1 |
| - | |||
| ×1 | ×1 | ×1 | - |
Stagger Length
| Stagger Length | 10 seconds |
|---|
Rewards
| Easy/Normal | Hard | |
|---|---|---|
| Gil | 500 | 1312 |
| AP | 6 | 18 |
| Exp | 750 | 3960 |
| Items Dropped | - | |
| Rare Items Dropped | - | |
| Steal | Iron Maiden (5%) | |
Learnable Enemy Skills
No Enemy Skills can be learned from M.O.T.H. Unit.
M.O.T.H. Unit Boss Fight Guide
M.O.T.H. Unit Abilities and Attack Patterns
| Name | Element | Blockable? | Knockdown? | Status |
|---|---|---|---|---|
|
|
- | Yes | Yes | - |
| Slices at a target with its claws while charging towards them. | ||||
|
|
- | Yes | No | - |
| Moves in a figure eight while spinning its saw. | ||||
|
|
- | Yes | Yes | - |
| Charges at a target at high speed. | ||||
|
|
- | Yes | No | - |
| Spins its saw while acting. | ||||
|
|
- | Yes | No | - |
| Shoots 8 smaller saw blades towards a target that move around the arena. | ||||
|
|
|
Yes | No | - |
| Charges an electric shock that knocks the target down. | ||||
|
|
|
Yes | Yes | - |
| Shoots a small charge of electric energy. | ||||
|
|
|
Yes | Yes | - |
| Charges up electrical energy and fires it off at a target. Often follows up with High Voltage and Shock. | ||||
*Status Effects and Ailments Guide
Best Characters for this Boss
Available Characters
 Cloud Cloud
|
 Barret Barret
|
You will fight M.O.T.H Units in Chapter 17 while controlling Cloud and Barret so they are the only available characters in this fight.
Recommended Characters
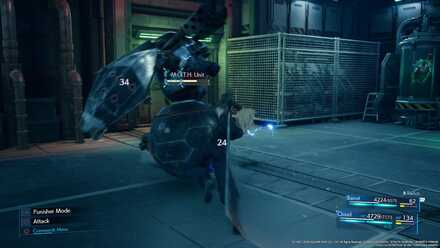
M.O.T.H Unit's rotating blades will be active at the beginning, which makes it difficult for Cloud to get close as the rotating blades can whittle down his HP quickly. During this time, have Barret do most of the attacking. Equip his weapon with Elemental + Lightning / Wind materias to make him deal more damage.
After it charges itself with electricity, it will withdraw its rotating blades. Cloud can now get close safely once this happens and deliver his melee attacks. You can also use his Punisher Mode's auto-counter against M.O.T.H Unit's close-ranged attacks and Drillstrike.
M.O.T.H. Unit Attack Phases
| Phase Point Summary | |
|---|---|
| 1 | M.O.T.H Unit's rotating blades will be active at the beginning. It will attack using its arms and rotating blades by getting close to its target. Most of the time, it will send out smaller rotating blades flying across the room. |
| 2 | After the M.O.T.H Unit charges electricity once, it will withdraw its rotating blades, but will still send out smaller rotating blades occassionally. M.O.T.H Unit will start attacking with High Voltage after charging with electricity once. |
| 3 | M.O.T.H Unit will continue using the same attack pattern as before, except its High Voltage becomes Ultrahigh Voltage. After it uses Ultrahigh Voltage, it will become vulnerable for a few seconds before starting over from its initial state. |
Tips & Strategies for Beating M.O.T.H. Unit
| ★ Strategy Checklist ★ (Click to jump) |
||
|---|---|---|
|
|
Stay Away from the Rotating Blades
M.O.T.H. Unit's Initial State

At the beginning, M.O.T.H. Unit's rotating blades are active so getting close to it or attacking it with melee attacks is dangerous as the blades can whittle down your party members' HP quickly. Use Barret during this phase to deal damage from afar safely.
If you really like using Cloud, use long-ranged attacks like Blade Burst and lightning / wind spells or use the Punisher Mode's auto-counter against its melee attacks and Drillstrike.
You can also resort to using Barrier to increase your defense against most of M.O.T.H. Unit's attacks.
After First Charge

After a while, M.O.T.H. Unit will charge itself with electricity and withdraw its rotating blades. This will be an opening for Cloud's melee attacks so make the most out of this opportunity.
Block the Flying Blades

M.O.T.H. Unit will occassionally send out flying blades from its torso. These blades will bounce across the room, making it very difficult to dodge, so your safest option is to have your guard up as soon as M.O.T.H. Unit opens up its torso for these blades.
Watch Out for Its Voltage Attacks

The first time M.O.T.H. Unit charges electricity gives it access to High Voltage, which deals heavy lightning-based damage to a single target. Its second charge gives it access to Ultrahigh Voltage, an improved version of High Voltage, which deals even more damage.
Do not try to dodge these attacks as they are extremely fast. Your only way out of these attacks is by blocking and hoping that your HP and magic defense are enough to keep you from losing consciousness.
...or just simply link Elemental + Lightning materias on your armor. Problem solved.
Vulnerable After Using Ultrahigh Voltage

As the assessment suggests, M.O.T.H. Unit will become vulnerable for staggering after it uses Ultrahigh Voltage. Use this opportunity to make it regret its existence by bombarding it with your most devastating attacks, preferably lightning and wind attacks.
After this short period, M.O.T.H. Unit will regain mobility and start over from its initial state.
Boss Battle Related Articles
Major Story Bosses
| All Major Story Bosses | |
|---|---|
| Chapter 1 | Scorpion Sentinel |
| Chapter 4 | Roche |
| Chapter 5 | Crab Warden |
| Chapter 7 | Airbuster |
| Chapter 8 | Reno Rude |
| Chapter 9 | Hell House |
| Chapter 10 | Abzu |
| Chapter 11 | Ghoul Eligor |
| Chapter 13 | Failed Experiment |
| Chapter 14 | Abzu (2nd Fight) |
| Chapter 15 | The Valkyrie |
| Chapter 16 | Specimen H0512 |
| Chapter 17 | Jenova Dreamweaver Rufus The Arsenal |
| Chapter 18 | Motor Ball Whisper Harbinger Sephiroth |
VR Mission Bosses
| All VR Mission Bosses | |
|---|---|
| Chapter 8 | Shiva |
| Chapter 9 | Fat Chocobo |
| Chapter 13 | Leviathan |
| Secret Boss | Bahamut |
| Superboss | Pride and Joy Prototype |
Story Sub-Bosses
| All Story Sub-Bosses | |
|---|---|
| Chapter 2 | The Huntsman |
| Chapter 3 | The Hoodlums |
| Chapter 4 | Enigmatic Spectre |
| Chapter 12 | Enigmatic Spectre |
| Chapter 17 | M.O.T.H. Unit Brain Pod Swordipede |
Monster Variants & Optional Sub-Bosses
| All Monster Variants & Optional Sub-Bosses | |
|---|---|
| Chapter 3 | Doomrat Cerulean Drake Wrath Hound |
| Chapter 8 | Hedgehog Pie King Mark II Monodrive Venomantis Chromogger |
| Chapter 14 | Rust Drake Tonberry Trypapolis Type-0 Behemoth |
| Chapter 17 | Malboro |
Author
How to Beat M.O.T.H. Unit | Boss Fight Guide
Rankings
Gaming News
Popular Games

Genshin Impact Walkthrough & Guides Wiki

Umamusume: Pretty Derby Walkthrough & Guides Wiki

Crimson Desert Walkthrough & Guides Wiki

Monster Hunter Stories 3: Twisted Reflection Walkthrough & Guides Wiki

Honkai: Star Rail Walkthrough & Guides Wiki

Pokemon Pokopia Walkthrough & Guides Wiki

The Seven Deadly Sins: Origin Walkthrough & Guides Wiki

Wuthering Waves Walkthrough & Guides Wiki

Zenless Zone Zero Walkthrough & Guides Wiki

Arknights: Endfield Walkthrough & Guides Wiki
Recommended Games

Fire Emblem Heroes (FEH) Walkthrough & Guides Wiki

Diablo 4: Vessel of Hatred Walkthrough & Guides Wiki

Cyberpunk 2077: Ultimate Edition Walkthrough & Guides Wiki

Yu-Gi-Oh! Master Duel Walkthrough & Guides Wiki

Super Smash Bros. Ultimate Walkthrough & Guides Wiki

Pokemon Brilliant Diamond and Shining Pearl (BDSP) Walkthrough & Guides Wiki

Elden Ring Shadow of the Erdtree Walkthrough & Guides Wiki

Monster Hunter World Walkthrough & Guides Wiki

The Legend of Zelda: Tears of the Kingdom Walkthrough & Guides Wiki

Persona 3 Reload Walkthrough & Guides Wiki
All rights reserved
© SQUARE ENIX CO., LTD. All Rights Reserved.
CHARACTER DESIGN:TETSUYA NOMURA/ROBERTO FERRARI
The copyrights of videos of games used in our content and other intellectual property rights belong to the provider of the game.
The contents we provide on this site were created personally by members of the Game8 editorial department.
We refuse the right to reuse or repost content taken without our permission such as data or images to other sites.


Elemental + Lightning on our armor.