Chapter 7: A Trap is Sprung Story Guide & Walkthrough | Airbuster Keycard Choices and Locations
This is a guide and walkthrough to Chapter 7: A Trap is Sprung, a story chapter in the game Final Fantasy 7 Remake. Read on to learn locations of items, rewards for completing this chapter, as well as useful tips and strategies for getting through this part of the story.
| Previous Chapter | Light the Way |
|---|---|
| Current Chapter | A Trap is Sprung |
| Next Chapter | Budding Bodyguard |
List of Contents
- List of Main Scenario Objectives
- Chapter 7: A Trap is Sprung Walkthrough
- Mako Reactor 5 - Interior
- Mako Reactor 5 - Assembly Plant (Room B8)
- Mako Reactor 5 - Assembly Plant (Room B7)
- Mako Reactor 5 - Assembly Plant (Room B6)
- Mako Reactor 5 - Assembly Plant (Room B5)
- Mako Reactor 5 - Interior (Part 2)
- Mako Reactor 5 - Front Gate
- Maps and Obtainable Items
- Maps
- Obtainable Items
- Shops & Vending Machines
- Tips and Strategies
- Boss Strategy Guide
- Airbuster
- Story Walkthrough Related Links
List of Main Scenario Objectives
| No. | Title | Description |
|---|---|---|
| 1 | Reach Mako Storage | Security is light as the group reaches mako storage. They plant the remote-controlled bomb on the reactor core and head for the exit. |
| 1-1 | Down the Pipe | The team slides down the pipe and finds themselves inside the armory. |
| 2 | Escape from the Reactor | Heidegger has sprung his trap, and the team's escape route has been cut off. Now they need to find a way to avoid being publicly executed. |
| 3 | Sentenced to Death | Despite Cloud and the others' best efforts to stop it, the still-incomplete airbuster is deployed. The three decide to face their problem head-on, and make for the front gate. |
| 3-1 | Monitor Data | It looks like the airbuster parts are still in transit. Divert the various components and weaken the machine. |
| 3-2 | Status of the Airbuster | The party checks on the airbuster's status and works out a plan for the coming battle. |
| 4 | Storm the Gates | Cloud is separated from the other two during the airbuster fight. Caught up in the reactor's collapse, Cloud falls to the undercity. |
| 4-1 | Disable the Emergency Lock | The lock is disabled and the door leading to the front gate is open. | ★ | Waste Recovery | They disable delta-level security and recover the diverted items. |
★This objective is labeled as a Discovery. It's unlocked after opening the Waste Management room by completing the Lock mini-game.
Chapter 7: A Trap is Sprung Walkthrough
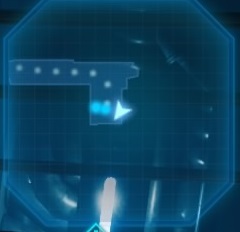
Mako Reactor 5 - Interior

| Objectives | |
|---|---|
| 1 | Go straight along the path, then turn left at the corner. |
| 2 | Go up to the pipe and Cloud will slide down. |
| 3 | Follow Barret and Tifa straight ahead. |
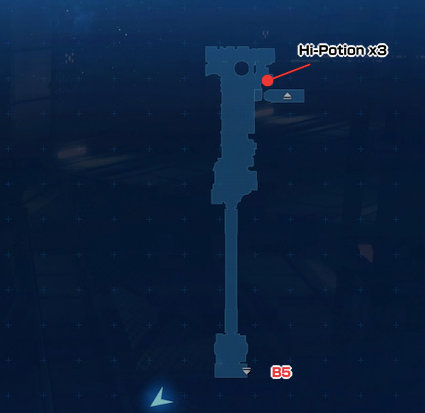
 A chest on the left contains 3 Hi-Potions. A chest on the left contains 3 Hi-Potions. |
|
| 4 | Go straight through the door and continue down the path. You'll fight 4 Monodrives. |
| 5 | In the next room, go down the ladder on the left. |
 At the bottom, open a chest to get Echo Mist x2. At the bottom, open a chest to get Echo Mist x2. |
|
| 6 | Walk along the catwalk, and turn right to find a flight of stairs down. You'll encounter two Slug-Rays and two Monodrives. |
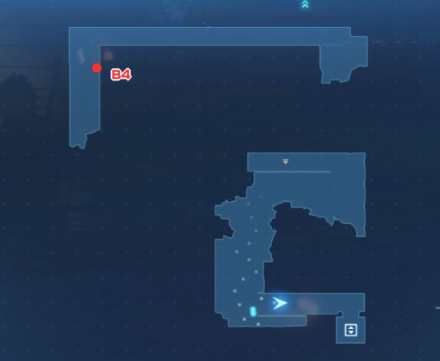
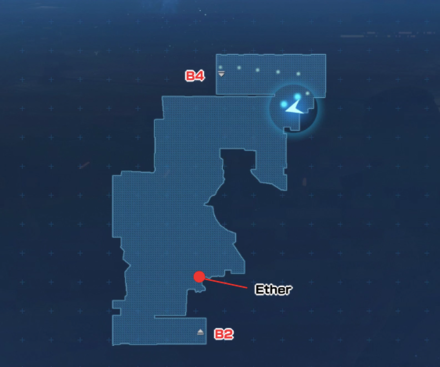
 On the far-right side of the platform, you'll find a chest with an Ether. On the far-right side of the platform, you'll find a chest with an Ether. |
|
| 7 | Go down the ladder, then continue straight on the platform. At the end, you'll fight with two Sweepers and two Laser Cannons. You'll be able to use Summon Materia during this fight. |
| 8 | After defeating the Sweepers, take the ladder down. |
| 9 | Go down the ladder on the right side of the path |
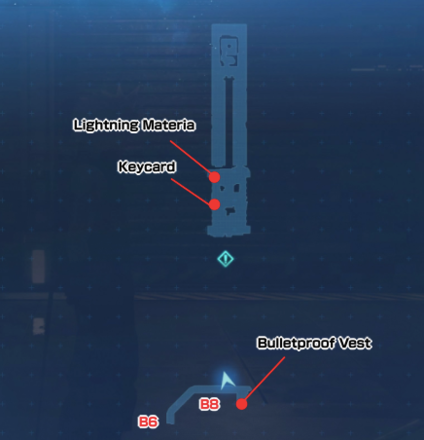
 Go past the ladder to find a chest with a Bulletproof Vest. Go past the ladder to find a chest with a Bulletproof Vest. |
|
| 10 | Walk straight ahead on the platform until a cutscene begins. |
| 11 | After the cutscene, continue straight ahead. |
| 11 | At the end, press the triangle button to start a cutscene. |
| 12 | Continue back to the ladder. A cutscene will begin. |
| 13 | After the cutscene, a battle will begin with two Shock Troopers and an Elite Shock Trooper. |
| 14 | Go out the door the Shock Troopers came in through. |
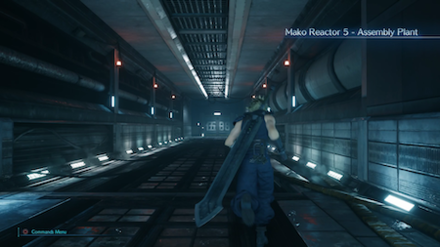
Mako Reactor 5 - Assembly Plant (Room B8)
| Objectives | |
|---|---|
| 1 | Press the switch to open the door at the end of the hall. A cutscene will begin. |
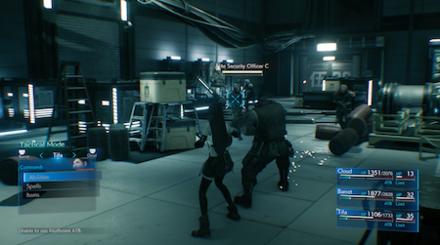
| 2 | On the other side of the door, a battle with two Elite Security Officers and four Security Officers will begin. |
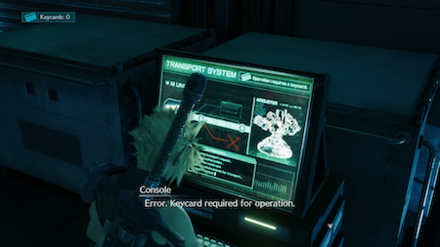
| 3 | Check the console on the far side of the room. |
| 4 | Go back to the console on the right side of the room. |
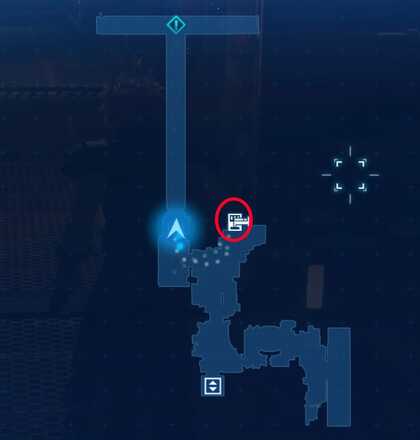
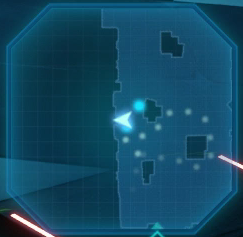 You can find the (Keycard #1 of 6) on top of a box on the opposite side of the room. You can find the (Keycard #1 of 6) on top of a box on the opposite side of the room. |
|
| 5 | Insert the Keycard in the console to dispose of one of the Airbuster's M Units. Unlike other consoles in this area, you'll need to use this one to continue the story. |
| 6 | Go to the console in the front of the room to open the door. |
Mako Reactor 5 - Assembly Plant (Room B7)
| Objectives | |
|---|---|
| 1 | Continue along the path. You'll fight two Monodrives and two Laser Cannons. |
| 2 | At the end of the path, press the switch to open the door. A cutscene will begin. |
| 3 | In the next room, a fight will begin with two Security Officers and two Elite Grenadiers. |
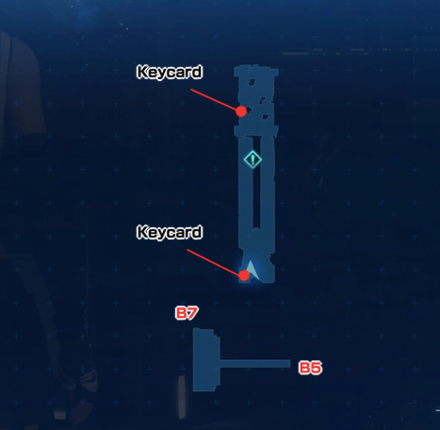
 Pick up a Keycard (#2 of 6) on the right side of the room. Pick up a Keycard (#2 of 6) on the right side of the room. |
|
 You can find a Lightning Materia in the back-right corner. You can find a Lightning Materia in the back-right corner. |
|
| 5 | Choose a Console to use the Keycard with. You can choose to either dispose of one the Airbuster's AI Programming Cores, reducing its tactical awareness and its rate of using its fingerbeams, or its Big Bomber Shells, limiting the number of these attacks it can use. We recommend disabling the AI Programming Cores. |
| 6 | Go to the door at the far side of the room and press the switch to open it. |
Mako Reactor 5 - Assembly Plant (Room B6)
| Objectives | |
|---|---|
| 1 | In the hallway, you'll fight an Elite Shock Trooper and two Laser Cannons. |
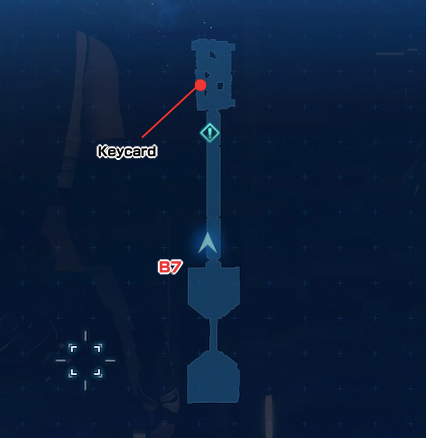
 In the far left corner of the hallway, you'll find a Keycard (#3 of 6) on the floor. In the far left corner of the hallway, you'll find a Keycard (#3 of 6) on the floor. |
|
| 2 | Continue along the path and press the switch at the end to open the door. |
| 3 | In the next room, you'll fight three Elite Security Officers and two Security Officers. |
 On the left side of the room, you'll find a Keycard (#4 of 6) on a box. On the left side of the room, you'll find a Keycard (#4 of 6) on a box. |
|
| 4 | Choose which of the three Consoles you want to use the Keycard on. This time, you can choose to disable an AI Programming Core, a Big Bomber Shell, or an M Unit. We recommend choosing the first two and not taking the M Unit. |
| 5 | Press the switch on the far side of the room to open the door. |
Mako Reactor 5 - Assembly Plant (Room B5)
| Objectives | |
|---|---|
| 1 | Go up and around to find the next door. Press the switch to open it. |
 At the far-left end of the hallway room, you'll find a chest with Sonic Strikers, a weapon for Tifa. At the far-left end of the hallway room, you'll find a chest with Sonic Strikers, a weapon for Tifa. |
|
| 2 | In the next room, you'll find two Elite Security Officers and two Elite Grenadiers. |
  |
|
| 4 | Choose which of the four Consoles you want to use the Keycard on. This time, you can choose to disable an AI Programming Core, a Big Bomber Shell, or an M Unit. We recommend choosing the first two and not taking the M Unit. |
| 5 | Press the switch on the far side of the room to open the door. |
| 6 | In the hallway immediately after opening the door, you'll fight two Elite Shock Troopers. |
| 7 | Continue along the path and press the switch at the end to open the door. |
Mako Reactor 5 - Interior (Part 2)

| Objectives | |
|---|---|
| 1 | You'll be back in the room above the reactor's core. On the LCDs, you'll be able to check what parts have been disposed. Interact with the console to open the door. |
| 2 | Continue along the path and press the switch at the end to open the door. |
| 3 | As soon as you enter the room, you'll fight with two Riot Troopers and two Elite Riot Troopers. |
| 4 | A Cutter will burst forth from the wall opposite the Airbuster. It has Left and Right Blades you can take out. |
| 5 | Continue through the path opened by the Cutter and climb up the staircase. |
 On the far side of the room at the top, you'll find a chest with an Ether. On the far side of the room at the top, you'll find a chest with an Ether. |
|
| 6 | Climb up the staircase on the far side. You'll start a battle with four Monodrives. |
| 7 | Continue to the staircase on the far side of the room. |
| 8 | Press the switch to open the door to the elevator. |
| 9 | After exiting the elevator, press the switch on the far side. The door ahead will not open, but a door on the right side will. Go through the door on the right side. |
| 10 | Go up to the Console. Push the left and right Control Sticks forward at the same time with good timing to open the lock the Front Gate. |
Optional: Open the Waste Disposal room
| Objectives | |
|---|---|
| 1 | Go to the door on the far side and hit the switch. Then, go back to the Console. Finish three more lock challenges to open the door. |
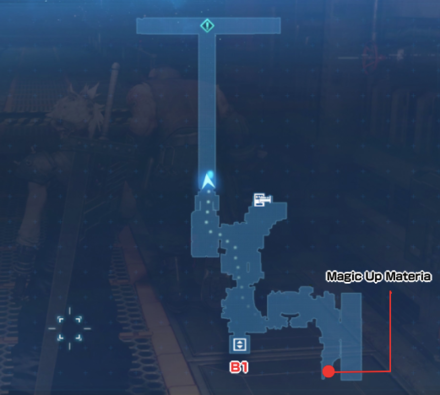
| 2 | Continue through the door and press the switch to release the disposed materials. |
 At the far end, you'll find a Magic Up Materia. At the far end, you'll find a Magic Up Materia. |
Mako Reactor 5 - Front Gate
| Objectives | |
|---|---|
| 1 | The door to the hallway will be open. Continue through and run through the door on the left. |
| 2 | Continue to the end of the room. A cutscene will begin. |
| Boss 3 |
The battle with Airbuster will begin. You will have 25 minutes to defeat it. After Airbuster is defeated, you'll get a Titanium Bangle. How to Beat Airbuster |
| 4 | A cutscene will begin and the chapter will end. |
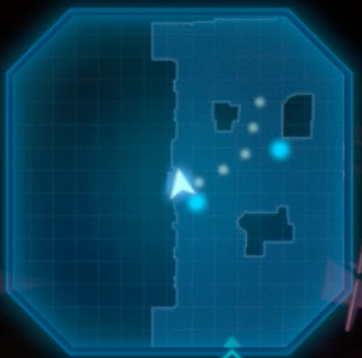
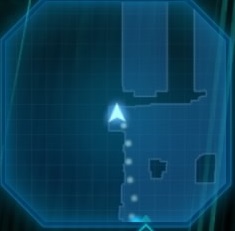
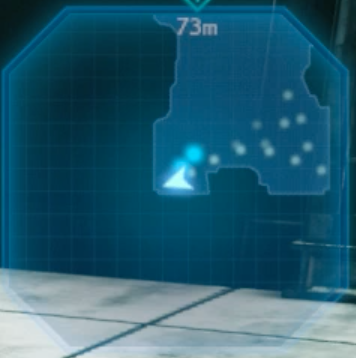
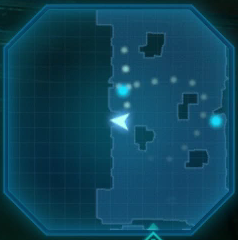
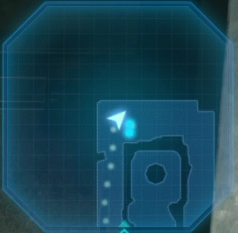
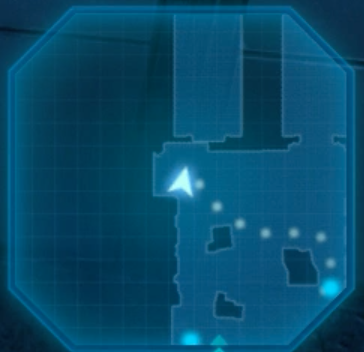
Maps and Obtainable Items
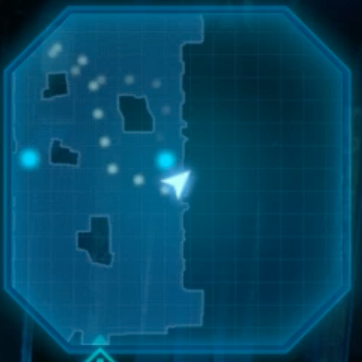
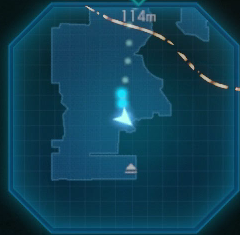
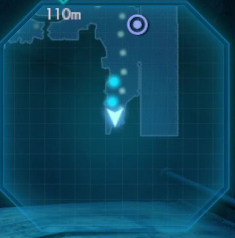
Maps
| List of Maps | |
|---|---|
 |
 |
 |
 |
 |
 |
 |
 |
 |
|
Obtainable Items
This list does not include all the possible items obtainable from the Waste Disposal room.
| Mako Reactor 5 - Interior | ||
|---|---|---|
| Hi-Potion x3 | Echo Mist x2 | Ether x1 |
| Bulletproof Vest x1 | - | - |
| Mako Reactor 5 - Assembly Plant | ||
| Keycard x6 | Lightning Materia x1 | Sonic Strikers x1 |
| Ether x1 | Magic Up Materia x1 | Titanium Bangle x1 |
Shops & Vending Machines
Vending Machine - Gate Office
 |
 |
| Items | Price |
|---|---|
| 2. Bombing Mission (Stock: 1) | 50 Gil |
| Potion | 50 Gil |
| Hi-Potion | 300 Gil |
| Mega Potion (Stock: 3) | 300 Gil |
| Ether (Stock: 1) | 100 Gil |
| Phoenix Down | 300 Gil |
| Phoenix Down (Stock: 1) | 100 Gil |
| Antidote | 80 Gil |
| Echo Mist | 100 Gil |
| Smelling Salts | 80 Gil |
| Weapons / Armor | Price |
|---|---|
| Iron Bangle | 1000 Gil |
| Star Bracelet | 1600 Gil |
| Leather Bracer | 1600 Gil |
| Mesmeric Armlet | 1600 Gil |
| Accessories | Price |
|---|---|
| Power Wristguards | 800 Gil |
| Bulletproof Vest | 800 Gil |
| Earrings | 800 Gil |
| Talisman | 800 Gil |
| Revival Earrings | 500 Gil |
| Materia | Price |
|---|---|
| Healing Materia | 600 Gil |
| Cleansing Materia | 1500 Gil |
| Fire Materia | 500 Gil |
| Ice Materia | 500 Gil |
| Lightning Materia | 500 Gil |
| Poison Materia | 1500 Gil |
| Barrier Materia | 1500 Gil |
| HP Up Materia | 2000 Gil |
| MP Up Materia | 2000 Gil |
| Deadly Dodge Materia | 600 Gil |
Tips and Strategies
Airbuster Choices
Use Airbuster Keycards to Dispose of Airbuster's Enhancements

To best handle the Airbuster battle, you'll want to take out as many of its Enhancements as possible.
We recommend taking out as many of its AI Programming Cores as possible. This will limit its ability to use its Fingerbeams, which can stun your party members and are highly dangerous. Removing AI Programming Cores will have the added benefit of limiting Airbuster's movement abilities, making its attacks slower.
Where to Find Airbuster Keycards

There are a total of 6 Keycards obtainable in the Assembly Plant area. You're required to use the first keycard to take out an M Unit, so other than that, you're free to choose how to use them.
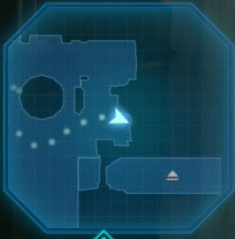
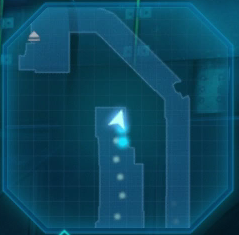
Each of the 6 Keycards can be found in the following locations. Jump to the Maps section above for detailed locations of each of the Keycards on the full Map.
| Room | Location |
|---|---|
| Room B8 | In the middle of the left wall |
| Room B7 | In the middle of the right wall |
| Hallway between B7 and B6 | Far left corner of the middle area |
| Room B6 | In the middle of the left wall |
| Room B5 | In the far left corner of the room |
| Room B5 | On a box on the right side of the room |
Collect Airbuster's Enhancements from Waste Disposal
Removing Airbuster's Enhancements has the added bonus of allowing you to collect them for yourself. By completing the optional lock challenges in Room 9, you can open the door to the Waste Disposal room, allowing you to retrieve all the Enhancements which you disposed of.
While the Big Bomber and the AI Programming Core are received as items in themselves, Airbuster's M Units will instead yield 2 of a random healing item.
Items Obtainable from Airbuster's Enhancements
| Item | Usage |
|---|---|
| Big Bomber | Deals 500 damage to an enemy. |
| AI Programming Core | Sell for a large profit. |
| Phoenix Down, Ether, etc. x2 | Team recovery |
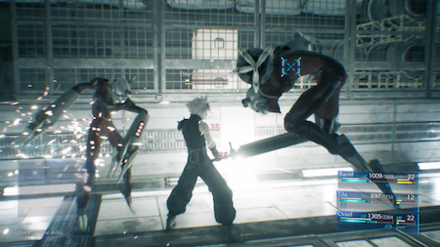
Boss Strategy Guide
Airbuster
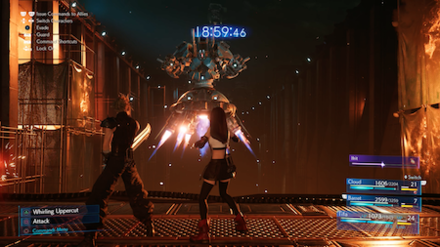
Airbuster is weak to Lightning attacks. Use Lightning attacks on it will fill its Stagger gauge. Using Big Bombers obtained from the Waste Disposal room will also deal massive damage.
Phase 1
- If you stand behind it, it can use a cannon from its back to deal heavy damage and knock you back.
- Will drop electric bombs which take some time to explode. These are easy to avoid, so step out of range when it drops them.
Phase 2
- Will start to use its Big Bombers.
- Will use Tankbuster, a huge laser that can radiate out and hit you even if you're not standing in front of it. Be sure to block this attack.
- Its Left and Right Arms will move independently to execute their own attacks.
- During this phase, your Summon gauge will start to fill.
Phase 3
- Airbuster will start flying with jetpacks. Characters other than Barret won't be able to hit it with their standard attacks until it moves close.
- Airbuster will come in close and start throwing attacks like electric punches and shooting flames from its hands. Generally, keep your distance and use ranged attacks to deal damage.
Story Walkthrough Related Links
| Chapter 1 | The Destruction of Mako Reactor 1 |
|---|---|
| Chapter 2 | Fateful Encounters |
| Chapter 3 | Home Sweet Slum |
| Chapter 4 | Mad Dash |
| Chapter 5 | Dogged Pursuit |
| Chapter 6 | Light the Way |
| Chapter 7 | A Trap is Sprung |
| Chapter 8 | Budding Bodyguard |
| Chapter 9 | The Town That Never Sleeps |
| Chapter 10 | Rough Waters |
| Chapter 11 | Haunted |
| Chapter 12 | Fight for Survival |
| Chapter 13 | A Broken World |
| Chapter 14 | In Search of Hope |
| Chapter 15 | The Day Midgar Stood Still |
| Chapter 16 | The Belly of the Beast |
| Chapter 17 | Deliverance from Chaos |
| Chapter 18 | Destiny's Crossroads |
| INTERmission Chapters | |
|---|---|
| Chapter 1 | Wutai's Finest |
| Chapter 2 | Covert Ops |
Author

Chapter 7: A Trap is Sprung Story Guide & Walkthrough | Airbuster Keycard Choices and Locations
Rankings
Gaming News
![Neverness to Everness (NTE) Review [Beta Co-Ex Test] | Rolling the Dice on Something Special](https://img.game8.co/4414628/dd3192c8f1f074ea788451a11eb862a7.jpeg/show)


Popular Games

Genshin Impact Walkthrough & Guides Wiki
Honkai: Star Rail Walkthrough & Guides Wiki
Arknights: Endfield Walkthrough & Guides Wiki
Umamusume: Pretty Derby Walkthrough & Guides Wiki
Wuthering Waves Walkthrough & Guides Wiki
Pokemon TCG Pocket (PTCGP) Strategies & Guides Wiki
Abyss Walkthrough & Guides Wiki
Zenless Zone Zero Walkthrough & Guides Wiki
Digimon Story: Time Stranger Walkthrough & Guides Wiki
Clair Obscur: Expedition 33 Walkthrough & Guides Wiki


Recommended Games
Fire Emblem Heroes (FEH) Walkthrough & Guides Wiki
Pokemon Brilliant Diamond and Shining Pearl (BDSP) Walkthrough & Guides Wiki
Diablo 4: Vessel of Hatred Walkthrough & Guides Wiki
Super Smash Bros. Ultimate Walkthrough & Guides Wiki
Yu-Gi-Oh! Master Duel Walkthrough & Guides Wiki
Elden Ring Shadow of the Erdtree Walkthrough & Guides Wiki
Monster Hunter World Walkthrough & Guides Wiki
The Legend of Zelda: Tears of the Kingdom Walkthrough & Guides Wiki
Persona 3 Reload Walkthrough & Guides Wiki
Cyberpunk 2077: Ultimate Edition Walkthrough & Guides Wiki


All rights reserved
© SQUARE ENIX CO., LTD. All Rights Reserved.
CHARACTER DESIGN:TETSUYA NOMURA/ROBERTO FERRARI
The copyrights of videos of games used in our content and other intellectual property rights belong to the provider of the game.
The contents we provide on this site were created personally by members of the Game8 editorial department.
We refuse the right to reuse or repost content taken without our permission such as data or images to other sites.
Found 1st key card in the same room as the m unit disposal terminal, 2nd key card in the room with 2 terminals, 3rd key card I'm the next room up the ramp far right corner.