How to Beat Specimen H0512 | Boss Fight Guide (Normal & Hard)

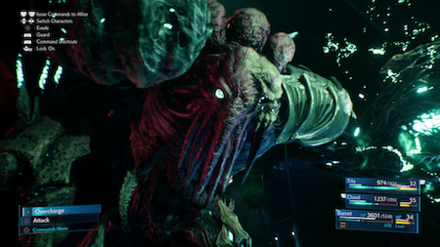
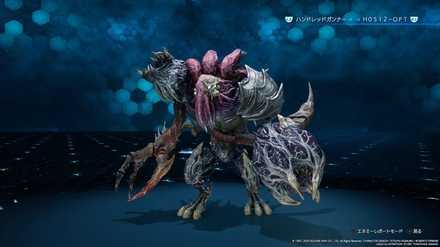
This is a guide to beating the Boss Specimen H0512 in the game Final Fantasy 7 Remake (FF7R). This article explains Specimen H0512's attack patterns, weaknesses, and tips and strategies for defeating it on both Normal and Hard Mode.
List of Contents
Specimen H0512 Stats and Information
Basic Information
| Specimen H0512 | ||
|---|---|---|

|
Species | Movement | Type |
| Artificial Life | Grounded | Boss |
Description
A monster created by Shinra's R&D Division. Highly adaptable, it evolves during battle, where it exhibits extraordinary offensive and restorative capabilities.
Assess (Tips)
Tactical data not available.
Specimen H0512 Stats
| Easy | Normal | Hard | |
|---|---|---|---|
| HP | 23338 | 42432 | 61308 |
| Attack | 233※1 | 391※2 | |
| Magic Attack | 184 | 301 | |
| Defense | 183 | 268 | |
| Magic Defense | 233 | 342 | |
Specimen H0512 Weaknesses & Resistances
| Weakness / Status Ailments | - | |
|---|---|---|
| Lesser Resistances | Lightning | |
| Greater Resistances | - | |
| Immunities | Poison, Slow, Proportional Damage | |
| Absorbed Elements | - | |
How to Stagger Specimen H0512
Stagger Rates
| ×1 | ×1 | ×1 | ×1 |
| - | |||
| ×1 | ×1 | ×1 | - |
Stagger Length
| Stagger Length | 10 seconds |
|---|
Specimen H0512 Abilities
| Rake |
| Noxious Expulsion |
| Seize |
| Regrowth |
Rewards
| Easy/Normal | Hard | |
|---|---|---|
| Gil | 1300 | 2250 |
| AP | 10 | 30 |
| Exp | 1300 | 4500 |
| Items Dropped | Talisman (100%) | |
| Rare Items Dropped | - | |
| Steal | Timeworn Talisman (12%) | |
Learnable Enemy Skills
No Enemy Skills can be learned from Specimen H0512.
Specimen H0512 Boss Fight Guide
Specimen H0512 Abilities and Attack Patterns
| Name | Element | Blockable? | Knockdown? | Status |
|---|---|---|---|---|
|
|
- | Yes | Yes | - |
| Swings its larger claw left to right. | ||||
|
|
- | Yes | Yes | - |
| Charges and swings out with its smaller claw. During phases 2 and 3 will charge towards further away targets. | ||||
|
|
- | No | Yes | - |
| Grabs a target with its right claw and binds them for 3 seconds before hurling them into the ground and creating a shockwave. Allies can be freed by dealing damage equal to 2% of its total HP or hitting it with abilities. | ||||
|
Regrowth
|
- | - | - | - |
| Regrows its left claw. | ||||
|
|
- | No | No |
|
| Sprays a purple mist in front of itself (spreads further on Hard mode) from its left claw that causes poison. | ||||
|
|
- | No | No |
|
| Sprays Mako out of its left claw. H0512-OPT α caught in this will change into H0512-OPT β. The Mako can spread in front of Specimen H0512 or around the arena in phase 3. It will linger for 10 seconds. | ||||
|
Regurgitate
|
- | - | - | - |
| Summons 5 H0512-OPT α in phase 2 and 5 H0512-OPT β in phase 3. | ||||
*Status Effects and Ailments Guide
Best Characters for This Boss
Available Characters
 Cloud Cloud
|
 Barret Barret
|
 Tifa Tifa
|
Best Characters and Equipment
Cloud should serve as the main attacker, countering attacks like Rend with Punisher Mode. Don't try to dodge away from attacks, as you won't be able to make it out of the way in time. Counter its attacks and bring the heat after you've Staggered it.
 Cloud Cloud |
Role: Attacker Weapon: Mythril Saber Armor: Cog Bangle Accessory: Otherworldly Crystal |
|---|---|
 Tifa Tifa |
Role: Support Weapon: Purple Pain Armor: Gothic Bangle Accessory: Mythical Amulet |
 Barret Barret |
Role: Tank & Long-Range Attacker Weapon: EKG Cannon Armor: Sorcerer's Armlet Accessory: Healing Carcanet |
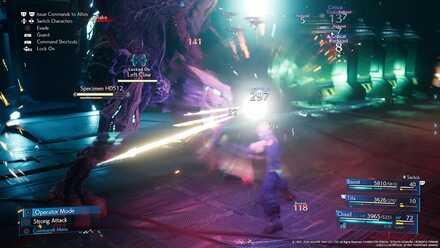
Focus on attacking its left claw and continue attacking it until it is staggered then let out your most damaging attacks. Increase the stagger damage by using Cloud's Infinity's End and Tifa's True Strike.
Best Materia for Cloud
The number of slots in your Weapon may vary depending on your Weapon Level.
| Weapon (5 Slots) | |
|---|---|
| Armor (3 Slots) | |
| Summon | |
Best Materia for Tifa
| Weapon (4 Slots) | ||
|---|---|---|
| Armor (3 Slots) | ||
| Summon | ||
Best Materia for Barret
| Weapon (5 Slots) | ||
|---|---|---|
| Armor (3 Slots) | ||
| Summon | ||
Since Cloud is your main attacker for this battle, you'll need to have him deal with the status effects from Mako Expulsion and Noxious Expulsion, which is why the Warding materias are paired with Poison and Time materias. You can also cast Haste from the Time materia to himself so he can unleash punishing abilities in quick succession. Remember to focus your attacks on the claw first.
Tifa will be your support this time. Cast Barrier to Cloud as soon as possible to make him endure more attacks from Specimen H0512. The First Strike materia will help you cast it sooner. If an ally needs healing, fill half of her ATB Gauge then use ATB Boost to completely fill it, then cast Cure. If her Magic Attack is high, Cure or Cura should be enough to restore a significant amount of HP. If you use another ability other than Barrier and Cure, the boost from Skill Master will be triggered, increasing your ATB gauge.
Your long range support Barret should be able to deal more damage with the Synergy and Elemental materias while you use Cloud. You can also pair these materias with Ice if it has a higher level than your Fire materia. Cast Silence on H0512-OPTs if their magic attacks are bothering you.
If you have the chance to summon, you can pick either Ifrit and focus the summon skills on Specimen H0512 or Fat Chocobo to deal with the H0512-OPts at the same time. You cannot summon Leviathan in this fight since the battle area does not have enough space.
Specimen H0512 Attack Phases
Phase 1
| Phase Point Summary | |
|---|---|
| 1 | Specimen H0512 will be surrounded by five H0512-OPTs. It will use all of its attacks from the start of the battle. |
Phase 2
| Phase Point Summary | |
|---|---|
| 1 | All the defeated H0512-OPTs will be regenerated. They will start to use Apoptosis, in which they will Self-Destruct and deal moderate damage to anything nearby. |
Tips & Strategies for Beating Specimen H0512
| ★ Strategy Checklist ★ (Click to jump) |
||
|---|---|---|
|
|
Use Punisher Mode's Auto-Counter

As Specimen H0512 mostly uses melee attacks with its Claws, most of its attacks can be countered using the Auto-Counter feature of Cloud's Punisher Mode. When it readies an attack like Rend, hold R1 to block, and Cloud will strike back with gusto.
Aim for the Claws

Specimen H0512 mostly attacks using its two massive Claws, and its Abilities like Rend and Seize are reliant on them. By crippling both of these, you can render it largely unable to attack. On the other hand, keep in mind that crippling the claws will add to the Focus Gauge, but not automatically cause Staggering.
It's not necessary to attack the Claws to finish the fight, but like many other bosses with multiple targets, doing so will make the battle go much more smoothly.
Cast Silence on H0512-OPTs

Unlike other fights with multiple opponents such as Enigmatic Spectre, there's no need to take out the smaller foes to deal damage to the main opponent. By Silencing them, you can leave them unable to use Magic attacks like Fire and Blizzard, and render them inert during the battle.
Increase Defense with Barrier
If you've Silenced the H0512-OPTs, you won't have much to deal with in the way of Magic, so you'll mostly only have to worry about physical attacks. Set up Barrier on Cloud, so that he can continue wailing on Specimen H0512 while taking reduced damage from its hits.
Cast Haste to Remove Slow

Specimen H0512's Mako Expulsion attack can inflict Slow on your party members. Be sure to get rid of Slow as soon as possible, so that you'll have enough ATB to cure the Poison effects and continue using Abilities and Magic. If you've got a Time Materia equipped, you'll be able to cast Haste on your party members to cancel out the effects of Slow.
Watch out for Apoptosis

In the second phase of the battle, the H0512-OPTs will begin to self-destruct, and can seriously hurt your party if you're not ready for it. Be sure to dodge out of the way when the Apoptosis Ability name appears over their heads.
That said, you can also acquire the Self-Destruct Enemy Skill from being hit by Apoptosis, so be sure to send in your character equipped with the Enemy Skill Materia to take at least one of these blows.
Specimen H0512: Hard Mode Guide
Best Characters and Equipment
 Cloud Cloud |
Weapon: Hardedge Armor: Force Bracelet Accessory: Champion Belt |
|---|---|
 Tifa Tifa |
Weapon: Metal Knuckles Armor: Force Bracelet Accessory: Champion Belt |
 Barret Barret |
Weapon: Light Machinge Gun Armor: Chain Bangle Accessory: Healing Carcanet |
Best Materia to Use
The number of slots in your Weapon may vary depending on your Weapon Level.
Cloud
| Weapon (6 Slots) | ||
|---|---|---|
| Armor (4 Slots) | ||
| Summon | ||
Tifa
| Weapon (6 Slots) | |||
|---|---|---|---|
| Armor (4 Slots) | |||
| Summon | |||
Barret
| Weapon (6 Slots) | |||
|---|---|---|---|
| Armor (4 Slots) | |||
| Summon | |||
| ★Strategy Checklist★ | ||
|---|---|---|
|
|
Have Cleansing Equipped For Resist and Esuna
Having Cleansing equipped can be a huge help against Specimen H0512. It will constantly use its poison and slow attack. Casting Resist ASAP will make sure you will not have to worry about any of those attacks.
Equip Elemental Linked with Fire or Ice
Equipping Elemental linked with Fire or Ice can help with ignoring H0512-OPTs. At Lv.3 of Elemental, you can even purposely get hit to recover some health.
Boss Fight Related Articles
Major Story Bosses
| All Major Story Bosses | |
|---|---|
| Chapter 1 | Scorpion Sentinel |
| Chapter 4 | Roche |
| Chapter 5 | Crab Warden |
| Chapter 7 | Airbuster |
| Chapter 8 | Reno Rude |
| Chapter 9 | Hell House |
| Chapter 10 | Abzu |
| Chapter 11 | Ghoul Eligor |
| Chapter 13 | Failed Experiment |
| Chapter 14 | Abzu (2nd Fight) |
| Chapter 15 | The Valkyrie |
| Chapter 16 | Specimen H0512 |
| Chapter 17 | Jenova Dreamweaver Rufus The Arsenal |
| Chapter 18 | Motor Ball Whisper Harbinger Sephiroth |
VR Mission Bosses
| All VR Mission Bosses | |
|---|---|
| Chapter 8 | Shiva |
| Chapter 9 | Fat Chocobo |
| Chapter 13 | Leviathan |
| Secret Boss | Bahamut |
| Superboss | Pride and Joy Prototype |
Story Sub-Bosses
| All Story Sub-Bosses | |
|---|---|
| Chapter 2 | The Huntsman |
| Chapter 3 | The Hoodlums |
| Chapter 4 | Enigmatic Spectre |
| Chapter 12 | Enigmatic Spectre |
| Chapter 17 | M.O.T.H. Unit Brain Pod Swordipede |
Monster Variants & Optional Sub-Bosses
| All Monster Variants & Optional Sub-Bosses | |
|---|---|
| Chapter 3 | Doomrat Cerulean Drake Wrath Hound |
| Chapter 8 | Hedgehog Pie King Mark II Monodrive Venomantis Chromogger |
| Chapter 14 | Rust Drake Tonberry Trypapolis Type-0 Behemoth |
| Chapter 17 | Malboro |
Author
How to Beat Specimen H0512 | Boss Fight Guide (Normal & Hard)| FF7 Remake
improvement survey
03/2026
improving Game8's site?

Your answers will help us to improve our website.
Note: Please be sure not to enter any kind of personal information into your response.

We hope you continue to make use of Game8.
Rankings
- We could not find the message board you were looking for.
Gaming News
Popular Games

Genshin Impact Walkthrough & Guides Wiki

Honkai: Star Rail Walkthrough & Guides Wiki

Umamusume: Pretty Derby Walkthrough & Guides Wiki

Pokemon Pokopia Walkthrough & Guides Wiki

Resident Evil Requiem (RE9) Walkthrough & Guides Wiki

Monster Hunter Wilds Walkthrough & Guides Wiki

Wuthering Waves Walkthrough & Guides Wiki

Arknights: Endfield Walkthrough & Guides Wiki

Pokemon FireRed and LeafGreen (FRLG) Walkthrough & Guides Wiki

Pokemon TCG Pocket (PTCGP) Strategies & Guides Wiki
Recommended Games

Diablo 4: Vessel of Hatred Walkthrough & Guides Wiki

Cyberpunk 2077: Ultimate Edition Walkthrough & Guides Wiki

Fire Emblem Heroes (FEH) Walkthrough & Guides Wiki

Yu-Gi-Oh! Master Duel Walkthrough & Guides Wiki

Super Smash Bros. Ultimate Walkthrough & Guides Wiki

Pokemon Brilliant Diamond and Shining Pearl (BDSP) Walkthrough & Guides Wiki

Elden Ring Shadow of the Erdtree Walkthrough & Guides Wiki

Monster Hunter World Walkthrough & Guides Wiki

The Legend of Zelda: Tears of the Kingdom Walkthrough & Guides Wiki

Persona 3 Reload Walkthrough & Guides Wiki
All rights reserved
© SQUARE ENIX CO., LTD. All Rights Reserved.
CHARACTER DESIGN:TETSUYA NOMURA/ROBERTO FERRARI
The copyrights of videos of games used in our content and other intellectual property rights belong to the provider of the game.
The contents we provide on this site were created personally by members of the Game8 editorial department.
We refuse the right to reuse or repost content taken without our permission such as data or images to other sites.


![Monster Hunter Stories 3 Review [First Impressions] | Simply Rejuvenating](https://img.game8.co/4438641/2a31b7702bd70e78ec8efd24661dacda.jpeg/thumb)


