Rhea and Byleth Infernal Guide and Recommended Team (Bound Hero Battle)
★ Latest Banners: Harmonized CYL Hector & Celica
☆ New: Harmonized Brave Hector, Harmonized Brave Celica, Chosen Fjorm
★ Free Units: Griss
☆ State of the Meta (February 2026)
This is a guide to clearing the Infernal and Lunatic maps for Rhea and Byleth in Fire Emblem Heroes (FEH). To see strategy for defeating Rhea and Byleth, enemy information, as well as the best units and party to use, read on!
Table of Contents
Rhea and Byleth Strategy Overview
| Enemy Units |
|
|---|---|
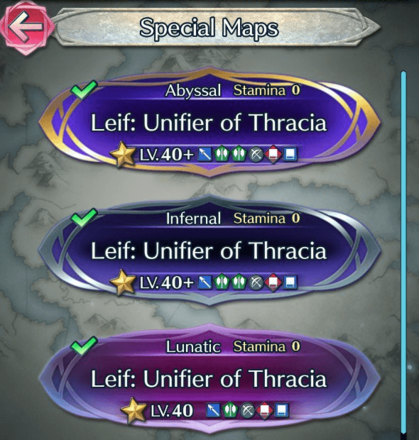
| Recommended Level | Lv.40 |
| Difficulty | Infernal Lunatic Hard |
| Conditions | Condition 1: All 4 units must survive. Condition 2: You cannot use Light's Blessing |
| Dates Active | 06/30/2024 - 07/05/2024 |
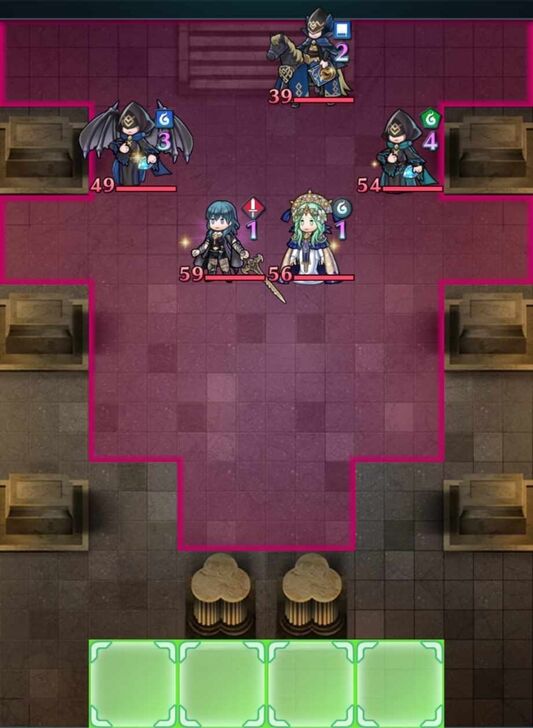
Initial Unit Placement
| Infernal | Lunatic |
|---|---|
 |
|
Infernal Enemy Information
A
 Blue Cavalier Blue Cavalier
|
HP 47 |
Atk 51 |
Spd 28 |
Def 18 |
Res 37 |
||||||
|---|---|---|---|---|---|---|---|---|---|---|---|
|
|
|
||||||||||
B
 Blue Fáfnir Blue Fáfnir
|
HP 62 |
Atk 52 |
Spd 43 |
Def 40 |
Res 39 |
||||||
|
|
|
||||||||||
C
 Green Manakete Green Manakete
|
HP 67 |
Atk 49 |
Spd 36 |
Def 34 |
Res 37 |
||||||
|
|
|
||||||||||
| D
|
HP 67 |
Atk 57 |
Spd 48 |
Def 40 |
Res 27 |
||||||
|
|
|
||||||||||
| E
|
HP 64 |
Atk 64 |
Spd 17 |
Def 47 |
Res 50 |
||||||
|
|
|
||||||||||
F
 Axe Knight Axe Knight
|
HP 81 |
Atk 58 |
Spd 17 |
Def 47 |
Res 25 |
||||||
|
|
|
||||||||||
Lunatic Enemy Information
| A
Blue Cavalier
|
HP 39 |
Atk 47 |
Spd 25 |
Def 17 |
Res 34 |
||||||
|---|---|---|---|---|---|---|---|---|---|---|---|
|
|
|
||||||||||
| B
Blue Fáfnir
|
HP 49 |
Atk 48 |
Spd 40 |
Def 37 |
Res 32 |
||||||
|
|
|
||||||||||
| C
Green Manakete
|
HP 54 |
Atk 45 |
Spd 33 |
Def 31 |
Res 30 |
||||||
|
|
|
||||||||||
| D
|
HP 59 |
Atk 54 |
Spd 44 |
Def 37 |
Res 25 |
||||||
|
|
|
||||||||||
| E
|
HP 56 |
Atk 60 |
Spd 16 |
Def 42 |
Res 46 |
||||||
|
|
|
||||||||||
Rhea and Byleth Strategy
Use a Hit and Run Strategy!
This map has no reinforcements and no refresher foes, making a Hit and Run strategy viable.
The Axe Knight is in range to be defeated by ranged cavalry units on turn one while his Aegis hasn't been pre-charged by Hardy Fighter 3 yet. Do so, and then use your own refresher assists, movement assists like Reposition, or post-combat movement effects like Canto to retreat to safety.
The enemies will then approach your team but be unable to reach your units. You can use the following turns to pick them off at your leisure.
Rhea has very high defensive stats and has both Revealing Breath and True Dragon Wall to help mitigate damage. However, her Spd is very low, and she has no way to prevent follow-up attacks. Bring a unit that can pierce through non-Special damage reduction to attack Rhea and she should fall in combat.
Alternatively, Use a Tanking Strategy!
You can also adopt a tanking strategy to clear this map, as none of the enemies in this map are too threatening except for Byleth and Rhea's pre-charged Specials.
The only concerning enemies on this map are Rhea with her high bulk and pre-charged Iceberg, and Byleth with Potent 4 granting additional follow-up attacks.
To combat this, ensure your tank unit has an effect that allows him/her to neutralize non-Special damage reduction effects in order to deal maximum damage to Rhea. As for Byleth, she can be dealt with similar to other Sword Infantry units: tank her damage with a high Def Blue unit, or defeat her in player phase using a Blue unit that deals magic damage.
Alternatively, bring a tank unit whose sole purpose is to soak damage, and equip them with as many defensive effects as possible. Then, bring an offensive unit that can neutralize non-Special damage reduction effects; this unit's role is to defeat both Rhea and Byleth and retreat to safety afterwards while the tank unit protects him/her from the other units.
Best Units for Rhea and Byleth
Player Phase Units With Multiple Actions
| Unit Name | |
|---|---|
|
|
Lance Armored Black Yule Lance creates 【Divine Vein (Flame)】 tiles, grants Special cooldown charges pre-combat, and cuts the effectiveness of enemy damage reduction skills. Raging Tempest grants mobility and one additional action after combat. Inheriting Galeforce can grant a third action per turn. |
|
|
Sword Armored Regal Sunshade's brave effect can quickly eliminate enemies. Raging Storm can grant one additional action after combat. Inheriting Galeforce can grant a third action per turn. |
|
|
Axe Armored Raging Storm can grant one additional action after combat. Inheriting Galeforce can grant a third action per turn. |
|
|
Lance Cavalry Incredibly mobile with United Bouquet granting movement+1 and Forever Yours granting 【Canto (Dist, +1; Max 4)】. Both Forever Yours and Duo Skill generate additional actions while refreshing Canto. |
|
|
Red Tome Cavalry Can act up to four times in one turn with Golden Sunlight, Time and Light, and her Duo Skill. Flared Sparrow leaves behind 【Divine Vein (Flame)】 terrain, softening up enemies for future engagements. |
|
|
Red Tome Cavalry Radiant Scrolls' brave effect can quickly defeat enemies. Duo Skill grants herself an additional action. |
|
|
Green Tome Cavalry Ninjutsu Scrolls' brave effect can quickly defeat enemies. Duo Skill grants herself an additional action. |
|
|
Blue Bow Flying Flamefrost Bow's brave effect can quickly defeat enemies. Duo Skill grants herself an additional action. |
|
|
Sword Cavalry Arcane Devourer has Special acceleration, allowing an easy Galeforce trigger. Fate Unchanged... allows a Reposition effect while inflicting 【Exposure】onto multiple foes. |
|
|
Lance Cavalry Geirdriful grants bonus stats and Special cooldown charges in combat. A Fate Changed! allows a Reposition effect while granting Brave Chrom an extra action and copies ally's bonuses, granting them to himself. |
|
|
Colorless Bow Cavalry Meisterbogen's brave effect can quickly defeat enemies. Njörun's Zeal II grants himself an additional action when triggered. |
|
|
Colorless Tome Cavalry Quietus Gullveig and Time is Light grant herself additional actions after combat. Flared Sparrow leaves behind 【Divine Vein (Flame)】 terrain, softening up enemies for future engagements. |
Savior Tank Units
|
|
Sword Armored Holy Yule Blade decays foe's Specials and grants multiple stat bonuses. Supreme Heaven deals bonus damage against dragons and beasts and also grants additional damage reduction. |
|
|
Colorless Breath Armored Multiple damage reduction effects and the 【Divine Vein (Stone)】 effect paired with high Spd allow her to survive multiple engagements. |
|
|
Lance Armored The king of blue tank units. Can counterattack at a distance, deny enemy follow-ups, and has his own follow-up attack. |
|
|
Blue Breath Armored Guaranteed follow-up attack. Weapon is comparable to Brave Hector's refined Maltet. Can neutralize penalties inflicted on her. |
|
|
Axe Armored High mobility for an armored unit. Incredibly sturdy with refined Flower Hauteclere and Black Eagle Rule granting multiple defensive effects. |
|
|
Colorless Beast Armored Refined Lion King Fang grants multiple defensive effects and guaranteed follow-up attacks on both phases. Nullifies buffs from ranged units. |
Support Units
| Unit Name | |
|---|---|
|
|
Staff Flying Grants damage reduction, healing, and can shut down "At start of turn" effects of foes in cardinal directions upon winning a Res check. |
|
|
Staff Cavalry Kitty-Cat Parasol grants Special cooldown charges, 30% damage reduction, and "neutralizes foe's bonuses to Atk" to nearby allies and can double as an offensive unit with high Atk and a guaranteed follow-up attack. |
|
|
Staff Flying Grants damage reduction and healing. |
|
|
Lance Infantry Grants bonus stats and Special acceleration to nearby allies. Can double as an offensive unit with refined Geirskögul |
|
|
Sword Infantry Grants bonus stats to his Ally Support during combat. |
|
|
Staff Flying Grants Atk+6 and Special acceleration to nearby allies during combat. |
Refresher Units
| Unit Name | |
|---|---|
|
|
Green Tome Flying Grants additional Atk to allies in similar cardinal directions. Can use her Duo Skill to grant another action to an adjacent ally. |
|
|
Blue Tome Flying Grants additional Atk and Spd to allies in similar cardinal directions. |
|
|
Blue Tome Flying Grants additional bonuses equal to highest bonus on unit and +1 movement. |
|
|
Green Tome Cavalry Grants +6 to all stats and +1 movement to target unit and all adjacent allies. Can use Harmonized Skill to grant extra actions to allies. |
List of All Dancers | Heroes with Refresher Skills
User Submitted Units / Parties for Rhea and Byleth
We are looking for user submitted clears!
Let us know about your party and how you cleared the maps in the comments below, via a picture of your team and their skills.
If you have uploaded the walkthrough video on Twitter etc., please enter the URL as well!
FEH Related Guides
Other Bound Hero Battle Walkthroughs

Bound Hero Battles Walkthroughs and Schedule
List of Bound Hero Battles
Comment
Author

Rhea and Byleth Infernal Guide and Recommended Team (Bound Hero Battle)
Premium Articles
Rankings
- We could not find the message board you were looking for.
Gaming News
![Animal Crossing: New Horizons Review [Switch 2] | Needlessly Crossing Over to a New Generation](https://img.game8.co/4391759/47d0408b0b8a892e453a0b90f54beb8a.png/show)


Popular Games

Genshin Impact Walkthrough & Guides Wiki
Honkai: Star Rail Walkthrough & Guides Wiki
Arknights: Endfield Walkthrough & Guides Wiki
Umamusume: Pretty Derby Walkthrough & Guides Wiki
Wuthering Waves Walkthrough & Guides Wiki
Pokemon TCG Pocket (PTCGP) Strategies & Guides Wiki
Abyss Walkthrough & Guides Wiki
Zenless Zone Zero Walkthrough & Guides Wiki
Digimon Story: Time Stranger Walkthrough & Guides Wiki
Clair Obscur: Expedition 33 Walkthrough & Guides Wiki


Recommended Games
Fire Emblem Heroes (FEH) Walkthrough & Guides Wiki
Pokemon Brilliant Diamond and Shining Pearl (BDSP) Walkthrough & Guides Wiki
Diablo 4: Vessel of Hatred Walkthrough & Guides Wiki
Super Smash Bros. Ultimate Walkthrough & Guides Wiki
Yu-Gi-Oh! Master Duel Walkthrough & Guides Wiki
Elden Ring Shadow of the Erdtree Walkthrough & Guides Wiki
Monster Hunter World Walkthrough & Guides Wiki
The Legend of Zelda: Tears of the Kingdom Walkthrough & Guides Wiki
Persona 3 Reload Walkthrough & Guides Wiki
Cyberpunk 2077: Ultimate Edition Walkthrough & Guides Wiki


All rights reserved
© 2025 Nintendo / INTELLIGENT SYSTEMS
The copyrights of videos of games used in our content and other intellectual property rights belong to the provider of the game.
The contents we provide on this site were created personally by members of the Game8 editorial department.
We refuse the right to reuse or repost content taken without our permission such as data or images to other sites.