Sain and Kent Infernal Guide and Recommended Team (Bound Hero Battle)
★ Latest Banners: Tiki: Everlasting Voice | Springtime Sisters
☆ New: Mythic Tiki (Adult) | Spring Thórr, Spring Dorothea, Spring Sothe, Spring Eirika
★ Free Units: Spring Bernadetta
☆ State of the Meta (February 2026)

This is a guide to clearing the Infernal and Lunatic maps for Sain and Kent in Fire Emblem Heroes (FEH). To see strategy for defeating Sain and Kent, enemy information, as well as the best units and party to use, read on!
Table of Contents
Sain and Kent Strategy Overview
| Enemy Units |
|
|---|---|
| Recommended Level | Lv.40 |
| Difficulty | Infernal Lunatic Hard |
| Conditions | Condition 1: All 4 units must survive. Condition 2: You cannot use Light's Blessing |
| Dates Active | 12/29/2023 to 01/11/2024 |
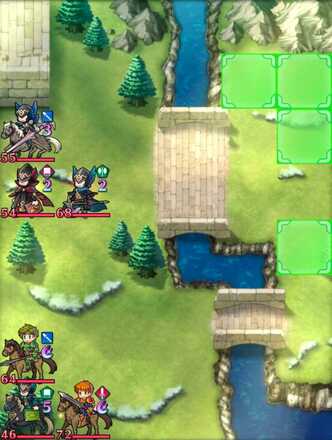
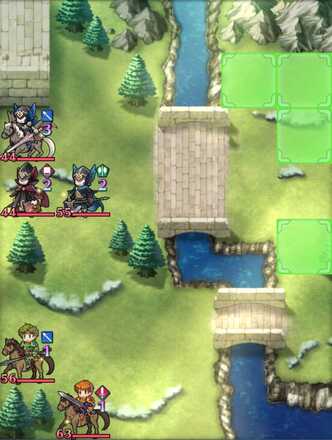
Initial Unit Placement
| Infernal | Lunatic |
|---|---|
 |
|
Infernal Enemy Information
A
 Lance Flier Lance Flier
|
HP 55 |
Atk 47 |
Spd 38 |
Def 26 |
Res 39 |
||||||
|---|---|---|---|---|---|---|---|---|---|---|---|
|
|
|
||||||||||
B
 Red Mage Red Mage
|
HP 54 |
Atk 49 |
Spd 38 |
Def 25 |
Res 33 |
||||||
|
|
|
||||||||||
C
 Axe Fighter Axe Fighter
|
HP 68 |
Atk 52 |
Spd 37 |
Def 36 |
Res 24 |
||||||
|
|
|
||||||||||
| D
|
HP 64 |
Atk 65 |
Spd 42 |
Def 39 |
Res 20 |
||||||
|
|
|
||||||||||
E
 Green Flier Green Flier
|
HP 46 |
Atk 47 |
Spd 41 |
Def 17 |
Res 35 |
||||||
|
|
|
||||||||||
| F
|
HP 72 |
Atk 57 |
Spd 44 |
Def 33 |
Res 26 |
||||||
|
|
|||||||||||
Lunatic Enemy Information
A
 Lance Flier Lance Flier
|
HP 44 |
Atk 44 |
Spd 35 |
Def 23 |
Res 36 |
||||||
|---|---|---|---|---|---|---|---|---|---|---|---|
|
|
|
||||||||||
B
 Red Mage Red Mage
|
HP 44 |
Atk 46 |
Spd 35 |
Def 20 |
Res 30 |
||||||
|
|
|
||||||||||
C
 Axe Fighter Axe Fighter
|
HP 55 |
Atk 47 |
Spd 34 |
Def 33 |
Res 22 |
||||||
|
|
|
||||||||||
| D
|
HP 56 |
Atk 61 |
Spd 38 |
Def 36 |
Res 18 |
||||||
|
|
|
||||||||||
| E
|
HP 63 |
Atk 53 |
Spd 40 |
Def 30 |
Res 24 |
||||||
|
|
|||||||||||
Sain and Kent Strategy
Use a Hit and Run Strategy!
This map has no reinforcements, making a Hit and Run strategy viable.
Focus on defeating the enemies at the top area of the map, specifically the Axe Fighter first if possible. This will prevent Sain from using his Rally Up Atk+, which triggers the effects of the Jolly Jade Lance, granting him an additional action afterward. With the extra action, he can advance closer and add more pressure to your team, so this is one way to prevent that from happening.
After that, with most enemies advancing closer to your team by the next turn, you can start picking them off one by one. The most threatening units left by then should be Sain and Kent, so try to defeat them first if possible.
As mentioned, Sain can take another action after using a Rally skill, so focus on him if you don't want him to move around. Kent will also have premium skills with him and a refined weapon in this mode, making him much more threatening than usual. Try to defeat him quickly as well to lessen the map's difficulty.
Alternatively, Use a Tanking Strategy!
You can also adopt a tanking strategy to clear this map, as most enemies are not too threatening offensively. Sain and Kent are the only units to be mindful of, as they both have the most powerful kits compared to the others.
You can start by luring the units at the top, as they are the closest to your starting points. These units aren't too powerful and can be defeated easily with any of your offensive tanks. However, note that Sain can also reach you despite being at the bottom of the map, as he can gain an extra action from his Jolly Jade Lance.
In the next set of turns, Kent (and the Green Mage if playing in Infernal) will move closer to your team. Prioritize eliminating Kent next, as he can inflict massive damage with his maxed-out kit, which now includes skills such as Atk/Spd Unity, Spd/Def Snag 4, and Alarm Atk/Spd. Use a Def tank, preferably a blue unit to gain color advantage, and lure him into attacking this unit to defeat him.
Best Units for Sain and Kent
Player Phase units
| Unit Name | |
|---|---|
|
|
Lance Armored Black Yule Lance creates 【Divine Vein (Flame)】 tiles, grants Special cooldown charges pre-combat, and cuts the effectiveness of enemy damage reduction skills. Raging Tempest grants mobility and one additional action after combat. Inheriting Galeforce can grant a third action per turn. |
|
|
Sword Armored Regal Sunshade's brave effect can quickly eliminate enemies. Raging Storm can grant one additional action after combat. Inheriting Galeforce can grant a third action per turn. |
|
|
Red Tome Cavalry Great nuking power with Radiant Scrolls. Flared Mirror creates Divine Veins that hinder movement for enemy ranged units and deal pre-combat damage to foes when they enter combat. Duo Skill grants another action post-combat. |
|
|
Green Tome Cavalry Ninjutsu Scrolls' brave effect can quickly defeat enemies. Duo Skill grants herself an additional action. |
|
|
Blue Bow Flying Flamefrost Bow's brave effect can quickly defeat enemies. Duo Skill grants herself an additional action. |
|
|
Colorless Dagger Flying Tailwind Shuriken's brave effect can quickly defeat enemies. Duo Skill grants herself an additional action. |
|
|
Sword Cavalry Arcane Devourer grants bonus Special charges and Special cooldown acceleration, allowing an easy Galeforce trigger. Fate Unchanged... allows repositioning an ally to safety and using the extra action for Fallen Chrom to retreat to safety himself. |
|
|
Lance Cavalry Geirdriful grants bonus Special charges and Special cooldown acceleration, allowing an easy Galeforce trigger. A Fate Changed! allows repositioning an ally to safety and using the extra action for Brave Chrom to retreat to safety himself. |
|
|
Blue Tome Flying Gold Unwinding grants herself an additional action after combat. Flared Sparrow leaves behind 【Divine Vein (Flame)】 terrain, softening up enemies for future engagements. |
|
|
Lance Cavalry Moonlight Bangle grants Canto for mobility. Binding Reginleif allows her to defeat her foes in one round. |
|
|
Sword Cavalry Lyngheiðr grants Canto for mobility. Seiðr Shell is pre-charged and can defeat an enemy quickly. |
Tank Units
| Unit Name | |
|---|---|
|
|
Sword Armored Holy Yule Blade decays foe's Specials and grants multiple stat bonuses. Supreme Heaven deals bonus damage against dragons and beasts and also grants additional damage reduction. |
|
|
Colorless Breath Armored Multiple damage reduction effects and the 【Divine Vein (Stone)】 effect paired with high Spd allow her to survive multiple engagements. |
|
|
Lance Armored Guaranteed follow-up attack Weapon refine makes him a very powerful tank. |
|
|
Blue Breath Armored Guaranteed follow-up attack. Weapon is comparable to Brave Hector's refined Maltet. Can neutralize penalties inflicted on her. |
|
|
Red Breath Armored Can retaliate at any distance with Distant Ferocity. Woeful Upheaval deals chip damage, has a Far Save effect, and gives damage reduction. |
|
|
Red Breath Infantry A budget option that can fulfill the tank role to bait on turn one. A red unit is used here to help mitigate damage from the right side of the map, as she will not have color disadvantage against all the enemies on that side. |
|
|
Blue Breath Infantry A budget option that can fulfill the tank role to bait on turn one. A blue unit is used here to help mitigate damage from the left side of the map, as she will not have color disadvantage against all the enemies on that side. |
Support Units
| Unit Name | |
|---|---|
|
|
Staff Flying Grants damage reduction, healing, and can shut down "At start of turn" effects of foes in cardinal directions upon winning a Res check. |
|
|
Staff Cavalry Kitty-Cat Parasol grants Special cooldown charges, 30% damage reduction, and "neutralizes foe's bonuses to Atk" to nearby allies and can double as an offensive unit with high Atk and a guaranteed follow-up attack. |
|
|
Staff Flying Grants damage reduction and healing. |
|
|
Lance Infantry Grants bonus stats and Special acceleration to nearby allies. Can double as an offensive unit with refined Geirskögul |
|
|
Sword Infantry Grants bonus stats to his Ally Support during combat. |
|
|
Staff Flying Grants Atk+6 and Special acceleration to nearby allies during combat. |
Recommended Dancer Units
| Unit Name | |
|---|---|
|
|
Green Tome Flying Gentle Dream provides stat and mobility bonuses. Duo Skill grants an ally an additional action. |
|
|
Blue Tome Flying Gentle Dream provides stat and mobility bonuses. |
|
|
Blue Tome Flying Prayer Wheel and Gray Waves II combine to grant an ally stat and mobility bonuses. |
|
|
Green Tome Cavalry Dancing Flames and Gray Waves combine to grant an ally stat and mobility bonuses. S/R Far Trace 3 allows repositioning after an attack or a refresh. |
List of All Dancers | Heroes with Refresher Skills
User Submitted Units / Parties for Sain and Kent
We are looking for user submitted clears!
Let us know about your party and how you cleared the maps in the comments below, via a picture of your team and their skills.
If you have uploaded the walkthrough video on Twitter etc., please enter the URL as well!
FEH Related Guides
Other Bound Hero Battle Walkthroughs
Bound Hero Battles Walkthroughs and Schedule
List of Bound Hero Battles
Comment
Author
Sain and Kent Infernal Guide and Recommended Team (Bound Hero Battle)
improvement survey
03/2026
improving Game8's site?

Your answers will help us to improve our website.
Note: Please be sure not to enter any kind of personal information into your response.

We hope you continue to make use of Game8.
Premium Articles
Rankings
- We could not find the message board you were looking for.
Gaming News
Popular Games

Genshin Impact Walkthrough & Guides Wiki

Honkai: Star Rail Walkthrough & Guides Wiki

Umamusume: Pretty Derby Walkthrough & Guides Wiki

Pokemon Pokopia Walkthrough & Guides Wiki

Resident Evil Requiem (RE9) Walkthrough & Guides Wiki

Monster Hunter Wilds Walkthrough & Guides Wiki

Wuthering Waves Walkthrough & Guides Wiki

Arknights: Endfield Walkthrough & Guides Wiki

Pokemon FireRed and LeafGreen (FRLG) Walkthrough & Guides Wiki

Pokemon TCG Pocket (PTCGP) Strategies & Guides Wiki
Recommended Games

Diablo 4: Vessel of Hatred Walkthrough & Guides Wiki

Fire Emblem Heroes (FEH) Walkthrough & Guides Wiki

Yu-Gi-Oh! Master Duel Walkthrough & Guides Wiki

Super Smash Bros. Ultimate Walkthrough & Guides Wiki

Pokemon Brilliant Diamond and Shining Pearl (BDSP) Walkthrough & Guides Wiki

Elden Ring Shadow of the Erdtree Walkthrough & Guides Wiki

Monster Hunter World Walkthrough & Guides Wiki

The Legend of Zelda: Tears of the Kingdom Walkthrough & Guides Wiki

Persona 3 Reload Walkthrough & Guides Wiki

Cyberpunk 2077: Ultimate Edition Walkthrough & Guides Wiki
All rights reserved
© 2025 Nintendo / INTELLIGENT SYSTEMS
The copyrights of videos of games used in our content and other intellectual property rights belong to the provider of the game.
The contents we provide on this site were created personally by members of the Game8 editorial department.
We refuse the right to reuse or repost content taken without our permission such as data or images to other sites.


![Everwind Review [Early Access] | The Shaky First Step to A Very Long Journey](https://img.game8.co/4440226/ab079b1153298a042633dd1ef51e878e.png/thumb)

![Monster Hunter Stories 3 Review [First Impressions] | Simply Rejuvenating](https://img.game8.co/4438641/2a31b7702bd70e78ec8efd24661dacda.jpeg/thumb)


