Final Battle Walkthrough: Maps and Enemies
★All Pieces of Heart & Goddess Cubes Locations
☆How to Get All Gratitude Crystals
★Empty Bottle Guide
This is a complete guide to the Final Battle for The Legend of Zelda: Skyward Sword HD for the Nintendo Switch. Read on to learn more about how to progress through the story, where to find treasure chests, Goddess Cubes, Heart Pieces, and other collectibles, as well as how to beat story bosses and more!
Final Battle Maps and Treasure Chest Locations
Hylia Grounds Map

Final Battle Story Walkthrough
| Objectives |
|---|
| 1. Defeat the Red Bokoblins. |
| 2. Defeat the Wooden Shield Moblins. |
| 3. Defeat the Blue Bokoblin. |
| 4. Defeat the 2 Stalfos. |
| 5. Defeat the Bokoblins at the lowest part of the pit. |
| 6. Have your final rematch with Ghirahim. |
| 7. Defeat Demise. |
| 8. The End. |
Defeat the Red Bokoblins.

You'll find yourself at the Sealed Temple. Go through the Gate of Time.
Exit through the front door of the temple. You'll have to face a barrage of enemies as you descend the pit. Start off by taking out a few waves of Bokoblins.
Make your way down and the next group you'll battle will be Bokoblins circled around you.
Defeat the Wooden Shield Moblins

The next wave of Bokoblins will be carrying bombs. And then you'll have to fight 3 Wooden Shield Moblins.
Defeat the Blue Bokoblin

The next wave of Bokoblins will now include Archers. Power your way through and defeat the Blue Bokoblin.
Defeat the 2 Stalfos.
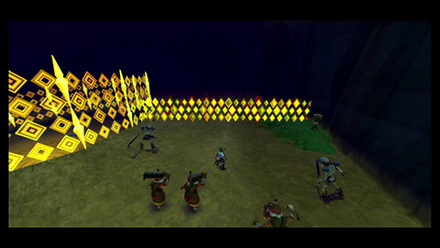
The next horde will now have Bokoblins who use horns to summon more Bokoblins. Slash through taking out 2 Stalfos.
Defeat the Bokoblins at the lowest part of the pit.

Nearing the bottom of the pit, defeat the last few Bokoblins and Wooden Shield Moblins before getting to where Ghirahim is.
Take out the horde of Bokoblins he summoned, to finally face Ghirahim.
Have your final rematch with Ghirahim.
Bring Ghirahim back to the ground.

For his first sequence, he will approach you while aiming to strike you with his fists. Dodge his attacks and slash at him until you can push him off the edge.
When he falls down to a lower layer, perform a fatal blow. He will stand up and now attempt to strike you with back kicks. Dodge or Shield Bash to stun him and push him off the edge again.
Strike with your second fatal blow. Repeat this method until you can push him off again and strike your third fatal blow.
Duel Ghirahim with swords

Once you reach the bottom of the pit, Ghirahim will summon his saber. When the timing is right, strike him by thrusting your sword into his chest.
Whittle down Ghirahim's cleaver

Continue doing so until he calls for an even larger blade. When he strikes, perform a shield bash then unleash a flurry of strikes of your own. This will wear down his sword.
When enough of his sword is exposed, stab at his chest more. Continue doing so until he retreats. A cutscene will play.
Defeat Demise.
Dark Skies

When you're ready, go through the dark portal and battle with Demise. For the first sequence, shield bash his strikes and counterattack.
For the next sequence, Demise will call upon lightning onto his blade, so be careful with how you strike. A shield bash to a counterattack is still a solid strategy.
Stormy Skies

When lightning starts, the second phase of the battle starts. You can raise your sword, similar to how you use a Skyward Strike to call lightning to your blade and use it against Demise. Slash at him continuously when he is stunned.
When he flies away from your strikes, be ready to perform a Fatal Strike. The first time is guaranteed to miss, but you'll have to execute it very quickly to land the killing blow.
How to Beat Demise
The End

Congratulations! You've now beaten Skyward Sword! After the credits roll, you'lll also unlock the ability to play through Hero Mode! Hero Mode offers a fresh playthrough with harder challenges.
Final Battle Enemies
| List of Enemies | Strategy |
|---|---|
 Stalfos Stalfos
|
Attack the side it is not protecting, or repel its attack with a Shield Bash to open a gap to its defenses. You can also use Bombs to stun it. |
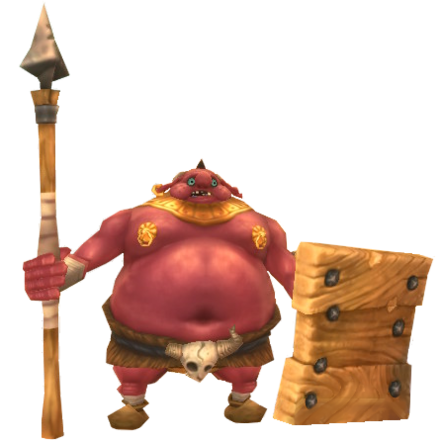 Wooden Shield Moblin Wooden Shield Moblin
|
Slash away its shield first with a sword until it is destroyed, then you can freely hit it. Avoid its attacks indicated by its wind-ups. |
 Red Bokoblin (Archer) Red Bokoblin (Archer)
|
Bokoblin Archers attack from a long distance, so it is effective to use the bow and arrow as well. If they attack with fire arrows, try not to guard wth a wooden shield. |
 Red Bokoblin (Leader) Red Bokoblin (Leader)
|
Leaders have the same attack pattern as Red Bokoblins, and can be defeated with a sword or bow. You can take away its Monster Horn with a whip to prevent it from alerting nearby Bokoblins. |
 Red Bokoblin Red Bokoblin
|
Red Bokoblin can be easily defeated with a sword or bow. Invite an attack and repel it with a Shield Bash, then strike. |
 Blue Bokoblin Blue Bokoblin
|
Blue Bokoblins use the same attack pattern as Red Bokoblins, but are tougher. Invite an attack and repel it with a Shield Bash, then strike. |
Skyward Sword HD Related Guides

| Skyward Sword Walkthough | |
|---|---|
| Complete Story Walkthrough | |
| Dungeons and Temples List | Silent Realm Guide |
Main Locations
Silent Realm Trials
| Silent Realm Trials | |
|---|---|
 Farore's Trial Farore's Trial |
 Nayru's Trial Nayru's Trial |
 Din's Trial Din's Trial |
 The Goddess's Trial The Goddess's Trial |
Author
The Legend of Zelda: Skyward Sword Walkthrough & Guides Wiki
Final Battle Walkthrough: Maps and Enemies
improvement survey
03/2026
improving Game8's site?

Your answers will help us to improve our website.
Note: Please be sure not to enter any kind of personal information into your response.

We hope you continue to make use of Game8.
Rankings
- We could not find the message board you were looking for.
Gaming News
Popular Games

Genshin Impact Walkthrough & Guides Wiki

Honkai: Star Rail Walkthrough & Guides Wiki

Umamusume: Pretty Derby Walkthrough & Guides Wiki

Pokemon Pokopia Walkthrough & Guides Wiki

Resident Evil Requiem (RE9) Walkthrough & Guides Wiki

Monster Hunter Wilds Walkthrough & Guides Wiki

Wuthering Waves Walkthrough & Guides Wiki

Arknights: Endfield Walkthrough & Guides Wiki

Pokemon FireRed and LeafGreen (FRLG) Walkthrough & Guides Wiki

Pokemon TCG Pocket (PTCGP) Strategies & Guides Wiki
Recommended Games

Diablo 4: Vessel of Hatred Walkthrough & Guides Wiki

Cyberpunk 2077: Ultimate Edition Walkthrough & Guides Wiki

Fire Emblem Heroes (FEH) Walkthrough & Guides Wiki

Yu-Gi-Oh! Master Duel Walkthrough & Guides Wiki

Super Smash Bros. Ultimate Walkthrough & Guides Wiki

Pokemon Brilliant Diamond and Shining Pearl (BDSP) Walkthrough & Guides Wiki

Elden Ring Shadow of the Erdtree Walkthrough & Guides Wiki

Monster Hunter World Walkthrough & Guides Wiki

The Legend of Zelda: Tears of the Kingdom Walkthrough & Guides Wiki

Persona 3 Reload Walkthrough & Guides Wiki
All rights reserved
© Nintendo. The Legend of Zelda, Nintendo Switch and amiibo are trademarks of Nintendo © 2021 Nintendo.
The copyrights of videos of games used in our content and other intellectual property rights belong to the provider of the game.
The contents we provide on this site were created personally by members of the Game8 editorial department.
We refuse the right to reuse or repost content taken without our permission such as data or images to other sites.
 Skyloft
 Sealed Grounds
 Faron Woods
 Skyview Temple
 Eldin Volcano
 Earth Temple
 Lanayru Mine
 Lanayru Desert
 Lanayru Mining Facility
 Inside Thunderhead (Isle of Songs)
 Lake Floria
 Ancient Cistern
 Lanayru Sand Sea
 Sandship
 Volcano Summit
 Fire Sanctuary
 Lanayru Gorge
 Sky Keep





![Monster Hunter Stories 3 Review [First Impressions] | Simply Rejuvenating](https://img.game8.co/4438641/2a31b7702bd70e78ec8efd24661dacda.jpeg/thumb)


