This survey will take about 1 minute.
Your answers will help us to improve our website.
FF7 Remake
How to Beat Type-0 Behemoth | Boss Fight Guide (Normal & Hard Mode)
This is a guide to beating the Boss Type-0 Behemoth in the game Final Fantasy 7 Remake (FF7R). This article explains Type-0 Behemoth's attack patterns, weaknesses, and tips and strategies for defeating it both on Normal and Hard mode.
List of Contents
- Where to Find Type-0 Behemoth
- Type-0 Behemoth Stats and Information
- Type-0 Behemoth Boss Fight Guide
- Best Characters for This Boss
- Type-0 Behemoth Attack Phases
- Tips & Strategies for Beating Type-0 Behemoth
- Type-0 Behemoth: Hard Mode Guide
- Best Characters and Equipment
- Best Materia to Use
- Hard Mode Basic Strategy
- Hard Mode Reward
- Beating Behemoth in the Shinra Combat Simulator
- Boss Fight Related Articles
Where to Find Type-0 Behemoth

Type-0 Behemoth is fought as part of the Subterranean Menace Odd Job in Chapter 14. In the first part of the Chapter, head to Evergreen Park and talk to Wymer. This will unlock the Quest, and you'll be able to head into the nearby tunnel, at the end of which Type-0 Behemoth will be waiting.
Subterranean Menace (Odd Job 24) Walkthrough
Type-0 Behemoth Stats and Information
Basic Information
| Type-0 Behemoth | ||
|---|---|---|
|
Species | Movement | Type |
| Artificial Life | Grounded | Normal |
Description
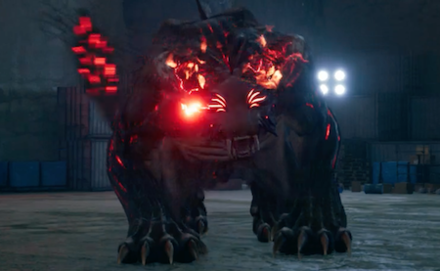
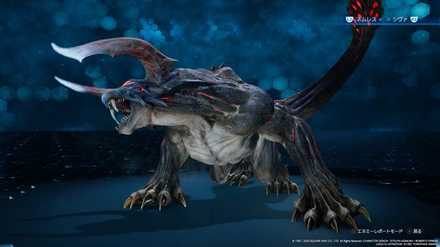
Variant form of the behemoth. They are bred and raised as Shinra lab specimens and other monsters quake in fear at the sound of their roar.
Assess (Tips)
Cripple and knock down its upper or lower body. While one is knocked down, do the same to the other to stagger the beast. It will counter if attacked with spells while its horns are intact.
Type-0 Behemoth Stats
| Easy | Normal | Hard | |
|---|---|---|---|
| HP | 22044 | 40080 | 70740 |
| Attack | 169 | 328 | |
| Magic Attack | 169 | 328 | |
| Defense | 194※ | 342※ | |
| Magic Defense | 194※ | 342※ | |
Type-0 Behemoth Weaknesses & Resistances
| Weakness / Status Ailments | - | |
|---|---|---|
| Lesser Resistances | - | |
| Greater Resistances | Stop, Proportional Damage | |
| Immunities | Sleep | |
| Absorbed Elements | - | |
Stagger Rates
| ×No effect | ×No effect | ×No effect | ×No effect |
| - | |||
| ×No effect | ×No effect | ×No effect | - |
Stagger Length
| Stagger Length | 10 seconds |
|---|
Rewards
| Easy/Normal | Hard | |
|---|---|---|
| Gil | 200 | 656 |
| AP | 15 | 45 |
| Exp | 240 | 1584 |
| Items Dropped | Behemoth Horn (100%) | |
| Rare Items Dropped | - | |
| Steal | Enchanted Ring (5%) | |
Learnable Enemy Skills
No Enemy Skills can be learned from Type-0 Behemoth.
Type-0 Behemoth Boss Fight Guide
Type-0 Behemoth Abilities and Attack Patterns
| Name | Element | Blockable? | Knockdown? | Status |
|---|---|---|---|---|
|
|
- | No | Yes | - |
| Swipes up at a target with its horns. | ||||
|
|
- | No | Yes | - |
| Lifts its front paws up and slams down at the ground. If it makes contact with a target, they will be bound for 8 seconds and be clawed at 3 times. If the Type-0 Behemoth takes damage equal to 1% of its max HP it will release the target. While Rampaging this attack will also cause shockwaves to release in the area. | ||||
|
|
- | Yes | Yes | - |
| Does a spin attack in the immediate area. While Rampaging, will cause shockwaves to release and repeat 2-3 times. | ||||
|
|
- | Yes | Yes | - |
| Jumps at a target and does a spin attack. While Rampaging, the jump and landing will release shockwaves in the area. | ||||
|
|
- | Yes | Yes | - |
| Will counter magic attacks with a magic explosion. | ||||
|
|
- | Yes | Yes | - |
| Releases a fierce roar and begins Rampaging, adding additional effects to abilities. | ||||
|
|
- | Yes | Yes | - |
| Tackles a target. | ||||
|
|
- | Yes | Yes | - |
| Swings its tail around while it's downed. | ||||
|
|
- | Yes | Yes | - |
| Flails its head around while it's downed. | ||||
|
|
- | Yes | Yes | - |
| Kicks out wildly while it's downed. | ||||
|
|
- | Yes | Yes | - |
| Swipes its claws out while it's downed. | ||||
|
|
- | Yes | Yes | - |
| Rolls about on the ground. | ||||
|
|
- | Yes | Yes | - |
| Lifts its body up and smashes at the ground, releasing shockwaves. | ||||
|
|
- | Yes | Yes | - |
| Releases a fierce roar and causes shockwaves to appear. Will recover the HP of its upper and lower body. | ||||
|
|
- | Yes | Yes | - |
| After roaring and sending shockwaves out in the area, drops large boulders on the party that will hit it as well. | ||||
*Status Effects and Ailments Guide
Best Characters for This Boss
Available Characters
 Cloud Cloud
|
 Barret Barret
|
 Tifa Tifa
|
Aerith will be missing from the party at this point, so make sure you have one of the other characters take over the healer role for this fight. You'll need a healer – trust us!
Recommended Characters
Using melee attacks against Type-0 Behemoth is frustrating, as it moves quickly and it can be difficult to predict when it will attack. It's best to use Barret to keep a distance while continuing to attack.
When Type-0 Behemoth turns around to face you with its Horn, the Horn will block all attacks that go past it, so switch to another character on the opposite side to continue attacking Type-0 Behemoth from the rear.
Type-0 Behemoth Attack Phases
Phase 1
| Phase Point Summary | |
|---|---|
| 1 | Type-0 Behemoth's main body cannot be targeted, and its three body parts, Lower Body, Upper Body, and Horn, will all be separate targets. The Horn will be immune to damage, so cripple its Lower and Upper Body to stagger it. As you deal damage to its other parts, the main body will take damage as well. |
| 2 | After it is Staggered, the Horn will become vulnerable. Attack the Horn repeatedly to take it out. After the Stagger ends, Type-0 Behemoth will use Revitalize, and its Upper and Lower Body will be restored to full health. If you didn't take out the Horn completely, it will become immune to damage again. Repeat from Step 1 until the Horn is knocked out. |
| 3 | After the Horn is defeated, you'll be able to attack Type-0 Behemoth directly. Continue attacking it until its HP is depleted. |
Tips & Strategies for Beating Type-0 Behemoth
| ★ Strategy Checklist ★ (Click to jump) |
||
|---|---|---|
|
|
Attack from the Rear
For the majority of the battle, the Horn will be immune to all damage. You'll have no choice but to attack the Upper and Lower Body first, and when you face it to attack from the front, your attacks will often accidentally strike the Horn and be wasted.
Your energy is best spent focusing on attacking from the rear, and crippling its Lower Body first. This will immobilize it, allowing you easier access to target the Upper Body directly without its Horn getting in the way. When it turns around and faces you with its Horn again, switch to a different character behind it to continue attacking from the back.
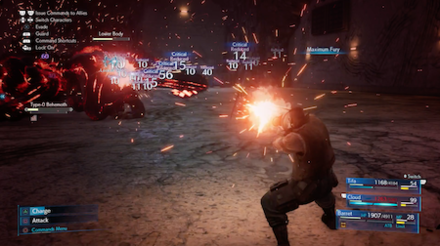
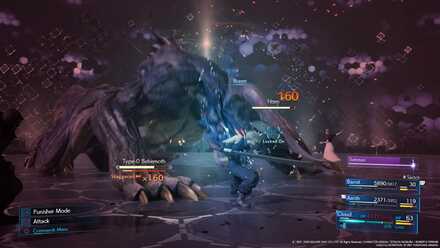
Avoid Using Offensive Magic

Type-0 Behemoth using Counter Flare after hit with Magic.
Type-0 Behemoth's Horn has a built-in defense system – when you attack any part of its body with offensive Magic, it will strike back with the powerful Counter Flare.
That said, it is possible to block and absorb the damage from Counter Flare, so if you're willing to make the trade-off, it's still possible to use offensive Magic to damage the Upper and Lower body. Just be warned that you won't get off scot-free.
Once you've knocked out the Horn, you'll be able to pelt Type-0 Behemoth directly with offensive Magic without consequences. That said, this won't occur until the very end of the battle, and the Type-0 Behemoth won't have much health left after its Horn is gone, so there's not much point saving up your MP just for this. You're best off equipping Materia that will help with physical attacks, support, healing, and especially Poison.
Use Poison for Consistent Damage
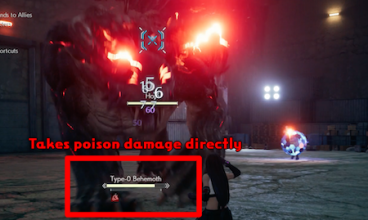
Although Type-0 Behemoth's main body will take damage during the battle as its parts are attacked, it's not possible until the very end of the fight, after the Horn has been knocked out, to directly target Type-0 Behemoth itself. However, by inflicting Poison on its Lower or Upper Body, it's possible to deal Poison damage to Type-0 Behemoth directly.
By wearing it down by keeping it consistently poisoned throughout the fight, players can reduce the number of times they need to defeat the Lower and Upper Body, and bring the fight to an earlier than expected end.
Set Up Barrier on your Party

Assuming you don't cast offensive Magic, causing it to respond with Counter Flare, Type-0 Behemoth will attack you strictly with physical moves. This means that your Barrier can do double-duty protecting you from all its attacks. Use Materia like First Strike and ATB Boost to get your ATB Gauge filled from the start of the battle, and set up Barrier on your whole party early to reduce the amount of time you'll need to spend healing everyone as the fight continues.
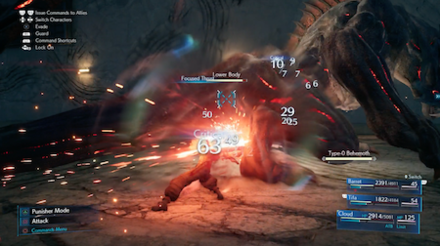
Watch Out for its Body Slam

After Type-0 Behemoth has been crippled, it will fall over and appear to be completely vulnerable, but stay on your toes. The Behemoth will get up on its feet for a moment, then slam down hard on your attacking party members. When you see the Body Slam Ability name appear, get out of the way stat!
Steal an Enchanted Ring

If you've got the Steal Materia on one of your party members, you can nab a rare Enchanted Ring from this boss. Give it a go if you've got a spare ATB charge!
Enchanted Ring Effect and Stats
Type-0 Behemoth: Hard Mode Guide
Best Characters and Equipment
| Cloud |
Role: Attacker Weapon: Hardedge Armor: Supreme Bracer Accessory: Supernatural Wristguards |
|---|---|
| Tifa |
Role: Pinch Hitter Weapon: Metal Knuckles Armor: Supreme Bracer Accessory: Champion Belt |
| Barret |
Role: Healer & Tank Weapon: Big Bertha Armor: Supreme Bracer Accessory: Healing Carcanet |
Cloud and Tifa Will Be Dishing Out the Damage
You will be mostly using Cloud and Tifa in this fight. Cloud to cripple the upper and lower body with Tifa breaking the Horn during stagger. Tifa can also be used if you have trouble hitting the Behemoth as long as you have Parry materia equipped on her.
Barret as the Healer
Barret will mostly be doing healing and revival as he has the most HP and will probably live the longest. You can occasionally use his ATB to use attacks like Maximum Fury to help criplle the body parts.
Best Materia to Use
The number of slots in your Weapon may vary depending on your Weapon Level.
Cloud
| Weapon (6 Slots) | ||
|---|---|---|
| Armor (3 Slots) | ||
| Summon | ||
Barret
| Weapon (6 Slots) | |||
|---|---|---|---|
| Armor (3 Slots) | |||
| Summon | |||
Tifa
| Weapon (6 Slots) | |||
|---|---|---|---|
| Armor (3 Slots) | |||
| Summon | |||
Hard Mode Basic Strategy
Always Have Barrier and Haste Up on Your Party

With how much Physical damage Behemoth puts out you will want to always have Barrier up as much as possible. You will also want to keep your damage output up and Haste will exactly do the trick. Have at least one of them on two different characters to spread out the MP consumption.
How to Get the Time Materia
Keep Poison Up on Behemoth

Even with offensive spells not affecting Behemoth you can still deal consistent damage with Poison spells. This fight can be long but having Behemoth posioned for most of the fight can shorten it. It will retaliate right away so watch out for Counter Flare!
Parry on Tifa Will Let Her Keep Up

Having the Parry materia on Tifa will allow her to keep up with Behemoth's movement while still defending. Even with Behemoth running around during the fight, Parry will allow you to keep up and continue your assualt!
How to Get and Use the Parry Materia
Counterstance When Behemoth is Enraged

After Behemoth uses Rampage it will be more aggressive with its offense. You will want to use Counterstance to continue dishing out damage while minimizing the damage your receive. Having Counterstance in your Battle shortcuts will help you activate it in clutch situations. But be careful as it has some attacks that can not be countered!
Hard Mode Reward
Barret Manuscript
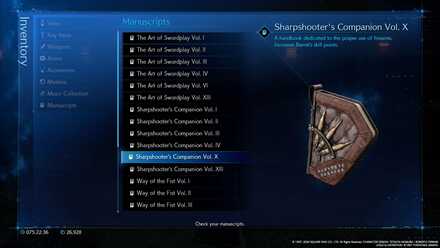
Overcoming the challenge of beating the Behemoth on Hard Mode will net you the Manuscript: Sharpshooter's Companion Vol.X. Giving you more SP and bringing you closer to getting all the weapon upgrades for Barret!
Beating Behemoth in the Shinra Combat Simulator
Beating Behemoth is hard enough, but beating it while having to beat other legendary monsters to get to it is even tougher! But with our guide on the Shinra Combat Simulator battle challenge Three Person-Team vs. Monsters of Legend, you can beat the Behemoth and any other monsters that gets thrown at you!
How to Beat Three Person-Team vs. Monsters of Legend
Boss Fight Related Articles
Major Story Bosses
| All Major Story Bosses | |
|---|---|
| Chapter 1 | Scorpion Sentinel |
| Chapter 4 | Roche |
| Chapter 5 | Crab Warden |
| Chapter 7 | Airbuster |
| Chapter 8 | Reno Rude |
| Chapter 9 | Hell House |
| Chapter 10 | Abzu |
| Chapter 11 | Ghoul Eligor |
| Chapter 13 | Failed Experiment |
| Chapter 14 | Abzu (2nd Fight) |
| Chapter 15 | The Valkyrie |
| Chapter 16 | Specimen H0512 |
| Chapter 17 | Jenova Dreamweaver Rufus The Arsenal |
| Chapter 18 | Motor Ball Whisper Harbinger Sephiroth |
VR Mission Bosses
| All VR Mission Bosses | |
|---|---|
| Chapter 8 | Shiva |
| Chapter 9 | Fat Chocobo |
| Chapter 13 | Leviathan |
| Secret Boss | Bahamut |
| Superboss | Pride and Joy Prototype |
Story Sub-Bosses
| All Story Sub-Bosses | |
|---|---|
| Chapter 2 | The Huntsman |
| Chapter 3 | The Hoodlums |
| Chapter 4 | Enigmatic Spectre |
| Chapter 12 | Enigmatic Spectre |
| Chapter 17 | M.O.T.H. Unit Brain Pod Swordipede |
Monster Variants & Optional Sub-Bosses
| All Monster Variants & Optional Sub-Bosses | |
|---|---|
| Chapter 3 | Doomrat Cerulean Drake Wrath Hound |
| Chapter 8 | Hedgehog Pie King Mark II Monodrive Venomantis Chromogger |
| Chapter 14 | Rust Drake Tonberry Trypapolis Type-0 Behemoth |
| Chapter 17 | Malboro |
Comment
2  Anonymous almost 6 years
Yes, u can fight tonberry and malboro in this game.
Author

How to Beat Type-0 Behemoth | Boss Fight Guide (Normal & Hard Mode)
Please participate in our site
improvement survey
03/2026
improvement survey
03/2026
Would you assist in
improving Game8's site?
improving Game8's site?

×
We are listening to our users' valuable opinions and discussing how to act on them.
The information collected through this survey will be used for the purpose of improving our services. In addition, the information will only be disclosed a part of a statistic in a format that will not allow identification of personal information.
Begin Survey
Not Now
×
Please rate each item regarding Game8.co's Advertisements.
Amount of Ads
Very Dissatisfied
Somewhat Dissatisfied
Fine
Somewhat Satisfied
Highly Satisfied
Placement of Ads
Timing of Ad Display
Ad Loading Speed
Safeness of Ads
Content of Ads
×
Please rate each item regarding Game8.co's Quality of Articles.
Amount of information
Very Dissatisfied
Somewhat Dissatisfied
Fine
Somewhat Satisfied
Highly Satisfied
Frequency of updates
Speed of new information
Accuracy of articles
Understandibility of articles
Readability of sentences
×
Please rate each item regarding Game8.co's Usability of the Site.
Ease of finding information
Very Dissatisfied
Somewhat Dissatisfied
Fine
Somewhat Satisfied
Highly Satisfied
Loading Speed
Use of Color
Font Size
Visibility of Images
Easy to Understand Layout
×
Please rate each item regarding Game8.co's Message Boards, Comments.
Ease of Writing
Very Dissatisfied
Somewhat Dissatisfied
Fine
Somewhat Satisfied
Highly Satisfied
Readability
Ease in Finding Information
Comment Quality
Comment Quantity
Admin Response
×
Please rate each item regarding Game8.co's Site's new design.
Please rate our site's new design
Very Dissatisfied
Somewhat Dissatisfied
Fine
Somewhat Satisfied
Highly Satisfied
Do you think that the website's design change makes the site easier to use?
Has the new design made it easier for you to find information on the site?
Has the new design improved the overall visual appeal of the site?
How would you rate your overall satisfaction with the new design of the site?
×
How likely are you to recommend Game8 to someone you know?
Very Unlikely
0
1
2
3
4
5
6
7
8
9
10
Very Likely
If you have other opinions regarding potential improvement to the website, please share them with us. We would appreciate your honest opinion.
Note: This is a free response section, so you can proceed without entering anything.
Note: Please be sure not to enter any kind of personal information into your response.
Note: Please be sure not to enter any kind of personal information into your response.
×
Thank You
×
Thank you for participating in our survey! Your answers will help us to improve the quality of our website and services.
We hope you continue to make use of Game8.
We hope you continue to make use of Game8.
Close
Rankings
- We could not find the message board you were looking for.
Gaming News


![Everwind Review [Early Access] | The Shaky First Step to A Very Long Journey](https://img.game8.co/4440226/ab079b1153298a042633dd1ef51e878e.png/thumb)

![Monster Hunter Stories 3 Review [First Impressions] | Simply Rejuvenating](https://img.game8.co/4438641/2a31b7702bd70e78ec8efd24661dacda.jpeg/thumb)
Popular Games

Genshin Impact Walkthrough & Guides Wiki
Honkai: Star Rail Walkthrough & Guides Wiki
Umamusume: Pretty Derby Walkthrough & Guides Wiki
Pokemon Pokopia Walkthrough & Guides Wiki
Resident Evil Requiem (RE9) Walkthrough & Guides Wiki
Monster Hunter Wilds Walkthrough & Guides Wiki
Wuthering Waves Walkthrough & Guides Wiki
Arknights: Endfield Walkthrough & Guides Wiki
Pokemon FireRed and LeafGreen (FRLG) Walkthrough & Guides Wiki
Pokemon TCG Pocket (PTCGP) Strategies & Guides Wiki


Recommended Games
Diablo 4: Vessel of Hatred Walkthrough & Guides Wiki
Fire Emblem Heroes (FEH) Walkthrough & Guides Wiki
Yu-Gi-Oh! Master Duel Walkthrough & Guides Wiki
Super Smash Bros. Ultimate Walkthrough & Guides Wiki
Pokemon Brilliant Diamond and Shining Pearl (BDSP) Walkthrough & Guides Wiki
Elden Ring Shadow of the Erdtree Walkthrough & Guides Wiki
Monster Hunter World Walkthrough & Guides Wiki
The Legend of Zelda: Tears of the Kingdom Walkthrough & Guides Wiki
Persona 3 Reload Walkthrough & Guides Wiki
Cyberpunk 2077: Ultimate Edition Walkthrough & Guides Wiki


All rights reserved
© SQUARE ENIX CO., LTD. All Rights Reserved.
CHARACTER DESIGN:TETSUYA NOMURA/ROBERTO FERRARI
The copyrights of videos of games used in our content and other intellectual property rights belong to the provider of the game.
The contents we provide on this site were created personally by members of the Game8 editorial department.
We refuse the right to reuse or repost content taken without our permission such as data or images to other sites.
I am both happy and sad to meet them this early in the game.