Planetologist Class Guide

The Planetologist is one of five playable classes in Dune: Awakening that focuses on exploration and resource gathering. Learn more about the Planetologist, their skills and mechanics, and whether to start with this class!
| All Planetologist Guides | |
|---|---|
| Explorer Planetologist Build | Planetologist Class Guide |
Planetologist Overview
Starting Ability, Focus, and Description
| Planetologist | |
|---|---|

|
|
| Starting Ability | |
| Focus | Exploration and Resource Gathering |
| Skill Trees | |
| Scientist | Improves resource yields and power pack use |
| Explorer | Focuses on improving traversing |
| Mechanic | Boosts vehicle repairs and effectivity |
Planetologists are part scientist, part explorer - trained to survive in hostile environments while beginning the process of terraforming. Their training is extensive as they are the frontline exploration force of any new planet discovered by the Imperium.
All Planetologist Skills
Scientist Skill Tree
| Scientist | Explorer | Mechanic |
 |
||
| 1 |
 Cutteray Mining
|
Your understanding of structural and mineral composition leads to an increase in the resource yield when using a cutteray.
Lv. 1: Cutteray Yield 10% Lv. 2: Cutteray Yield 15% Lv. 3: Cutteray Yield 20% |
|---|---|---|
| 2 |
 Dew Gathering
|
Careful manipulation of the Holtzman field on the dew reaper allows you to increase the water yield.
Lv. 1: Dew Reaper Yield 10% Lv. 2: Dew Reaper Yield 15% Lv. 3: Dew Reaper Yield 20% |
| 3 |
 Rerouting
|
Tinkering with your power pack allows you to increase the recharge rate.
Lv. 1: Power Regeneration 2% Lv. 2: Power Regeneration 5% Lv. 3: Power Regeneration 10% |
| 4 |
Deep Analysis
|
You develop an understanding of analysis mode mining with the cutteray. Your bonus yields are increased.
Lv. 1: Bonus Yield 10% Lv. 2: Bonus Yield 15% Lv. 3: Bonus Yield 20% |
| 5 |
 Compaction
|
You've made minor adjustments to the way you use the compactor that improves the efficiency of its resource yields.
Lv. 1: Compactor Yield 10% Lv. 2: Compactor Yield 15% Lv. 3: Compactor Yield 20% |
| 6 |
 Overcharge
|
You have learned to push your power pack beyond its limits, allowing you to increase the maximum power capacity.
Lv. 1: Maximum Power 20 Lv. 2: Maximum Power 30 Lv. 3: Maximum Power 40 |
| 7 |
 Conservation of Energy
|
When you focus your efforts, you can reduce the power drain of every action you take.
Lv. 1: Power Usage -3% Lv. 2: Power Usage -6% Lv. 3: Power Usage -9% |
Explorer Skill Tree
| Scientist | Explorer | Mechanic |
 |
||
| 1 |
 Suspensor Pad
|
Drop a suspensor device that launches yourself (and targets) into the air. Useful for navigation and traversal.
Lv. 1: ・ Cooldown 15 ・ Stamina Cost 15 |
|---|---|---|
| 2 |
 Cartographer
|
You can now create sinkcharts of the areas revealed by your surveys. Create sinkcharts from the Map Screen, but you will require a blank sinkchart in your inventory. |
| 3 |
 Mountaineer
|
You are better at finding the handholds and footholds while climbing, reducing your stamina drain.
Lv. 1: Climbing Stamina Drain -15% Lv. 2: Climbing Stamina Drain -20% Lv. 3: Climbing Stamina Drain -25% |
| 4 |
 Scanner Mastery
|
You have become proficient with the hand scanner - improving the range of detection.
Lv. 1: Detection Radius 15% Lv. 2: Detection Radius 20% Lv. 3: Detection Radius 25% |
| 5 |
 Stillsuit Seals
|
Though you have no formal training with the stillsuit, you have adjusted several seals and tabs that must be properly fitted for the suit to act with optimal efficiency. Your water reclamation while wearing a stillsuit is improved.
Lv. 1: Hydration Capture 105% Lv. 2: Hydration Capture 110% Lv. 3: Hydration Capture 115% |
| 6 |
 Spice Surveyor
|
Through research and field experience, you have learned to recognize the density of a spice bed from surveys. This ability is of most use in the Deep Desert. |
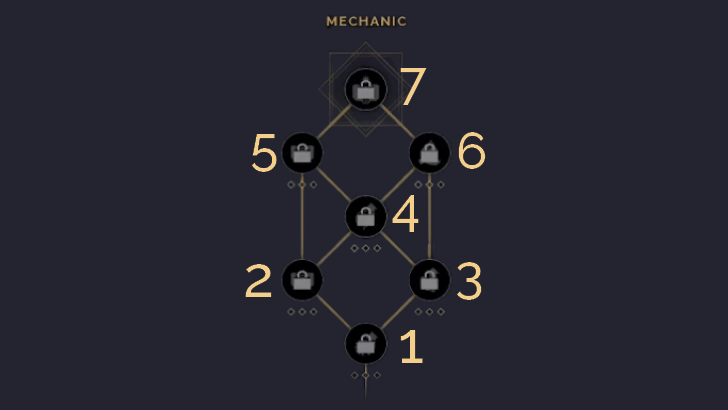
Mechanic Skill Tree
| Scientist | Explorer | Mechanic |
 |
||
| 1 |
 Vehicle Repair
|
Your field training as a mechanic reduces the maximum durability loss of vehicle components when performing repairs.
Lv. 1: Reduce Max Durability Loss 15% Lv. 2: Reduce Max Durability Loss 20% Lv. 3: Reduce Max Durability Loss 25% |
|---|---|---|
| 2 |
 Fuel Efficient Driver
|
Driving groundcars has taught you several techniques for fuel conservation while exploring. This applies to all types of ground vehicles.
Lv. 1: Fuel Usage -15% Lv. 2: Fuel Usage -20% Lv. 3: Fuel Usage -25% |
| 3 |
Vehicle Mining
|
Applying your understanding of structural and mineral composition to heavier vehicle machinery results in a larger resource yield.
Lv. 1: Mining Yield 10% Lv. 2: Mining Yield 15% Lv. 3: Mining Yield 20% |
| 4 |
Vehicle Scanning
|
You have become proficient with vehicle mounted scanners - improving the range of detection.
Lv. 1: Detection Radius 15% Lv. 2: Detection Radius 20% Lv. 3: Detection Radius 25% |
| 5 |
Fuel Efficient Pilot
|
Piloting ornithopters has taught you several techniques for fuel conservation while exploring. This applies to all types of ornithopters.
Lv. 1: Fuel Usage -15% Lv. 2: Fuel Usage -20% Lv. 3: Fuel Usage -25% |
| 6 |
Sandcrawler Yield
|
Your understanding of sand and the vacuum static action of the sandcrawler allows you to harvest spice more efficiently.
Lv. 1: Sandcrawler Yield 10% Lv. 2: Sandcrawler Yield 15% Lv. 3: Sandcrawler Yield 20% |
| 7 |
 Heat Management
|
While under the influence of large amounts of melange, you can instinctively sense where and how to shift a vehicle to reduce heat buildup.
Lv. 1: Heat Generation -20% |
Planetologist Gameplay
Late Game Essential
The Planetologist’s Skill Trees specialize in late-game resource management and enhanced terrain traversal. While it may not be essential early on, this class becomes nearly indispensable later, offering significant advantages that improve quality of life.
Should You Start with Planetologist?
You Cannot Start With This Class
The Planetologist is the only Class you cannot start the game with. However, it offers essential passives and abilities in the late-game.
Dune: Awakening Related Guides

List of All Classes
 Bene Gesserit Bene Gesserit |
 Mentat Mentat |
| Planetologist |
 Swordmaster Swordmaster |
 Trooper Trooper |
- |
Author
Planetologist Class Guide
Rankings
- We could not find the message board you were looking for.
Gaming News

![Death Stranding 2: On The Beach [PC] Review | A Port That Delivers](https://img.game8.co/4447392/15310a0c9aa1b6843bb713b2ea216930.jpeg/show)


Popular Games

Genshin Impact Walkthrough & Guides Wiki
Umamusume: Pretty Derby Walkthrough & Guides Wiki
Crimson Desert Walkthrough & Guides Wiki
Monster Hunter Stories 3: Twisted Reflection Walkthrough & Guides Wiki
Honkai: Star Rail Walkthrough & Guides Wiki
Pokemon Pokopia Walkthrough & Guides Wiki
The Seven Deadly Sins: Origin Walkthrough & Guides Wiki
Wuthering Waves Walkthrough & Guides Wiki
Zenless Zone Zero Walkthrough & Guides Wiki
Arknights: Endfield Walkthrough & Guides Wiki


Recommended Games
Fire Emblem Heroes (FEH) Walkthrough & Guides Wiki
Diablo 4: Vessel of Hatred Walkthrough & Guides Wiki
Cyberpunk 2077: Ultimate Edition Walkthrough & Guides Wiki
Yu-Gi-Oh! Master Duel Walkthrough & Guides Wiki
Super Smash Bros. Ultimate Walkthrough & Guides Wiki
Pokemon Brilliant Diamond and Shining Pearl (BDSP) Walkthrough & Guides Wiki
Elden Ring Shadow of the Erdtree Walkthrough & Guides Wiki
Monster Hunter World Walkthrough & Guides Wiki
The Legend of Zelda: Tears of the Kingdom Walkthrough & Guides Wiki
Persona 3 Reload Walkthrough & Guides Wiki


All rights reserved
© 2025 Funcom. All Rights Reserved.
The copyrights of videos of games used in our content and other intellectual property rights belong to the provider of the game.
The contents we provide on this site were created personally by members of the Game8 editorial department.
We refuse the right to reuse or repost content taken without our permission such as data or images to other sites.
Trainer locations and quests should be linked here.