Interactive Map
★ Sea of Sorrow Free DLC Announced!
☆ Walkthrough
★ Best Crest Builds | Best Tools
☆ Full Interactive Map of Pharloom!
★ Mask Shards | Spool Fragments | Abilities
☆ Boss Guides: The Unravelled | First Sinner
This is an interactive map of Pharloom in Hollow Knight: Silksong. See the full Silksong map, including locations of Benches, Mask Shards, Silk Hearts, and Spool Fragments.
List of Contents
Pharloom Full Interactive Map
| ・Click on the arrow in the upper left corner to access our sidebar to check all other pins and even search for individual pins. ・Pins checked off the map will reflect in the list below. We encourage users to sign up and log in to save your progress with the map. |
Silksong Map
Map Icon Legend
| Exploration | |||||
|---|---|---|---|---|---|
(Shakra) |
|||||
| Combat | |||||
| Quests and Collectibles | |||||
| Icon | How to Use |
|---|---|
 | Show Names This button reveals the Name of every icon currently shown. |
 | Show Pins This button will toggle between showing and hiding all the pins that you have already marked as acquired. |
 | Fullscreen This button will change the map display to fill the screen. |
 | Search Mode Toggle This button will display a search bar which you can use to search for an individual pin by its name. |
 | Icon Mode Toggle In Search Mode, this button will toggle you back to Icon Mode, removing the search bar and displaying the icons again. |
 | All Pins This button is shown along with the Icons on the right when there are over 6 types of pins. Click it for a full selection of all available pin types. |
 | Counter Tracks the number of pins you have of a certain type. The pin type shown is set to the page and currently cannot be changed; however, all pin type counters can be viewed by clicking the checklist icon on the right side. |
| View All Counters This icon is found on the right side of the Counter. When a map has more than one pin type, click this icon to see Counters for all pin types. |
How to Update the Map
Buy the Map and Quill From Shakra

You will be able to access the map once you purchase the item from Shakra. Each area will have its own corresponding map, so you will have to purchase the map for each location.
A quill is also required to update the map, so you will have to purchase it separately. The maps and quill will cost Rosaries, so you should save them up while exploring each area.
Shakra Locations and Item List
Pharloom Locations
All Locations in Pharloom
Moss Grotto Map
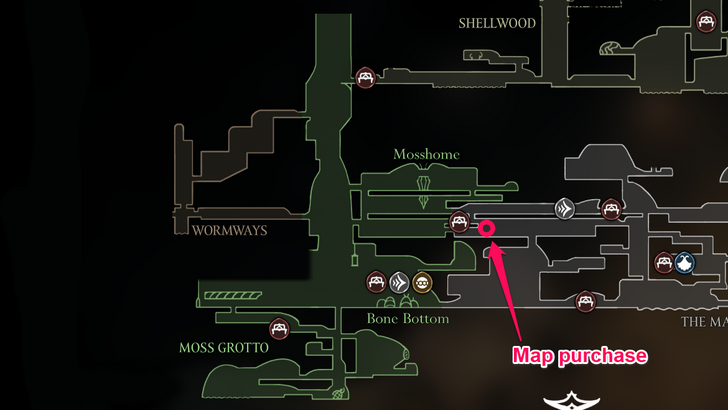
Moss Grotto is the first area encountered in Hollow Knight: Silksong. It is the bottommost level and where Hornet's journey starts. This is where the first town is located, at Bone Bottom.
The Marrow Map
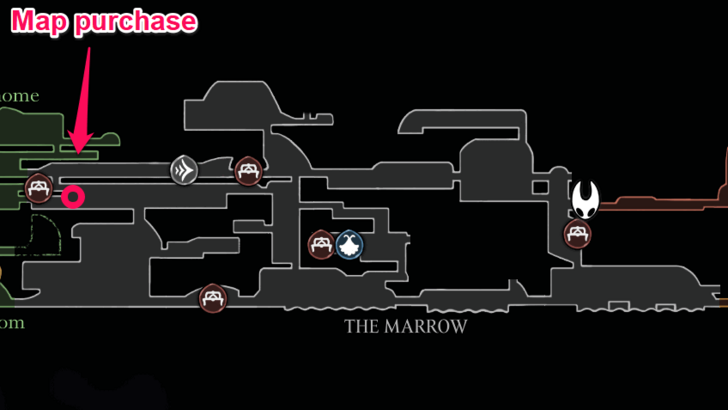
The Marrow is the second area you arrive at on your journey. Here, you can meet Shakra and purchase your first Map and Quill.
Deep Docks Map
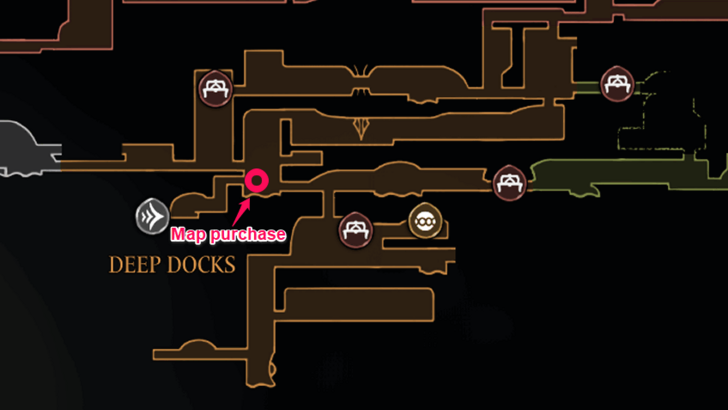
Deep Docks is an industrial area featuring environmental hazards such as ember floors, platforms, and lava pits, as well as enemies protected by metal armor.
Far Fields Map
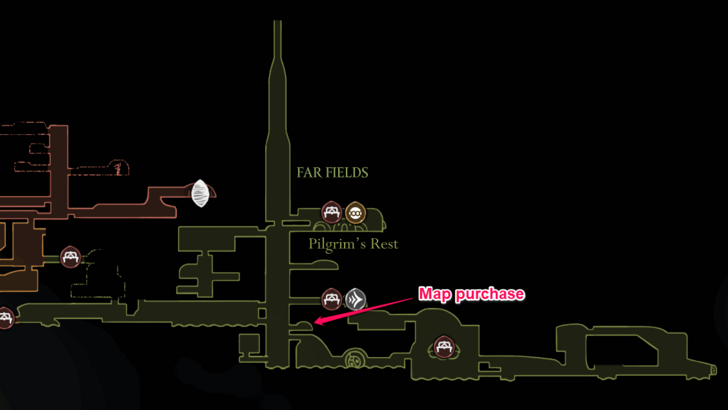
East of Deep Docks, you will reach the Far Fields, where you can obtain Drifter's Cloak, which allows Hornet to glide.
Hunter's March Map
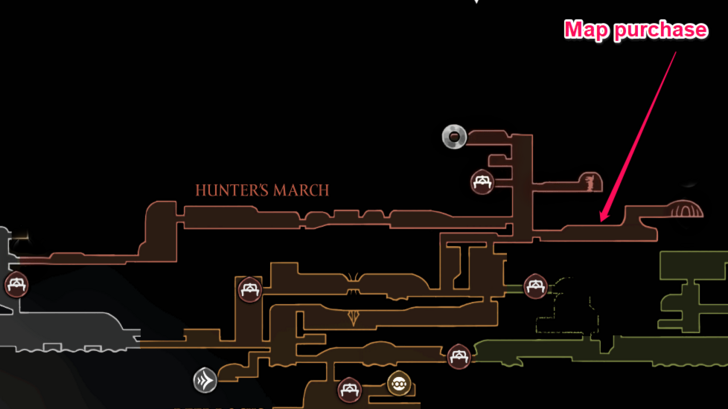
Hunter's March is a dangerous den filled with traps and bug enemies that are quite tanky. This area also contains Chapel of the Beast, where the Savage Beastfly resides. Be careful when exploring the area to avoid losing your Rosaries.
Greymoor Map
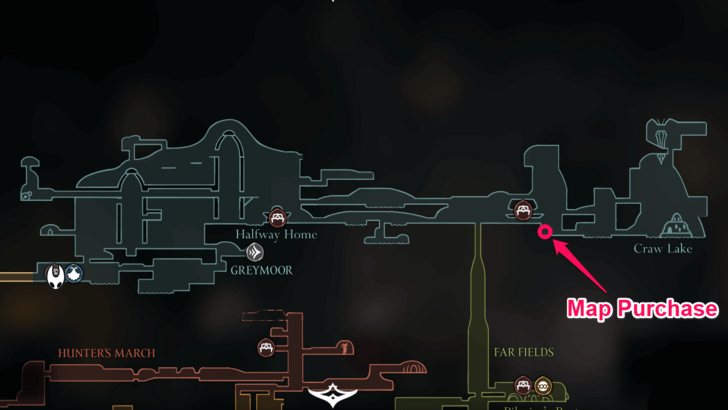
Greymoor is one of the largest areas in game, featuring caverns and towers filled with mysteries waiting for the players to discover.
Wormways Map
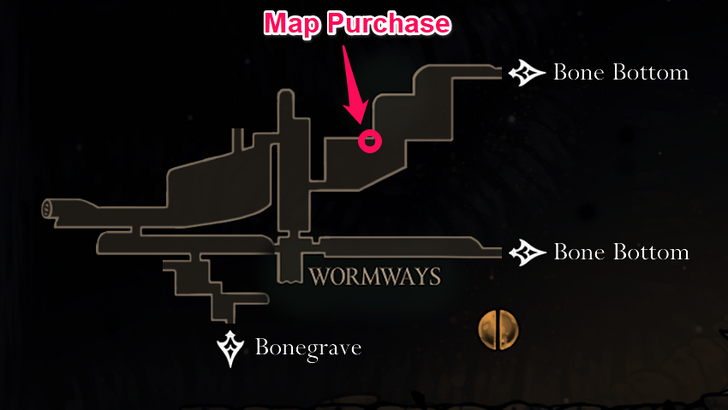
Save up enough money to buy the Simple Key from the merchant at Bone Bottom, then access the locked door to the upper left of Bone Bottom, past a long corridor with a large acid-spewing bug. This is how you reach the Wormways.
Bellhart Map
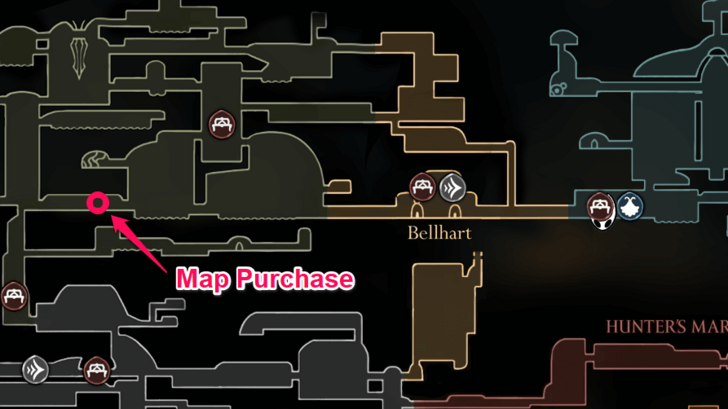
From Greymoor, pass through Bellhart to make your way to Shellwood, moving ever closer towards your goal. Here, you will see a city lost to Silk.
Shellwood Map
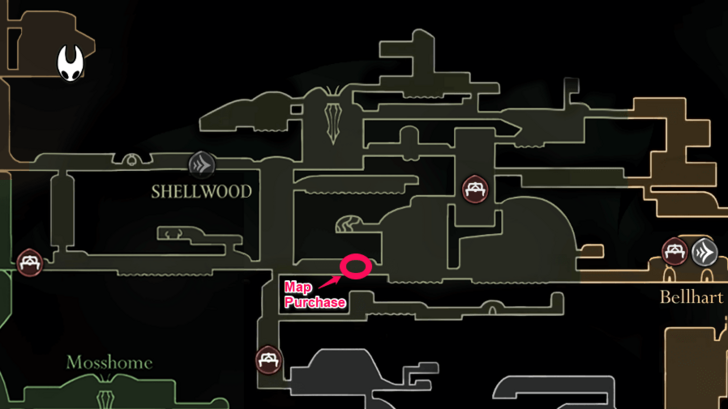
Here, Hornet can obtain the Cling Grip ability, which allows you to hang on to walls and climb high areas without the need for platforms.
Blasted Steps Map
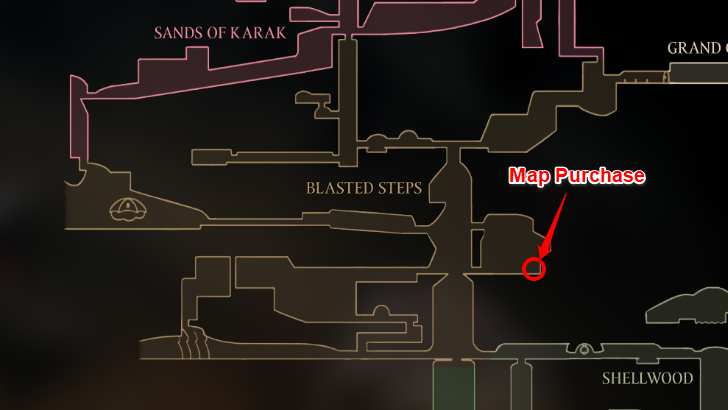
After defeating Widow in Bellhart and acquiring the Needolin, you can head to Blasted Steps situated west of Shellwood. This place is a desert area filled with sand bugs that will attack you when you touch the sand.
Grand Gate Map
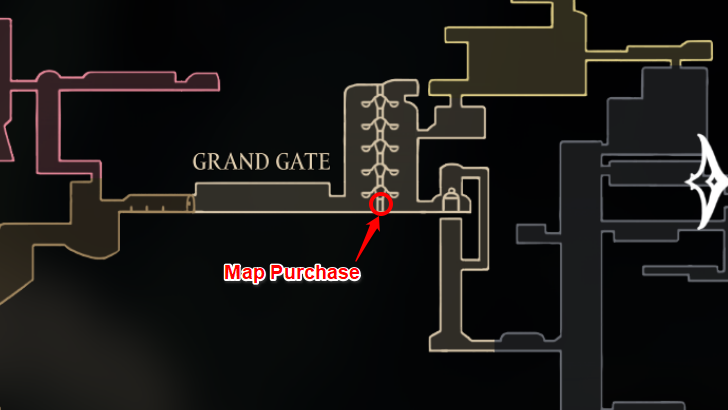
After beating the Last Judge in Blasted Steps, you will enter the Grand Gate, which is the entry point of the Choral Chambers (Citadel). The map can be purchased immediately for 40 rosaries upon reaching the area.
Underworks Map
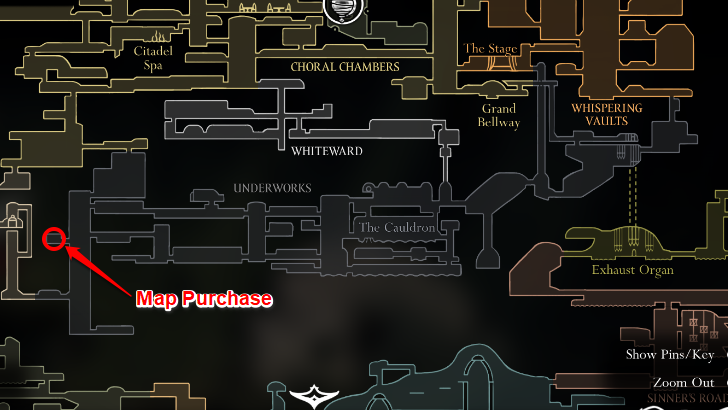
Underworks is filled with mercenaries that will attack you when seen. This location is directly below the Citadel and is a dangerous place filled with debris and machines that will damage Hornet.
Choral Chambers Map
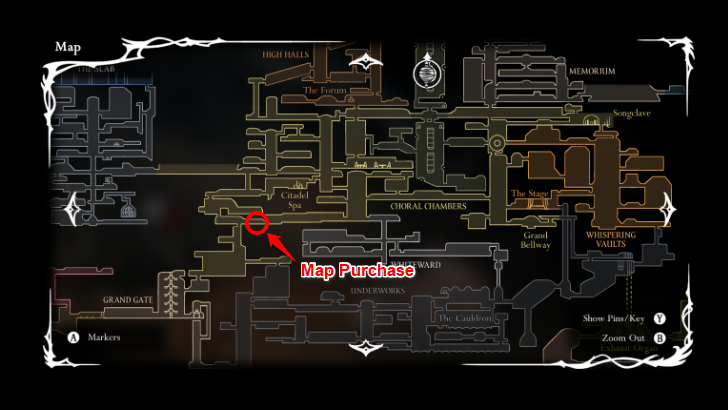
Choral Chambers is considered to be the Citadel and is a location filled with guards controlled by silk. The environment is made of clockwork where gears spin to unlock new areas.
Choral Chambers 100% Map Guide
The Slab Map
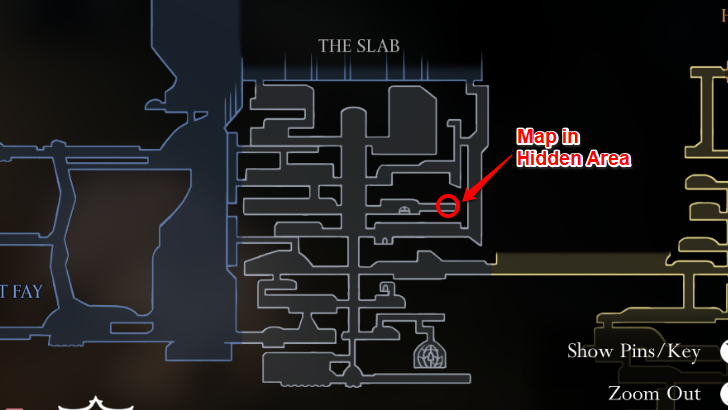
The Slab is a prison area that you can gain access to as soon as you obtain the Cling Grip ability. A large bug guard in Deep Docks will put you in a cage and capture you, taking you to the facility.
Mount Fay Map
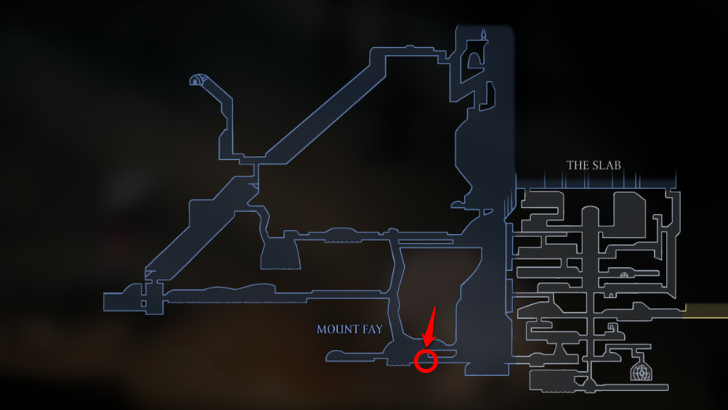
Mount Fay is an isolated area found in the upper left of Pharloom. In this region, Hornet takes damage from the cold when she goes for long periods without a heat source. You need the Clawline to successfully traverse this area.
Whiteward Map
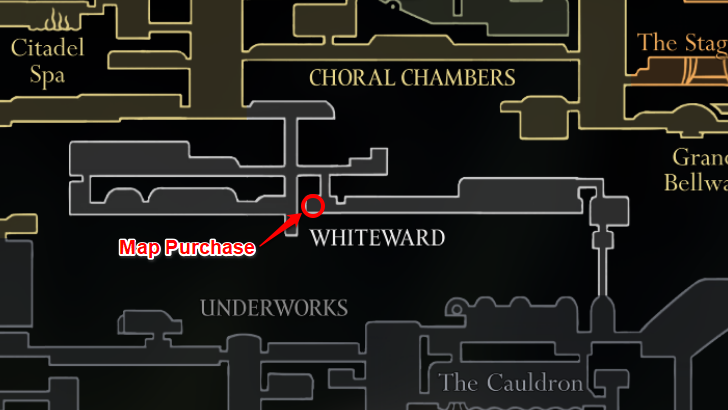
Whiteward is depicted to be the medical facility of the Citadel found below Choral Chambers. The atmosphere is dark here and enemies encountered boast horrific powers.
Weavenest Atla Map
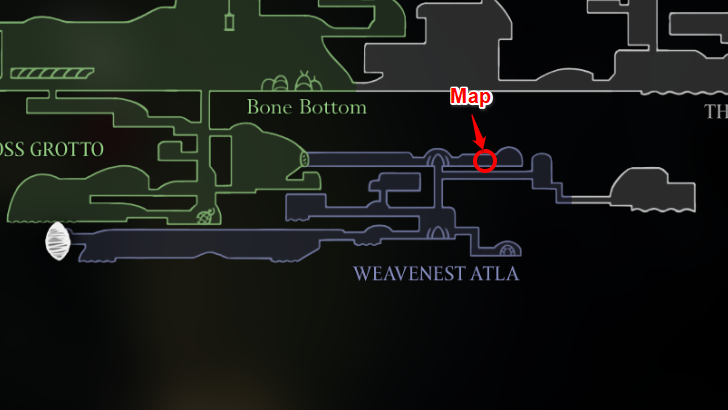
Weavenest Atla is an area unlocked by using the Needolin on the locked door in Moss Grotto. The map can be found upon hitting the glowing devices in the far right room directly after entering the area.
Memorium Map
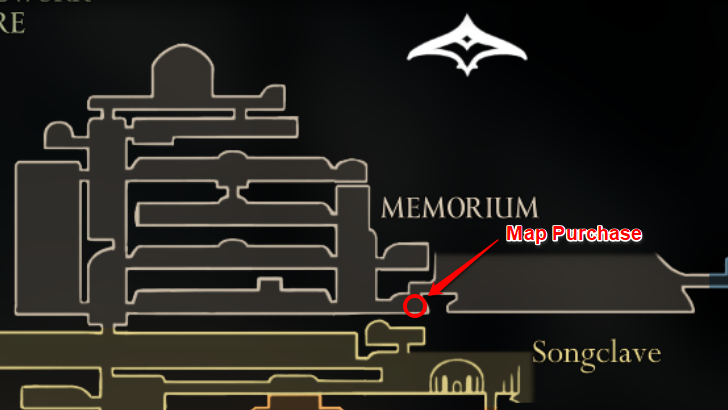
The Memorium is the upper right area of the Citadel. Overgrown vines and moss enemies can be found here, showing what seems to be an abandoned facility of the region.
Putrified Ducts Map
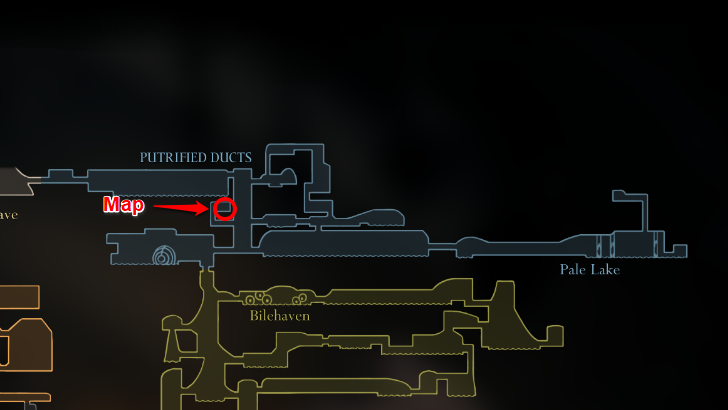
Putrified Ducts is an area found to the far upper right of Pharloom. It is connected to the Memorium and Bilewater, where enemies have adapted to the sewage water flowing through the area.
Putrified Ducts 100% Map Guide
Sands of Karak Map
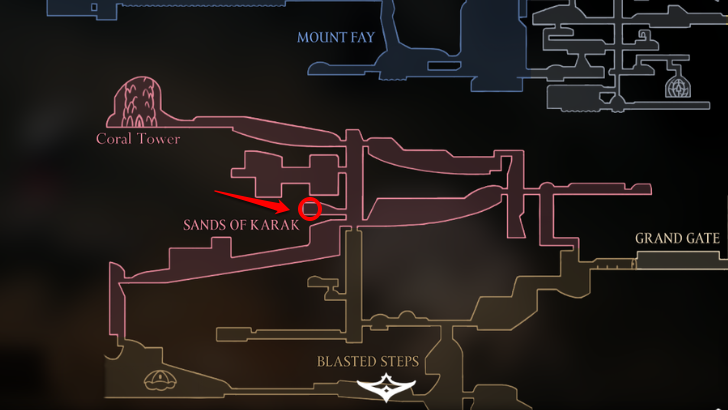
Sands of Karak is an area where most of the platforms are made out of spiky plants. You create these temporary platforms by hitting the golden balls.
Sinner's Road Map
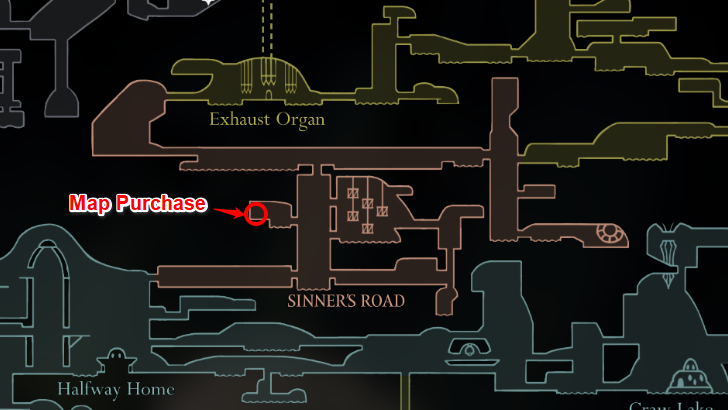
Sinner's Road is an area filled with cages and enemies. This area is rotting with maggots, as bugs struggle to live with the availability of food in the area. Be on the look out for friendly caged NPCs.
Wisp Thicket Map
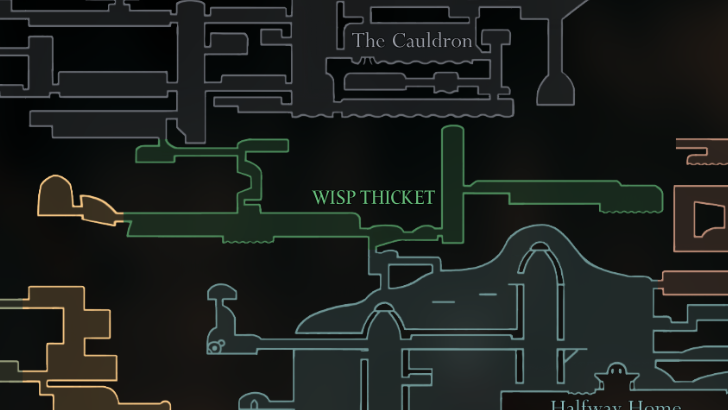
Wisp Thicket is a hidden area found above Greymoor. There is no map that can be purchased for this area specifically, as it will be automatically listed down once you have the Greymoor Map unlocked.
Cogwork Core Map
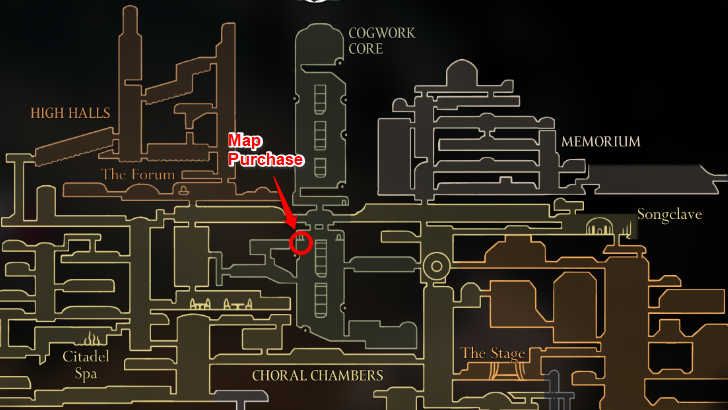
Cogwork Core is an area full of gears and automaton bugs. The map is just above the bench in the same room when coming from the Cogwork Dancers boss room.
High Halls Map
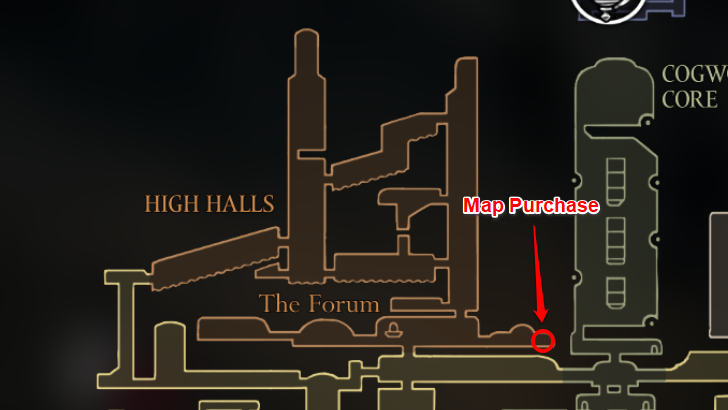
High Halls is the upper left area of the Citadel. Rotating gears that require you to use the Clawline are prevalent here, as the flowing waters will make it difficult for you to explore the area.
Whispering Vaults Map
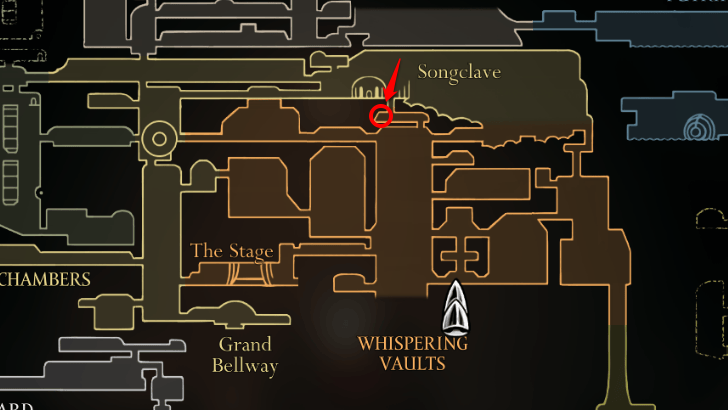
Whispering Vaults is an area to the right of Cogwork Core. You can find moveable platforms in the area that you can use to change the landscape of the room.
Whispering Vaults 100% Map Guide
Bilewater Map
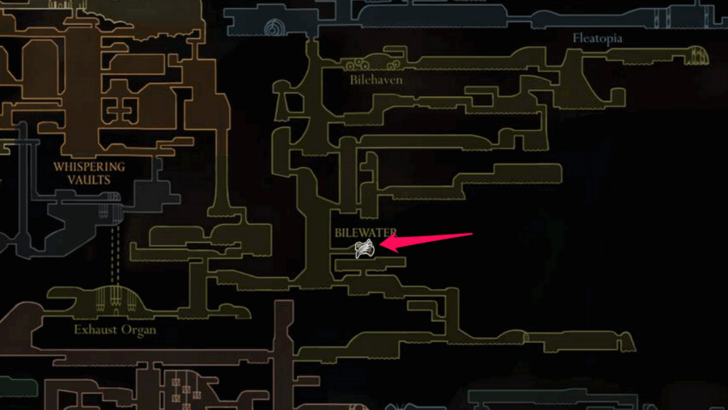
You can get to Bilewater from Sinner's Road. However, in order to obtain the map, you'd need the Faydown Cloak ability.
Bilewater 100% Map Guide
The Cradle Map
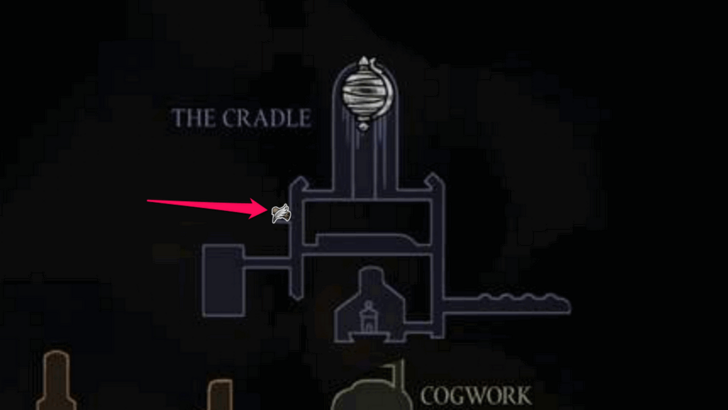
The very top of The Citadel, which you arrive at near the end of Act 2 by obtaining the Conductor's Melody, the Vaultkeeper's Melody, and the Architect's Melody.
The Cradle 100% Map Guide
Lost Verdania Map

Lost Verdania's map can be found glowing beside the Bench. Take note that this entire area is missable as it can only be accessed by completing the Green Prince's questline before Act 3.
The Abyss Map
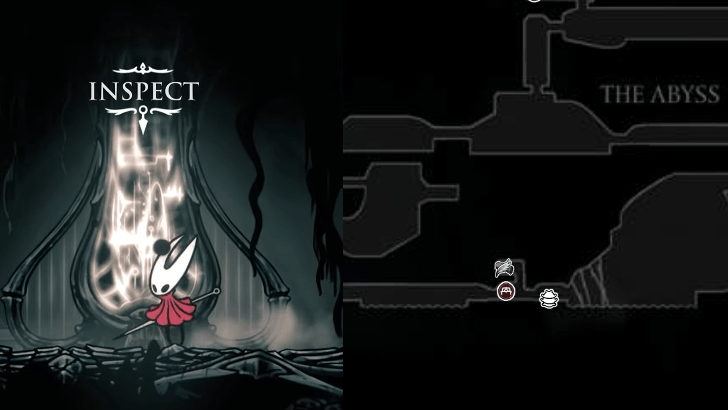
Once you get to the Bench, wall jump up and interact with the device to retrieve The Abyss Map.
Hollow Knight: Silksong Related Guides

Hollow Knight: Silksong Wiki Top
Guides by Category
| List of Categories | |
|---|---|
 Walkthrough Walkthrough |
 Tips and Tricks Tips and Tricks |
 Bosses Bosses |
 Maps Maps |
 Wishes Wishes |
 Abilities Abilities |
 Crests Crests |
 Skills Skills |
 Tools Tools |
 NPCs NPCs |
 Items Items |
 Enemies Enemies |
 News and Updates News and Updates |
|
Author

Interactive Map
Rankings
- We could not find the message board you were looking for.
Gaming News

![The Liar Princess and the Blind Prince Review [PC] | Lovely to Look at but Tedious to Play](https://img.game8.co/4442586/8d95f5faf05780f1765ce7e0938bd825.jpeg/show)
![The Seven Deadly Sins: Origin [First Impressions] | A Promising Start](https://img.game8.co/4440581/584e0bfb87908f12c4eab6e846eb1afd.png/thumb)
![The Liar Princess and the Blind Prince Review [PC] | Lovely to Look at but Tedious to Play](https://img.game8.co/4442586/8d95f5faf05780f1765ce7e0938bd825.jpeg/thumb)
![Marathon Cryo Archive Map Teased as [REDACTED] on Selection Screen](https://img.game8.co/4442236/6357203e58172f6de57f1991e7c39b22.png/thumb)
Popular Games

Genshin Impact Walkthrough & Guides Wiki
Umamusume: Pretty Derby Walkthrough & Guides Wiki
Pokemon Pokopia Walkthrough & Guides Wiki
Honkai: Star Rail Walkthrough & Guides Wiki
Monster Hunter Stories 3: Twisted Reflection Walkthrough & Guides Wiki
Arknights: Endfield Walkthrough & Guides Wiki
Wuthering Waves Walkthrough & Guides Wiki
Zenless Zone Zero Walkthrough & Guides Wiki
Pokemon TCG Pocket (PTCGP) Strategies & Guides Wiki
Monster Hunter Wilds Walkthrough & Guides Wiki


Recommended Games
Diablo 4: Vessel of Hatred Walkthrough & Guides Wiki
Cyberpunk 2077: Ultimate Edition Walkthrough & Guides Wiki
Fire Emblem Heroes (FEH) Walkthrough & Guides Wiki
Yu-Gi-Oh! Master Duel Walkthrough & Guides Wiki
Super Smash Bros. Ultimate Walkthrough & Guides Wiki
Pokemon Brilliant Diamond and Shining Pearl (BDSP) Walkthrough & Guides Wiki
Elden Ring Shadow of the Erdtree Walkthrough & Guides Wiki
Monster Hunter World Walkthrough & Guides Wiki
The Legend of Zelda: Tears of the Kingdom Walkthrough & Guides Wiki
Persona 3 Reload Walkthrough & Guides Wiki


All rights reserved
© 2025 Team Cherry
The copyrights of videos of games used in our content and other intellectual property rights belong to the provider of the game.
The contents we provide on this site were created personally by members of the Game8 editorial department.
We refuse the right to reuse or repost content taken without our permission such as data or images to other sites.
Ягода в Мемориуме отсутствует