This survey will take about 1 minute.
Your answers will help us to improve our website.
Digimon Story Time Stranger
Incoming Conflict Walkthrough
☆ DLC Episode Pack 3: March 11, 2026
★ Best Digimon | Best Team
★ Best Personality | How to Change Personality
☆ How Do Load Enhancements Work?
This is a walkthrough for the Incoming Conflict mission in Digimon Story Time Stranger. Read on to see how to complete all of its objectives and beat UltimateBrachiomon and Vulcanusmon!
| ◀︎ Previous Mission | Next Mission ▶︎ |
|---|---|
| Gathering Storm Clouds | Audience with an Oracle |
List of Contents
Incoming Conflict Walkthrough
| Incoming Conflict Guide | |
|---|---|
| 1 | 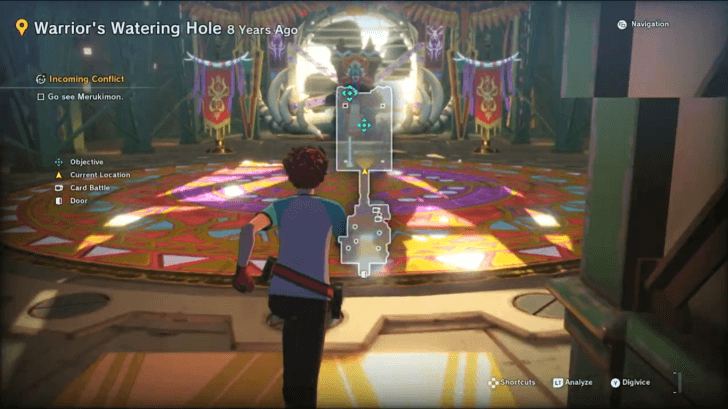 Exit the shanty to go find Merukimon in the Warrior's Watering Hole again. |
| 2 | 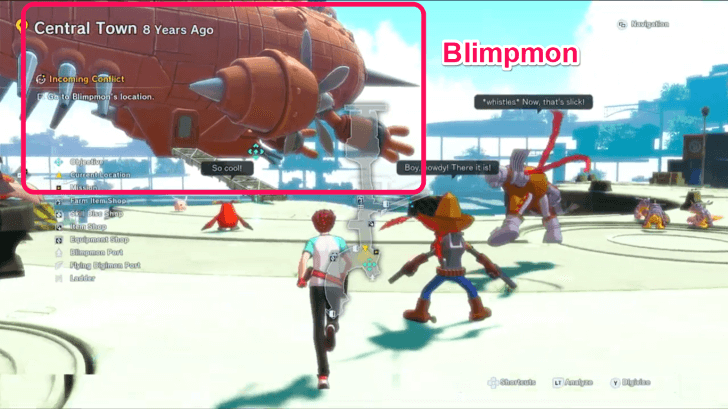 After talking to Merukimon, leave for Central Town to find Blimpmon. Note: Interacting with Blimpmon, the game will warn you that there is heavy fighting in the next location Factorial Town. If you are not yet ready, you can stay behind to gather resources and level up your Digimon. Otherwise, you can proceed. |
| 3 | 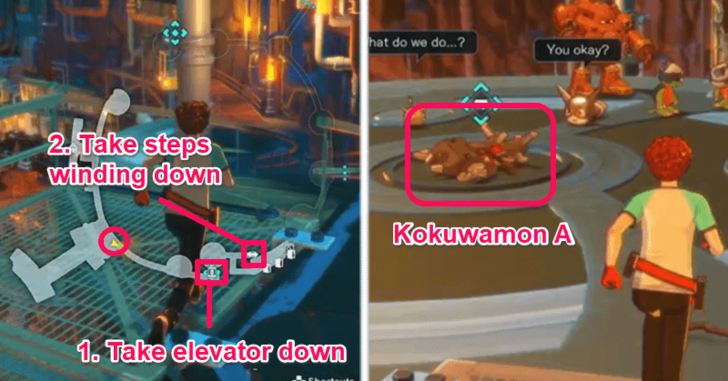 In Factorial Town, talk to the Guardramon. Then, take the elevator going down and find Kokuwamon A. |
| 4 | 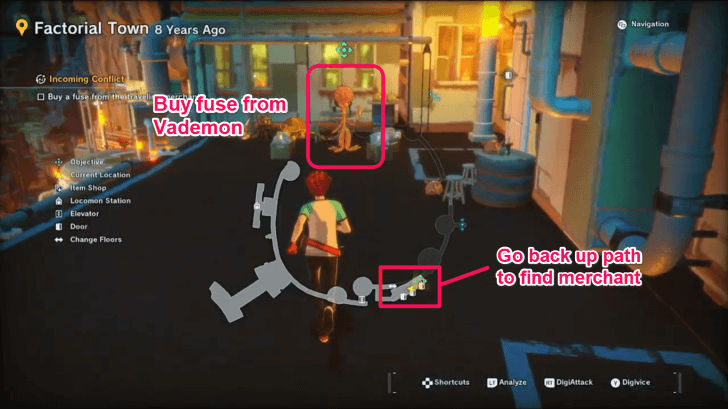 Buy a fuse at the upper section of Factorial Town. Talk to the Vademon merchant, who will you give you Shock Plasma I for the fuse. |
| 5 | 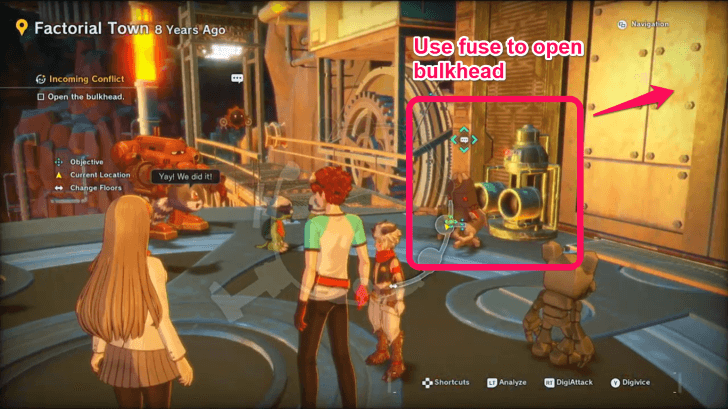 Return to Kokuwamon A, who will tell you to shock it. Use DigiAttack to shock it. Then, talk to the revitalized Kokuwamon A to open the bulkhead. |
| 6 | 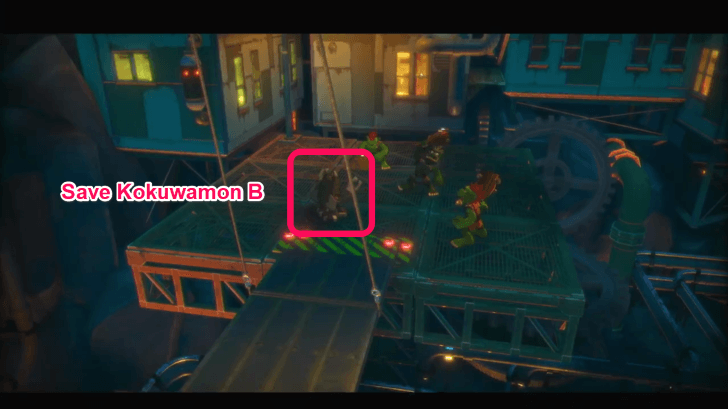 Deeper into Factorial Town, take a left to find Kokuwamon B surrounded by hostile Goblimon and Shamamon. Approach it to start the battle. After defeating the Digimon, Kokuwamon B will join the party and give you a battery. |
| 7 | 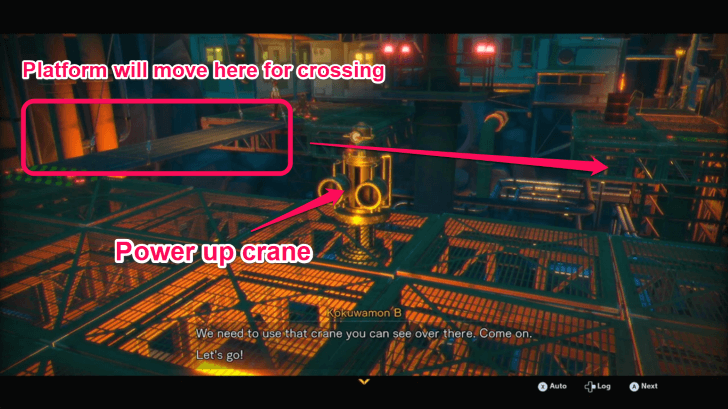 Go to the crane to operate it with the battery. The crane will transfer a platform to the right side, allowing you to cross to the other side. |
| 8 |  Slightly ahead, trapped Digimon will call for help behind a cell. Approach the chute to have Aegiomon crawl through it. On the other side, battle hostile Digimon with Aegiomon. After the battle, the trapped Digimon will give a battery. Climb out of the chute to return to the others. |
| 9 | 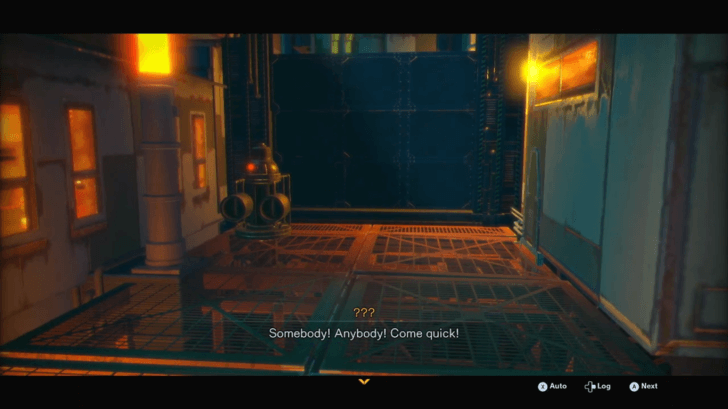 Go to the next objective marker, which leads you to a locked door. Power on the machine with the battery to lift the locked door. |
| 10 | 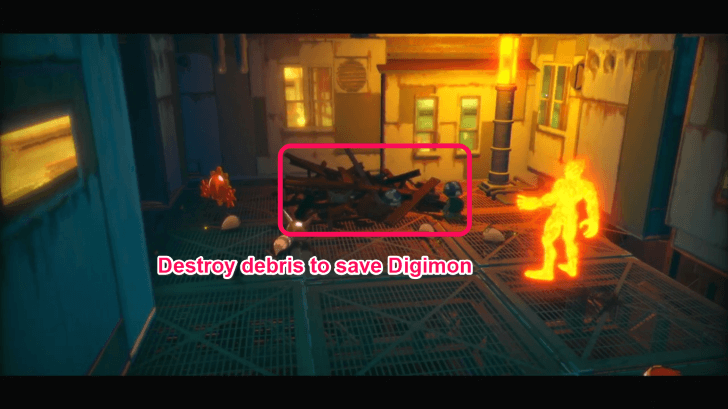 Free the trapped Digimon by using DigiAttack on the debris. The Meramon will give you Power Energy I. Proceed to the next objective marker. |
| * | 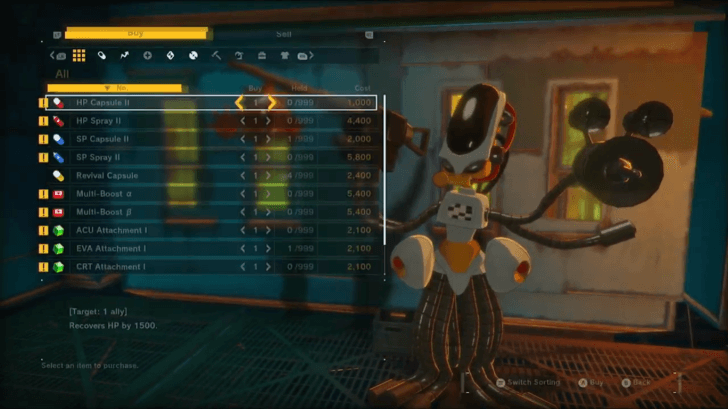 On the way to the objective, you will see more trapped Digimon. Destroy the debris with DigiAttack. You can interact with the Ebemon merchant to buy items from its shop. Near the Digimon, there is also a rift to the Outer Dungeons should you want to enter it. |
| 11 | 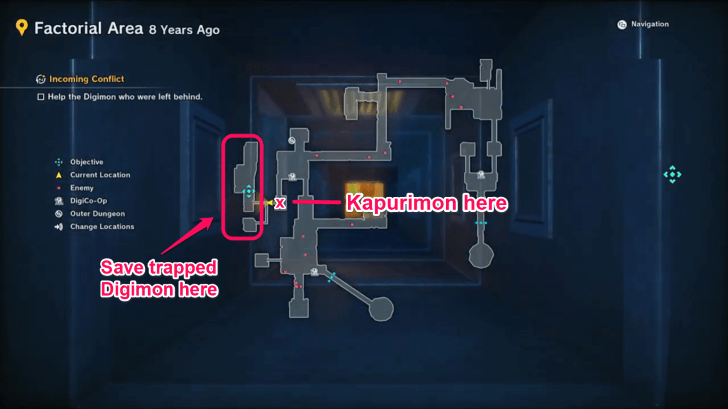 Destroy the cylinders to make a way through, where you will meet a Kapurimon. Enter the chute as Aegiomon to help more Digimon trapped on the opposite side. Go straight and drop down to beat two Guardromon. Return to the team through the chute and receive a battery from Kapurimon. |
| 12 | 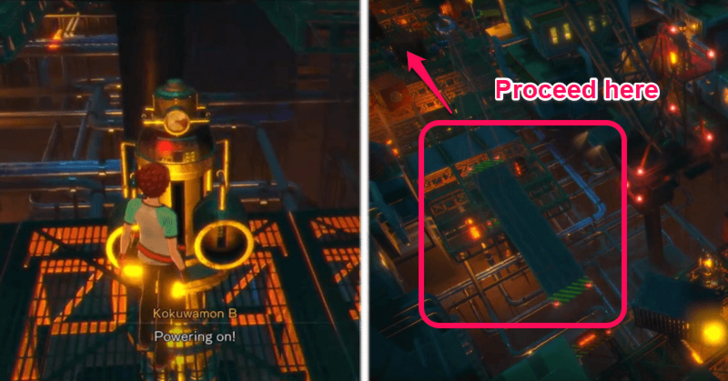 Return to where you destroyed the cylinders. Power up the crane with the battery to move the platform for you to cross on. At this point, you have to save three groups of Digimon trapped behind debris. |
| 12.1 | 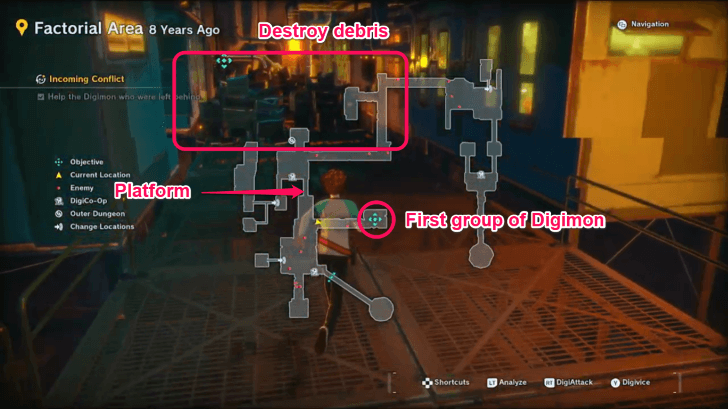 The first group of Digimon is just to the left immediately after crossing the platform. Destroy all the layers of debris to reach them and defeat the hostile Digimon. As a reward, the Digimon will give you Multi-Recovery (x3). |
| 12.2 | 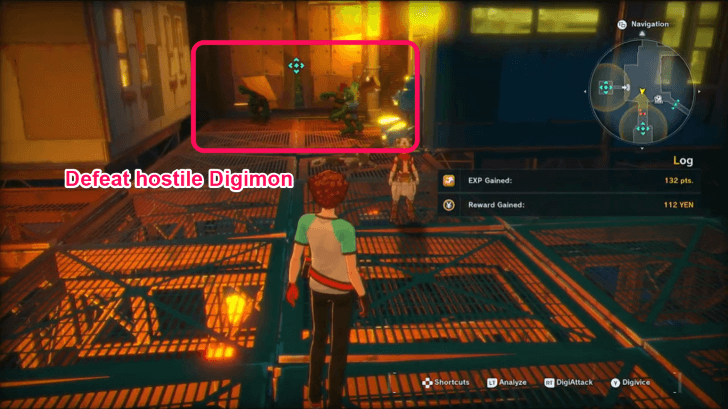 The second group is straight ahead from the platform. Defeat the trio of Goblimon and DigiAttack the broken door to free them. You will receive a Full Revival Spray as a reward. |
| 12.3 | 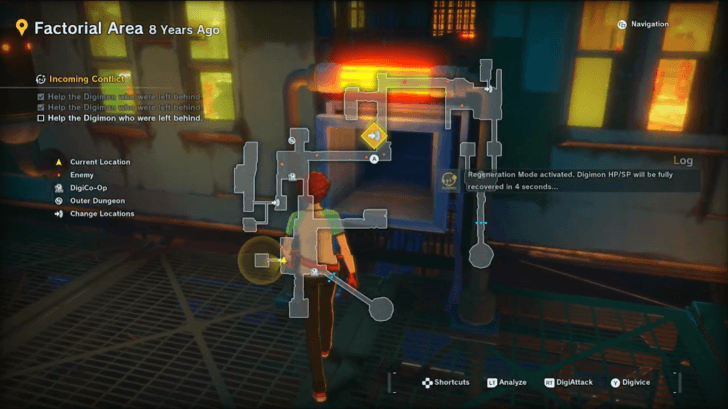 The third Digimon is stuck in a chute. To the right of the platform, go to the chute to have Aegiomon enter it. You will see a stuck Digimon you have to push out with the prompts. Afterwards, you will receive an Immortal Egg and a battery. Exit the chute. |
| 13 |  Power up the machine to unlock the door, leading you back to the starting area of Factorial Town. |
| 14 | 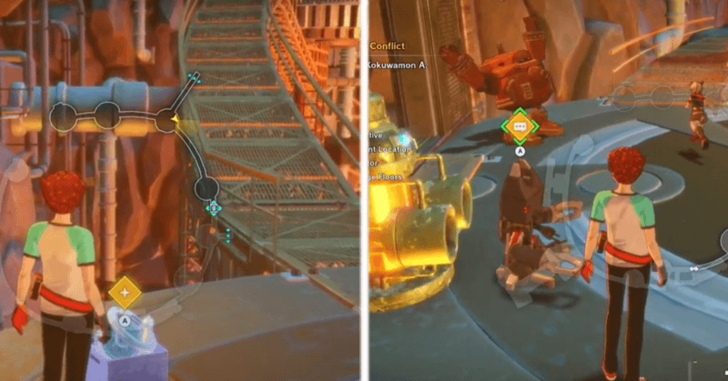 Follow the path winding up until you reach an elevator taking you back to where you first met Kokuwamon A. Report back to Kokuwamon A, who will join the party. |
| 15 | 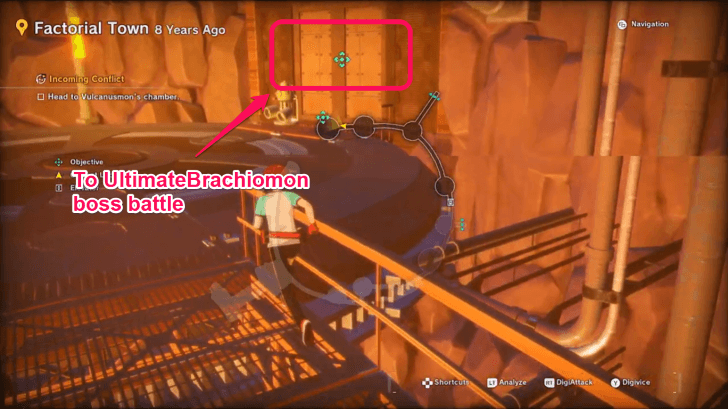 Descend down with the elevator again to go to Vulcanusmon's chamber. There is a rift to the In-Between Theater in case you want to restock your items and ready yourself for the two boss battles ahead. |
| 16 |  Once you enter the chamber, defeat the boss UltimateBrachiomon. ▶︎ How to Beat UltimateBrachiomon |
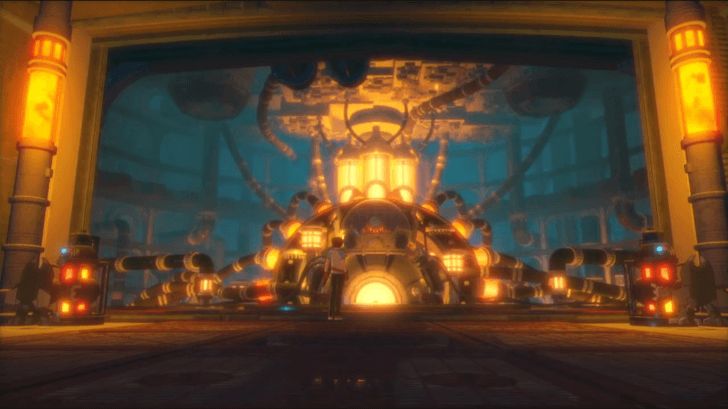
| 17 | 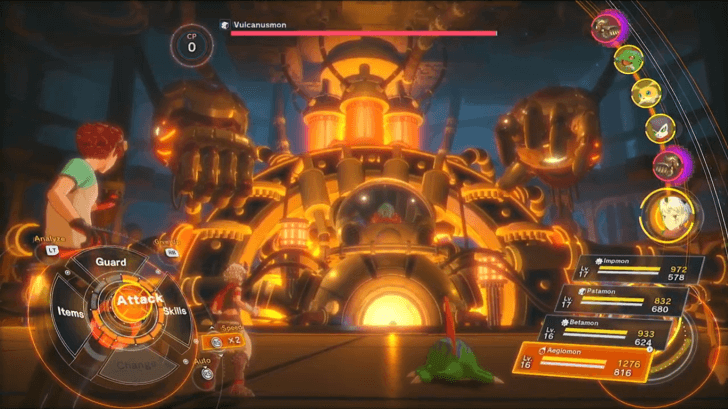 After defeating UltimateBrachiomon, go to the prompt beside its body to proceed to Vulcanusmon's chamber. If you are ready, interact with the door to fight Vulcanusmon. ▶︎ How to Beat Vulcanusmon |
| 18 | After the fight, go up the elevator and talk to Guardromon. Then, travel to Central Town: Station to talk to Merukimon, ending the mission. ▶︎ How to Beat Vulcanusmon |
Incoming Conflict Boss Guides
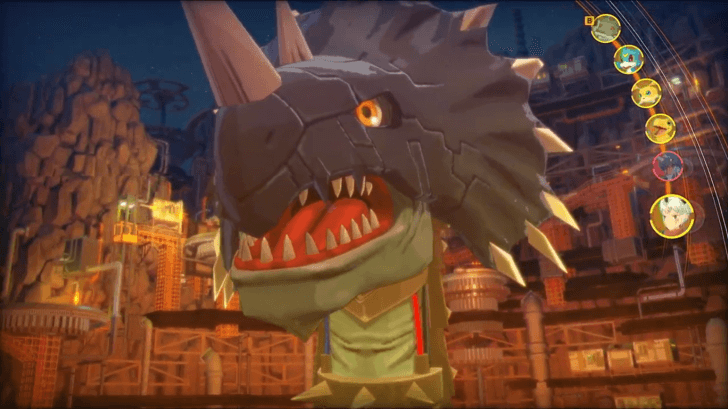
How to Beat UltimateBrachiomon
| UltimateBrachiomon |
|---|
 |
| General Tips and Strategy |
|
|
Use Plant and Wind Attacks
UltimateBrachiomon is a Data type weak to Plant and Wind attacks, so make sure your team has Virus-type Digimon with these elemental skills.
Watch Out for Changing Resistances
UltimateBrachiomon will alternate between resistances to Physical and Magic attacks. When this happens, use Digimon that will deal extra damage according to UltimateBrachiomon's current state.
How to Beat UltimateBrachiomon
How to Beat Vulcanusmon
| Vulcanusmon |
|---|
 |
| General Tips and Strategy |
|
|
Destroy Vulcanusmon's Mechanical Arms
Vulcanusmon's boss battle has three phases where you have to destroy its mechanical arms each time. Destroy them as quickly as possible to avoid taking the brunt of its damage dealt by its lethal moves.
Attack with Data-type Digimon
You might have to forgo using Vaccine Digimon to strike the balance between attacking Vulcanusmon and its mechanical arms, which are mainly weak to Data-type Digimon, including Vulcanusmon itself.
Note that the mechanical arms do not have any elemental weaknesses and resistances.
Digimon Time Stranger Related Guides
All Main Missions and Walkthrough
All Main Missions
Comment
Author

Incoming Conflict Walkthrough
Please participate in our site
improvement survey
03/2026
improvement survey
03/2026
Would you assist in
improving Game8's site?
improving Game8's site?

×
We are listening to our users' valuable opinions and discussing how to act on them.
The information collected through this survey will be used for the purpose of improving our services. In addition, the information will only be disclosed a part of a statistic in a format that will not allow identification of personal information.
Begin Survey
Not Now
×
Please rate each item regarding Game8.co's Advertisements.
Amount of Ads
Very Dissatisfied
Somewhat Dissatisfied
Fine
Somewhat Satisfied
Highly Satisfied
Placement of Ads
Timing of Ad Display
Ad Loading Speed
Safeness of Ads
Content of Ads
×
Please rate each item regarding Game8.co's Quality of Articles.
Amount of information
Very Dissatisfied
Somewhat Dissatisfied
Fine
Somewhat Satisfied
Highly Satisfied
Frequency of updates
Speed of new information
Accuracy of articles
Understandibility of articles
Readability of sentences
×
Please rate each item regarding Game8.co's Usability of the Site.
Ease of finding information
Very Dissatisfied
Somewhat Dissatisfied
Fine
Somewhat Satisfied
Highly Satisfied
Loading Speed
Use of Color
Font Size
Visibility of Images
Easy to Understand Layout
×
Please rate each item regarding Game8.co's Message Boards, Comments.
Ease of Writing
Very Dissatisfied
Somewhat Dissatisfied
Fine
Somewhat Satisfied
Highly Satisfied
Readability
Ease in Finding Information
Comment Quality
Comment Quantity
Admin Response
×
Please rate each item regarding Game8.co's Site's new design.
Please rate our site's new design
Very Dissatisfied
Somewhat Dissatisfied
Fine
Somewhat Satisfied
Highly Satisfied
Do you think that the website's design change makes the site easier to use?
Has the new design made it easier for you to find information on the site?
Has the new design improved the overall visual appeal of the site?
How would you rate your overall satisfaction with the new design of the site?
×
How likely are you to recommend Game8 to someone you know?
Very Unlikely
0
1
2
3
4
5
6
7
8
9
10
Very Likely
If you have other opinions regarding potential improvement to the website, please share them with us. We would appreciate your honest opinion.
Note: This is a free response section, so you can proceed without entering anything.
Note: Please be sure not to enter any kind of personal information into your response.
Note: Please be sure not to enter any kind of personal information into your response.
×
Thank You
×
Thank you for participating in our survey! Your answers will help us to improve the quality of our website and services.
We hope you continue to make use of Game8.
We hope you continue to make use of Game8.
Close
Rankings
- We could not find the message board you were looking for.
Gaming News


![Everwind Review [Early Access] | The Shaky First Step to A Very Long Journey](https://img.game8.co/4440226/ab079b1153298a042633dd1ef51e878e.png/thumb)

![Monster Hunter Stories 3 Review [First Impressions] | Simply Rejuvenating](https://img.game8.co/4438641/2a31b7702bd70e78ec8efd24661dacda.jpeg/thumb)
Popular Games

Genshin Impact Walkthrough & Guides Wiki
Honkai: Star Rail Walkthrough & Guides Wiki
Umamusume: Pretty Derby Walkthrough & Guides Wiki
Pokemon Pokopia Walkthrough & Guides Wiki
Resident Evil Requiem (RE9) Walkthrough & Guides Wiki
Monster Hunter Wilds Walkthrough & Guides Wiki
Wuthering Waves Walkthrough & Guides Wiki
Arknights: Endfield Walkthrough & Guides Wiki
Pokemon FireRed and LeafGreen (FRLG) Walkthrough & Guides Wiki
Pokemon TCG Pocket (PTCGP) Strategies & Guides Wiki


Recommended Games
Diablo 4: Vessel of Hatred Walkthrough & Guides Wiki
Fire Emblem Heroes (FEH) Walkthrough & Guides Wiki
Yu-Gi-Oh! Master Duel Walkthrough & Guides Wiki
Super Smash Bros. Ultimate Walkthrough & Guides Wiki
Pokemon Brilliant Diamond and Shining Pearl (BDSP) Walkthrough & Guides Wiki
Elden Ring Shadow of the Erdtree Walkthrough & Guides Wiki
Monster Hunter World Walkthrough & Guides Wiki
The Legend of Zelda: Tears of the Kingdom Walkthrough & Guides Wiki
Persona 3 Reload Walkthrough & Guides Wiki
Cyberpunk 2077: Ultimate Edition Walkthrough & Guides Wiki


All rights reserved
©Akiyoshi Hongo, Toei Animation
©Bandai Namco Entertainment Inc.
The copyrights of videos of games used in our content and other intellectual property rights belong to the provider of the game.
The contents we provide on this site were created personally by members of the Game8 editorial department.
We refuse the right to reuse or repost content taken without our permission such as data or images to other sites.