This survey will take about 1 minute.
Your answers will help us to improve our website.
FF7 Remake
How to Beat Scarlet & The Crimson Mare | Boss Guide (Normal & Hard)

This is a guide to beating the Boss Scarlet & The Crimson Mare in the game Final Fantasy 7 Remake (FF7R) from the INTERmission DLC in the Intergrade PS5 version. This article explains Scarlet & The Crimson Mare's attack patterns, weaknesses, and tips and strategies for defeating them on both Normal and Hard.
List of Contents
Scarlet & The Crimson Mare Basic Information
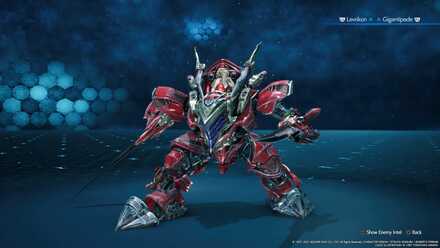
| The Crimson Mare | ||
|---|---|---|
|
Species | Movement | Type |
| Mechanical | Grounded | Boss |
Description
Blood-red battle armor for Scarlet's personal use. Its creator's personality can be seen in every facet of this machine, from its extravagantly outfitted cockpit--That emphasizes form over function--to its arm's oversized weapons loadout.
Assess (Tips)
When its pilot is incapacitated, it will be susceptible to staggering. It is capable of equipping a variety of lethal artillery, but destorying these weapons will temporarily eliminate the threat they pose.
The Crimson Mare Stats
| Easy | Normal | Hard | |
|---|---|---|---|
| HP | Currently Unknown | 34140 | Currently Unknown |
The Crimson Mare Weaknesses & Resistances
| Weakness / Status Ailments | Lightning | |
|---|---|---|
| Lesser Resistances | Fire | |
| Greater Resistances | - | |
| Immunities | Poison, Silence, Sleep, Slow, Stop, Berserk, Fixed Damage, Proportional Damage | |
| Absorbed Elements | - | |
Rewards
| Easy/Normal | Hard | |
|---|---|---|
| Gil | 1400 | |
| AP | 10 | |
| Exp | 1400 | |
| Items Dropped | - | |
| Rare Items Dropped | - | |
| Steal | - | |
Firebird Armlet
Once you defaet Scarlet, she dropst the Firebird Armlet. It is an armlet with only 3 slots, but has an effect of allowing you to survive fatal damage once per battle.
Firebird Armlet Materia Slots and Stats
Best Characters, Equipment and Materia for This Boss
Available Characters
 Yuffie Yuffie
|
 Sonon Sonon
|
You can only use Yuffie and Sonon for this fight.
Recommended Characters
 Yuffie Yuffie |
Weapon: Boomerang Armor: Chthonian Armlet Accessory: Ribbon |
|---|---|
 Sonon Sonon |
Weapon: Marshalist's Staff Armor: Ninja Armlet Accessory: Kindred Cord |
Mage Yuffie
You will want to put Yuffie in the role of a mage for this fight in order to deal high amount of Fire damage to incapacitate Scarlet quickly. With your Ninjutsu you can also switch to Lightning when you have to deal with The Crimson Mare itself.
Sonon Mix of Physical and Magic
Sonon will be dealing a mix of physical and magical damage to deal with The Crimson Mare. Whenever you need to have an arm broken or to dish damage to the staggered the Crimson Mare, make sure to use the most out of Synergy and synergized abilities.
Best Materia for Yuffie
| Weapon (4 Slots) | ||
|---|---|---|
| Armor (4 Slots) | ||
| Summon | ||
Best Materia for Sonon
| Weapon (3 Slots) | |
|---|---|
| Armor (4 Slots) | |
Tips & Strategies for Beating Scarlet & The Crimson Mare
| ★ Strategy Checklist ★ (Click to jump) |
||
|---|---|---|
|
|
Use Fire on Scarlet and Lightning on Crimson

In this fight, you will want to swap between fire and lightning. Use Fire to deal the most damage to Scarlet, then lightning when you need to deal damage to the Crimson Mare. It's up to you which one to prioritize, just make sure you're using the right element on the target!
Eliminate the Small Fry

At the start, there will be Sentry Rays around the battlefield. It is a good idea to focus on the first and take them out ASAP. They don't have much health so they are fairly easy to get rid of. Sentry Launchers will also appear higher up to bother you. Use range attacks to destroy them quickly and focus on The Crimson Mare.
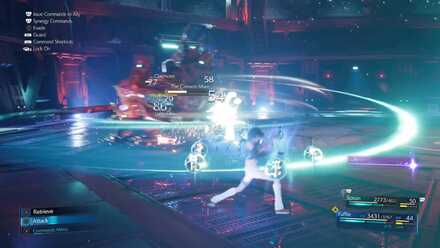
Take out Scarlet to Stagger

If you want to stagger the Crimson Mare, your best bet is to try and take out Scarlet. Once you deplete her health and knock her out, the Crimson Mare will become vulnerable and go into the pressured state. This is the best time to throw everything at it!
Cripple The Crimson Mare Weapons

The Crimson Mare has sets of weapons it is going to equip during the battle with you. It has a long-range set with the Makocannon arms and a close-range set with the Claymore and Shield, you will wanna focus on those and destroy them. Destroying one will reduce combat capabilities while destroying both arms will completely render it useless until it equips new weapons. Synergize with Sonon to take out the arms swiftly!
Summon Ramuh

The Crimson Mare's weakness is lightning and Ramuh's element is lightning, a perfect match for this fight! Using Ramuh can give you a huge edge with its large area lightning attacks! If you do not have Ramuh yet, check out our guide on getting this summon!
How to Get Ramuh Materia
Scarlet & The Crimson Mare Attack Phases
In this fight, Scarlet will start with a default weapon of dual sword guns. After enough damage is dealt it will switch to Makocannon weapons. It will then switch to a claymore and shield after more damage is dealt to it. Every time you cripple both its arms it will swap between the cannons and the claymore and shield.
Default Weapons
Bullet Barrage

The Crimson Mare fires its guns at a target. This attack does not deal that much damage, but it will put you in hit-stun, making you an easier target for other enemies. Keep your eye out for this attack and block or avoid it!
Flame Spire

Scarlet summons a pillar of fire at a location. The location where this attack will appear is pretty easy to see. You will see sparks erupting from the ground, get out of the way to completely avoid attack!
Directive: Deploy
Scarlet summons Sentry Launchers around the battlefield. They can deal heavy damage if not dealt with immediately. It is advisable to focus on them and quickly take them out.
Sword Strikes

The Crimson Mare will move around and strike with its swords to deal damage. Each strike by itself won’t deal too much damage, but being hit consecutively will add up.
Sword Dash

The Crimson Mare puts its sword in front of it and dashes forward. This can deal a lot of damage if it hits. Once you see its swords glow red, get ready to block or dodge out of the way!
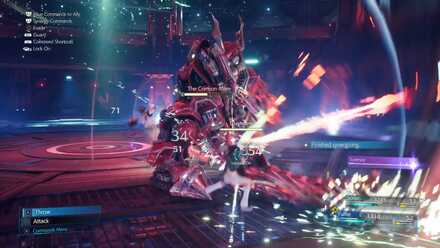
Makocannons
Makocannon Beam

The Crimson Mare charges up one of its arms and fires a beam that deals heavy damage. This attack is easy to avoid and block as it is telegraphed clearly when it puts up an arm and charges the beam.
Makocannon Blasts

The Makocannon fires orbs that deal some damage. They don’t deal too much damage per orb but adds up if you get hit by too many. The attack is pretty quick so you might wanna block it if you don’t think you have time to dodge.
Makocannon Barrage

The makocannon is pointed upwards and fired into the air with the blasts falling back down scattered around the battlefield. This is a large area of effect attack so try and gain some distance when you see the Crimson Mare point its cannon into the air.
Claymore and Shield
Rocket Launcher

Scarlet fires multiple rockets from a rocket launcher.
Claymore Smash
The Claymore is raised and drop to deal massive damage to its target. The attack itself is quick but has a long wind-up time with the claymore being raised into the air.
Claymore Spin
The Crimson Mare spins around rapidly with the claymore extended out. A quick multi-hit attack, is better to try to block as it can be tough to avoid with its big area.
Shield Charge

A drill emerges from the shield and the Crimson Mare charges forward and strikes its target. This is a quick attack but it telegraphed when it pulls out the drill.
Shield Thrust

A uses its shield drill and quickly thrusts into its target. Deals low damage but multi-hit when successful. This attack can be tough to see coming so keep your finger on the block button and be ready!
Scarlet & The Crimson Mare: Hard Mode Guide
Scarlet & The Crimson Mare Hard Mode Video Guide
Recommended Materia
| Materia | Reason |
|---|---|
Required ・Try and give 2 to each character ・Attach 4 to the Ninja Armlet to level them up ・Try to start leveling them up as early as possible |
|
Required ・Link to Magnify for best effects ・Still useful without Magnify |
|
Required ・Only give to Yuffie ・Sonon will revive Yuffie by sacrificing himself if she dies |
|
Helpful ・A way to heal without using MP ・Heals more based on how much HP you've lost |
|
Helpful ・Heal all party members without using HP ・Requires 2 ATB so it can prevent you from using other attacks |
|
Helpful ・Gives you a boost to your MP ・Great for Hard Mode where you can't recover MP easily ・Equip 2 to each character if possible |
|
Helpful ・Fills the ATB Gauge when blocking attacks ・Sonon can also make use of it |
|
Helpful ・You'll be staggering this boss more frequently so you can make use of the extra ATB |
|
Helpful ・Equip on Sonon ・Every time Yuffie uses a command Sonon will follow up with the weakest linked magic ・Does not require ATB or MP |
Keeping Safe
| Summary | |
|---|---|
| ① | Prioritize the sentries that spawn |
| ② | Throw your Shuriken at Scarlet and use Windstorm |
| ③ | When Crimson Mare is Pressured, press L2 to Synergize with Sonon and use Synergized Art of War |
| └ | When staggered, use Yuffie's Art of War and Sonon's Swirling Storm |
| ④ | When it switches to Makocannons use Lightning Ninjutsu and destroy both arms |
| ⑤ | While it has a sword and shield, use Banishment on the sword and then target the shield |
| └ | Repeat steps 4 and 5 until victory |
Uses 2 New Moves in Each Phase
| Makocannon Phase: Fusillade |
|---|
 ※Block the projectiles then block or use Brumal Form to avoid the large laser ※Block the projectiles then block or use Brumal Form to avoid the large laser |
| Sword and Shield Phase: Fulgent Blade |
 ※Blocking every hit can still deal a lot of damage so make use of Brumal Form or a perfect guard to negate damage ※Blocking every hit can still deal a lot of damage so make use of Brumal Form or a perfect guard to negate damage |
In Chapter 2 you'll be facing bosses in quick succession. To conserve MP, try to get rid of any sentries that spawn and the Crimson Mare's arms to cut down on damage and be aware of long range attacks.
FF7 Remake Intergrade Related Links
Intergrade and INTERmission Guide
Intergrade Story Walkthrough
| Chapter 1 | Chapter 2 |
|---|---|
 Chapter 1: Wutai's Finest Chapter 1: Wutai's Finest
|
 Chapter 2: Covert Ops Chapter 2: Covert Ops
|
Intergrade Boss Fights
| Chapter 1 | Levrikon Gigantipede Ramuh |
|---|---|
| Chapter 2 | Scarlet & The Crimson Mare Projector Nero the Sable |
| Shinra Combat Simulator | vs. Shinra's Dark Secrets vs. Midgarian Monsters Weiss the Immaculate Pride and Joy Mk 0.5 (Top Secrets) |
Intergrade Side Content
 Happy Turtle Flyers Happy Turtle Flyers
|
 Shinra Box Buster Shinra Box Buster
|
Fort Condor Minigame
 Fort Condor Guide Fort Condor Guide
|
Condor Coin Farming |
| Fort Condor Units | |
| Fort Condor Boards |
Intergrade Guides
Author

How to Beat Scarlet & The Crimson Mare | Boss Guide (Normal & Hard)
Please participate in our site
improvement survey
03/2026
improvement survey
03/2026
Would you assist in
improving Game8's site?
improving Game8's site?

×
We are listening to our users' valuable opinions and discussing how to act on them.
The information collected through this survey will be used for the purpose of improving our services. In addition, the information will only be disclosed a part of a statistic in a format that will not allow identification of personal information.
Begin Survey
Not Now
×
Please rate each item regarding Game8.co's Advertisements.
Amount of Ads
Very Dissatisfied
Somewhat Dissatisfied
Fine
Somewhat Satisfied
Highly Satisfied
Placement of Ads
Timing of Ad Display
Ad Loading Speed
Safeness of Ads
Content of Ads
×
Please rate each item regarding Game8.co's Quality of Articles.
Amount of information
Very Dissatisfied
Somewhat Dissatisfied
Fine
Somewhat Satisfied
Highly Satisfied
Frequency of updates
Speed of new information
Accuracy of articles
Understandibility of articles
Readability of sentences
×
Please rate each item regarding Game8.co's Usability of the Site.
Ease of finding information
Very Dissatisfied
Somewhat Dissatisfied
Fine
Somewhat Satisfied
Highly Satisfied
Loading Speed
Use of Color
Font Size
Visibility of Images
Easy to Understand Layout
×
Please rate each item regarding Game8.co's Message Boards, Comments.
Ease of Writing
Very Dissatisfied
Somewhat Dissatisfied
Fine
Somewhat Satisfied
Highly Satisfied
Readability
Ease in Finding Information
Comment Quality
Comment Quantity
Admin Response
×
Please rate each item regarding Game8.co's Site's new design.
Please rate our site's new design
Very Dissatisfied
Somewhat Dissatisfied
Fine
Somewhat Satisfied
Highly Satisfied
Do you think that the website's design change makes the site easier to use?
Has the new design made it easier for you to find information on the site?
Has the new design improved the overall visual appeal of the site?
How would you rate your overall satisfaction with the new design of the site?
×
How likely are you to recommend Game8 to someone you know?
Very Unlikely
0
1
2
3
4
5
6
7
8
9
10
Very Likely
If you have other opinions regarding potential improvement to the website, please share them with us. We would appreciate your honest opinion.
Note: This is a free response section, so you can proceed without entering anything.
Note: Please be sure not to enter any kind of personal information into your response.
Note: Please be sure not to enter any kind of personal information into your response.
×
Thank You
×
Thank you for participating in our survey! Your answers will help us to improve the quality of our website and services.
We hope you continue to make use of Game8.
We hope you continue to make use of Game8.
Close
Rankings
- We could not find the message board you were looking for.
Gaming News


Popular Games

Genshin Impact Walkthrough & Guides Wiki
Honkai: Star Rail Walkthrough & Guides Wiki
Umamusume: Pretty Derby Walkthrough & Guides Wiki
Pokemon Pokopia Walkthrough & Guides Wiki
Resident Evil Requiem (RE9) Walkthrough & Guides Wiki
Monster Hunter Wilds Walkthrough & Guides Wiki
Wuthering Waves Walkthrough & Guides Wiki
Arknights: Endfield Walkthrough & Guides Wiki
Pokemon FireRed and LeafGreen (FRLG) Walkthrough & Guides Wiki
Pokemon TCG Pocket (PTCGP) Strategies & Guides Wiki


Recommended Games
Diablo 4: Vessel of Hatred Walkthrough & Guides Wiki
Fire Emblem Heroes (FEH) Walkthrough & Guides Wiki
Yu-Gi-Oh! Master Duel Walkthrough & Guides Wiki
Super Smash Bros. Ultimate Walkthrough & Guides Wiki
Pokemon Brilliant Diamond and Shining Pearl (BDSP) Walkthrough & Guides Wiki
Elden Ring Shadow of the Erdtree Walkthrough & Guides Wiki
Monster Hunter World Walkthrough & Guides Wiki
The Legend of Zelda: Tears of the Kingdom Walkthrough & Guides Wiki
Persona 3 Reload Walkthrough & Guides Wiki
Cyberpunk 2077: Ultimate Edition Walkthrough & Guides Wiki


All rights reserved
© SQUARE ENIX CO., LTD. All Rights Reserved.
CHARACTER DESIGN:TETSUYA NOMURA/ROBERTO FERRARI
The copyrights of videos of games used in our content and other intellectual property rights belong to the provider of the game.
The contents we provide on this site were created personally by members of the Game8 editorial department.
We refuse the right to reuse or repost content taken without our permission such as data or images to other sites.