This survey will take about 1 minute.
Your answers will help us to improve our website.
FF7 Remake
How to Beat the Ghoul | Boss Fight Guide (Normal & Hard Mode)
This is a guide to beating the Boss Ghoul in the game Final Fantasy 7 Remake (FF7R). This article explains Ghoul's attack patterns, weaknesses, and tips and strategies for defeating them on both Normal and Hard Mode.
List of Contents
Ghoul Stats and Information
Basic Information
| Ghoul | ||
|---|---|---|

|
Species | Movement | Type |
| Unreadable | Grounded | Boss |
Description
An aggregate of ghosts. The large amounts of baleful energy that results from this aggregation allow it to use telekinesis.
Assess (Tips)
Switches between physical and ghostly forms. Neither magic attacks against the physical form nor physical attacks against the ghostly form have any effect on its stagger gauge. Use magic attacks against the ghostly form to rapidly fill its stagger gauge.
Ghoul Stats
| Easy | Normal | Hard | |
|---|---|---|---|
| HP | 10276 | 18683 | 40086 |
| Attack | 136 | 328 | |
| Magic Attack | 136 | 328 | |
| Defense | 156 | 342 | |
| Magic Defense | 143 | 312 | |
Ghoul Weaknesses & Resistances
| Weakness / Status Ailments | Fire | |
|---|---|---|
| Lesser Resistances | - | |
| Greater Resistances | - | |
| Immunities | Silence, Slow, Stop, Magic, Proportional Damage | |
| Absorbed Elements | - | |
Stagger Rates
| ×1※ | ×1※ | ×1.75 | ×1 |
| - | |||
| ×1 | ×1 | ×1 | - |
Stagger Length
| Phase 1 | Phase 2 |
|---|---|
| 12 seconds | 12 seconds |
Rewards
| Easy/Normal | Hard | |
|---|---|---|
| Gil | 600 | 1800 |
| AP | 10 | 30 |
| Exp | 600 | 3600 |
| Items Dropped | Subversion Materia (100%) | |
| Rare Items Dropped | - | |
| Steal | Turbo Ether (5%) | |
Learnable Enemy Skills
No Enemy Skills can be learned from Ghoul.
How to Pressure the Ghoul
| Phase | Situation |
|---|---|
| Phase 1 | When damage is dealt equaling 7% (10% on Hard Mode) of its max HP. |
| Phase 2 | When damage is dealt equaling 5% (8% on Hard Mode) of its max HP. |
| − | In the time before it attacks when it is hit by magic while charging Etheric Burst. |
Damage and Stagger Dealt While in Ghost Form
| Spell | Damage | Normal (Stagger Rate) |
Pressured (Stagger Rate) |
|---|---|---|---|
| Cure | Low | 4 | 24 |
| Cura | Medium | 6 | 36 |
| Curaga | High | 10 | 60 |
| Regen | Low | 0 | 0 |
| Raise | Medium | 0 | 0 |
| Arise | High | 0 | 0 |
| Potions | Low to Medium | 3 | 18 |
| Elixir | High | 8 | 48 |
Note: The Ghoul has a Focus Gauge of 150.
Ghoul Boss Fight Guide
Ghoul Abilities and Attack Patterns
| Name | Element | Blockable? | Knockdown? | Status |
|---|---|---|---|---|
|
|
|
Yes | No | - |
| Makes orbs of light float into the air. Once in the air they will home in on the party. | ||||
|
|
- | Yes | Yes | - |
| Swings its right claw down, creating a trail of light that explodes soon after. | ||||
|
|
- | Yes | Yes | - |
| Uses various types of debris and hurls them at the party telekinetically with varying strength. (A) Lifts 1 or 3 pieces of debris and sends them at the target. (B) Lifts everything in the room and rearranges it, smashing it down to the ground. (C) Lifts debris one by one to throw at a target, up to 6 times. |
||||
|
|
- | Yes | No |
|
| Chases a target, swinging with its claws. | ||||
|
|
- | No | No |
Stun (3 sec)
|
| Screams in a wide area, stunning anyone in range. Can be avoided by hiding behind debris. | ||||
|
Phantasmic Flurry
|
- | No | No | - |
| Summons red lights around the room that ghost arms come out from when approached. Can grab and bind a target for up to 20 seconds. | ||||
|
Incorporeality
|
- | - | - | - |
| Changes to Ghost form. | ||||
|
|
- | Yes | Yes | - |
| Summons blue flames around the arena that will explode when come into contact with. Will disappear after 12 seconds. | ||||
|
|
- | Yes | No | - |
| Binds a target and absorbs their MP for 5 seconds. | ||||
|
|
- | Yes | Yes | - |
| Charges energy for 2 seconds and releases it in a wide area. Can be avoided by hiding behind debris or hitting it with magic while it charges. | ||||
*Status Effects and Ailments Guide
Hard Mode Attacks
Nothing new for abilities in this fight, however the damage dealt and frequency of the attacks is increased so be careful.
Best Characters for This Boss
Available Characters
 Cloud Cloud
|
 Tifa Tifa
|
 Aerith Aerith
|
Recommended Characters
You want to have Aerith doing the most with her strong magic abilities until the Ghoul goes into its Physical form where Cloud and Tifa will shine the most. Rotate as necessary.
Ghoul Attack Phases
Phase 1
| Phase Point Summary | |
|---|---|
| 1 | The Ghoul will begin with Telekenesis, hurling debris at a random target. |
| 2 | It will also use a blue flame attack from time to time and Piercing Scream to stun. |
| 3 | When it uses Incorporeality it will change into its Ghost form and become immune to physical attacks. |
| 4 | While in Ghost form it can use Phantasmic Flurry to silence a target. Ghost arms also appear to grab or damage your party members throughout the arena. |
| 5 | When it takes enough damage it will move into phase 2. |
Phase 2
| Phase Point Summary | |
|---|---|
| 1 | The Ghoul continues to use Telekenesis, however also as a shield. |
| 2 | When it casts Balefire, blue flames will spawn around the Ghoul, making it more difficult to approach. |
Tips & Strategies for Beating Ghoul
| ★ Strategy Checklist ★ (Click to jump) |
||
|---|---|---|
|
|
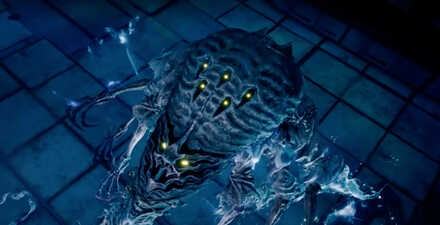
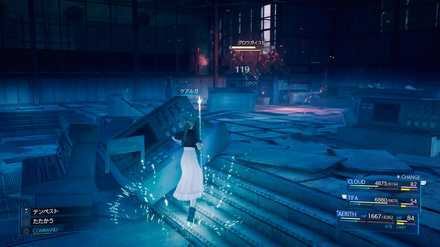
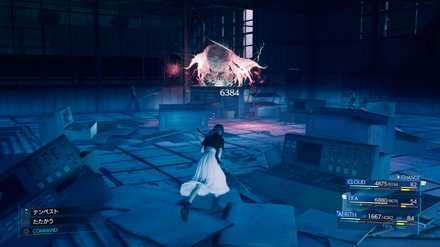
Watch Its Body Color
 Enlarge Enlarge |
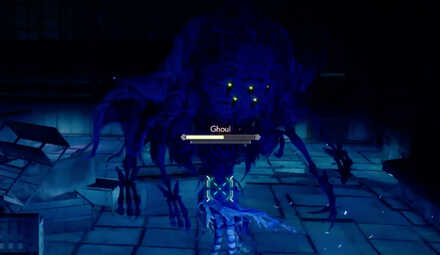 Enlarge Enlarge |
The Ghoul will alternate between two forms, Physical and Ghost. While in its Physical form, it will be blue, and in Ghost form it will be red. While in Physical form it is immune to magic damage and in Ghost form immune to physical attacks. Target it with Cloud and Tifa while in Physical form until it uses Incorporeality to switch to Ghost form, then hit it with your strongest fire spells to quickly get it to switch back. If you hit it with enough magic attacks it won't be able to use its Phantasmic Flurry attack that will silence you.
Weak to Healing in Ghost Form
While the Ghoul is not typically weak to healing like Ghosts are, when it uses Incorporeality and switches to Ghost form, it will take damage from healing. Using a Phoenix Down on it in Ghost form will also immediately make it revert back to Physical form.
Stay Away From the Blue Fire

In the second phase, the Ghoul will begin to cast Balefire from time to time. This will cause blue flames to appear on the ground around it that can deal enough damage to KO a character if they aren't at full health. Walk around these as carefully as you can when attempting to get close to the Ghoul.
Ghoul: Hard Mode Guide
Best Characters and Equipment
| Cloud |
Weapon: Buster Sword Armor: Force Bracelet Accessory: Champion Belt |
|---|---|
| Aerith |
Weapon: Mythril Rod Armor: Chain Bangle Accessory: Circlet |
| Tifa |
Weapon: Metal Knuckles Armor: Force Bracelet Accessory: Champion Belt |
Balanced Cloud
With the Ghouls changing forms constantly, it is a good idea to have Cloud have both Physical and Magical damage to be able to deal with both forms. Cloud's signature Buster Sword will be a good weapon for this fight.
Aerith as the Offensive Mage
Aerith can deal tons of damage with one spell if built offensively. Equip her with Mythril Rod and Circlet and you will be seeing big numbers when you deal damage with your spells!
Heavy Hitter Tifa
Aerith and Cloud can deal the magical damage, you will need Tifa for the Physical damage when the Ghoul is in its Physical form. With Metal Knuckles you can deal the most physical damage when you can.
Best Materia to Use
The number of slots in your Weapon may vary depending on your Weapon Level.
Cloud
| Weapon (6 Slots) | ||
|---|---|---|
| Armor (4 Slots) | ||
| Summon | ||
Aerith
| Weapon (6 Slots) | ||
|---|---|---|
| Armor (4 Slots) | ||
| Summon | ||
Tifa
| Weapon (6 Slots) | ||
|---|---|---|
| Armor (4 Slots) | ||
| Summon | ||
| ★Strategy Checklist★ | ||
|---|---|---|
|
|
Guard or Avoid Its Flame Attack
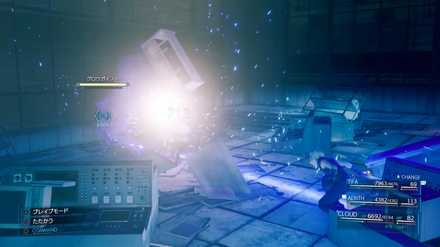 Enlarge Enlarge |
→ |  Enlarge Enlarge |
When the Ghoul unleashes its flame attack on hard mode it can hurt pretty bad. When you see the Ghoul raise its arms over its head, be prepared to guard or dodge away. There are also times where it will use this move directly after Telekenesis, so be prepared to heal.
Use Curaga While it's in Ghost Form
 Enlarge Enlarge |
→ |  Enlarge Enlarge |
As in normal mode, while in Ghost form it is weak to healing magic or items. To take full advantage of this, have Aerith cast Curaga on the Ghoul for massive damage. Arise will deal damage as well, but Curaga hurts more and costs less MP.
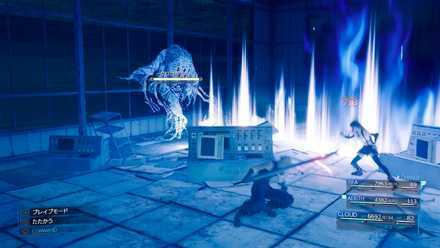
Play it Safe During Balefire
When its HP gets low it will begin to use a combination of Balefire, Telekenesis, and its flame attack, giving you less freedom to maneuver the battlefield safely. Getting hit by any of these attacks will take out a large chunk HP, so try to go for the small openings after Piercing Scream or its flame attack to lay on the hurt.
Boss Fight Related Articles
Major Story Bosses
| All Major Story Bosses | |
|---|---|
| Chapter 1 | Scorpion Sentinel |
| Chapter 4 | Roche |
| Chapter 5 | Crab Warden |
| Chapter 7 | Airbuster |
| Chapter 8 | Reno Rude |
| Chapter 9 | Hell House |
| Chapter 10 | Abzu |
| Chapter 11 | Ghoul Eligor |
| Chapter 13 | Failed Experiment |
| Chapter 14 | Abzu (2nd Fight) |
| Chapter 15 | The Valkyrie |
| Chapter 16 | Specimen H0512 |
| Chapter 17 | Jenova Dreamweaver Rufus The Arsenal |
| Chapter 18 | Motor Ball Whisper Harbinger Sephiroth |
VR Mission Bosses
| All VR Mission Bosses | |
|---|---|
| Chapter 8 | Shiva |
| Chapter 9 | Fat Chocobo |
| Chapter 13 | Leviathan |
| Secret Boss | Bahamut |
| Superboss | Pride and Joy Prototype |
Story Sub-Bosses
| All Story Sub-Bosses | |
|---|---|
| Chapter 2 | The Huntsman |
| Chapter 3 | The Hoodlums |
| Chapter 4 | Enigmatic Spectre |
| Chapter 12 | Enigmatic Spectre |
| Chapter 17 | M.O.T.H. Unit Brain Pod Swordipede |
Monster Variants & Optional Sub-Bosses
| All Monster Variants & Optional Sub-Bosses | |
|---|---|
| Chapter 3 | Doomrat Cerulean Drake Wrath Hound |
| Chapter 8 | Hedgehog Pie King Mark II Monodrive Venomantis Chromogger |
| Chapter 14 | Rust Drake Tonberry Trypapolis Type-0 Behemoth |
| Chapter 17 | Malboro |
Comment
5  Anonymous almost 6 years
Yea but if you have healing 20% less, curaga is great just have Aerith and Cloud cast it as soon as it changes for easy 8-9k dmg and pressured, and if you want to cast sleep/poison that is actually a good idea poisoned will make it take 60 every second, sleep will give you time to max out your ATBs and ensure that those curaga hits dont miss. Baleful fire is the only annoyance that poison can make up for in dmg so you can stay put and wait till it changes form again.
Author

How to Beat the Ghoul | Boss Fight Guide (Normal & Hard Mode)
Please participate in our site
improvement survey
03/2026
improvement survey
03/2026
Would you assist in
improving Game8's site?
improving Game8's site?

×
We are listening to our users' valuable opinions and discussing how to act on them.
The information collected through this survey will be used for the purpose of improving our services. In addition, the information will only be disclosed a part of a statistic in a format that will not allow identification of personal information.
Begin Survey
Not Now
×
Please rate each item regarding Game8.co's Advertisements.
Amount of Ads
Very Dissatisfied
Somewhat Dissatisfied
Fine
Somewhat Satisfied
Highly Satisfied
Placement of Ads
Timing of Ad Display
Ad Loading Speed
Safeness of Ads
Content of Ads
×
Please rate each item regarding Game8.co's Quality of Articles.
Amount of information
Very Dissatisfied
Somewhat Dissatisfied
Fine
Somewhat Satisfied
Highly Satisfied
Frequency of updates
Speed of new information
Accuracy of articles
Understandibility of articles
Readability of sentences
×
Please rate each item regarding Game8.co's Usability of the Site.
Ease of finding information
Very Dissatisfied
Somewhat Dissatisfied
Fine
Somewhat Satisfied
Highly Satisfied
Loading Speed
Use of Color
Font Size
Visibility of Images
Easy to Understand Layout
×
Please rate each item regarding Game8.co's Message Boards, Comments.
Ease of Writing
Very Dissatisfied
Somewhat Dissatisfied
Fine
Somewhat Satisfied
Highly Satisfied
Readability
Ease in Finding Information
Comment Quality
Comment Quantity
Admin Response
×
Please rate each item regarding Game8.co's Site's new design.
Please rate our site's new design
Very Dissatisfied
Somewhat Dissatisfied
Fine
Somewhat Satisfied
Highly Satisfied
Do you think that the website's design change makes the site easier to use?
Has the new design made it easier for you to find information on the site?
Has the new design improved the overall visual appeal of the site?
How would you rate your overall satisfaction with the new design of the site?
×
How likely are you to recommend Game8 to someone you know?
Very Unlikely
0
1
2
3
4
5
6
7
8
9
10
Very Likely
If you have other opinions regarding potential improvement to the website, please share them with us. We would appreciate your honest opinion.
Note: This is a free response section, so you can proceed without entering anything.
Note: Please be sure not to enter any kind of personal information into your response.
Note: Please be sure not to enter any kind of personal information into your response.
×
Thank You
×
Thank you for participating in our survey! Your answers will help us to improve the quality of our website and services.
We hope you continue to make use of Game8.
We hope you continue to make use of Game8.
Close
Rankings
- We could not find the message board you were looking for.
Gaming News


![Everwind Review [Early Access] | The Shaky First Step to A Very Long Journey](https://img.game8.co/4440226/ab079b1153298a042633dd1ef51e878e.png/thumb)

![Monster Hunter Stories 3 Review [First Impressions] | Simply Rejuvenating](https://img.game8.co/4438641/2a31b7702bd70e78ec8efd24661dacda.jpeg/thumb)
Popular Games

Genshin Impact Walkthrough & Guides Wiki
Honkai: Star Rail Walkthrough & Guides Wiki
Umamusume: Pretty Derby Walkthrough & Guides Wiki
Pokemon Pokopia Walkthrough & Guides Wiki
Resident Evil Requiem (RE9) Walkthrough & Guides Wiki
Monster Hunter Wilds Walkthrough & Guides Wiki
Wuthering Waves Walkthrough & Guides Wiki
Arknights: Endfield Walkthrough & Guides Wiki
Pokemon FireRed and LeafGreen (FRLG) Walkthrough & Guides Wiki
Pokemon TCG Pocket (PTCGP) Strategies & Guides Wiki


Recommended Games
Diablo 4: Vessel of Hatred Walkthrough & Guides Wiki
Fire Emblem Heroes (FEH) Walkthrough & Guides Wiki
Yu-Gi-Oh! Master Duel Walkthrough & Guides Wiki
Super Smash Bros. Ultimate Walkthrough & Guides Wiki
Pokemon Brilliant Diamond and Shining Pearl (BDSP) Walkthrough & Guides Wiki
Elden Ring Shadow of the Erdtree Walkthrough & Guides Wiki
Monster Hunter World Walkthrough & Guides Wiki
The Legend of Zelda: Tears of the Kingdom Walkthrough & Guides Wiki
Persona 3 Reload Walkthrough & Guides Wiki
Cyberpunk 2077: Ultimate Edition Walkthrough & Guides Wiki


All rights reserved
© SQUARE ENIX CO., LTD. All Rights Reserved.
CHARACTER DESIGN:TETSUYA NOMURA/ROBERTO FERRARI
The copyrights of videos of games used in our content and other intellectual property rights belong to the provider of the game.
The contents we provide on this site were created personally by members of the Game8 editorial department.
We refuse the right to reuse or repost content taken without our permission such as data or images to other sites.
Go and apply the Poison from Bio, alongside the additional Regen assistance to aid the DoT damage altogether. This will make it take a lot more damage per tick even more so when you put sleep on it.