How to Beat Three Person-Team vs. Monsters of Legend | Shinra Combat Simulator Guide
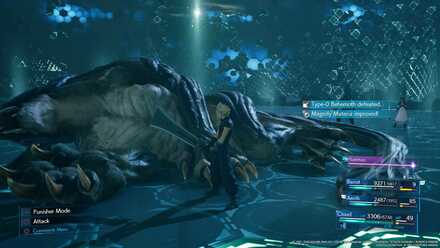
This is a guide to beating the Shinra Combat Simulator challenge Monsters of Legend in the game Final Fantasy 7 Remake. This article explains what enemies you will face, recommended equipment and materia, and tips and strategies for defeating them.
List of Contents
Monsters of Legend Basic Information
Enemies
| Battle Number | Enemy |
|---|---|
| Battle #1 | Bomb ×1 |
| Battle #2 | Tonberry ×1 |
| Battle #3 | Type-0 Behemoth ×1 |
| Battle #4 | Bomb ×1 Tonberry ×1 |
| Battle #5 | Malboro ×1 |
Rewards
| Rewards |
|---|
| Refocus Materia |
Best Characters for This Battle
Available Characters
 Cloud Cloud
|
 Barret Barret
|
 Tifa Tifa
|
 Aerith Aerith
|
It's possible to use any set of 2 characters in this battle, but we recommend using Cloud, Barret and Aerith.
Recommended Characters
 Cloud Cloud |
Role: Attacker Weapon: Hardedge Armor: Force Bracelet Accessory: Champion Belt or Survival Vest |
|---|---|
 Barret Barret |
Role: Tank & Support Weapon: Big Bertha Armor: Supreme Bracer Accessory: Survival Vest |
 Aerith Aerith
|
Role: Healer & Mage Weapon: Reinforced Staff Armor: Chain Bangle Accessory: Circlet |
Cloud as the Main Damage with Aerith and Barret as Support
Cloud will be doing the main chunk of damage with the other party members supporting him, making sure he deals the as much damage as possible. Barret can tank damage with his Lifesaver with Aerith making sure everyone is healed up.
Best Equipment for This Battle
Equipment
Cloud
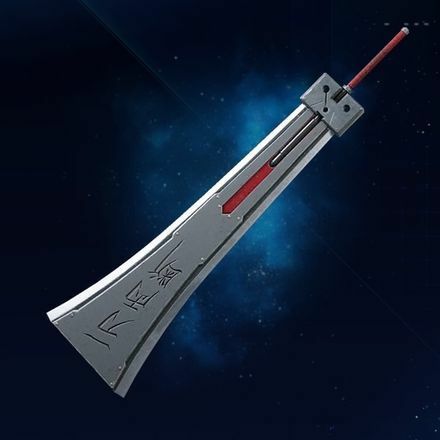
| Hardedge | Base | Fully Upgraded | ||
|---|---|---|---|---|
|
Attack | 57 | 137 | |
| Magic Attack | 19 | 46 | ||
| User | Cloud | |||
| Materia Slots (Fully Upgraded) |
○-○○ ○-○○-○○-○ |
|||
| Fully Upgraded Bonus Stats | ||||
| Defense | +0 | Magic Defense | +0 | |
| Max HP | +0 | Max MP | +0 | |
| Description | ||||
| A mighty blade able to cleave in one stroke anything foolish enough to stand in the wielder's way. | ||||
| Armor | ATK | MATK | DEF | MDEF | Slots |
|---|---|---|---|---|---|
|
|
0 | 0 | 9 | 9 | ○-○○-○ |
Barret
| Big Bertha | Base | Fully Upgraded | ||
|---|---|---|---|---|

|
Attack | 45 | 93 | |
| Magic Attack | 30 | 62 | ||
| User | Barret | |||
| Materia Slots (Fully Upgraded) |
○-○○ ○-○○-○○-○ |
|||
| Fully Upgraded Bonus Stats | ||||
| Defense | +0 | Magic Defense | +0 | |
| Max HP | +1250 | Max MP | +0 | |
| Description | ||||
| A firearm that boasts unrivaled destructive force. Found in the slums' black market. | ||||
| Armor | ATK | MATK | DEF | MDEF | Slots |
|---|---|---|---|---|---|
|
|
0 | 0 | 9 | 9 | ○-○○-○ |
Aerith
| Reinforced Staff | Base | Fully Upgraded | ||
|---|---|---|---|---|

|
Attack | 50 | 50 | |
| Magic Attack | 82 | 131 | ||
| User | Aerith | |||
| Materia Slots (Fully Upgraded) |
○-○○ ○-○○-○○-○ |
|||
| Fully Upgraded Bonus Stats | ||||
| Defense | +0 | Magic Defense | +13 | |
| Max HP | +300 | Max MP | +18 | |
| Description | ||||
| A solid and durable staff experimentally produced in Hojo's laboratory. | ||||
| Armor | ATK | MATK | DEF | MDEF | Slots |
|---|---|---|---|---|---|
|
|
0 | 0 | 50 | 50 | ○-○○-○ |
Materia
Cloud
| Weapon (6 Slots) | ||
|---|---|---|
| Armor (4 Slots) | ||
| Summon | ||
Barret
| Weapon (6 Slots) | ||
|---|---|---|
| Armor (4 Slots) | ||
| Summon | ||
Aerith
| Weapon (6 Slots) | ||
|---|---|---|
| Armor (4 Slots) | ||
| Summon | ||
Monsters of Legend Battle Guide
Battle #1

| Enemies |
|---|
| Bomb ×1 |
Fire Combined with Elemental Makes the Fight Easier

If you have a Fire materia combined with Elemental Lv.2 in your armor slots, you will become resistant to all fire attacks. This will allow you to get up close and deal damage without worrying about Bomb's attacks. Make sure to save your ATB to do your high damaging abilities when it does an attack to stagger it more easily.
Battle #2

| Enemies |
|---|
| Tonberry ×1 |
Subversion Combined with Warding to Counter Insta-Death

Tonberry has 3 insta-death moves, Subversion combined with Warding Lv.3 will make those moves useless against the character equipped. Just having one on Aerith will make sure that there is someone always ready to cast Raise.
Revive on Each Party Member is a Must

Thonberry has multiple insta-kill moves. This can put you into situations where at least of your party members will be downed. It is important to have revive on each member to make sure at least one can cast Raise before everyone is taken out.
Battle #3

| Enemies |
|---|
| Type-0 Behemoth ×1 |
Cripple the Lower and Upper Body

It is best to try to focus on its Lower and Upper body. After you cripple both of them, the Type-0 Behemoth will go into stagger, this is the moment to strike with your hard hitting moves!
Cast Barrier for Type-0 Behemoth Physical Attacks
Having Barrier cast on your party will let you reduce a lot of the incoming damage in this fight as Type-0 Behemoth move set is mostly physical attacks.
Break It's Horns After Staggering

With its horns still intact, casting offensive spells will be me with Counter Flare. Its horns are also invlunlerable when not staggered. Focus on the horns after staggering and if you get to break it, you will be able cast spells against the Behemoth for the rest of the battle!
Battle #4

| Enemies |
|---|
| Bomb ×1 Thonberry ×1 |
Focus the Bomb then Thonberry

The Thonberry is slow to move and will generally not use its long range attacks if ignored. Use this to your advantage by quickly taking out the Bomb to focus on the Thonberry next!
Battle #5

| Enemies |
|---|
| Malboro ×1 |
Keep Cloud Behind Malboro

Malboro is slow and can only attack from its front. When it uses Bad Breath, get Cloud or whoever melee attacker you have behing it and attack from there. Make sure to get your ranged attackers to cast spells on its mouth to help stagger it!
Having Cleansing Materia Lv.2 is Recommended
Malboro's Bad Breath attack can apply multiple status effects. Esuna can get rid of all those status effects with just one cast!
How to Beat Malboro | Boss Guide
Combat Simulator Related Articles
| ★3 Battle Challenges |
|---|
| Three-Person Team vs. Mayor is Best |
| ★4 Battle Challenges |
| Vs. SOLDIER Trainees |
| Two-Person Team vs. High Flyers |
| Three-Person Team vs. Team Ragbag |
| ★5 Battle Challenges |
| Vs. 3-C SOLDIER Candidates |
| Two-Person Team vs. Dynamic Duos |
| ★6 Battle Challenges |
| Three-Person Team vs. Monsters of Legend |
| ★7 Battle Challenges |
| Three-Person Team Vs. Top Secrets |
Comment
Maybe you need to check your facts, the "Moogle Circlet" (actually called Moogle's Amulet) increases item drop rates. I imagine you're thinking of the Healing Carcanet, which increases the effectiveness of healing spells. They have recommended the Circlet because it's boost to magic power also increases healing potency, not sure you knew that either, and also provides 10% extra MP which is vital for these hard mode challenges.
Author
How to Beat Three Person-Team vs. Monsters of Legend | Shinra Combat Simulator Guide
improvement survey
03/2026
improving Game8's site?

Your answers will help us to improve our website.
Note: Please be sure not to enter any kind of personal information into your response.

We hope you continue to make use of Game8.
Rankings
- We could not find the message board you were looking for.
Gaming News
Popular Games

Genshin Impact Walkthrough & Guides Wiki

Honkai: Star Rail Walkthrough & Guides Wiki

Umamusume: Pretty Derby Walkthrough & Guides Wiki

Pokemon Pokopia Walkthrough & Guides Wiki

Resident Evil Requiem (RE9) Walkthrough & Guides Wiki

Monster Hunter Wilds Walkthrough & Guides Wiki

Wuthering Waves Walkthrough & Guides Wiki

Arknights: Endfield Walkthrough & Guides Wiki

Pokemon FireRed and LeafGreen (FRLG) Walkthrough & Guides Wiki

Pokemon TCG Pocket (PTCGP) Strategies & Guides Wiki
Recommended Games

Fire Emblem Heroes (FEH) Walkthrough & Guides Wiki

Diablo 4: Vessel of Hatred Walkthrough & Guides Wiki

Yu-Gi-Oh! Master Duel Walkthrough & Guides Wiki

Super Smash Bros. Ultimate Walkthrough & Guides Wiki

Pokemon Brilliant Diamond and Shining Pearl (BDSP) Walkthrough & Guides Wiki

Elden Ring Shadow of the Erdtree Walkthrough & Guides Wiki

Monster Hunter World Walkthrough & Guides Wiki

The Legend of Zelda: Tears of the Kingdom Walkthrough & Guides Wiki

Persona 3 Reload Walkthrough & Guides Wiki

Cyberpunk 2077: Ultimate Edition Walkthrough & Guides Wiki
All rights reserved
© SQUARE ENIX CO., LTD. All Rights Reserved.
CHARACTER DESIGN:TETSUYA NOMURA/ROBERTO FERRARI
The copyrights of videos of games used in our content and other intellectual property rights belong to the provider of the game.
The contents we provide on this site were created personally by members of the Game8 editorial department.
We refuse the right to reuse or repost content taken without our permission such as data or images to other sites.


![Slay the Spire 2 Review [Early Access] | Still the Deckbuilder to Beat](https://img.game8.co/4433115/44e19e1fb0b4755466b9e516ec7ffb1e.png/thumb)

![Resident Evil Village Review [Switch 2] | Almost Flawless Port](https://img.game8.co/4432790/e1859f64830960ce4248d898f8cd38d9.jpeg/thumb)


I was confused when I read this. I think that this website needs a ginormous update. Every page has lots of problems. I get that they probably had to spend hours of their free time working on this but that does not mean that they should just type information that is not helpful. Just yesterday I looked up Bahumat tips and it said to use a team without Baret and then they tell you tips about using Baret for that fight. It also had lots of grammar mistakes, false information, ETC.