Best Party Builds and Team Compositions
☆ 100% Walkthrough Guide
★ Best Vocations | Best Party | Best Characters
☆ Find all Mini Medals and Tablet Fragments!
★ Farm Guides: EXP | Gold | Vocation Prof.
☆ List of Missables and Cut Content
★ Post-Game Guide

These are the best party builds and team compositions in Dragon Quest 7 Reimagined (DQ7). Learn about the best vocation builds and party compositions here!
List of Contents
Best Party Compositions
Best Early Game Team Composition
| Party Member | Primary Vocation | Secondary Vocation |
|---|---|---|
| 1st |
 Warrior Warrior
|
|
| 2nd |
 Mage Mage
|
|
| 3rd |
 Jester Jester
|
|
| 4th |
 Priest Priest
|
While you will eventually have to branch out and master other Beginner Vocations in order to unlock Intermediate and Advanced vocations, this set-up allows you to easily reach your most needed Vocations quickly.
When one party member has mastered one Vocation, you can simply rotate them to a different position so they can master other vocations while maintaining synergy with the party.
| Attack Strategy | Support Strategy |
Attack Strategy
The Warrior-Martial Artist covers a pure physical offense role, and will eventually lay down the path towards Gladiator. The skill set covered by both vocations gives more physical attack power with buffs that boost their own offense stats.
Mage will act as your magic offense role. If you wish to follow the path of the Sage, you can support the Mage's kit with Priest to aid with healing proficiency.
However, if you want to balance your physical and magic skills and attributes, you should pair the Mage with Warrior—which are both needed for the Armament vocation later on.
Support Strategy
The Jester is a versatile support in which it can fulfill multiple roles in the party depending on its secondary vocation. If you want to have more offense support, have a Thief secondary to inflict status effects on the enemy—making enemies easier to defeat especially with the Jester's debuffs.
If you want to focus more on buffing your own party, Jester can be paired with Dancer or Troubadour, which will fulfill the requirements for a Luminary vocation.
Meanwhile, the Priest will serve as your healer. At 8★, they will even be able to use Grace of the Goddess to resurrect fallen party members.
If you want to have a second magic attacker, go with Mage. However, if you want to strengthen the Priest's kit with more physical skills, you can go for Martial Artist, which are the requirements for the Paladin vocation.
Best Mid Game Team Composition
| Party Member | Primary Vocation | Secondary Vocation |
|---|---|---|
| 1st |
 Gladiator Gladiator
|
|
| 2nd |
 Paladin Paladin
|
|
| 3rd |
 Luminary Luminary
|
|
| 4th |
 Sage Sage
|
The Gladiator carries the offensive power of this team, while the Paladin, Luminary, and Sage will act as valuable support.
| Attack Strategy | Support Strategy |
Attack Strategy
The Gladiator's Let Loose, Flashback, guarantees incredible damage, especially paired with Warrior's A Cut Above that can deal multiple strikes on a single enemy. However, it also sacrifices its user's defense and places them in a vulnerable position if attacked.
Support Strategy
To cover this weakness, use the Paladin's skill Forbearance, to soak up all incoming attacks. This skill is best paired with the Paladin's perk, Knight Watch, which greatly reduces the damage taken by the user. You can also capitalize on Paladin's defensive abilities by making its secondary the Troubadour, which offers excellent magic defense coverage including Divine Intervention—a skill that lowers the enemy's magic resistance, making spells hit harder.
With the help of the Luminary's Showtime!, it'll be much easier to get your party members worked up so they can Let Loose. With Armamentalist, it can also serve as your magic attacker with strong AoE magic skills.
The Sage will heal your team and also provide magic support when needed. With Mage, you can further buff magic skills using Channel Anger, and reduce defenses using Sap and Kasap.
Best Late Game Composition
| Party Member | Primary Vocation | Secondary Vocation |
|---|---|---|
| 1st |
 Champion Champion
|
|
| 2nd |
 Champion Champion
|
|
| 3rd |
 Jester Jester
|
|
| 4th |
 Sage Sage
|
In this team, the two Champions should serve as your attackers. To cover a wider range of skills, you should consider making one Champion's secondary a Hero, while the other Champion is a Paladin.
| Attack Strategy | Support Strategy |
Attack Strategy
As a Hero Secondary, your Champion will have access to more offensive skills including Sword Dance, which can act as your burst when paired with your Let Loose, Divide. Divide is considered the strongest Let Loose in the game as it can raise the damage of your attacks by 3 times the manpower.
Of course, the Champion's kit by itself is notably also well-equipped with its own set of powerful physical skills by itself such as Multifists, which can serve as an alternate to Sword Dance if you wish to have a different secondary vocation. In this case, you can opt to have Paladin as a secondary
Support Strategy
The Sage-Druid will be both your healer and magic attacker. Druids have Omniheal, a skill unlocked at 7★, that can restore all HP to all party members. Since this skill unlocks later into the vocation, you should opt to have your secondary be a vocation that grants early healing skills such as the Sage. Both vocations also offer a wide variety of elemental skills and can serve as your magical offense.
Jester and Luminary have great buff and debuff capabilities, making them your primary support in this team. The Jester's Anti-Status skills like Sobering Slap and Joke's on You can clear status ailments in your party, and Luminary's Pass the Torch can be used to give up their turn to another attacker when you have finished applying all your buffs and debuffs.
Seed Farming Party Composition
| Party Member | Required Primary Vocation |
|---|---|
 Hero Hero
|
 Sage Sage
|
 Maribel Maribel
|
|
 Sir Mervyn Sir Mervyn
| |
 Aishe Aishe
|
This party setup is specifically optimized for farming Super Stat Seeds from The Almighty and the Four Spirits in Yet Another World, which becomes accessible in the post-game.
All four members must have Sage as their primary vocation to access Magic Burst and be at least Level 90-99 to have maximum MP stats since Magic Burst consumes all remaining MP to deal damage based on the amount spent.
Recommended Equipment and Explanation
| Equipment | Details |
|---|---|
|
|
・Increase MP by 30 ・Boosts Magic Burst damage output. |
|
|
・Increases Agility by 100 ・Helps ensure you act before the boss (aim for 550+ Agility) |
|
|
・Guarantees the wearer attacks first. ・Best equipped on Sir Mervyn due to lower base Agility. |
|
|
・HP is halved but damage dealt is increased by 20%. ・Significantly boosts Magic Burst damage |
While weapons and equipment can be adjusted, accessories are the real priority for this build.
If your damage feels slightly short of a one-turn clear, consider stacking additional MP through equipment like Canny Cap, Water Amulet, or Pink Pearl. Speed is just as important as damage, so make sure your Agility thresholds are met.
Seed Farming Strategy
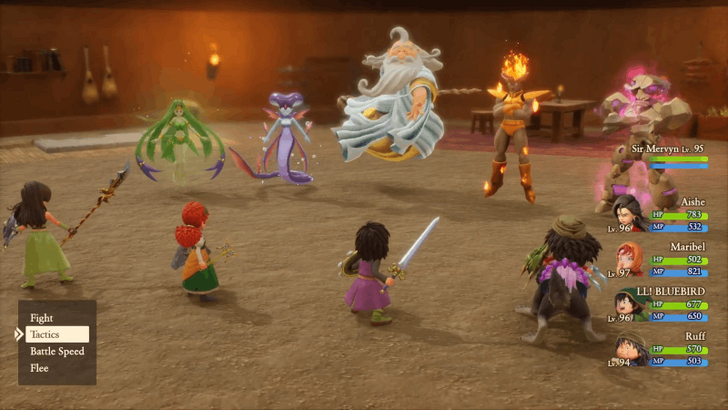
First things first, toggle the game to the easiest difficulty, this ensures three properly optimized Magic Bursts have more chance to defeat The Almighty in a single turn.
The strategy revolves entirely around an OTK (One Turn Kill). Enter the battle at full MP and immediately have three to four party members cast Magic Burst. Because the skill scales directly with remaining MP, maximizing MP and acting first ensures the highest possible burst damage before the boss can respond.
If your damage falls slightly short, adjust MP-boosting gear or ensure that all party members act before the boss by reaching at least 550 Agility.
How to Beat The Almighty and The Spirits
Best Vocation Builds
Attacker Build
| Primary Vocation | Secondary Vocation |
|---|---|
 Champion Champion
|
The Champion's perk, Divide, is the strongest Let Loose in the game. When paired with the Hero's Sword Dance, it creates a powerful burst that deals massive damage towards multiple enemies.
The Champion's Multi-Fist, which can do multiple strikes, pairs just as well with Divide, which means you can opt for a different secondary vocation. If you wish to focus on being a Magic Attacker, consider having Paladin as a secondary to boost your defenses.
While it's less optimal since some bosses are immune to status effects, having the Thief as a second vocation will allow you to use Victimser or Persecutter, which can slice through status-inflicted enemies 6 times.
Magic Build
| Primary Vocation | Secondary Vocation |
|---|---|
 Sage Sage
|
Just like the Champion, the Sage has a chance to deal massive elemental damage with its Let Loose, and they can even act as a supportive healer when needed as well.
Druid has a strong set of magical offense skills, alongside Omniheal, which is essential in the late game for its full party healing capabilities. This makes it a good secondary to Sage.
You could also have Mage as a secondary as Mage's Channel Anger could be fatal when paired with Sage's Let Loose. Having both buffs at the same time, and having a different member apply Elfin Elixers, the user could cause tremendous damage towards their opponent.
Support Build
| Primary Vocation | Secondary Vocation |
|---|---|
 Luminary Luminary
|
Luminary's Let Loose increases the odds of your other party members getting worked up. This, alongside being the only vocation besides Armamentalist that can use Oomph to raise the attack of a single party member, is the reason why Luminary is the one of the best vocations for supporter roles.
If you wish to have a pure supporter role, you can use Mage as a secondary to gain access to Sap and Kasap, which can significantly reduce the defenses of enemies.
If you wish to focus on magical support, have Troubadour as a secondary to be able to use Divine Intervention and decrease the enemy's resistance to magic. This makes your spells land with heavier damage.
After using your buffs and debuffs, use Luminary's Pass the Torch to give your turn to the main attacker. Although, keep in mind that this strategy is not optimal for fights with turn timers like the Arena.
Balanced Build
| Primary Vocation | Secondary Vocation |
|---|---|
 Jester Jester
|
The Jester is a good Anti-Status vocation since it has skills like Sobering Slap and Joke's on You that can clear status effects from your party, and in the case of the latter, transfer them to the opponent. Its perk, Play the Fool, makes it harder for opponents to hit you, and can even cause them to fall into fits of laughter.
Because of its array of useful buffs and debuffs, the Jester can fill in almost any missing role in the team if needed depending on its secondary.
If paired with Paladin, you can take advantage of Forbearance to have enemies target you while your Let Loose is active. With Mage or Troubadour, you can expand Jester's skill arsenal with more debuffs like Sap and Divine Intervention.
With a Luminary secondary, you can focus solely on supporting your team, and can get access to Pass the Torch to give your turn to someone more useful. And if you want to be both a powerful spell caster and a healer, Druid gives you access to a wider spread of offense attacks alongside Omniheal to keep your party members at high HP.
Back-Up Build
| Either Primary or Secondary Vocation |
|---|
 Paladin Paladin
|
While most of the time you won't need all 5 members of your party, you should consider making your back-up party member use Paladin as one of their vocations.
The times where you will be needing your back-up party member are likely to be emergency scenarios where one or more of your party members are down. Making them a Paladin grants them access to Kerplunk, which will resurrect all your party members with full HP at the cost of the caster's life.
Dragon Quest 7 Reimagined (DQ7) Related Guides

Dragon Quest 7 Reimagined Wiki Front
Recommended Guides
Comment
Author
Best Party Builds and Team Compositions
Rankings
- We could not find the message board you were looking for.
Gaming News
Popular Games

Genshin Impact Walkthrough & Guides Wiki

Umamusume: Pretty Derby Walkthrough & Guides Wiki

Crimson Desert Walkthrough & Guides Wiki

Monster Hunter Stories 3: Twisted Reflection Walkthrough & Guides Wiki

Honkai: Star Rail Walkthrough & Guides Wiki

Pokemon Pokopia Walkthrough & Guides Wiki

The Seven Deadly Sins: Origin Walkthrough & Guides Wiki

Wuthering Waves Walkthrough & Guides Wiki

Zenless Zone Zero Walkthrough & Guides Wiki

Arknights: Endfield Walkthrough & Guides Wiki
Recommended Games

Fire Emblem Heroes (FEH) Walkthrough & Guides Wiki

Diablo 4: Vessel of Hatred Walkthrough & Guides Wiki

Cyberpunk 2077: Ultimate Edition Walkthrough & Guides Wiki

Yu-Gi-Oh! Master Duel Walkthrough & Guides Wiki

Super Smash Bros. Ultimate Walkthrough & Guides Wiki

Pokemon Brilliant Diamond and Shining Pearl (BDSP) Walkthrough & Guides Wiki

Elden Ring Shadow of the Erdtree Walkthrough & Guides Wiki

Monster Hunter World Walkthrough & Guides Wiki

The Legend of Zelda: Tears of the Kingdom Walkthrough & Guides Wiki

Persona 3 Reload Walkthrough & Guides Wiki
All rights reserved
© ARMOR PROJECT/BIRD STUDIO/SQUARE ENIX
© SUGIYAMA KOBO ℗ SUGIYAMA KOBO
The copyrights of videos of games used in our content and other intellectual property rights belong to the provider of the game.
The contents we provide on this site were created personally by members of the Game8 editorial department.
We refuse the right to reuse or repost content taken without our permission such as data or images to other sites.
 All Mini Medal Locations
 All Sparkly Spot Locations
 Best Vocations Tier List
 Best Characters Tier List
 Best Vocations For Each Character
 Best Starting Vocations
 Best Monster Hearts
 Best Weapons and Equipment
 Best Skills Tier List
 EXP Farming Guide
 Money Farming Guide
 Vocational Proficiency Farming Guide
 Seed Farming Guide
 Trophy Guide and Achievements List
 List of Missables
 All Cut Content
 Lucky Panel Guide
 List of All DLCs
 List of All Keys
 Post Game Guide
 Allblades Arena Guide
 Is There New Game Plus?


![Death Stranding 2: On The Beach Review [PC] | A Port That Delivers](https://img.game8.co/4447392/15310a0c9aa1b6843bb713b2ea216930.jpeg/thumb)


