Best Vocations Tier List
☆ 100% Walkthrough Guide
★ Best Vocations | Best Party | Best Characters
☆ Find all Mini Medals and Tablet Fragments!
★ Farm Guides: EXP | Gold | Vocation Prof.
☆ List of Missables and Cut Content
★ Post-Game Guide
This is a tier list of the best vocations in Dragon Quest 7 Reimagined (DQ7). Learn which job classes are the best in the game here!
| All Vocation Guides | |||||
|---|---|---|---|---|---|
| All 26 Vocations | Best Starting Vocations | Best Vocations Tier List | |||
| Best Vocations Per Character | Moonlighting Guide | ||||
List of Contents
Best Vocations Tier List
| Tier | Character |
|---|---|
※ Had something else in mind? Check out our Tier List Maker below and share your list in the comments!
Tier List Criteria
| Tier | Criteria |
|---|---|
| Top-tier vocations with high damage, versatile skills, and strong utility. Can carry difficult fights solo or in parties, and their abilities remain valuable throughout the game. | |
| Reliable vocations that excel with some investment or setup. Offer good offensive or supportive skills, flexible in most encounters, but slightly less consistent than S tier. | |
| Solid vocations that shine in specific situations or party compositions. Contribute effectively but may need stronger allies to reach their full potential. | |
| All starting vocations with limited impact or specialized utility. Usable early on, but generally outclassed later. |
Best Vocations Ranking Explained
S Tier
| Vocation | Explanation |
|---|---|
 Champion Champion
|
・Top-tier advanced vocation with insane physical output. ・Can solo tough fights thanks to high multihit damage and counter mechanics. ・Excellent late-game carry, especially with Divide. |
 Hero Hero
|
・Ultimate versatility and strong self-sufficiency. ・Access to unique Hero-only abilities that turn the tide of battle. ・Shines in both offense and utility. |
 Druid Druid
|
・Summons strong spirits each turn with That Special Summon let loose ability, providing consistent extra damage and support. ・Excellent for both solo and party play with amazing skillset. ・Advanced vocation that scales extremely well into endgame. |
 Sage Sage
|
・High magic damage with spell echoes thanks to the Let Loose ability, allowing multi-target devastation. ・Can heal and attack simultaneously. ・Strong mid-to-late game presence. |
 Paladin Paladin
|
・Tough tank with defensive buffs and strong heals. ・Can withstand endgame bosses while supporting party. ・Great hybrid between Attack and Defence. |
 Gladiator Gladiator
|
・Can deal massive damage by sacrificing defense. ・Excellent for solo and late-game dominance if managed carefully. ・A high-risk, but really high-reward physical attacker. |
These vocations are the cream of the crop, they excel in almost every scenario. Whether it’s raw damage, multi-target attacks, healing, or buffs, these classes can carry fights solo or synergize perfectly with other top-tier units.
Heroes and Champions shine because of unique abilities and extreme versatility, while support-heavy S tier vocations like Sage and Paladin provide massive value without needing much setup.
A Tier
| Vocation | Explanation |
|---|---|
 Armamentalist Armamentalist
|
・Excellent elemental coverage and attack power. ・Can handle both physical and magical roles. ・Strong mid-to-late game performer. |
 Pirate Pirate
|
・Powerful AoE physical attacker with excellent mob-clearing potential. ・Deck the Swabs Let Loose grants attack and defence buffs plus HP recovery, greatly boosting performance in longer fights. ・Versatile in party setups. |
 Warrior Warrior
|
・Reliable frontliner with strong physical attacks. ・Good early-to-late game consistency. ・Can survive without being glued to a healer. |
 Martial Artist Martial Artist
|
・High crit potential and fast attacks. ・Self-sufficient but slightly vulnerable to magic attacks. ・Excellent for auto-attack battles. |
 Luminary Luminary
|
・Boosts allies’ stats and deals moderate damage. ・Skills like Pass the Torch and Hustle Dance dramatically amplify your best damage dealers. ・Value depends on party strength. |
 Mage Mage
|
・High magic damage, critical spells. ・Can solo weaker fights but relies on MP management. ・Has low phystical damage and no further use once MP drains. |
 Priest Priest
|
・Powerful healer and support with AoE revival, thanks to Born Again. ・Good healing capabilities and buff utility. ・Can keep party alive, but becomes less necessary when party's HP and MP are at max. |
 Monster Wrangler Monster Wrangler
|
・Summon-focused vocation that provides inconsistent but potentially high damage. ・Let Loose ability greatly improves summon reliability, making it viable into late game. ・Needs some support for optimal efficiency but solid in most encounters. |
A Tier vocations are reliable and flexible, but often require a bit of strategy or party support to reach their full potential. They bring strong physical or magical attacks, useful buffs, and occasional multi-target abilities.
Pirate, Warrior, and Martial Artist are solid choices for damage, while Luminary, Mage, Priest, and Monster Wrangler add utility or summoning power that’s strong but sometimes conditional.
B Tier
| Vocation | Explanation |
|---|---|
 Dancer Dancer
|
・Strong support vocation passing positive status effects. ・Cannot carry fights alone. ・Best used to boost other frontline vocations and then swap slots with another after buffs. |
 Thief Thief
|
・Thief is support-heavy and situational, its output is amazing in combos, but outside of that, damage can be low or inconsistent. ・Supportive but frail in direct combat. ・Needs a strong team to reach its potential. |
 Troubadour Troubadour
|
・Party-wide buffs and MP cost reduction with Encore. ・Low damage output, needs strong frontliners. ・Optimal as a swap palette in long fights for sustainability. |
 Sailor Sailor
|
・Stat buffs and moderate attacks. ・Support-heavy, struggles solo. ・Kamikaze gives great damage, but a one-off skill. |
 Shepherd Shepherd
|
・Can use Wooly Bully to summon sheep for added attacks. ・Supportive, but very low direct damage. ・Not enough raw damage or versatility to push it into A Tier. |
 Jester Jester
|
・Debuffs enemies but not really ideal in every battle. ・Low direct damage and frail in combat, so best used in combination with strong frontline vocations. ・Cannot survive alone. |
B Tier vocations are situational or support-heavy. They shine in the right party composition or against specific enemy types, but they usually struggle alone or lack consistent damage.
Dancer, Thief, and Troubadour boost allies and manipulate fights, while Sailor, Shepherd, and Jester provide interesting effects but limited raw output. These vocations are best used strategically, rather than as all-purpose carries.
C Tier
| Vocation | Explanation |
|---|---|
 Fledgling Fisherman Fledgling Fisherman
|
・Hero's starting vocation, weak combat stats. ・Mostly utility-based attacks and minor heals. ・Has early healing, party-wide protection, and high survivability through Ocean’s Devotion and Lifeboat.. |
 Mini Mayoress Mini Mayoress
|
・Maribel's starting vocation, has elemental attacks and minor buffs, but has high MP Growth. ・Falls off though without MP. ・Let loose ability only shows weakness of enemies but not really useful. |
 Heir Apparent Heir Apparent
|
・Kiefer's starting vocation, has moderate physical damage with some crit potential. ・Has the shortest MP bar. ・Lacks support skills and becomes vulnerable when Royal Flush lowers defense. |
 Wolf Boy Wolf Boy
|
・Ruff's starting vocation, focuses on multi-action and minor physical damage. ・Risky for stable early-game progress. ・Powerful but inconsistent and the Let Loose ability can swing fights or backfire. |
 Destiny's Dancer Destiny's Dancer
|
・Similar to Dancer, provides buffs and status passing. ・Not effective solo. ・Good support, but exclusive to Aishe. |
 Chevalier Chevalier
|
・Starting tank/physical attacker vocation by Sir Mervyn. ・Cannot compete with advanced/intermediate vocations late-game. ・Serves as a stepping stone for future vocation. |
C Tier vocations are starter classes that often fade as the game progresses. Their damage output, utility, or survivability is outclassed by advanced or intermediate vocations, though some like Wolf Boy or Fledgling Fisherman can occasionally surprise in early-game fights.
Dragon Quest 7 Reimagined Tier List Maker
Create Your Own Vocation Tier List!
How to Use the Tier List Maker
| # | Step-by-Step Guide |
|---|---|
| 1 |
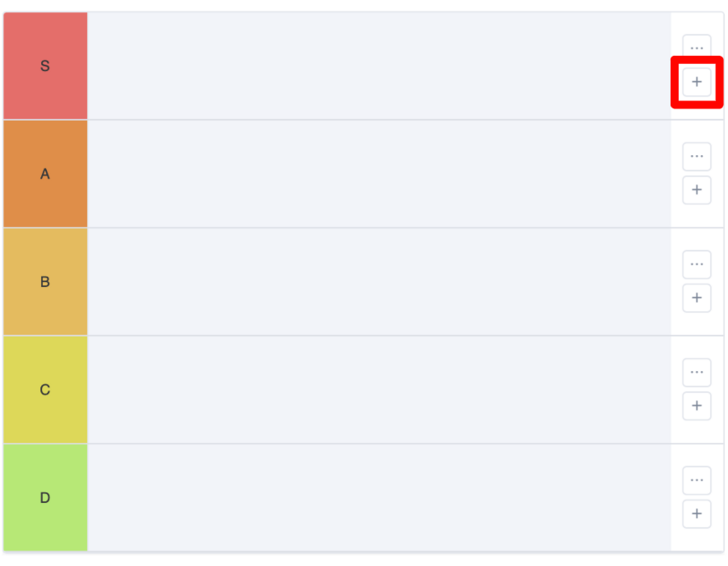 Click the Plus Button on the Right Side To begin creating your Tier List, click the plus button, which you can find at the rightmost corner of each tier. |
| 2 |
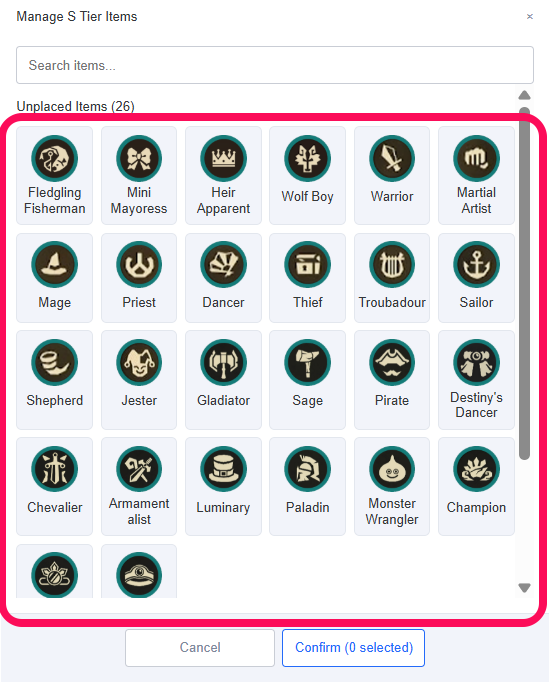 Select the Character in Each Tier Afterwards, select the Character that correspond to each tier in your list. |
| 3 |
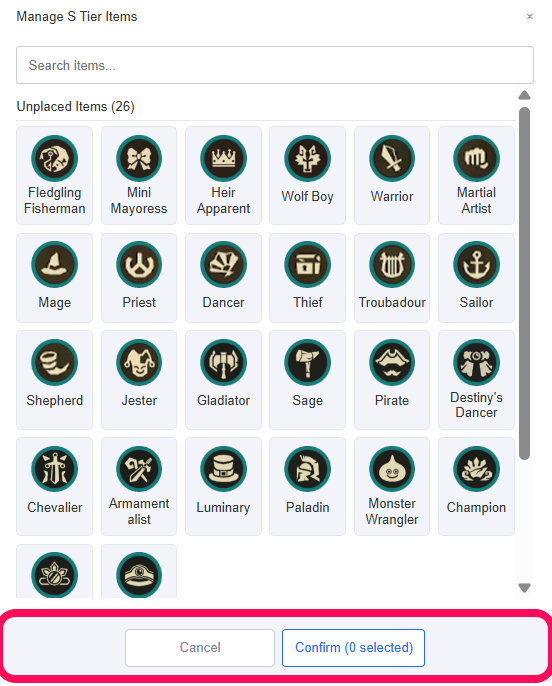 Confirm Your Choices Your selected Character will then appear below. Once you're done selecting your Character, select confirm. |
| 4 |
 Save Image or Share in the Comments Once you're satisfied with your list, you can download the image by selecting Generate Image or share it with other users by posting it in the comments! |
Here is a guide on how to use the Tier List Maker. Let us know in the comments who you think is the best character deserving to get that S Tier in Dragon Quest 7 Reimagined (DQ7)!
Dragon Quest 7 Reimagined (DQ7) Related Guides

Dragon Quest 7 Reimagined Wiki Front
Recommended Guides
| Location Guides | |
|---|---|
 All Mini Medal Locations All Mini Medal Locations |
 All Sparkly Spot Locations All Sparkly Spot Locations |
| Tier Lists | |
| Best Vocations Tier List |
 Best Characters Tier List Best Characters Tier List |
| Best Guides | |
 Best Vocations For Each Character Best Vocations For Each Character |
 Best Party Builds Best Party Builds |
 Best Starting Vocations Best Starting Vocations |
 Best Monster Hearts Best Monster Hearts |
 Best Weapons and Equipment Best Weapons and Equipment |
 Best Skills Tier List Best Skills Tier List |
| Farming Guides | |
 EXP Farming Guide EXP Farming Guide |
 Money Farming Guide Money Farming Guide |
 Vocational Proficiency Farming Guide Vocational Proficiency Farming Guide |
 Seed Farming Guide Seed Farming Guide |
| Recommended Guides | |
 Trophy Guide and Achievements List Trophy Guide and Achievements List |
 List of Missables List of Missables |
 All Cut Content All Cut Content |
 Lucky Panel Guide Lucky Panel Guide |
 List of All DLCs List of All DLCs |
 List of All Keys List of All Keys |
 Post Game Guide Post Game Guide
|
 Allblades Arena Guide Allblades Arena Guide
|
 Is There New Game Plus? Is There New Game Plus?
|
- |
Author
Best Vocations Tier List
Rankings
- We could not find the message board you were looking for.
Gaming News

![Death Stranding 2: On The Beach [PC] Review | A Port That Delivers](https://img.game8.co/4447392/15310a0c9aa1b6843bb713b2ea216930.jpeg/show)


Popular Games

Genshin Impact Walkthrough & Guides Wiki
Umamusume: Pretty Derby Walkthrough & Guides Wiki
Crimson Desert Walkthrough & Guides Wiki
Monster Hunter Stories 3: Twisted Reflection Walkthrough & Guides Wiki
Honkai: Star Rail Walkthrough & Guides Wiki
Pokemon Pokopia Walkthrough & Guides Wiki
The Seven Deadly Sins: Origin Walkthrough & Guides Wiki
Wuthering Waves Walkthrough & Guides Wiki
Zenless Zone Zero Walkthrough & Guides Wiki
Arknights: Endfield Walkthrough & Guides Wiki


Recommended Games
Fire Emblem Heroes (FEH) Walkthrough & Guides Wiki
Diablo 4: Vessel of Hatred Walkthrough & Guides Wiki
Cyberpunk 2077: Ultimate Edition Walkthrough & Guides Wiki
Yu-Gi-Oh! Master Duel Walkthrough & Guides Wiki
Super Smash Bros. Ultimate Walkthrough & Guides Wiki
Pokemon Brilliant Diamond and Shining Pearl (BDSP) Walkthrough & Guides Wiki
Elden Ring Shadow of the Erdtree Walkthrough & Guides Wiki
Monster Hunter World Walkthrough & Guides Wiki
The Legend of Zelda: Tears of the Kingdom Walkthrough & Guides Wiki
Persona 3 Reload Walkthrough & Guides Wiki


All rights reserved
© ARMOR PROJECT/BIRD STUDIO/SQUARE ENIX
© SUGIYAMA KOBO ℗ SUGIYAMA KOBO
The copyrights of videos of games used in our content and other intellectual property rights belong to the provider of the game.
The contents we provide on this site were created personally by members of the Game8 editorial department.
We refuse the right to reuse or repost content taken without our permission such as data or images to other sites.
Mirabel’s starting let loose ability actually GIVES monsters elemental weaknesses if you pay attention to the thumbs up symbol. Paired with the Archer Heart which gives +20% damage when you exploit this it’s excellent.