Conditions Guide: All Positive and Negative Effects
Conditions in Umamusume: Pretty Derby will affect your character's training outcomes. Get to know how conditions work and how to manage them with this guide!
List of Contents
List of All Conditions
Good Conditions (Orange)
| Name | Effect | How to Get |
|---|---|---|
| Charming ◯ | Raises Friendship Bond gain by 2. | • Random Trainee and Support Card events (ex. Sweep Tosho, Nishino Flower) • Fourth dialogue choice in Accupuncturist event. |
| Fast Learner | Reduces the cost of skills by 10%. | • Random Trainee and Support Card events |
| Hot Topic | Raises Friendship Bond gain for Director Akikawa and Reporter Etsuko Otonashi by 2. | • Random Trainee and Support Card events (ex. Daitaku Helios) |
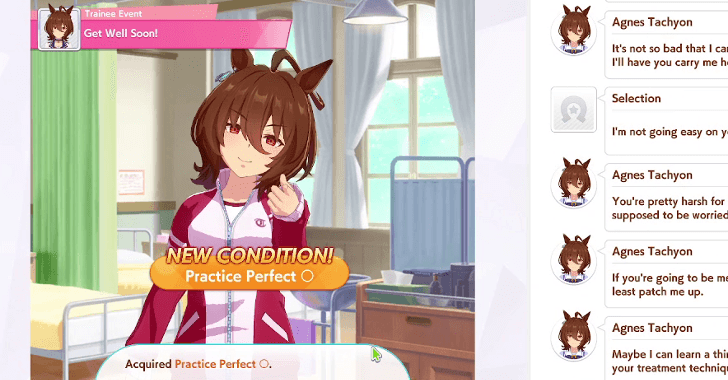
| Practice Perfect ◯ | Lowers chance of training failure by 2%. |
• Random Trainee and Support Card events • Possible outcome from yellow dialogue (bottom) choice after training failure |
| Practice Perfect ◎ | Lowers chance of training failure by 4%. | • Only obtainable in Narita Taishin's career after winning the Nikkei Sho. |
| Shining Brightly | Lowers chance of training failure by 5%. | • Only obtainable in Super Creek's Career, after succeeding the Kikuka Sho race. |
Bad Conditions (Blue)
| Name | Effect | How to Get |
|---|---|---|
| Migraine | Mood cannot be increased (except when using Alarm Clocks to retry races) | • Possible effect in random Trainee Event Migraine Blues. |
| Night Owl | Character may lose energy. | • Possible effect from the random Sleep Deprived Trainee Event after doing Rest. |
| Practice Poor | Increases chance of training failure by 2% | • Can be gained randomly from Training Failure Trainee Event. |
| Skin Outbreak | Character's mood may decrease by one stage. | • Small chance of getting it after doing three races in a row. |
| Slacker | Character may not show up for training. | • Effect from a random Trainee Event |
| Slow Metabolism | Character cannot gain Speed from speed training. | • Possible effect of specific Trainee Events about deciding to eat lots of food (usually bottom option) (ex. Bakushin?! Class?!) You can refer to Event Choice Checker for events. |
| Under the Weather | Increases chance of training failure by 5%. | • Only obtainable in Super Creek's Career. Cannot be removed until Super Creek places, at least third place, in her Kikuka Sho Goal race. |
| Not Ready | Chance of -5 Energy for every race. | • Only obtainable in Meisho Doto (Turbulent Blue)'s Career. Cannot be removed until Meisho Doto completes her 3rd career goal of meeting the 15,000 Fan count. |
Condition Details
| Condition Details | |
|---|---|
| Good (Orange) | Bad (Blue) |
| Charming ◯ | Migraine |
| Fast Learner | Night Owl |
| Hot Topic | Practice Poor |
| Practice Perfect ◯ | Skin Outbreak |
| Practice Perfect ◎ | Slacker |
| Shining Brightly | Slow Metabolism |
| - | Under the Weather |
How to Get Charming ◯
| All Characters | |
|---|---|
|
・Small chance to obtain during Training or racing ・Bottom choice in Accupuncturist event |
|
| Trainee-Specific Events | |
|
┗ Curse or Comfort
┗ Within a World of Illusion
┗ The Taste of Victory!
┗ Like Mother, Like Daughter
┗ Everyone's Oguri Cap
|
|
| Support Card Events | |
How to Get Fast Learner
| All Characters | |
|---|---|
| ・Small chance of obtaining it after Training or racing | |
| Trainee-Specific Events | |
|
┗ Vivid Memories
┗ Here to Help!
|
|
| Support Card Events | |
No Support Cards Available |
|
How to Get Hot Topic
| All Characters | |
|---|---|
| ・Small chance of obtaining it after Training or racing | |
| Trainee-Specific Events | |
|
┗ What's Prettier than Gold?
|
|
| Support Card Events | |
How to Get Practice Perfect ◯
| All Characters | |
|---|---|
| ・Obtained in Master Trainer event ・Small chance of obtaining it after picking yellow dialogue choice in Failed Training event |
|
| Trainee-Specific Events | |
| Support Card Events | |
Practice Perfect will decrease Training Failure rate by 2%. Though the bonus is little, this is a useful condition that should be gained when available.
Will Be Replaced by Practice Poor and Vice Versa
Its opposite condition, Practice Poor, will increase the Training Failure rate by 2%. If your Trainee gains Practice Poor while they have Practice Perfect ◯, it will be replaced.
Likewise, a Trainee can replace Practice Poor with Practice Perfect ◯. This is incredibly useful if your Trainee or Support Card has an event that can give you the condition.
How to Get Practice Perfect ◎
 Narita Taishin (Nevertheless) Narita Taishin (Nevertheless)
|
Practice Perfect ◎ can only be obtained during Narita Taishin's hidden event after winning the Nikkei Sho.
Note that stacking two Practice Perfects ◯ does not result in Practice Perfect ◎.
Narita Taishin (Nevertheless) Guide
How to Get Migraine
| Trainee Events (All Characters) | |
|---|---|
| ・Small chance of obtaining it via Migraine Blues event after Training |
A Trainee with Migraine cannot have their mood raised. The only exception is when you use an Alarm Clock to re-do a race.
It's recommended to head to the Infirmary immediately as mood is a big factor in training and races.
Recreation Guide: How to Improve Mood
How to Get Night Owl
| Trainee Events (All Characters) | |
|---|---|
| ・Small chance of obtaining it via Sleep Deprived event after using Rest |
In the Sleep Deprived event, a Trainee can receive the Night Owl condition. This will make them randomly lose -10 energy, and sometimes mood, after a turn. This will not always activate so you could keep this condition if you have valuable turns.
However, you should go to the Infirmary when you can, since it will disrupt your Training over time. Resting also has a chance to cure Night Owl.
How to Get Practice Poor
| Trainee Events (All Characters) | |
|---|---|
| ・Small chance of obtaining it from any dialogue choice in Training Failure event |
Practice Poor is the opposite of Practice Perfect ◯ as it increases a Trainee's Training Failure rate by 2%. There will always be a chance to receive after failing a training session.
As mentioned in a previous section, it will replace Practice Perfect ◯ in your Trainee's Condition list. Likewise, it can also be replaced by gaining Practice Perfect ◯. Either way, if there is not any Friendship Training, you should head to the Infirmary.
How to Get Skin Outbreak
| Trainee Events (All Characters) | |
|---|---|
| ・Small chance of obtaining it after doing three races in a row |
A Skin Outbreak will make a Trainee randomly lose one stage of Mood, which has a chance to happen after every turn.
Immediately head to the Infirmary as mood is important for training and races. Resting may also cure Skin Outbreak.
How to Get Slacker
| Trainee Events (All Characters) | |
|---|---|
| ・Small chance of obtaining it after doing training | |
| Character-specific Trainee Events | |
| ┗"This One's For Keeps!" (Bottom Choice, Guaranteed Effect if Failed) |
Slacker will give a chance for your Trainee to not show up for training and waste a turn. Cure this condition as soon as you can through the Infirmary or by training with the reporter Etsuko Otonashi.
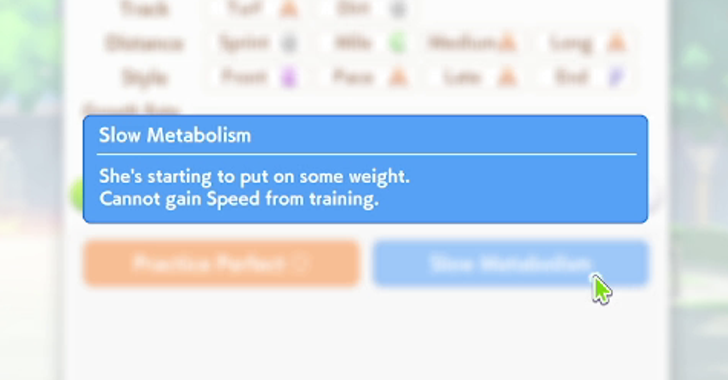
How to Get Slow Metabolism
| Trainee Events (All Characters) | |
|---|---|
| ・Random chance to obtain it when choosing Bottom Choice for Trainee Events related to eating |
All characters have a Trainee event where they can withhold eating a large amount of food (Top Choice) or eat it anyways (Bottom Choice). The Bottom Choice will give + 30 Energy, - 5 Speed, + 5 Power, 10 Skills Points, and a chance to gain Slow Metabolism.
The condition will prevent any Speed gains from Speed training. However, you can still gain it from events.
Use the Infirmary when you can because Speed is the most important stat in the game. It also has a chance to be cured after successful training.
How to Cure Shining Brightly / Under the Weather
| Character-specific Trainee Events | |
|---|---|
| ┗ Obtained after Sumire Stakes (Guaranteed Effect) ┗ Cured by finishing at least third in the Kikuka Sho (Under the Weather is replaced by Shining Brightly) |
These two conditions are unique to Super Creek's URA Finale Career. Shining Brightly and Under the Weather will increase or decrease Super Creek's Training Failure rate by 5%. You cannot cure Under the Weather until you gain Shining Brightly by completing her Kikuka Sho Goal race.
When you have to train with Under the Weather, avoid risky training options and keep your energy high.
How to Cure Not Ready
| Character-specific Trainee Events | |
|---|---|
| ┗ Obtained after Debut Race (Guaranteed Effect) ┗ Cured by finishing her 3rd career goal (15,000 Fans) |
Meisho Doto's Not Ready condition is unique to her career and is obtained as soon as you finish the Debut Race. She has a chance to get -5 Energy after every race, and this condition persists until she completes her 3rd career goal.
This condition isn't too bad for Meisho Doto if you can manage your energy just right. You can optimize around it by only taking the relevant G1 or G2 races, then minimizing races until the point where she is cured.
How to Manage Conditions
Infirmary Can Remove Bad Conditions
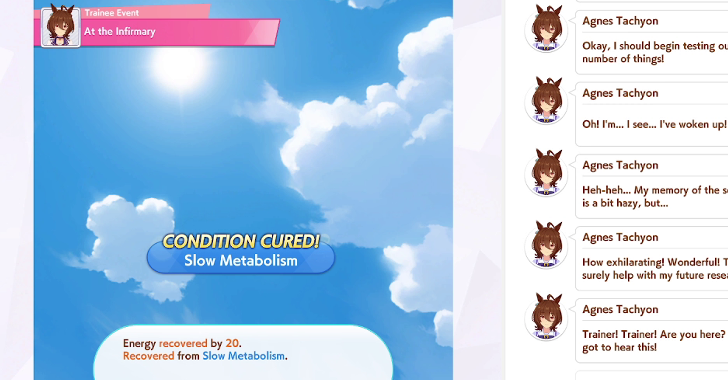
Once you receive a bad condition, the Infirmary will be unlocked. Going to the Infirmary will grant your character +20 Energy and a chance to remove one bad condition.
Other Ways to Cure Bad Conditions
| Condition | How to Cure |
|---|---|
| Night Owl | ・Get Well-Rested event when resting. |
| Skin Outbreak | |
| Slacker |
・Get Fan Letter event. ・Train with Etsuko Otonashi (reporter). |
| All Bad Conditions |
・Rest and Recreation during summer camp. ・Top option of Extra Training events (random) |
The infirmary is not the only way to cure negative conditions. Some events can also cure them, although they depend on luck.
Rest and recreation during summer camp can cure negative conditions as well, but make sure to think it over, since it takes up a valuable turn during camp. The top option of the Extra Training events also has a chance to cure all bad conditions.
Some Bad Conditions are Manageable
Sometimes, you do not need to immediately remove a bad condition. For example, the Night Owl condition will add an event where your character will lose 10 energy.
There is some risk involved, but it is worth taking the chance if your character needs to train. Conditions will not affect races so you do not need to remove them at the end of the Career.
SSR Support Cards Can Cure Conditions
|
|
|
|
|
|
Several SSR Support Cards are also able to cure negative conditions. These should be able to save you a trip to the Infirmary, provided the events show up at the right time.
Shrine Event Could Remove Bad Conditions
When a Trainee does Recreation, there is 1 in 3 or 33% chance that they will visit the shrine. In that event, there is a small chance that a bad condition can be removed.
This is not a recommended way to remove a bad condition, but it is an additional effect that could happen.
Most Good Conditions Can Not Be Removed
Good Conditions will last throughout the the character's Career. Try to get them in the Junior or Classic Year to maximize their benefits.
However, some events can remove good condtions. For example, Practice Perfect ◯ can be replaced by Practice Poor.
What Are Conditions?
Passive Effects on Your Trainee
Conditions are passive effects that affect your character's training. Orange conditions will benefit your character while blue conditions will hinder their training.
Gained From Random Events or Dialogue Choices
Your character can gain conditions from random events or certain dialogue choices.
This can be decided by your trainee and Support Cards. For example, Gold Ship has a Trainee Event called This One's For Keeps! that could give her the Slacker bad condition.
Umamusume Event Choice Checker
Check Full Stats for Trainee's Conditions
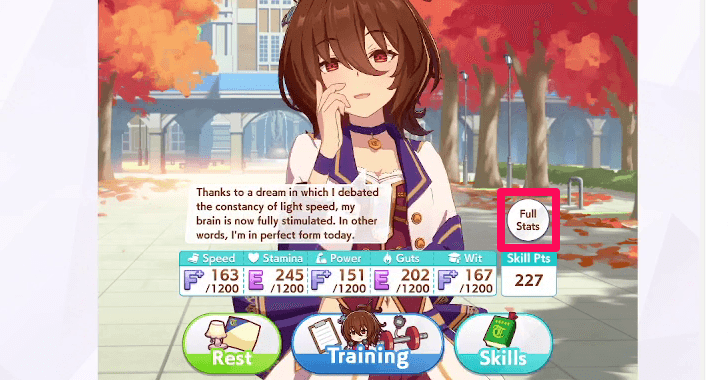
You can press the Full Stats button in the Career screen to check your Trainee's conditions. Orange conditions are good while the dark blue ones are bad.
Umamusume: Pretty Derby Related Guides
Tips and Tricks
Comment
 Rarelucky 4 months
tried getting it from kitasan then fine motion but it didnt stack up
Author

Conditions Guide: All Positive and Negative Effects
Premium Articles
Rankings

Gaming News


Popular Games

Genshin Impact Walkthrough & Guides Wiki
Umamusume: Pretty Derby Walkthrough & Guides Wiki
Crimson Desert Walkthrough & Guides Wiki
Monster Hunter Stories 3: Twisted Reflection Walkthrough & Guides Wiki
Honkai: Star Rail Walkthrough & Guides Wiki
Pokemon Pokopia Walkthrough & Guides Wiki
The Seven Deadly Sins: Origin Walkthrough & Guides Wiki
Wuthering Waves Walkthrough & Guides Wiki
Zenless Zone Zero Walkthrough & Guides Wiki
Arknights: Endfield Walkthrough & Guides Wiki


Recommended Games
Fire Emblem Heroes (FEH) Walkthrough & Guides Wiki
Diablo 4: Vessel of Hatred Walkthrough & Guides Wiki
Cyberpunk 2077: Ultimate Edition Walkthrough & Guides Wiki
Yu-Gi-Oh! Master Duel Walkthrough & Guides Wiki
Super Smash Bros. Ultimate Walkthrough & Guides Wiki
Pokemon Brilliant Diamond and Shining Pearl (BDSP) Walkthrough & Guides Wiki
Elden Ring Shadow of the Erdtree Walkthrough & Guides Wiki
Monster Hunter World Walkthrough & Guides Wiki
The Legend of Zelda: Tears of the Kingdom Walkthrough & Guides Wiki
Persona 3 Reload Walkthrough & Guides Wiki


All rights reserved
© Cygames, Inc.
The copyrights of videos of games used in our content and other intellectual property rights belong to the provider of the game.
The contents we provide on this site were created personally by members of the Game8 editorial department.
We refuse the right to reuse or repost content taken without our permission such as data or images to other sites.
and got it from master trainer, still didnt stack