Hugh & Niime Infernal Guide and Recommended Team (Bound Hero Battle)
★ Latest Banners: Tiki: Everlasting Voice | Springtime Sisters
☆ New: Mythic Tiki (Adult) | Spring Thórr, Spring Dorothea, Spring Sothe, Spring Eirika
★ Free Units: Spring Bernadetta
☆ State of the Meta (February 2026)

This is a guide to clearing the Infernal and Lunatic maps for Hugh & Niime in Fire Emblem Heroes (FEH). To see strategy for defeating Hugh & Niime, enemy information, as well as the best units and party to use, read on!
Table of Contents
Hugh and Niime Strategy Overview
| Enemy Units |
|
|---|---|
| Recommended Level | Lv.40 |
| Difficulty | Infernal Lunatic Hard |
| Conditions | Condition 1: All 4 units must survive. Condition 2: You cannot use Light's Blessing |
| Dates Active | 12/23/2024 - 01/01/2024 |
Initial Unit Placement
| Infernal | Lunatic |
|---|---|
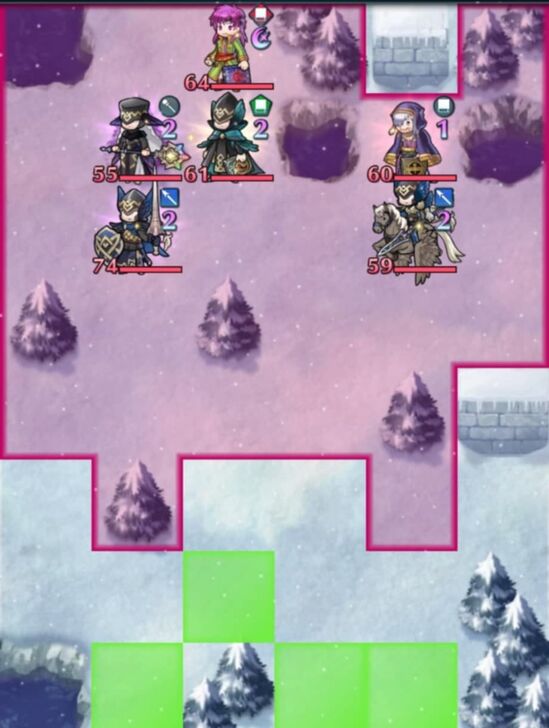 |
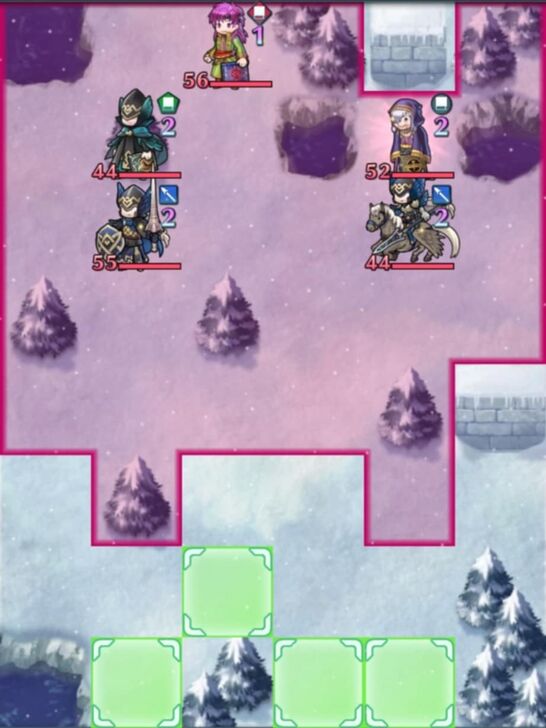
|
Infernal Enemy Information
| A
|
HP 64 |
Atk 56 |
Spd 49 |
Def 30 |
Res 26 |
||||||
|---|---|---|---|---|---|---|---|---|---|---|---|
|
|
|
||||||||||
B
 Cleric Cleric
|
HP 55 |
Atk 52 |
Spd 40 |
Def 38 |
Res 55 |
||||||
|
|
|||||||||||
C
 Green Mage Green Mage
|
HP 61 |
Atk 59 |
Spd 45 |
Def 31 |
Res 39 |
||||||
|
|
|
||||||||||
| D
|
HP 60 |
Atk 67 |
Spd 36 |
Def 10 |
Res 55 |
||||||
|
|
|
||||||||||
E
 Lance Fighter Lance Fighter
|
HP 74 |
Atk 57 |
Spd 44 |
Def 43 |
Res 31 |
||||||
|
|
|
||||||||||
F
 Lance Flier Lance Flier
|
HP 59 |
Atk 48 |
Spd 40 |
Def 30 |
Res 45 |
||||||
|
|
|
||||||||||
Lunatic Enemy Information
| A
|
HP 56 |
Atk 52 |
Spd 45 |
Def 27 |
Res 24 |
||||||
|---|---|---|---|---|---|---|---|---|---|---|---|
|
|
|
||||||||||
B
 Green Mage Green Mage
|
HP 44 |
Atk 46 |
Spd 35 |
Def 20 |
Res 30 |
||||||
|
|
|
||||||||||
| C
|
HP 52 |
Atk 63 |
Spd 33 |
Def 9 |
Res 51 |
||||||
|
|
|
||||||||||
D
 Lance Fighter Lance Fighter
|
HP 55 |
Atk 47 |
Spd 34 |
Def 33 |
Res 22 |
||||||
|
|
|
||||||||||
E
 Lance Flier Lance Flier
|
HP 44 |
Atk 38 |
Spd 30 |
Def 23 |
Res 36 |
||||||
|
|
|
||||||||||
Hugh and Niime Strategy
Use a Hit and Run Strategy!
This map has no reinforcements and no refresher foes, making a Hit and Run strategy viable.
Stay out of the range of the enemy units on the first turn while repositioning your team, since the enemies will not engage until you step into their threat range. Once ready, initiate on any of the generic enemies using a ranged unit with 3 movement, and then use movement Assists, refresher assists, and Canto effects to retreat and get your units out of range.
The enemies will then approach your units but be unable to reach them.
If you have Emblem Sigurd or Brave Felix (equipped with an area-of-effect Special), you can use their superior movement to quickly deal massive damage in an area and then use their extra action to retreat to safety afterwards. This will reduce the number of foes remaining while forcing them to advance forward into their demise.
Simply snipe units one at a time while retreating to safety afterwards and this map will be completed quickly.
Alternatively, Use a Tanking Strategy!
You can also adopt a tanking strategy to clear this map, as none of the enemies in this map are too threatening except for Hugh and Niime with their pre-charged Specials. However, since both of them deal magical damage, you can opt into bringing a pure magical tank to soak their attacks. A physical damage tank with a Distant Counter effect works well against Niime due to her Crystalline Water reducing her Def stat.
Use the first few turns to set up your formation, and then place your tank unit in range of the enemies on the right side while keeping the support units out of range. With enough support, both the Lance Flier and Niime will fall on the first turn.
When baiting from the right side, only Niime and the Lance Flier will be able to reach your bait unit. Take advantage of this by using a unit that can tank both of their attacks and defeat them in retaliation.
The other enemies will begin advancing, but be unable to reach your units. You can then take advantage of this by only placing tank units in range of 1-2 enemies at once, or by using offensive units to clear the remaining enemies. Be careful with the Cleric, as she has Magic Shield+ to grant herself an extra action and Trilemma+ which can skew combat heavily if your unit has weapon triangle disadvantage!
Retain this strategy for the successive turns and eventually all the enemies will fall.
Best Units for Hugh and Niime
Player Phase Units
| Unit Name | |
|---|---|
|
|
Sword Infantry New Levin Sword accelerates Special by 2, opening up either area-of-effect spam or quick Galeforce. Lone Wolf can grant up to three actions in one turn. |
|
|
Lance Cavalry Holy-War Spear grants Emblem Sigurd +2 movement (5 total), 【Canto (3)】, and bonus true damage. Override is an area-of-effect Special that grants an extra action after use. |
|
|
Lance Armored Black Yule Lance creates 【Divine Vein (Flame)】 tiles, grants Special cooldown charges pre-combat, and cuts the effectiveness of enemy damage reduction skills. Raging Tempest grants mobility and one additional action after combat. Inheriting Galeforce can grant a third action per turn. |
|
|
Sword Armored Regal Sunshade's brave effect can quickly eliminate enemies. Raging Storm can grant one additional action after combat. Inheriting Galeforce can grant a third action per turn. |
|
|
Lance Cavalry Incredibly mobile with United Bouquet granting movement+1 and Forever Yours granting 【Canto (Dist, +1; Max 4)】. Both Forever Yours and Duo Skill generate additional actions while refreshing Canto. |
|
|
Red Tome Cavalry Can act up to four times in one turn with Golden Sunlight, Time and Light, and her Duo Skill. Flared Sparrow leaves behind 【Divine Vein (Flame)】 terrain, softening up enemies for future engagements. |
|
|
Colorless Bow Cavalry Great nuking power with Ylisse Ninja Bow dealing up to +25 true damage. Future Focus is a Swap that also grants 【Future Witness】 and 【Null Follow-Up】 to multiple allies upon use. Duo Skill grants another action post-combat and refreshes Canto. |
|
|
Red Tome Cavalry Great nuking power with Radiant Scrolls. Flared Mirror creates Divine Veins that hinder movement for enemy ranged units and deal pre-combat damage to foes when they enter combat. Duo Skill grants another action post-combat. |
|
|
Green Tome Cavalry Ninjutsu Scrolls' brave effect can quickly defeat enemies. Duo Skill grants herself an additional action. |
|
|
Blue Bow Flying Flamefrost Bow's brave effect can quickly defeat enemies. Duo Skill grants herself an additional action. |
|
|
Colorless Dagger Flying Tailwind Shuriken's brave effect can quickly defeat enemies. Duo Skill grants herself an additional action. |
|
|
Sword Cavalry Arcane Devourer grants bonus Special charges and Special cooldown acceleration, allowing an easy Galeforce trigger. Fate Unchanged... allows repositioning an ally to safety and using the extra action for Fallen Chrom to retreat to safety himself. |
|
|
Lance Cavalry Geirdriful grants bonus Special charges and Special cooldown acceleration, allowing an easy Galeforce trigger. A Fate Changed! allows repositioning an ally to safety and using the extra action for Brave Chrom to retreat to safety himself. |
|
|
Colorless Tome Cavalry Quietus Gullveig and Time is Light grant herself additional actions after combat. Flared Sparrow leaves behind 【Divine Vein (Flame)】 terrain, softening up enemies for future engagements. |
|
|
Sword Cavalry Lyngheiðr grants Canto for mobility. Seiðr Shell+ is pre-charged and can defeat an enemy quickly. |
Tank Units
| Unit Name | |
|---|---|
|
|
Sword Infantry Emblem Ragnell neutralizes multiple penalties that affect his combat. Laguz Friend 4 provides strong damage reduction. Great Aether provides extra damage reduction and sustain to keep him healthy throughout multiple combats. |
|
|
Lance Armored Ice-Crystal Spear provides multiple defensive effects and a Null C-Disrupt effect. Dual Ice Mirrors and Shield Fighter work together to heavily mitigate damage from multiple ranged attacks and then reflect the damage back onto the enemy. |
|
|
Sword Armored Holy Yule Blade decays foe's Specials and grants multiple stat bonuses. Supreme Heaven deals bonus damage against dragons and beasts and also grants additional damage reduction. |
|
|
Colorless Breath Armored Multiple damage reduction effects and the 【Divine Vein (Stone)】 effect paired with high Spd allow her to survive multiple engagements. |
|
|
Lance Armored An older unit available on weekly revival banners that can keep up with modern metagame units if given investment. Neutralizes armor weakness, neutralizes penalties, prevents foe's follow-up attack and has a guaranteed follow-up attack. |
|
|
Axe Armored A free-to-play unit available using Heroic Grails with a statline heavily focused on tanking. Praise-Piner Axe neutralizes foe's bonuses, grants damage reduction, and has post-combat healing to loop her built-in Miracle effect over and over again. |
|
|
Axe Armored High mobility for an armored unit. Incredibly sturdy with refined Flower Hauteclere and Black Eagle Rule granting multiple defensive effects. |
Support Units
| Unit Name | |
|---|---|
|
|
Staff Flying Grants damage reduction, healing, and can shut down "At start of turn" effects of foes in cardinal directions upon winning a Res check. |
|
|
Staff Cavalry Kitty-Cat Parasol grants Special cooldown charges, 30% damage reduction, and "neutralizes foe's bonuses to Atk" to nearby allies and can double as an offensive unit with high Atk and a guaranteed follow-up attack. |
|
|
Staff Flying Grants damage reduction and healing. |
|
|
Lance Flying Refined Spear of Assal grants Seteth and nearby allies bonus stats, true damage, true damage reduction, and neutralizes foe's bonuses. |
|
|
Staff Flying Grants Atk+6 and Special acceleration to nearby allies during combat. |
Refresher Units
| Unit Name | |
|---|---|
|
|
Green Tome Flying Grants additional Atk to allies in similar cardinal directions. Can use her Duo Skill to grant another action to an adjacent ally. |
|
|
Blue Tome Flying Grants additional Atk and Spd to allies in similar cardinal directions. |
|
|
Blue Tome Flying Grants additional bonuses equal to highest bonus on unit and +1 movement. |
|
|
Green Tome Cavalry Grants +6 to all stats and +1 movement to target unit and all adjacent allies. Can use Harmonized Skill to grant extra actions to allies. |
List of All Dancers | Heroes with Refresher Skills
User Submitted Units / Parties for Hugh and Niime
We are looking for user submitted clears!
Let us know about your party and how you cleared the maps in the comments below, via a picture of your team and their skills.
If you have uploaded the walkthrough video on Twitter etc., please enter the URL as well!
FEH Related Guides
Other Bound Hero Battle Walkthroughs
Bound Hero Battles Walkthroughs and Schedule
List of Bound Hero Battles
Comment
Author
Hugh & Niime Infernal Guide and Recommended Team (Bound Hero Battle)
improvement survey
03/2026
improving Game8's site?

Your answers will help us to improve our website.
Note: Please be sure not to enter any kind of personal information into your response.

We hope you continue to make use of Game8.
Premium Articles
Rankings
- We could not find the message board you were looking for.
Gaming News
Popular Games

Genshin Impact Walkthrough & Guides Wiki

Honkai: Star Rail Walkthrough & Guides Wiki

Umamusume: Pretty Derby Walkthrough & Guides Wiki

Pokemon Pokopia Walkthrough & Guides Wiki

Resident Evil Requiem (RE9) Walkthrough & Guides Wiki

Monster Hunter Wilds Walkthrough & Guides Wiki

Wuthering Waves Walkthrough & Guides Wiki

Arknights: Endfield Walkthrough & Guides Wiki

Pokemon FireRed and LeafGreen (FRLG) Walkthrough & Guides Wiki

Pokemon TCG Pocket (PTCGP) Strategies & Guides Wiki
Recommended Games

Diablo 4: Vessel of Hatred Walkthrough & Guides Wiki

Cyberpunk 2077: Ultimate Edition Walkthrough & Guides Wiki

Fire Emblem Heroes (FEH) Walkthrough & Guides Wiki

Yu-Gi-Oh! Master Duel Walkthrough & Guides Wiki

Super Smash Bros. Ultimate Walkthrough & Guides Wiki

Pokemon Brilliant Diamond and Shining Pearl (BDSP) Walkthrough & Guides Wiki

Elden Ring Shadow of the Erdtree Walkthrough & Guides Wiki

Monster Hunter World Walkthrough & Guides Wiki

The Legend of Zelda: Tears of the Kingdom Walkthrough & Guides Wiki

Persona 3 Reload Walkthrough & Guides Wiki
All rights reserved
© 2025 Nintendo / INTELLIGENT SYSTEMS
The copyrights of videos of games used in our content and other intellectual property rights belong to the provider of the game.
The contents we provide on this site were created personally by members of the Game8 editorial department.
We refuse the right to reuse or repost content taken without our permission such as data or images to other sites.


![Everwind Review [Early Access] | The Shaky First Step to A Very Long Journey](https://img.game8.co/4440226/ab079b1153298a042633dd1ef51e878e.png/thumb)

![Monster Hunter Stories 3 Review [First Impressions] | Simply Rejuvenating](https://img.game8.co/4438641/2a31b7702bd70e78ec8efd24661dacda.jpeg/thumb)


