Perpetual Exploit Day 6 Guide
★ Exclusive: Check out the State of Meta in 4.0!
♦ Latest: 4.0 Redeem Codes
♦ Phase 2: Sparkxie, Sparkle, Cerydra, Rappa
♦ Upcoming: Ashveil, Silver Wolf Lv.999, Evanescia
♦ Events: Cosmicon, Roll On!, Ding! Arcadia Fun-Time Clock-In Essentials

Perpetual Exploit is Honkai: Star Rail's Tides of War Day 6 challenge. See the best teams and Support Functions, how to beat Day 6, stage details, and all the rewards here!
| Tides of War Event Guides | ||
|---|---|---|
Perpetual Exploit Best Team
Tides of War Day 6 Best Team
| Best Team for Day 6 | |||
|---|---|---|---|
|
|
|
|
|
The best team for Day 6 consists of the Trial Characters available for the stage. Dr. Ratio and Topaz will be your DPS characters while Hanya provides additional buffs and Aventurine will keep the team shielded.
You'll want to have Dr. Ratio and Topaz use their Skills as much as possible to trigger their follow-up attacks, so the Skill Point recovery from Hanya's kit will make managing the team's actions a lot easier.
Best Support Functions for Day 6
| Support Function | Buff Effect |
|---|---|
 Chain Motivation Chain Motivation |
Grit Phase 2 (Option) Action will be Advanced Forward by 100% after an Ultimate is cast. Additionally gains 2 Grit Value after any ally makes an action or initiates a follow-up attack. This effect can reach a max of 6 stacks. All stacks will be dispelled after any enemy target performs an action. |
 Master Exploder Master Exploder |
Grit Phase 3 (Option) When any ally performs an action or a follow-up attack, inflicts 1 stack of Detonate on the enemy boss. Attacking enemy units with Detonate will deal DMG equal to 1% of the attacker's ATK plus a set amount. Every 5 stacks of Detonate will increase the Additional DMG by 10%. All stacks of Detonate will be cleared from a target when they perform an action. |
We recommend using the Chain Motivation and Master Exploder Support functions to make the most out of Dr. Ratio and Topaz's frequent follow-up attacks and easily gain Grit Value.
How to Beat Perpetual Exploit
Focus Attacks on Bosses Only
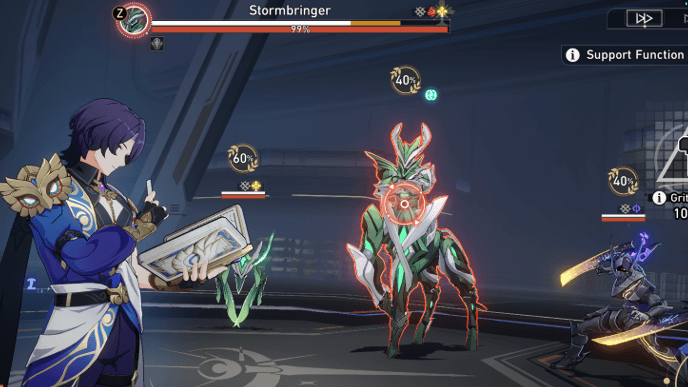
All your attacks should be directed towards the boss enemies only to clear the Day 6 stage much faster. With the Master Exploder Support Function equipped, bosses will be much easier to defeat if they're the sole target of your attacks.
Reach Cocolia During the Third Cycle
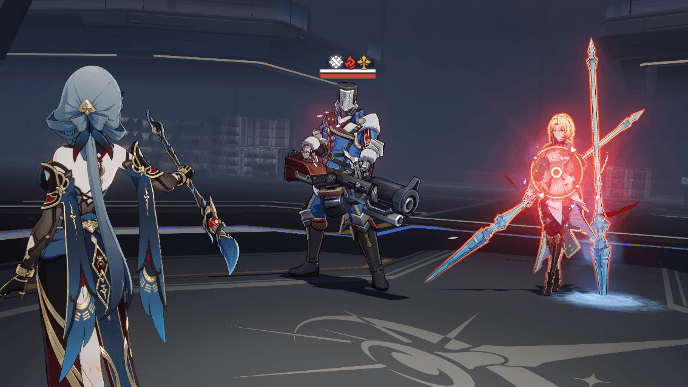
Based on our test runs, you should be fighting Cocolia during the 3rd cycle or earlier to perfect Day 6. Cocolia is weak to Fire, so having Topaz receive the buffs from Hanya's Ultimate in this wave will be more efficient.
Raise Grit Value with Follow-Up Attacks
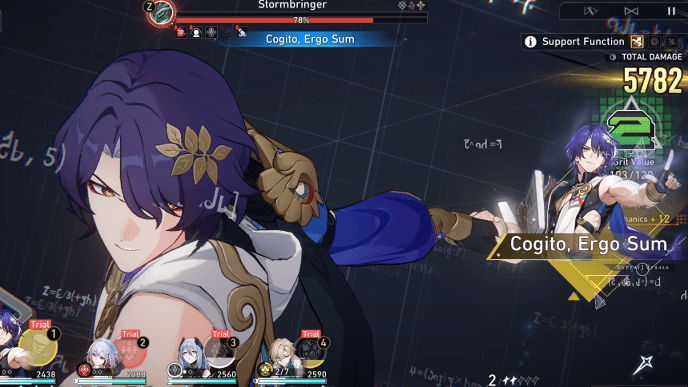
Having the Chain Motivation Support Function equipped will allow all your party member's actions to gain Grit Value, making it easier for you to reach higher Grit Phases much quicker.
Try to get Dr. Ratio and Topaz to trigger their follow-up attacks as often as possible. Hanya's Skill will help recover Skill Points for them and increase the DMG an enemy receives.
Buff and Spam Attacks in Grit Phase 4
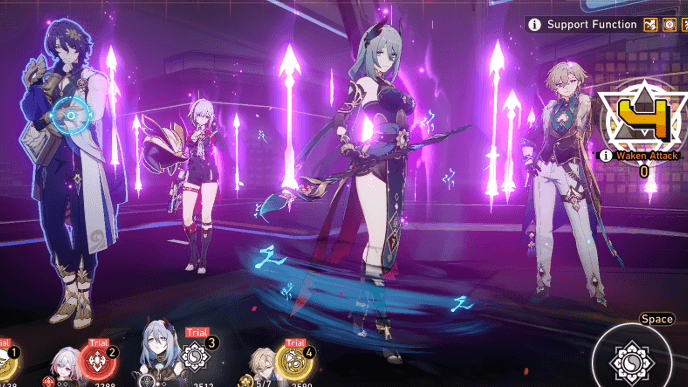
Grit Phase 4 will advance your characters' actions forward and let them deal consecutive attacks. Have Hanya use her Ultimate on a DPS character and inflict Burden on the bosses with her Skill before you let your damage dealers spam their attacks.
Perpetual Exploit Stage Details
Tides of War Day 6 Trial Characters
| Trial | Character Build |
|---|---|
|
|
|
|
|
|
|
|
|
|
|
|
|
|
Tides of War Day 6 Grit Mechanics
| Day 6 Grit Mechanics |
|---|
|
◆ Activate Grit Mechanics in battle to accumulate Grit Value and elevate Grit Phase. ◆ Accumulates a large amount of Grit Value after allies perform consecutive actions. |
Tides of War Day 6 Support Functions
| Support Function | Grit Phase & Buff Effect |
|---|---|
 Chain Motivation Chain Motivation |
Grit Phase 2 (Option) Action will be Advanced Forward by 100% after an Ultimate is cast. Additionally gains 2 Grit Value after any ally makes an action or initiates a follow-up attack. This effect can reach a max of 6 stacks. All stacks will be dispelled after any enemy target performs an action. |
 Hyperspeed Hyperspeed |
Grit Phase 2 (Option) Action will be Advanced Forward by 100% after Ultimate is cast. Additionally gains 12 Grit Value when the same character acts consecutively or triggers a follow-up attack. |
 Master Exploder Master Exploder |
Grit Phase 3 (Option) When any ally performs an action or a follow-up attack, inflicts 1 stack of Detonate on the enemy boss. Attacking enemy units with Detonate will deal DMG equal to 1% of the attacker's ATK plus a set amount. Every 5 stacks of Detonate will increase the Additional DMG by 10%. All stacks of Detonate will be cleared from a target when they perform an action. |
 Chain Amplification Chain Amplification |
Grit Phase 3 (Option) Additionally deals 2 hits when attacking enemy targets. Each hit will deal DMG equal to 100% of the attacker's ATK plus a set amount. When the same character acts consecutively or unleashes follow-up attacks, the number of additional DMG hits increases by 4 / 6 / 8 / 10, and additionally increases by 1 for each action thereafter. |
 Sweeping Storm Sweeping Storm |
Grit Phase 4 (Fixed) Increases all enemies' DMG received by 100%. All allies will gain 2 stacks of Galefury. Consumes 1 stack of Galefury when the character's turn ends and immediately advances an action by 100%. |
Phases 2 and 3 each have two Support Functions you can choose from. You can only pick one for each phase.
Tides of War Day 6 Enemies
| Enemies | Weaknesses |
|---|---|
Perpetual Exploit Rewards
Tides of War Day 6 Rewards
| Objectives | Rewards |
|---|---|
| Enter “Grit Phase 4: Power Awoken” 1 time. |
|
| Defeat the first wave's boss. |
|
| Defeat the second wave's boss. |
|
| Defeat the third wave's boss. |
|
Perpetual Exploit Information
Part of Tides of War

Perpetual Exploit is the Day 6 stage of Tides of War where performing consecutive actions will earn extra Grit Value. In this stage, characters with Follow-Up attacks will be the best ones to use for Day 6.
Honkai: Star Related Guides

Tides of War Day Guides
| Stage | Trial Characters |
|---|---|
 Day 1 Day 1 |
◆
◆
◆
|
 Day 2 Day 2 |
◆
◆
◆
◆
◆
|
 Day 3 Day 3 |
◆
◆
◆
◆
|
 Day 4 Day 4 |
◆
◆
◆
◆
|
 Day 5 Day 5 |
◆
◆
◆
◆
|
 Day 6 Day 6 |
◆
◆
◆
|
Other Upcoming and Current Events

Author
Perpetual Exploit Day 6 Guide
improvement survey
03/2026
improving Game8's site?

Your answers will help us to improve our website.
Note: Please be sure not to enter any kind of personal information into your response.

We hope you continue to make use of Game8.
Premium Articles
Rankings
Gaming News
Popular Games

Genshin Impact Walkthrough & Guides Wiki

Honkai: Star Rail Walkthrough & Guides Wiki

Umamusume: Pretty Derby Walkthrough & Guides Wiki

Pokemon Pokopia Walkthrough & Guides Wiki

Resident Evil Requiem (RE9) Walkthrough & Guides Wiki

Monster Hunter Wilds Walkthrough & Guides Wiki

Wuthering Waves Walkthrough & Guides Wiki

Arknights: Endfield Walkthrough & Guides Wiki

Pokemon FireRed and LeafGreen (FRLG) Walkthrough & Guides Wiki

Pokemon TCG Pocket (PTCGP) Strategies & Guides Wiki
Recommended Games

Diablo 4: Vessel of Hatred Walkthrough & Guides Wiki

Fire Emblem Heroes (FEH) Walkthrough & Guides Wiki

Yu-Gi-Oh! Master Duel Walkthrough & Guides Wiki

Super Smash Bros. Ultimate Walkthrough & Guides Wiki

Pokemon Brilliant Diamond and Shining Pearl (BDSP) Walkthrough & Guides Wiki

Elden Ring Shadow of the Erdtree Walkthrough & Guides Wiki

Monster Hunter World Walkthrough & Guides Wiki

The Legend of Zelda: Tears of the Kingdom Walkthrough & Guides Wiki

Persona 3 Reload Walkthrough & Guides Wiki

Cyberpunk 2077: Ultimate Edition Walkthrough & Guides Wiki
All rights reserved
Copyright © 2024 HoYoverse, COGNOSPHERE. All Rights Reserved.
The copyrights of videos of games used in our content and other intellectual property rights belong to the provider of the game.
The contents we provide on this site were created personally by members of the Game8 editorial department.
We refuse the right to reuse or repost content taken without our permission such as data or images to other sites.


![Monster Hunter Stories 3 Review [First Impressions] | Simply Rejuvenating](https://img.game8.co/4438641/2a31b7702bd70e78ec8efd24661dacda.jpeg/thumb)


Don't worry too much about reaching cocolia during the 3rd cycle. Even if you get to her with 2 cycles left, you get so many FUAs that by the time a cycle is done she'll only have 40% hp left