Echidna and Larum Infernal Guide and Recommended Team (Bound Hero Battle)
★ Latest Banners: Tiki: Everlasting Voice | Springtime Sisters
☆ New: Mythic Tiki (Adult) | Spring Thórr, Spring Dorothea, Spring Sothe, Spring Eirika
★ Free Units: Spring Bernadetta
☆ State of the Meta (February 2026)

This is a guide to clearing the Infernal and Lunatic maps for Echidna and Larum in Fire Emblem Heroes (FEH). To see strategy for defeating Echidna and Larum, enemy information, as well as the best units and party to use, read on!
Table of Contents
Echidna and Larum Strategy Overview
| Enemy Units |
|
|---|---|
| Recommended Level | Lv.40 |
| Difficulty | Infernal Lunatic Hard |
| Conditions | Condition 1: All 4 units must survive. Condition 2: You cannot use Light's Blessing |
| Dates Active | 07/27/2023 to 08/02/2023 |
Initial Unit Placement
| Infernal | Lunatic |
|---|---|
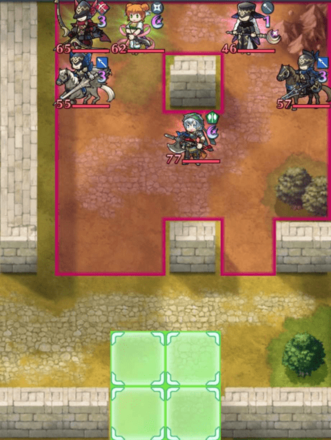 |
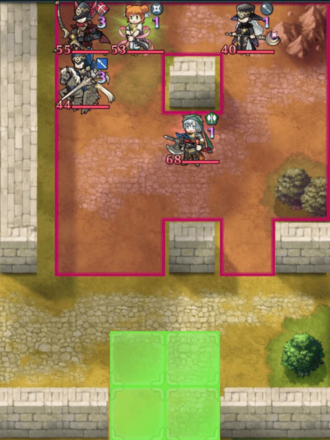 |
Infernal Enemy Information
A
 Red Bow (Enemy) Red Bow (Enemy)
|
HP 65 |
Atk 50 |
Spd 36 |
Def 34 |
Res 21 |
||||||
|---|---|---|---|---|---|---|---|---|---|---|---|
|
|
|
||||||||||
| B
|
HP 62 |
Atk 47 |
Spd 45 |
Def 20 |
Res 33 |
||||||
|
|
|
||||||||||
C
 Cleric Cleric
|
HP 46 |
Atk 50 |
Spd 34 |
Def 20 |
Res 47 |
||||||
|
|
|
||||||||||
D
 Lance Flier Lance Flier
|
HP 55 |
Atk 47 |
Spd 38 |
Def 26 |
Res 39 |
||||||
|
|
|
||||||||||
E
 Lance Cavalier Lance Cavalier
|
HP 57 |
Atk 45 |
Spd 22 |
Def 31 |
Res 33 |
||||||
|
|
|
||||||||||
| F
|
HP 77 |
Atk 53 |
Spd 39 |
Def 33 |
Res 30 |
||||||
|
|
|
||||||||||
Lunatic Enemy Information
A
 Red Bow (Enemy) Red Bow (Enemy)
|
HP 55 |
Atk 47 |
Spd 31 |
Def 31 |
Res 19 |
||||||
|---|---|---|---|---|---|---|---|---|---|---|---|
|
|
|
||||||||||
| B
|
HP 53 |
Atk 44 |
Spd 41 |
Def 18 |
Res 30 |
||||||
|
|
|
||||||||||
C
 Cleric Cleric
|
HP 40 |
Atk 47 |
Spd 31 |
Def 18 |
Res 43 |
||||||
|
|
|
||||||||||
D
 Lance Flier Lance Flier
|
HP 44 |
Atk 44 |
Spd 35 |
Def 23 |
Res 36 |
||||||
|
|
|
||||||||||
| E
|
HP 68 |
Atk 50 |
Spd 36 |
Def 30 |
Res 27 |
||||||
|
|
|
||||||||||
Echidna and Larum Strategy
Use a Hit and Run strategy!
This map has no reinforcements, making a Hit and Run strategy viable. It also helps that most of the enemies are grouped together, allowing Galeforce users to immediately go on the offensive after their first actions.
Larum is a refresher unit with her Dance assist skill. Predicting the enemy AI can be difficult if you are not aware of the AI priority order of operations, thus, it is advised to defeat Larum quickly and then retreat to safety once she is removed from the map. Defeating her using a ranged unit, and then using your own refresher kills and movement assists like Reposition
Outside of Echidna and Larum, the enemies in this map are not too threatening. Echidna has two sustain skills in Atk/Spd Finish 4 and Atk/Def Bulwark 3, which will keep her HP up especially with the Cleric's own healing capabilities. Luckily, Echidna is in the front line, allowing you to pick her off with an offensive unit and then retreating to safety afterwards.
Alternatively, use a tanking strategy!
The enemies here can be defeated with a tanking strategy easily, as none of them are too threatening, especially if Echidna is kept away from her allies to deactivate her Atk/Spd Finish 4. Most modern day tanks will survive hits from all the enemies on this map if provided appropriate support.
Choose a side to bait the enemy units on, and place your tank unit in range of the enemy units. Place the support allies near the tank unit but out of range of the enemies, and allow the enemies to approach.
Best Units for Echidna and Larum
Player Phase units
| Unit Name | |
|---|---|
|
|
Sword Armored Regal Sunshade's brave effect can quickly eliminate enemies. Raging Storm can grant one additional action after combat. Inheriting Galeforce can grant a third action per turn. |
|
|
Green Tome Cavalry Ninjutsu Scrolls' brave effect can quickly defeat enemies. Duo Skill grants herself an additional action. |
|
|
Colorless Dagger Flying Tailwind Shuriken's brave effect can quickly defeat enemies. Duo Skill grants herself an additional action. |
|
|
Blue Bow Flying Flamefrost Bow's brave effect can quickly defeat enemies. Duo Skill grants herself an additional action. |
|
|
Lance Cavalry A Fate Changed! can Reposition an ally, copy their bonuses, and grant another action to himself. S/D Near Trace 3 grants Canto allowing him to retreat post-combat. |
|
|
Lance Cavalry Moonlight Bangle grants Canto for mobility. Binding Reginleif allows her to defeat her foes in one round. |
|
|
Sword Cavalry Lyngheiðr grants Canto for mobility. Seiðr Shell is pre-charged and can defeat an enemy quickly. |
Tank Units
| Unit Name | |
|---|---|
|
|
Sword Armored Regal Sunshade's brave effect can quickly eliminate enemies. Using a defensive build allows her to tank multiple enemies in this map. |
|
|
Lance Armored Guaranteed follow-up attack Weapon refine makes him a very powerful tank. |
|
|
Axe Armored Can retaliate against effects that prevent her counterattacks. A/R Far Save 3 protects nearby allies against ranged attacks. |
|
|
Red Breath Armored Can retaliate at any distance with Distant Ferocity. Woeful Upheaval deals chip damage, has a Far Save effect, and gives damage reduction. |
|
|
Colorless Beast Armored Can make a guaranteed follow-up attack Nullifies buffs from ranged units. |
|
|
Red Breath Infantry A budget option that can fulfill the tank role to bait on turn one. A red unit is used here to help mitigate damage from the most threatening unit on this map, Echidna. |
Support Units
| Unit Name | |
|---|---|
|
|
Staff Flying Grants damage reduction and can shut down "At start of turn" effects of foes in cardinal directions. |
|
|
Staff Flying Grants damage reduction and healing. |
|
|
Lance Infantry Grants bonus stats and Special acceleration to nearby allies during combat. |
|
|
Sword Infantry Grants bonus stats to his Ally Support during combat. |
|
|
Staff Flying Grants Atk+6 and Special acceleration to nearby allies during combat. |
Recommended Dancer Units
| Unit Name | |
|---|---|
|
|
Green Tome Flying Gentle Dream provides stat and mobility bonuses. Duo Skill grants an ally an additional action. |
|
|
Blue Tome Flying Gentle Dream provides stat and mobility bonuses. |
|
|
Blue Tome Flying Prayer Wheel and Gray Waves II combine to grant an ally stat and mobility bonuses. |
|
|
Green Tome Cavalry Dancing Flames and Gray Waves combine to grant an ally stat and mobility bonuses. S/R Far Trace 3 allows repositioning after an attack or a refresh. |
List of All Dancers | Heroes with Refresher Skills
User Submitted Units / Parties for Echidna and Larum
We are looking for user submitted clears!
Let us know about your party and how you cleared the maps in the comments below, via a picture of your team and their skills.
If you have uploaded the walkthrough video on Twitter etc., please enter the URL as well!
FEH Related Guides
Other Bound Hero Battle Walkthroughs
Bound Hero Battles Walkthroughs and Schedule
List of Bound Hero Battles
Comment
Author
Echidna and Larum Infernal Guide and Recommended Team (Bound Hero Battle)
improvement survey
03/2026
improving Game8's site?

Your answers will help us to improve our website.
Note: Please be sure not to enter any kind of personal information into your response.

We hope you continue to make use of Game8.
Premium Articles
Rankings
Gaming News
Popular Games

Genshin Impact Walkthrough & Guides Wiki

Honkai: Star Rail Walkthrough & Guides Wiki

Umamusume: Pretty Derby Walkthrough & Guides Wiki

Pokemon Pokopia Walkthrough & Guides Wiki

Resident Evil Requiem (RE9) Walkthrough & Guides Wiki

Monster Hunter Wilds Walkthrough & Guides Wiki

Wuthering Waves Walkthrough & Guides Wiki

Arknights: Endfield Walkthrough & Guides Wiki

Pokemon FireRed and LeafGreen (FRLG) Walkthrough & Guides Wiki

Pokemon TCG Pocket (PTCGP) Strategies & Guides Wiki
Recommended Games

Diablo 4: Vessel of Hatred Walkthrough & Guides Wiki

Fire Emblem Heroes (FEH) Walkthrough & Guides Wiki

Yu-Gi-Oh! Master Duel Walkthrough & Guides Wiki

Super Smash Bros. Ultimate Walkthrough & Guides Wiki

Pokemon Brilliant Diamond and Shining Pearl (BDSP) Walkthrough & Guides Wiki

Elden Ring Shadow of the Erdtree Walkthrough & Guides Wiki

Monster Hunter World Walkthrough & Guides Wiki

The Legend of Zelda: Tears of the Kingdom Walkthrough & Guides Wiki

Persona 3 Reload Walkthrough & Guides Wiki

Cyberpunk 2077: Ultimate Edition Walkthrough & Guides Wiki
All rights reserved
© 2025 Nintendo / INTELLIGENT SYSTEMS
The copyrights of videos of games used in our content and other intellectual property rights belong to the provider of the game.
The contents we provide on this site were created personally by members of the Game8 editorial department.
We refuse the right to reuse or repost content taken without our permission such as data or images to other sites.



![Everwind Review [Early Access] | The Shaky First Step to A Very Long Journey](https://img.game8.co/4440226/ab079b1153298a042633dd1ef51e878e.png/thumb)

![Monster Hunter Stories 3 Review [First Impressions] | Simply Rejuvenating](https://img.game8.co/4438641/2a31b7702bd70e78ec8efd24661dacda.jpeg/thumb)


